
Let’s move to actual authentication APIs. We’ll implement Registration first, then Login. Keeping them separate will make it easier to understand password verification, JWT issuance and refresh-token management.
Step 4.3.1 – User Registration API
Our first endpoint, First authentication endpoint POST /api/v1/auth/register
1. Understand the registration flow
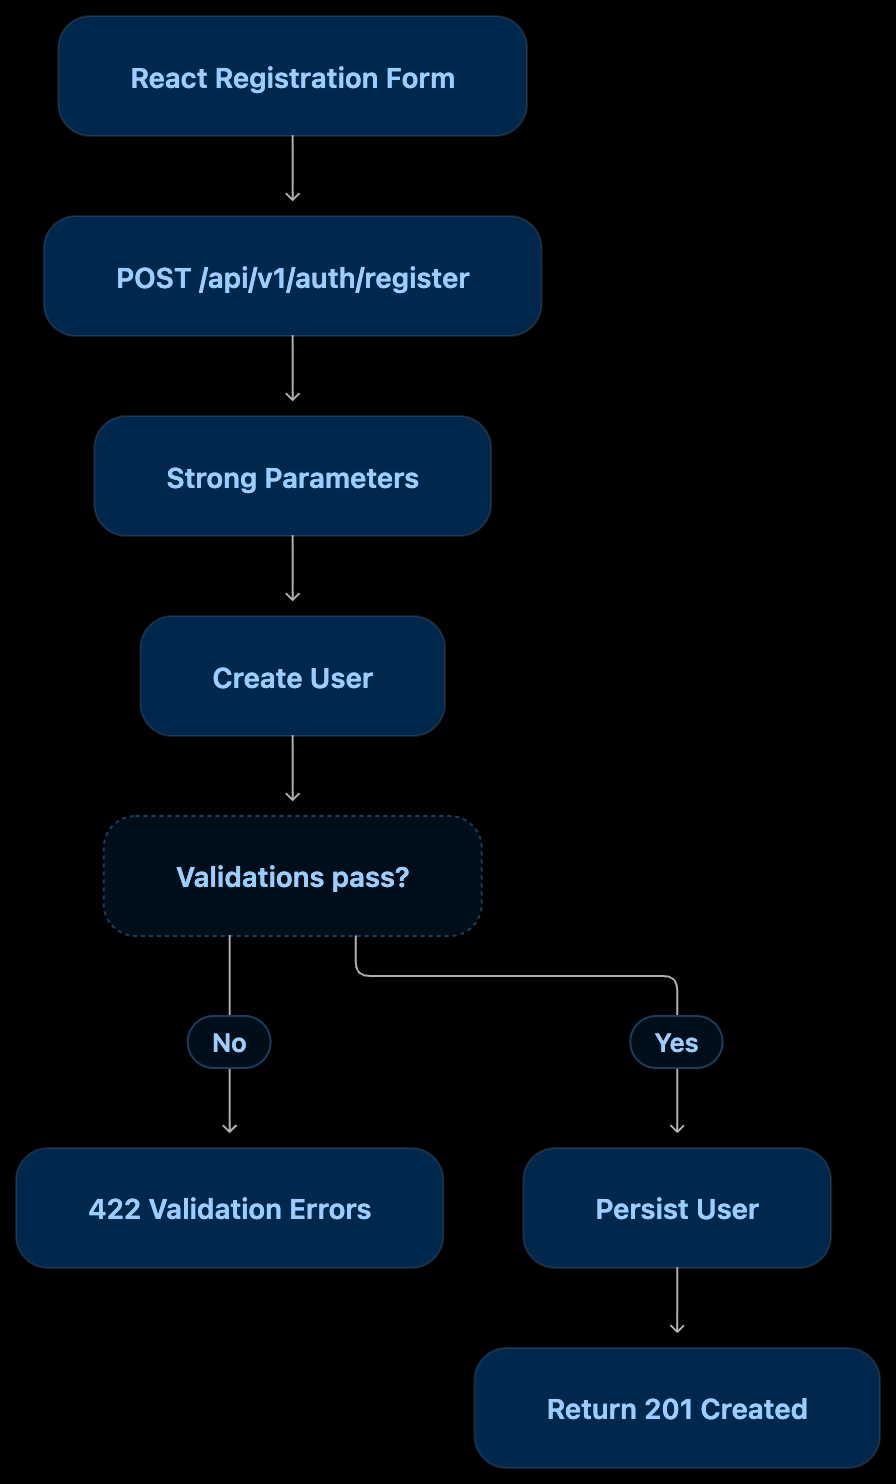
For this step, registration will create the User but won’t issue a JWT.
Why? We’ll implement login separately. Registration and authentication are different operations, even though some applications combine them.
2. Create the controller
Create these directories and file:
mkdir -p app/controllers/api/v1

touch app/controllers/api/v1/registrations_controller.rb
Controller: Api::V1::RegistrationsController
It should inherit from ApplicationController.
Implement one action: create
What should the action do?
A. Accept only permitted parameters
We should allow: email
password
password_confirmation
Never permit: password_digest
admin
role
account_status
The user must not be able to assign protected attributes through registration. Rails API applications include strong parameters and controller callbacks such as before_action through ActionController::API.
B. Create the user – Use the User model and handle validation failures.
C. Successful response – Return HTTP 201 Created.
Response contract:
{
  "user": {
    "id": 1,
    "email": "user@example.com"
  }
}
Important: Explicitly serialize only the allowed attributes. Don’t return user.as_json indiscriminately, because that could expose password_digest.
D. Failed response
Return HTTP 422 Unprocessable Entity.
Example:
{
  "errors": [
    "Email has already been taken"
  ]
}
Use the model’s validation errors rather than constructing your own validation logic in the controller.
3. Configure the API route
Open: backend/config/routes.rb
Add: POST /api/v1/auth/register
It should route to: Api::V1::RegistrationsController#create
Verify it: bin/rails routes
4. Write RSpec request specs
Create:
mkdir -p spec/requests/api/v1

touch spec/requests/api/v1/registrations_spec.rb
Use this structure:
RSpec.describe "API V1 Registration", type: :request do
  describe "POST /api/v1/auth/register" do
    # Examples
  end
end
Implement these five scenarios:
| Scenario | Expected result |
|---|---|
| Valid registration | 201 Created |
| Duplicate email | 422 Unprocessable Entity |
| Missing email | 422 Unprocessable Entity |
| Missing password | 422 Unprocessable Entity |
| Malicious mass-assignment attributes | Protected attributes ignored |
Important security test
Imagine someone sends:
{
  "user": {
    "email": "attacker@example.com",
    "password": "password@1",
    "password_confirmation": "password@1",
    "password_digest": "attacker-controlled-value"
  }
}
Your controller must not permit password_digest. Verify that Rails generates the actual bcrypt digest from the submitted password instead. Also verify that the response does not contain password_digest. This is precisely the type of issue you might encounter in a Rails API controller security-review int.
5. Rate limiting – we’ll introduce it with Login
We’ll add rate limiting to the login endpoint because preventing password brute-force attempts is especially important.
Rails 8.1 provides:
rate_limit to: 10, within: 3.minutes, only: :create
By default, Rails scopes this limit by client IP and uses an ActiveSupport cache store. Exceeding the limit produces HTTP 429. We’ll also cover custom JSON responses for rate-limit failures.
6. Run and verify
Start Rails: bin/rails server -p 3000
You can manually test using curl:
curl -i -X POST http://localhost:3000/api/v1/auth/register \
  -H "Content-Type: application/json" \
  -d '{
    "user": {
      "email": "test@example.com",
      "password": "password@1",
      "password_confirmation": "password@1"
    }
  }'
Run RSpec:
bundle exec rspec spec/requests/api/v1/registrations_spec.rb
Step 4.3.2 – Login API
We’ll implement: POST /api/v1/auth/login
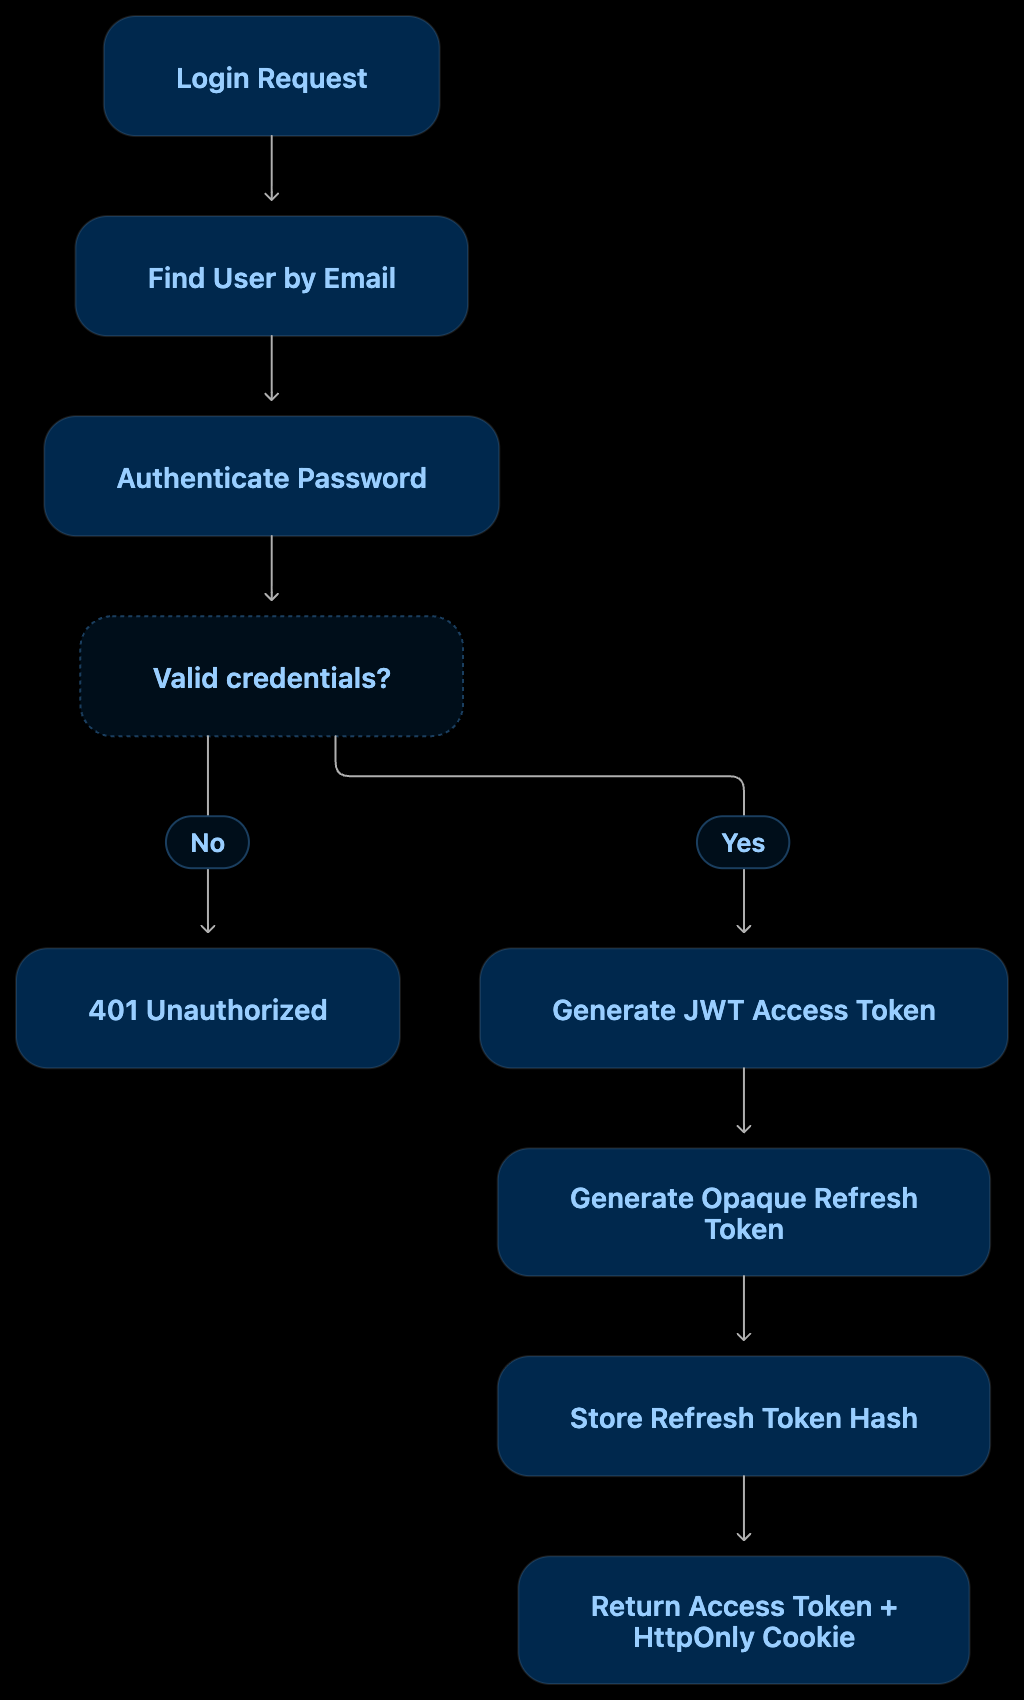
We’ll cover has_secure_password, authenticate, login rate limiting, refresh-token generation and cookie security.
Introducing JSON serializer: Blueprinter
I recommend using Blueprinter for our Rails API. It fits our application well, and I would introduce it now rather than building custom JSON serialization throughout our controllers.
We’ll also fix your registration implementation and request specs.
Blueprinter is a declarative JSON serialization library. It converts Ruby objects and ActiveRecord records into controlled JSON representations.
Github: https://github.com/procore-oss/blueprinter
Documentation: https://www.rubydoc.info/gems/blueprinter
Its main features are:
| Feature | Benefit |
|---|---|
| Explicit fields | Control exactly what the API exposes |
| Views | Different response representations for different use cases |
| Associations | Serialize related objects |
| Conditional fields | Include fields based on conditions |
| Renaming | Customize JSON attribute names |
| Collection rendering | Serialize arrays and ActiveRecord relations |
It also provides render_as_hash, which is useful when integrating with Rails controllers.
Is it actually fast?
Blueprinter is designed for performance, but I wouldn’t claim it is universally the fastest serializer.
For context, an older Rails 6.1/Ruby 2.7 benchmark found Blueprinter competitive with Alba and Panko, but the results depend on the workload and environment.
Three reasons to retaining Blueprinter for our project:
- Strong adoption relative to the alternatives.
- Explicit field definitions, views and association support.
- Enough flexibility for our User and Task API responses without introducing unnecessary complexity.
For our custom REST API, Blueprinter offers a good balance of readability, performance and maintainability.
Install Blueprinter
In backend/Gemfile, add: gem "blueprinter", "~> 1.3"
Then: cd backend
bundle install
The current RubyGems release listed is 1.3.0, and its declared minimum Ruby version is 3.1, so it meets our project’s declared Ruby requirement.
Create UserBlueprint
Create the directory and file:
mkdir -p app/blueprints

touch app/blueprints/user_blueprint.rb
Add:
class UserBlueprint < Blueprinter::Base
  identifier :id

  fields :email
end
Why only id and email?
Our User database record contains sensitive attributes. For example:
User
├── id
├── email
├── password_digest
├── created_at
└── updated_at
We only want:
{
  "id": 1,
  "email": "test@example.com"
}
This is an important security practice: explicitly whitelist fields for API serialization. Never serialize the entire ActiveRecord object. Blueprinter’s identifier and fields declarations give us control over exactly what is returned.
backend/app/controllers/api/v1/registrations_controller.rb:
class Api::V1::RegistrationsController < ApplicationController
  rate_limit to: 10, within: 3.minutes, only: :create

  def create
    user = User.new(registration_params)

    if user.save
      render json: UserBlueprint.render_as_hash(user, root: :data), status: :created
    else
      render json: { errors: user.errors.full_messages }, status: :unprocessable_entity
    end
  end

  private

  def registration_params
    params.require(:user).permit(:email, :password, :password_confirmation)
  end
end
Understand render_as_hash
Blueprinter offers different rendering methods:
| Method | Returns |
|---|---|
render | JSON string |
render_as_hash | Ruby Hash |
render_as_json | JSONified Ruby Hash |
We use: UserBlueprint.render_as_hash(user, root: :data)
This returns a Ruby Hash:
{
  data: {
    id: 1,
    email: "test@example.com"
  }
}
Rails then handles JSON encoding through: render json: ..., status: :created
One subtle but important point: avoid passing the JSON string returned by UserBlueprint.render into render json:. Rails could encode that string as another JSON string. render_as_hash avoids that issue.
Our API response contract
Successful registration – 201 Created
{
  "data": {
    "id": 1,
    "email": "test@example.com"
  }
}
Failed registration – 422 Unprocessable Entity
{
  "errors": [
    "Email has already been taken"
  ]
}
backend/spec/requests/api/v1/registrations_spec.rb:
require "rails_helper"

RSpec.describe "API V1 Registration", type: :request do
  let(:endpoint) { "/api/v1/auth/register" }

  let(:valid_params) do
    {
      user: {
        email: "test@example.com",
        password: "password@1",
        password_confirmation: "password@1"
      }
    }
  end

  describe "POST /api/v1/auth/register" do
    context "with valid attributes" do
      it "creates a user and returns 201 Created" do
        expect {
          post endpoint, params: valid_params, as: :json
        }.to change(User, :count).by(1)

        expect(response).to have_http_status(:created)

        user = User.find_by!(email: "test@example.com")

        expect(response.parsed_body).to eq(
          {
            "data" => {
              "id" => user.id,
              "email" => user.email
            }
          }
        )

        expect(user.authenticate("password@1")).to be_truthy
      end
    end

    context "with invalid attributes" do
      it "rejects duplicate email" do
        create(:user, email: "test@example.com")

        expect {
          post endpoint, params: valid_params, as: :json
        }.not_to change(User, :count)

        expect(response).to have_http_status(:unprocessable_entity)

        expect(response.parsed_body["errors"])
          .to include("Email has already been taken")
      end

      it "rejects email with different casing" do
        create(:user, email: "test@example.com")

        params = valid_params.deep_merge(
          user: { email: "TEST@EXAMPLE.COM" }
        )

        post endpoint, params: params, as: :json

        expect(response).to have_http_status(:unprocessable_entity)

        expect(response.parsed_body["errors"])
          .to include("Email has already been taken")
      end

      it "rejects missing email" do
        params = valid_params.deep_merge(
          user: { email: nil }
        )

        post endpoint, params: params, as: :json

        expect(response).to have_http_status(:unprocessable_entity)

        expect(response.parsed_body["errors"])
          .to include("Email can't be blank")
      end

      it "rejects missing password" do
        params = valid_params.deep_merge(
          user: {
            password: nil,
            password_confirmation: nil
          }
        )

        post endpoint, params: params, as: :json

        expect(response).to have_http_status(:unprocessable_entity)

        expect(response.parsed_body["errors"])
          .to include("Password can't be blank")
      end

      it "rejects password confirmation mismatch" do
        params = valid_params.deep_merge(
          user: { password_confirmation: "wrong-password" }
        )

        post endpoint, params: params, as: :json

        expect(response).to have_http_status(:unprocessable_entity)

        expect(response.parsed_body["errors"])
          .to include("Password confirmation doesn't match Password")
      end
    end

    context "with malicious mass-assignment attributes" do
      it "does not allow password_digest to be assigned" do
        attacker_digest = SecureRandom.hex(32)

        params = valid_params.deep_merge(
          user: { password_digest: attacker_digest }
        )

        post endpoint, params: params, as: :json

        expect(response).to have_http_status(:created)

        user = User.find_by!(email: "test@example.com")

        expect(user.password_digest).not_to eq(attacker_digest)
        expect(user.authenticate("password@1")).to be_truthy

        expect(response.parsed_body.dig("data").keys)
          .to contain_exactly("id", "email")
      end
    end
  end
end
Important testing concepts in this spec
1. change(User, :count).by(1) – This verifies the database side effect, not just the HTTP response.
2. as: :json – This tells Rails that we’re sending a JSON request. It also helps test the actual JSON API contract.
3. response.parsed_body – Avoid manually parsing JSON with JSON.parse(response.body) when Rails already provides this helper.
4. deep_merge – Preserves the nested user structure when overriding individual attributes.
5. contain_exactly – Verifies the serialized response contains exactly the permitted attributes, irrespective of ordering.
project structure
Our backend now has:
backend/
├── app/
│   ├── blueprints/
│   │   └── user_blueprint.rb
│   │
│   ├── controllers/
│   │   └── api/
│   │       └── v1/
│   │           └── registrations_controller.rb
│   │
│   └── models/
│       ├── user.rb
│       └── task.rb
│
├── config/
│   └── routes.rb
│
└── spec/
    └── requests/
        └── api/
            └── v1/
                └── registrations_spec.rb
Run: bundle exec rspec spec/requests/api/v1/registrations_spec.rb
Then: bundle exec rspec
API documentation – absolutely, we should have it
I strongly recommend documenting our API using the OpenAPI Specification
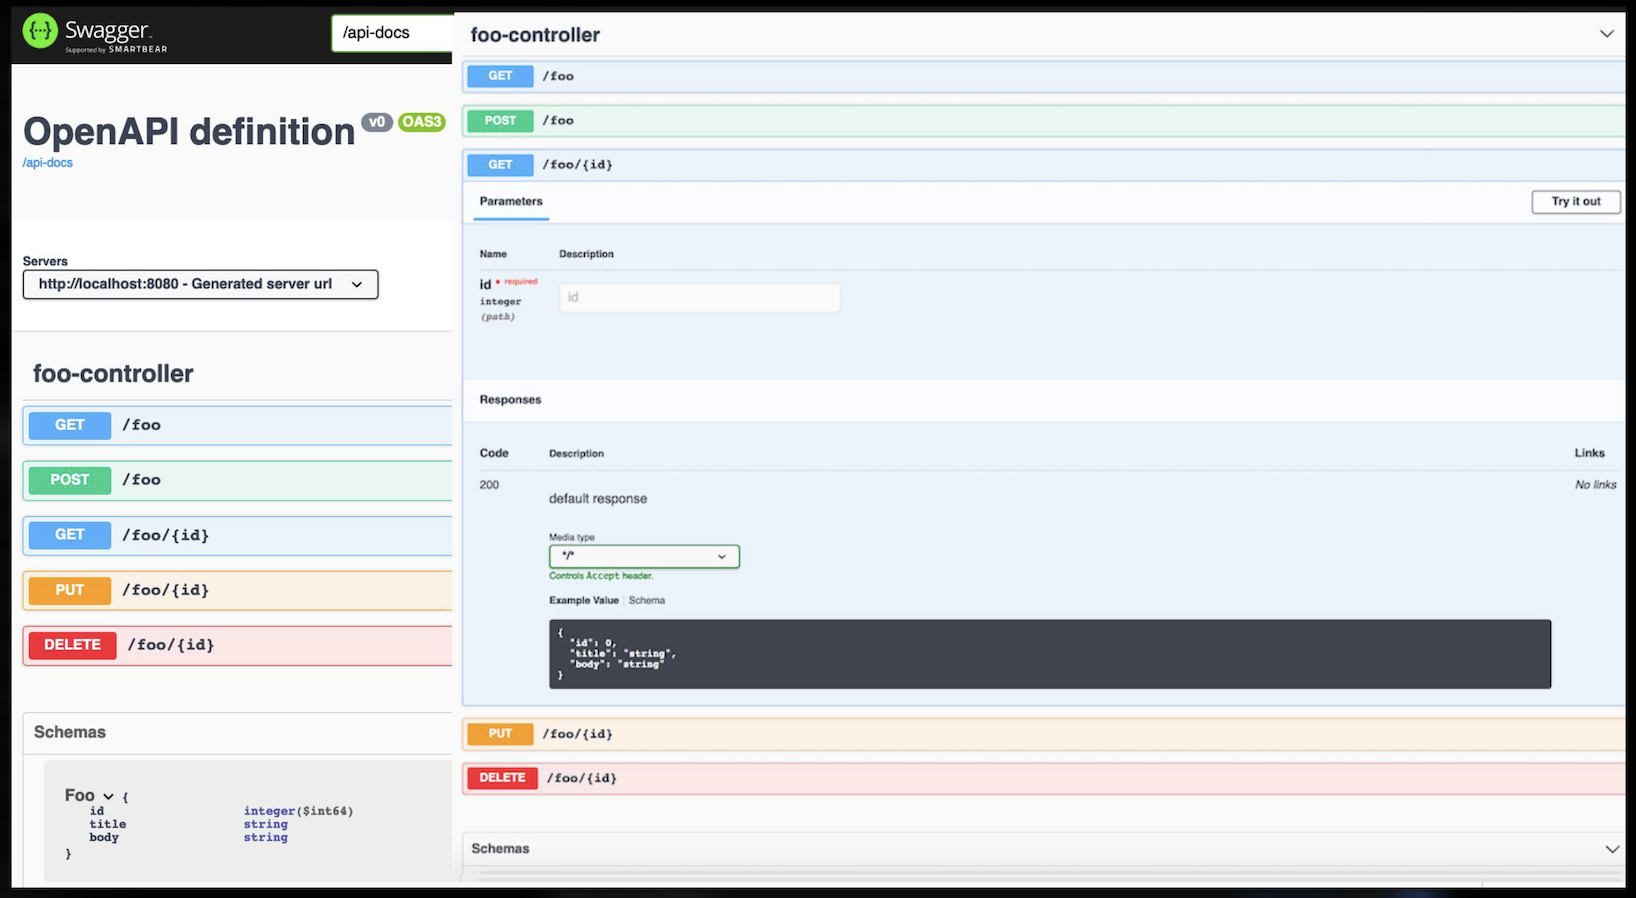
Why?
Imagine another developer joins your project. They shouldn’t need to read all your Rails controllers to understand the API. Documentation should tell them:
- Available endpoints.
- HTTP methods.
- Required request parameters.
- Request and response JSON structures.
- Authentication requirements.
- HTTP status codes.
- Validation errors.
- Pagination and filtering parameters.
A frontend developer can understand this without knowing anything about Rails.
OpenAPI is a machine-readable contract that describes these API operations, parameters, schemas, security requirements and responses.
Official standard: https://spec.openapis.org/oas/latest.html
rspec-openapi
Generates OpenAPI from existing RSpec request specs. Requires a separate documentation UI.
My recommendation: rspec-openapi + Swagger UI
rspec-openapi – 0.36.0 · November 1, 2026
It generates OpenAPI specifications directly from existing RSpec request specs without requiring a special testing DSL.
It has approximately 3.63 million RubyGems downloads and supports OpenAPI 3.0, 3.1 and 3.2. GitHub repository
Swagger UI – Documentation presentation
Displays the generated OpenAPI file as interactive documentation, including endpoint descriptions, parameters, schemas and request testing. Swagger UI website
How will this work?
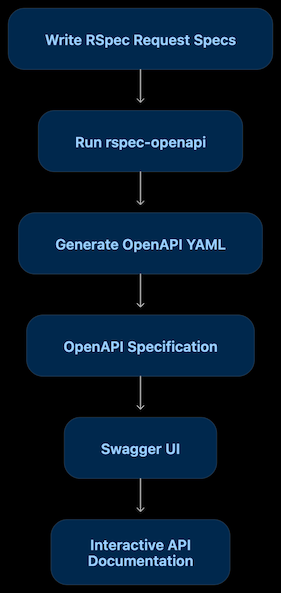
For example, when we write:
describe "POST /api/v1/auth/register" do
  it "creates a user" do
    post "/api/v1/auth/register",
      params: valid_params,
      as: :json

    expect(response).to have_http_status(:created)
  end
end
We can run: OPENAPI=1 bundle exec rspec
The tool generates:
doc/
└── openapi.yaml
The generated specification can then be loaded by Swagger UI.
One useful feature is that rspec-openapi preserves manual modifications when updating generated documentation. This matters because generated schemas sometimes need human refinement.
Our final tooling decisions
Rails API tooling baseline
| Concern | Selected tool |
| Serialization | Blueprinter |
| API specification | OpenAPI 3.2 |
| Documentation generation | rspec-openapi |
| Documentation UI | Swagger UI |
| Backend testing | RSpec |
| Test data | FactoryBot |
| Authentication | JWT + opaque refresh token |
When should we introduce API documentation?
I’d introduce rspec-openapi after completing our first few request specs. That way, we won’t create documentation for endpoints that are still changing.
Our learning sequence will now be:
- Complete registration API and its request specs.
- Implement login, JWT response and refresh-token cookie.
- Add authenticated Task CRUD endpoints.
- Introduce rspec-openapi and generate our first OpenAPI document.
- Configure Swagger UI.
- Update documentation whenever request contracts change.
- Add API documentation generation and validation to GitHub Actions CI.
This also gives us an excellent engineering practice: API tests become part of our API documentation workflow.


