If you have been developing Rails applications for years, there’s a good chance you’ve used:
bin/rails credentials:edit
hundreds of times.
You probably know that Rails stores encrypted credentials in:
config/credentials.yml.enc
and keeps the encryption key separately in:
config/master.key
But did you know that Rails can make:
git diff
show the decrypted, human-readable changes to credentials.yml.enc?
I recently discovered this while working on a Rails 8.1.3.1 application and it was one of those:
“I’ve been using Rails every day for years, and I didn’t know Rails could do this!”
moments.
Let’s see how it works.
First: What is credentials.yml.enc?
Rails encrypted credentials allow us to keep secrets such as:
openai:
  api_key: ...
or:
aws:
  access_key_id: ...
  secret_access_key: ...
inside:
config/credentials.yml.enc
The file is encrypted.
The encryption key is stored separately in:
config/master.key
Rails documentation explicitly states that the encrypted credentials file can be stored in version control as long as the master key remains secure. (Ruby on Rails Guides)
So our repository can contain:
config/
├── credentials.yml.enc ← encrypted, safe to commit
└── master.key ← secret, NEVER commit
Editing Rails Credentials
Normally we edit credentials with:
bin/rails credentials:edit
Rails decrypts the credentials, opens them in your configured editor, and encrypts them again when you save.
Rails then ensures the Git diff driver is configured to use:
bin/rails credentials:diff
Rails’ application generator includes this credentials diff enrollment as part of application setup and Rails 7.0 already contained the credentials diffing implementation. (Gem)
So this isn’t actually an 8.1-only feature.
That’s an important distinction.
Is This New in Rails 8.1?
No – and this is an important correction.
The encrypted credentials diff functionality existed before Rails 8.1.
For example, Rails 7.0 already had the credentials:diff implementation, and Rails 7.2’s application generator also enrolled projects in credentials diffing. (Gem)
Rails has supported decrypted Git diffs for encrypted credentials for several versions and Rails 8.x continues to build on the credentials tooling.
Rails 8.1 does introduce other useful credentials functionality. For example, Rails 8.1 added command-line credential fetching, which can be useful for deployment tooling such as Kamal. (Ruby on Rails Guides)
The master key should not be committed. Rails’ security guide explicitly recommends keeping the master key safe and out of version control. (Ruby on Rails Guides)
One Thing to Remember
The decrypted content can appear in your local terminal output.
The difference is a great way to understand what’s really happening.
Quick Reference
# Edit credentials
bin/rails credentials:edit

# Enroll project in credential diffing
bin/rails credentials:diff --enroll

# Normal readable diff
git diff

# Show the actual encrypted file diff
git diff --no-textconv -- config/credentials.yml.enc

# Inspect Git's configuration
git config --show-origin --get-regexp 'diff|textconv|filter'

# Check Git attributes
git check-attr diff -- config/credentials.yml.enc
Security rule:
 Y config/credentials.yml.enc → commit it
 X config/master.key          → NEVER commit it
Rails’ official security guide confirms that encrypted credentials can be stored in version control while the master key must remain protected. (Ruby on Rails Guides)
For this specific project, I recommend a single Git repository containing two applications:
rails_react_user_management/
├── backend/      # Rails API
└── frontend/     # React + Vite
This is cleaner than forcing Vite into Rails views because we explicitly want an API-only Rails backend. React’s current guidance supports using Vite as a build tool when building React from scratch, and Vite has a first-class Rails integration, but that integration is more useful when Rails is also serving the frontend. (React)
For our learning project, we’ll therefore keep the frontend and backend clearly separated while keeping them in one repo.
1. Prerequisites
Check:
ruby -v
rails -v
node -v
npm -v
Current Vite requires Node.js 20.19+ or 22.12+. (vitejs)
2. Create the Rails API
mkdir rails_react_user_management
cd rails_react_user_management

rails new backend --api -d postgresql
cd backend
The important part is:
--api
This tells Rails to create an API-only application rather than a traditional Rails application with views/assets. That’s exactly what we want.
Create the database:
bin/rails db:create
Start Rails:
bin/rails server
API:
http://localhost:3000
3. Create our User API
Let’s create a simple User model:
bin/rails generate model User name:string email:string
bin/rails db:migrate
Create controller:
bin/rails generate controller Users
app/controllers/users_controller.rb:
class UsersController < ApplicationController
  def index
    render json: User.all
  end

  def show
    render json: User.find(params[:id])
  end

  def create
    user = User.create!(user_params)
    render json: user, status: :created
  end

  private

  def user_params
    params.require(:user).permit(:name, :email)
  end
end
Routes:
# config/routes.rb

Rails.application.routes.draw do
  scope "/api" do
    resources :users
  end
end
React’s documentation currently recommends a build tool such as Vite when building a React application from scratch and Create React App is deprecated. (React)
Then we’ll add React Router, reusable components, forms, CRUD, loading/error states, custom hooks, useContext, Redux Toolkit, API abstraction, authentication, pagination, optimistic updates, testing, and production deployment.
For the int., the important architectural distinction is:
Rails is the API/backend and React is the client application. Vite is the frontend development/build tool.
Vite provides the development server and production build pipeline; its current production build uses Rolldown and outputs optimized static assets. (vitejs)
Next, we should implement the actual User Management UI – User list + Add User + Edit + Delete – using proper React components and API calls, because that will give you the hands-on React knowledge needed for the int.
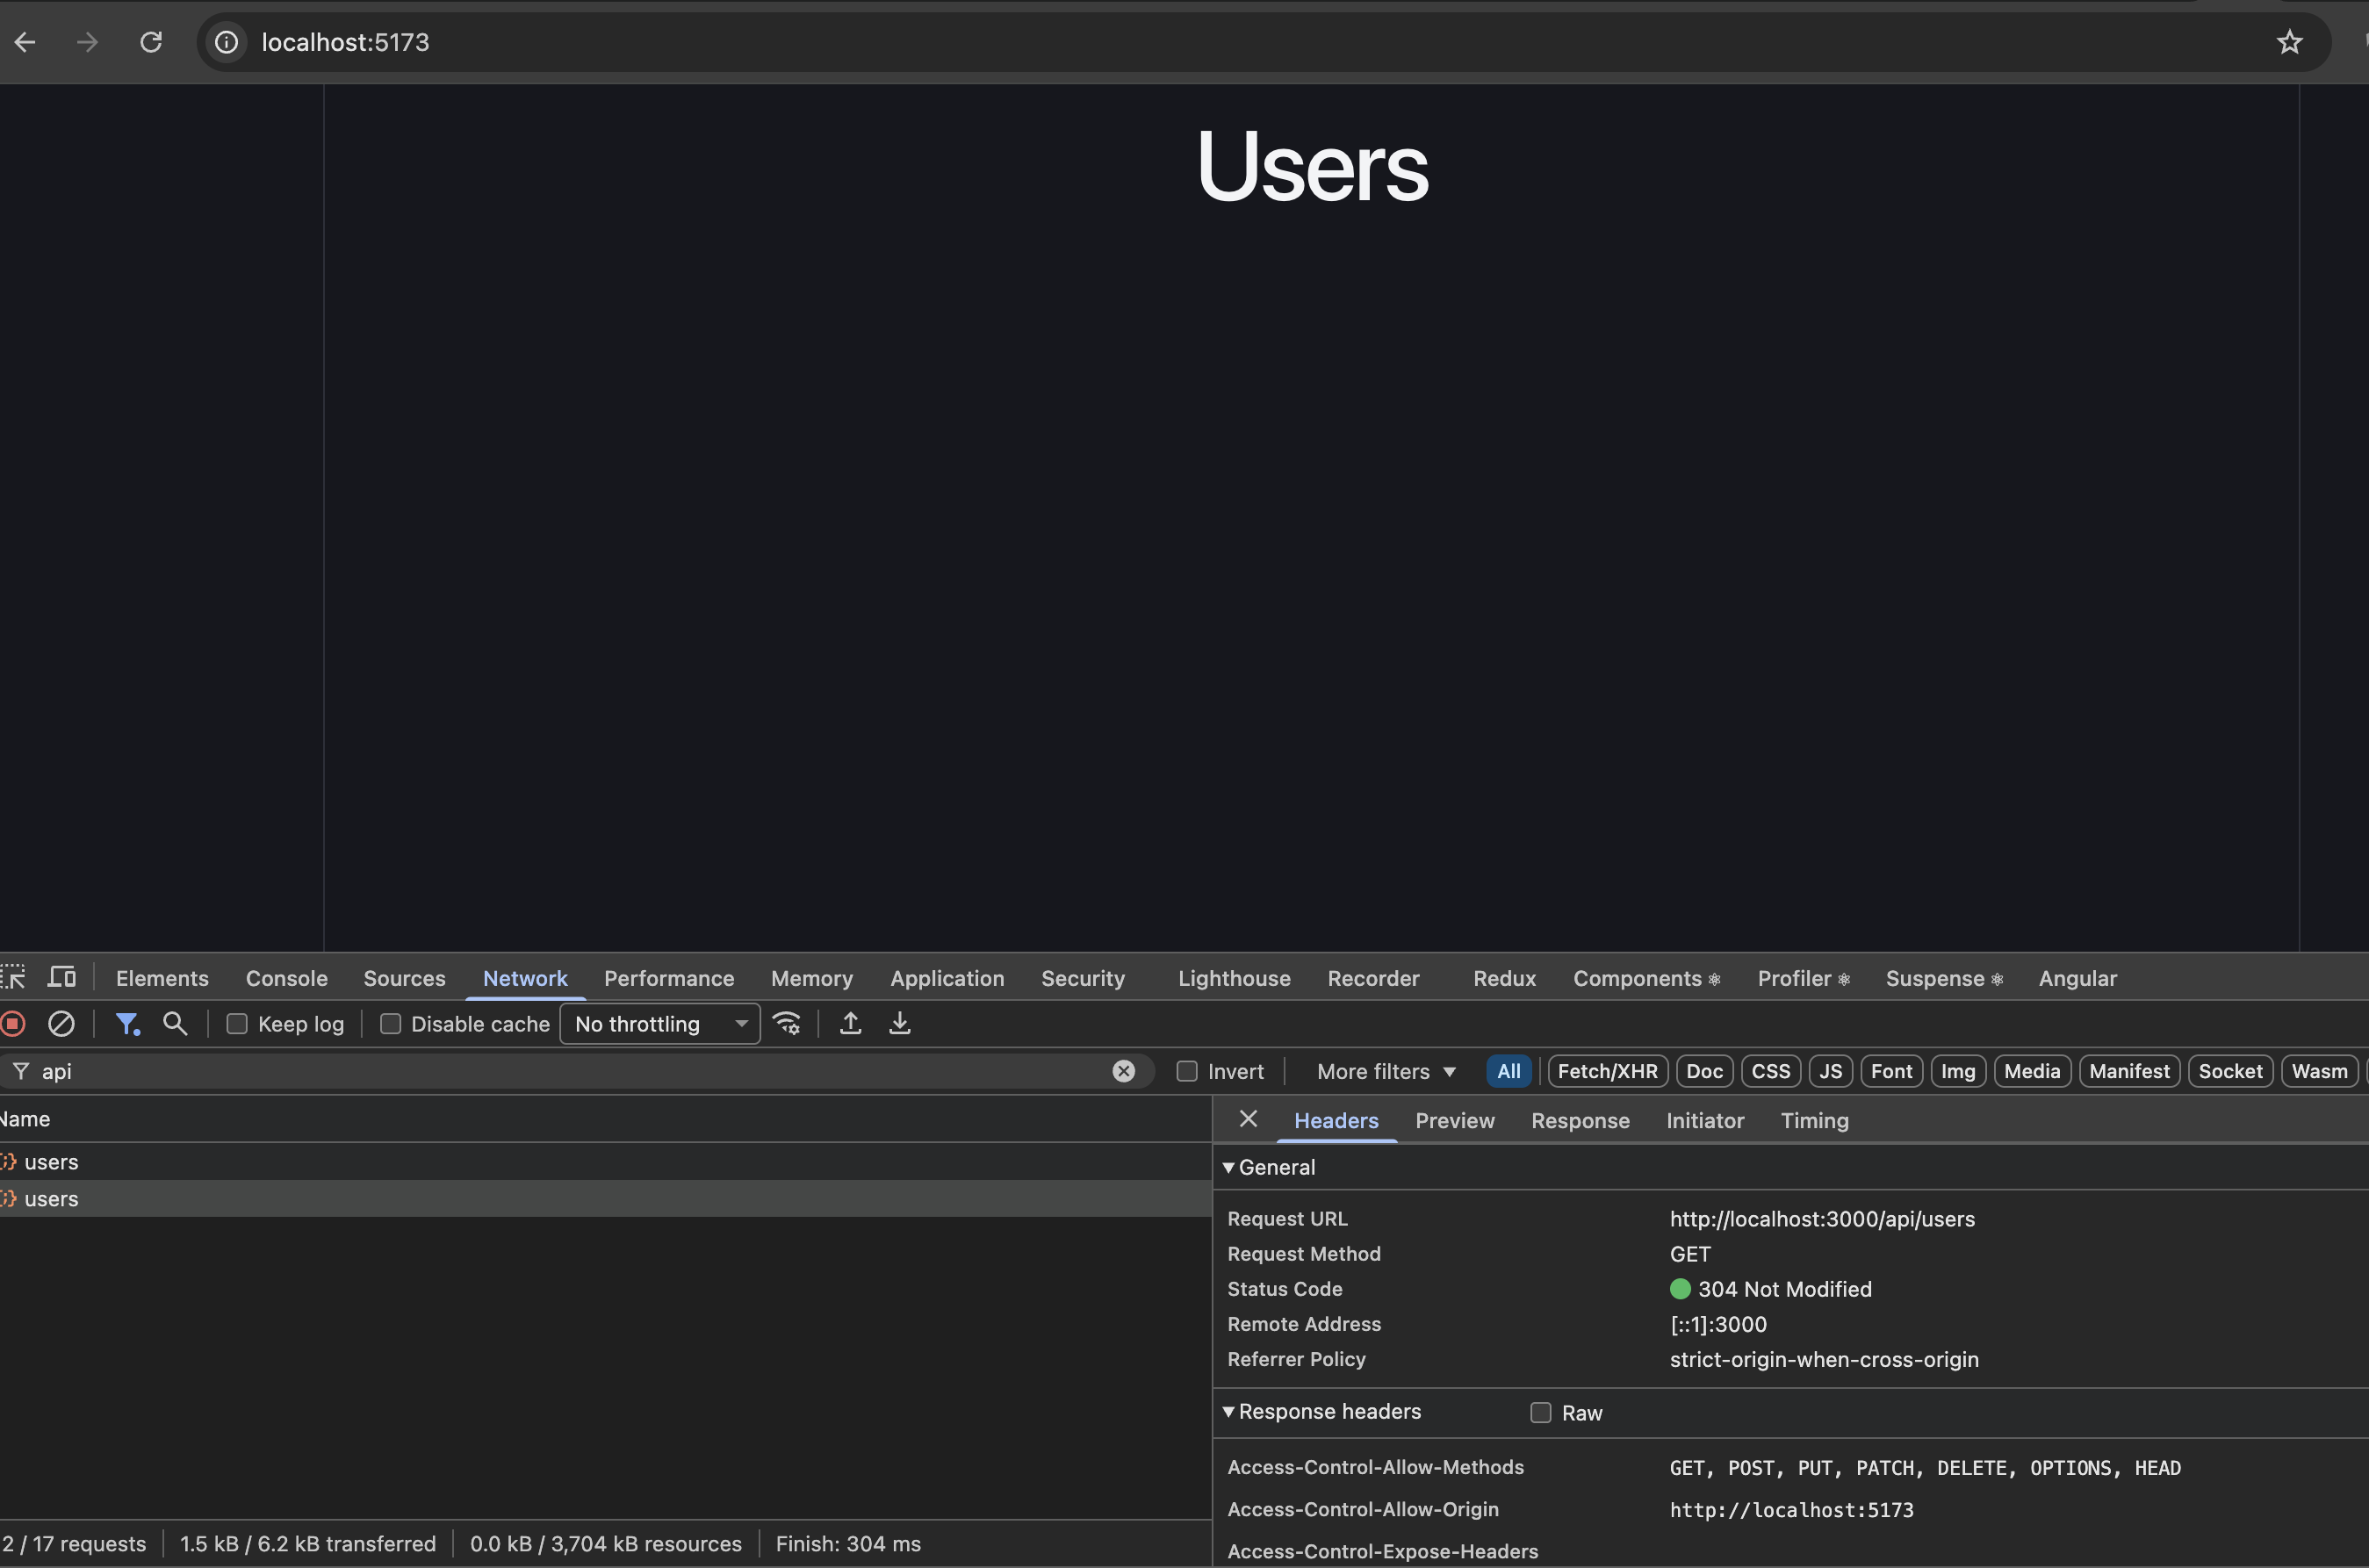
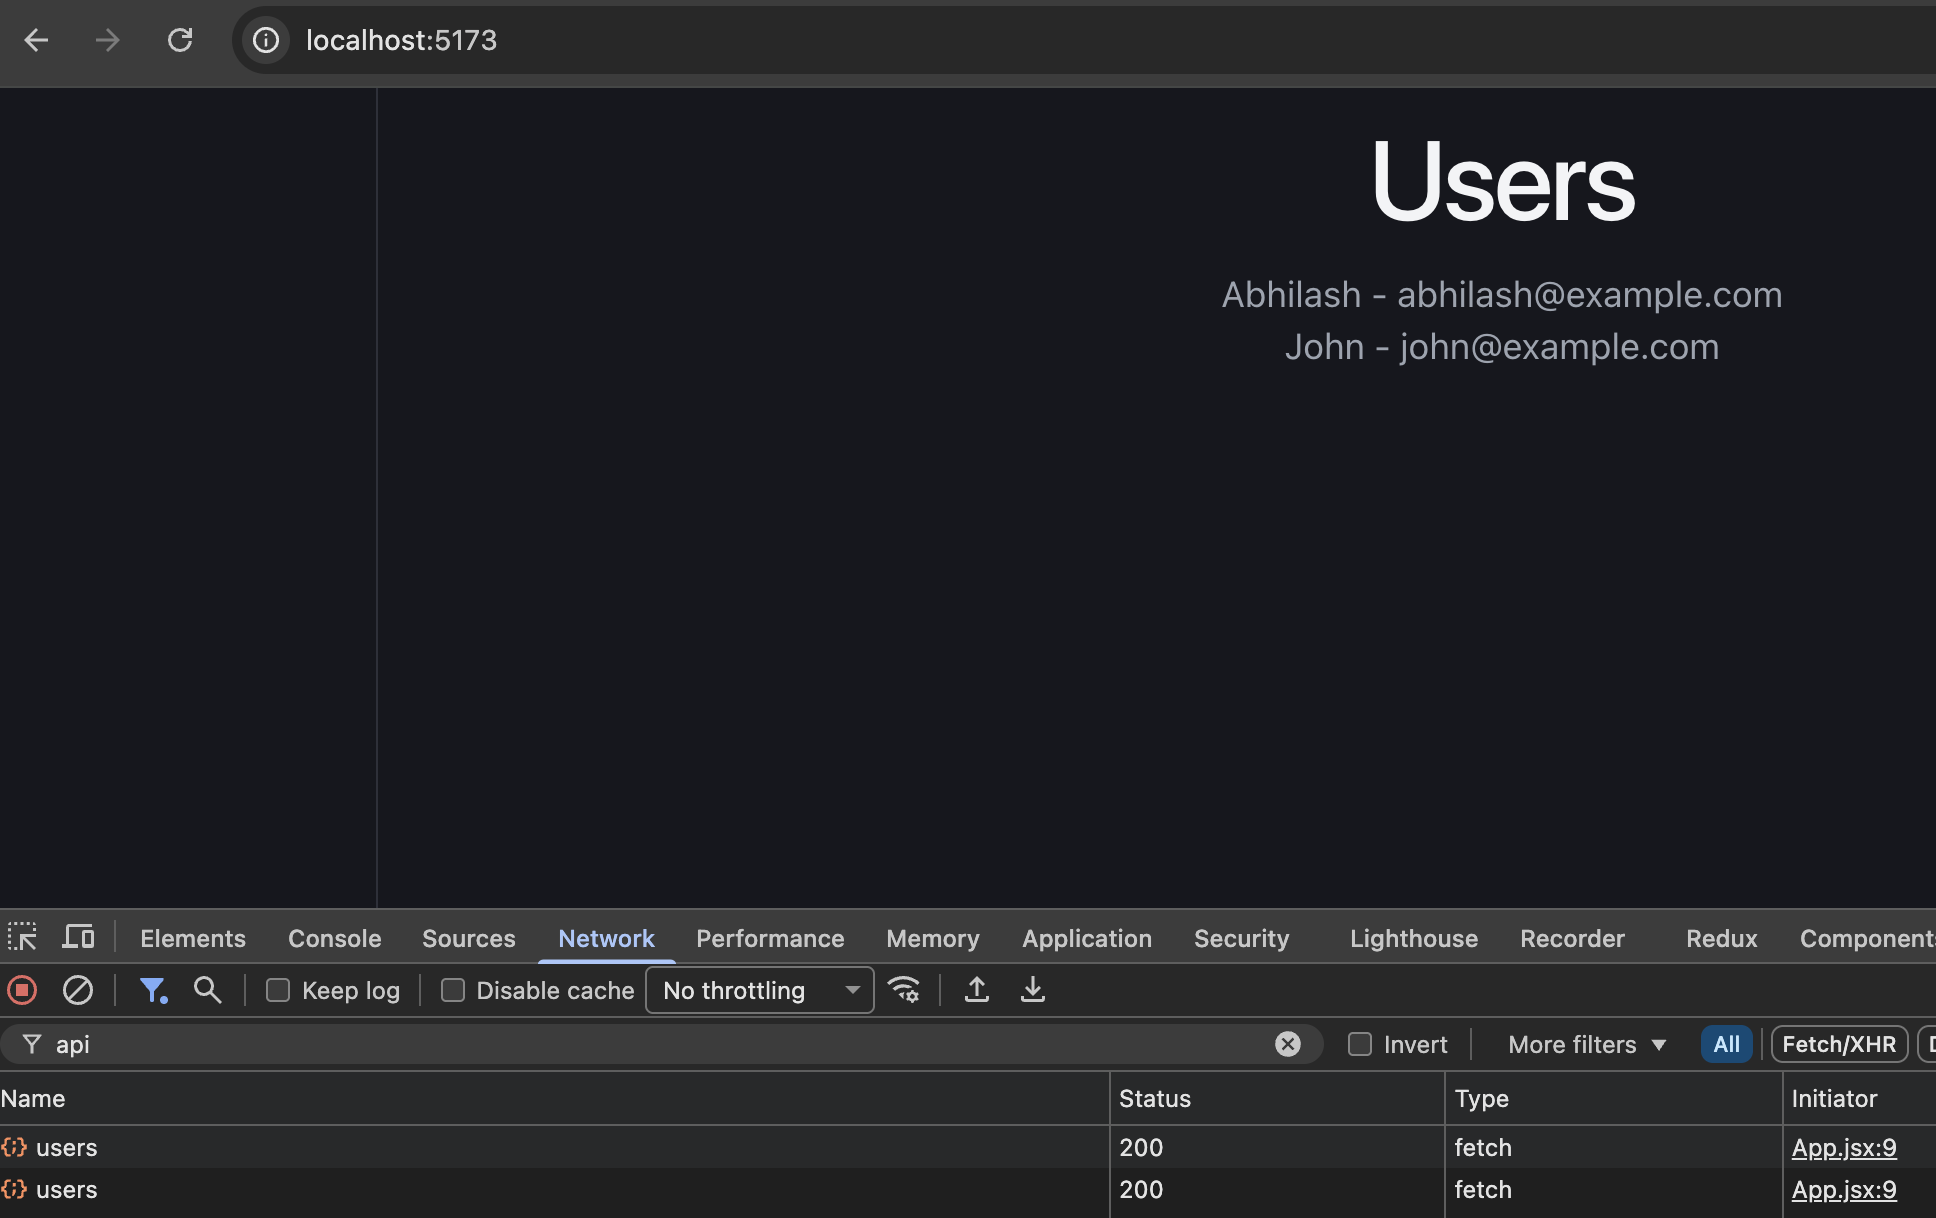
Q) The request inside the useEffect is firing 2 times. App.jsx line 9: fetch("/api/users") Why?
This is most likely happening because React StrictMode intentionally runs useEffect twice in development to help identify bugs in your components.
The above screenshot shows two successful GET /api/users requests, which matches this behavior.
1. Check main.jsx
Open frontend/src/main.jsx. The Vite React template typically wraps your app in StrictMode:
import { StrictMode } from "react";
import { createRoot } from "react-dom/client";
import App from "./App.jsx";

createRoot(document.getElementById("root")).render(
  <StrictMode>
    <App />
  </StrictMode>
);
Because of StrictMode, React performs an extra effect setup-and-cleanup cycle when mounting components in development.
Even though the dependency array is empty ([]), the effect runs twice during the initial development mount under StrictMode.
2. Does this happen in production?
No. React’s extra StrictMode effect cycle is development-only. A production build does not perform this extra cycle.
3. Int. takeaway
Remember these three points:
useEffect(..., []) normally runs on initial mount, not after every render.
StrictMode deliberately runs an extra effect setup-and-cleanup cycle in development.
Effects involving network requests should handle cleanup, errors, and cancellation where appropriate.
For our Rails + React application, keep StrictMode enabled. This behavior is expected during development and is not evidence that your Rails API or Vite proxy is incorrectly configured.
Now let’s implement streaming. OpenRouter supports Server-Sent Events (SSE) when stream: true, and the current Ruby SDK exposes Chat Completions streaming through stream_raw; its higher-level stream helper is not available in every released SDK version. (OpenRouter)
We’ll keep the implementation practical and compatible with the SDK behavior you’re using.
Step 9 – Stream the AI response
What changes?
Currently:
Browser
  ↓
POST
  ↓
Rails waits for entire LLM response
  ↓
redirect
Ai::Client.new.stream_chat(messages: messages) do |delta|
  print delta
  $stdout.flush
end
You should see the answer appearing progressively:
Ruby is a programming language...
instead of getting the entire answer at once.
Why $stdout.flush?
Ruby can buffer stdout. Flushing makes each chunk visible immediately in the console.
9.2 Now expose streaming from Rails
Instead of making MessagesController#create wait for the completed response, we’ll create a streaming endpoint.
Open:
config/routes.rb
Add:
resources :conversations, only: [:create, :show] do
  resources :messages, only: [:create]
end

get "/conversations/:conversation_id/messages/stream",
    to: "messages#stream",
    as: :conversation_messages_stream
9.3 Add the streaming controller action
Open:
app/controllers/messages_controller.rb
Add:
includeActionController::Live
and:
def stream
  conversation = Conversation.find(params[:conversation_id])

  response.headers["Content-Type"] = "text/event-stream"
  response.headers["Cache-Control"] = "no-cache"
  response.headers["X-Accel-Buffering"] = "no"

  sse = SSE.new(response.stream)

  messages = Ai::PromptBuilder
    .new(conversation: conversation)
    .build

  content = +""

  begin
    Ai::Client.new.stream_chat(messages: messages) do |delta|
      next if delta.blank?

      content << delta

      sse.write(
        { content: delta },
        event: "message"
      )
    end

    sse.write(
      { done: true },
      event: "done"
    )
  ensure
    sse.close
    response.stream.close
  end
end
But Rails doesn’t provide SSE automatically.
Add:
includeActionController::Live
and use Rails’ ActionController::Live::SSE if available in our Rails 8.1 setup, or otherwise we can use the standard SSE format directly. Rails 8.1’s Live controller infrastructure is the relevant mechanism here.
To avoid another dependency, let’s actually use the raw SSE format ourselves.
For our application, we’ll eventually use a Stimulus controller rather than inline JavaScript.
9.7 Don’t spend time styling this
Our immediate objective is proving:
LLM → SSE → Browser
Once you can see the response arriving incrementally, we’ve achieved the important part.
9.8 Commit
Once Ruby streaming works:
git add app/services/ai/client.rb
git commit -m"feat: stream LLM responses"
git push
Then we’ll wire the browser properly.
Int. knowledge from this step
You should now be able to explain:
What is SSE?
A persistent HTTP connection where the server pushes events to the client.
Why use it for AI?
Because LLM output naturally arrives incrementally, and streaming improves perceived latency.
Why not Action Cable?
WebSockets are bidirectional; SSE is simpler when the server primarily needs to push generated output to the browser.
Where does the LLM stream end?
At the Rails server, which consumes the provider’s SSE stream and forwards its own stream to the browser.
OpenRouter documents its AI streaming as SSE, while the Ruby SDK provides streaming chat-completion chunks through stream_raw.
Next step
Since ActionController::Live::SSE exists in Rails 8.1, let’s test the controller before committing.
One important point first: don’t test this through bin/rails server with WEBrick. Rails documents that WEBrick buffers responses, so Live streaming won’t behave correctly. Use our normal Puma server instead. (Ruby on Rails Guides)
1. First verify the route
Run:
bin/rails routes | grep stream
You should see our route, something like:
conversation_messages_stream
GET /conversations/:conversation_id/messages/stream
Then get a conversation ID:
bin/rails c
Conversation.last.id
For example:
1
Exit:
exit
2. Test with curl first
This is the easiest way to prove that the Rails endpoint is actually streaming.
But I prefer curl -N for the first test because the browser doesn’t give you a very useful raw view of SSE events.
Rails’ documentation uses essentially this same pattern – writing to response.stream periodically and closing the stream in ensure. (Ruby on Rails Guides)
One architectural correction before we commit
Don’t commit our current streaming implementation yet.
That is the version worth keeping in our portfolio and discussing in an int. scenario. Rails requires the response headers to be set before the first stream write and requires the stream to be closed when finished. (Ruby on Rails API)
the next step will be to connect the actual user message → streaming endpoint → browser UI rather than having a standalone stream endpoint.
Debug:ActionController::Live::ClientDisconnected – 500 Internal Server Error
Yes – very likely from our rescue behavior, but the deeper issue is that ActionController::Live::ClientDisconnected is not the same exception as IOError in Rails 8.1.
does not necessarily catch the exception you’re seeing.
Why the 500 appears
Our stream is working, then eventually the client closes the connection – or example:
browser finishes and closes the SSE connection
EventSource.close() is called
browser navigates/reloads
user closes the tab
network connection disappears
Rails detects that the client is gone while processing the Live response and raises:
ActionController::Live::ClientDisconnected
Rails’ Live processing happens in a separate thread, and once the response has been committed Rails handles exceptions differently from a normal controller request. (Ruby on Rails API)
Don’t interpret ClientDisconnected as an application failure.
It’s closer to:
Rails: "I'm streaming."
Browser: "I'm no longer listening."
Rails: "Okay."
For SSE, that’s a normal lifecycle event.
Why you’re seeing Completed 500
This is the part that initially looks strange.
With ActionController::Live, Rails starts processing the action in a separate thread. When an exception occurs after the response has already been committed/started streaming, Rails can’t behave like a normal controller request with a fresh 500 response. Rails’ Live implementation has special handling for committed responses and closes the stream after logging the exception.
So our log can be misleading:
Completed 500 Internal Server Error
ActionController::Live::ClientDisconnected
even though:
the user received the streamed answer successfully,
the connection closed normally afterward.
That’s exactly why I would treat ClientDisconnected separately from genuine application errors.
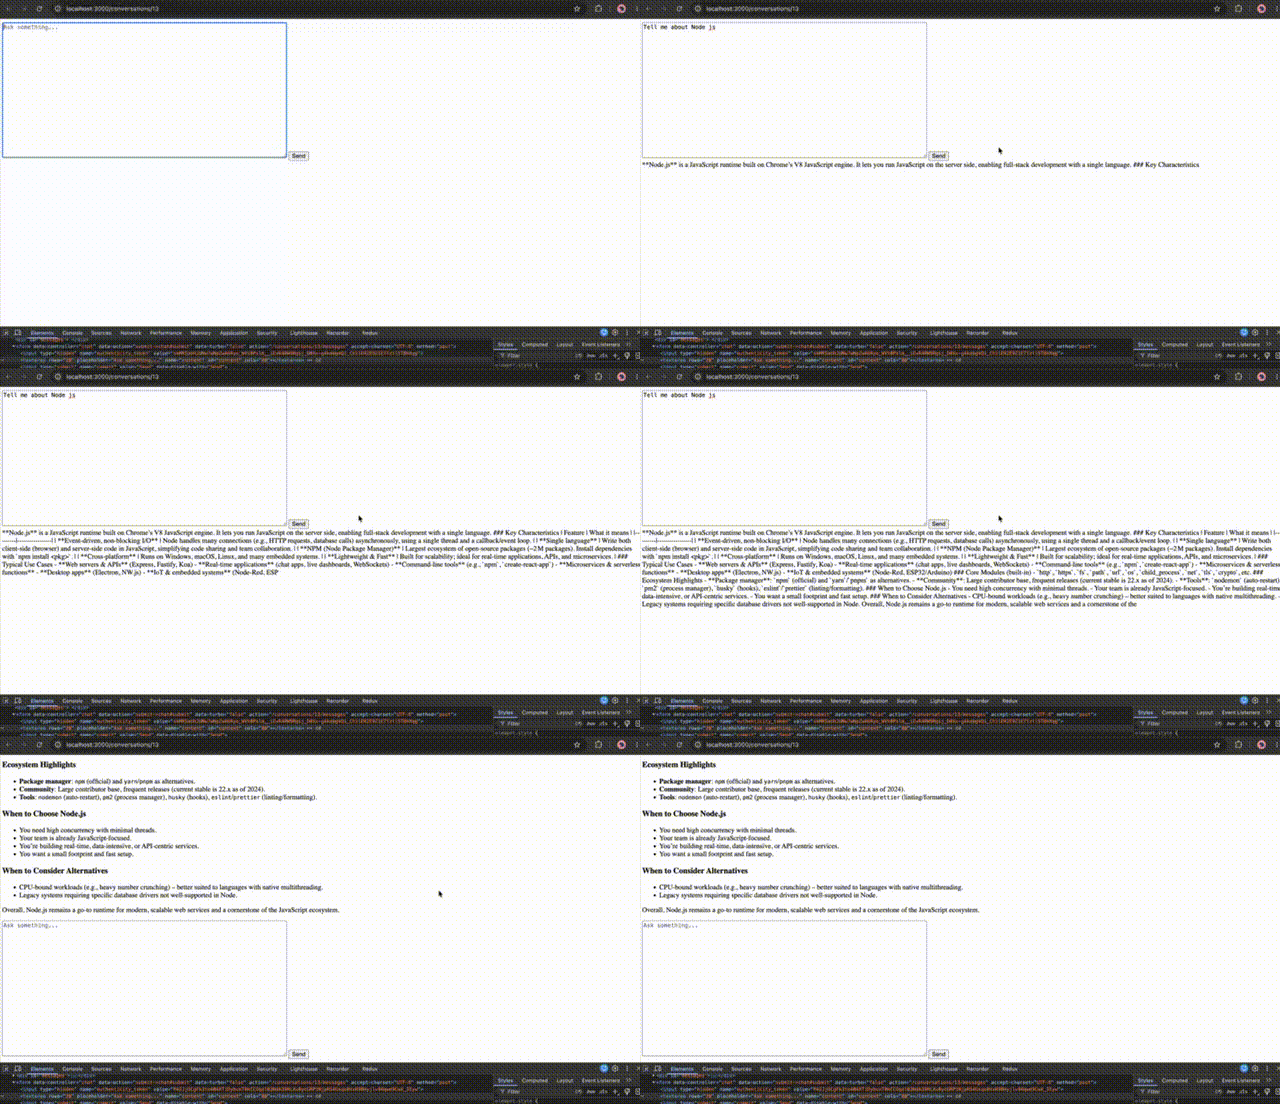
Fix Streaming issue: After entering the question the page get stuck
Our server logs are as follows:

Started POST "/conversations"
Processing by ConversationsController#create as TURBO_STREAM
Parameters: {"...., "conversation" => {"title" => "Tell me about Node js"}, "commit" => "Start conversation"}

Then goes to
Started GET "/conversations/13"
Processing by ConversationsController#show as TURBO_STREAM
Parameters: {"id" => "13"}
Rendering conversations/show.html.erb
200 OK
Then the page stuck on the Form: form_with in the conversations/show.html.erb. the div streaming-response is blank and it is not going to messages controller#stream or I think it is not executing the chat_controller.js also.
Yes – the server logs strongly suggest the problem is before MessagesController#stream. The conversation page loads correctly, then the form submission isn’t triggering our Stimulus chat#submit.
The likely culprit is Turbo + Stimulus registration, not SSE.
Depending on the Rails 8 application template/setup, your index.js may use automatic controller loading instead. The important thing is that chat_controller.js is being registered under:
chat
3. Check application.js
Open:
app/javascript/application.js
You should have the normal Rails setup, typically something along the lines of:
import"@hotwired/turbo-rails"
import"controllers"
The important line is:
import"controllers"
Without it, your Stimulus controllers won’t be registered.
This tells us what the client’s constructor expects.
Also try:
OpenAI::Client.instance_methods(false)
We’re learning to inspect a Ruby library rather than treating it as magic.
Step 5.14 – Create the OpenAI client
Now let’s modify:
app/services/ai/client.rb
We’ll start with:
class Ai::Client
  def initialize
    @api_key = Rails.application.credentials.dig(:openai, :api_key)

    raise "OpenAI API key is missing" if @api_key.blank?

    @client = OpenAI::Client.new(api_key: @api_key)
  end
end
The Ruby OpenAI SDK’s API can change between versions, so don’t blindly copy the exact request syntax from older tutorials. That’s why we’re checking the version we’ve actually installed before writing the API call.
Now we’ve:
“OpenAI client initialized.”
We’ll make our first actual LLM request and inspect the complete response, including:
response
model
output
usage
input tokens
output tokens
That will lead directly into why we added those fields to our Message model.
@client=OpenAI::Client.new(api_key:@api_key)
We’ll use our installed SDK’s API, not older ruby-openai examples. The current official openai Ruby SDK documents OpenAI::Client.new(api_key: ...) and the Responses API as the current interface. (GitHub)
Step 5.16 – Make the First Real LLM Request
For this step, we’ll do one simple request and inspect the response.
We are not integrating it with Conversation or Message yet.
Our goal is:
Rails console
↓
Ai::Client
↓
OpenAI Responses API
↓
LLM
↓
Response
1. Add a chat method
Open:
app/services/ai/client.rb
Change it to:
class Ai::Client
  def initialize
    @api_key = Rails.application.credentials.dig(:openai, :api_key)

    raise "OpenAI API key is missing" if @api_key.blank?

    @client = OpenAI::Client.new(api_key: @api_key)
  end

  def chat(message)
    @client.responses.create(
      model: "gpt-5.2",
      input: message
    )
  end
end
The SDK’s current Responses API accepts model and input for creating a response. (GitHub)
Why input: message?
We’re deliberately starting with the simplest possible request:
input:"Explain Ruby blocks in simple terms"
Later we’ll send structured conversation history:
input: [
{ role::system, content:"..." },
{ role::user, content:"..." }
]
The Responses API supports both simple input and structured message input. (GitHub)
2. Start Rails console
bin/rails c
Create the client:
client=Ai::Client.new
Now make the request:
response=client.chat(
message:"Explain Ruby blocks in simple terms."
)
This is the moment our application makes an actual network request.
3. Inspect the response
First:
response.class
Then:
response
Don’t worry if the output is large.
The current official Ruby SDK returns typed response objects and the response contains the generated output plus metadata such as usage. (GitHub)
But if you get the following output, we can change the model which has free API calls:
ai-assistant(dev):013> client = Ai::Client.new
ai-assistant(dev):003> res = ai.chat('I want to be a expert in Ruby language')
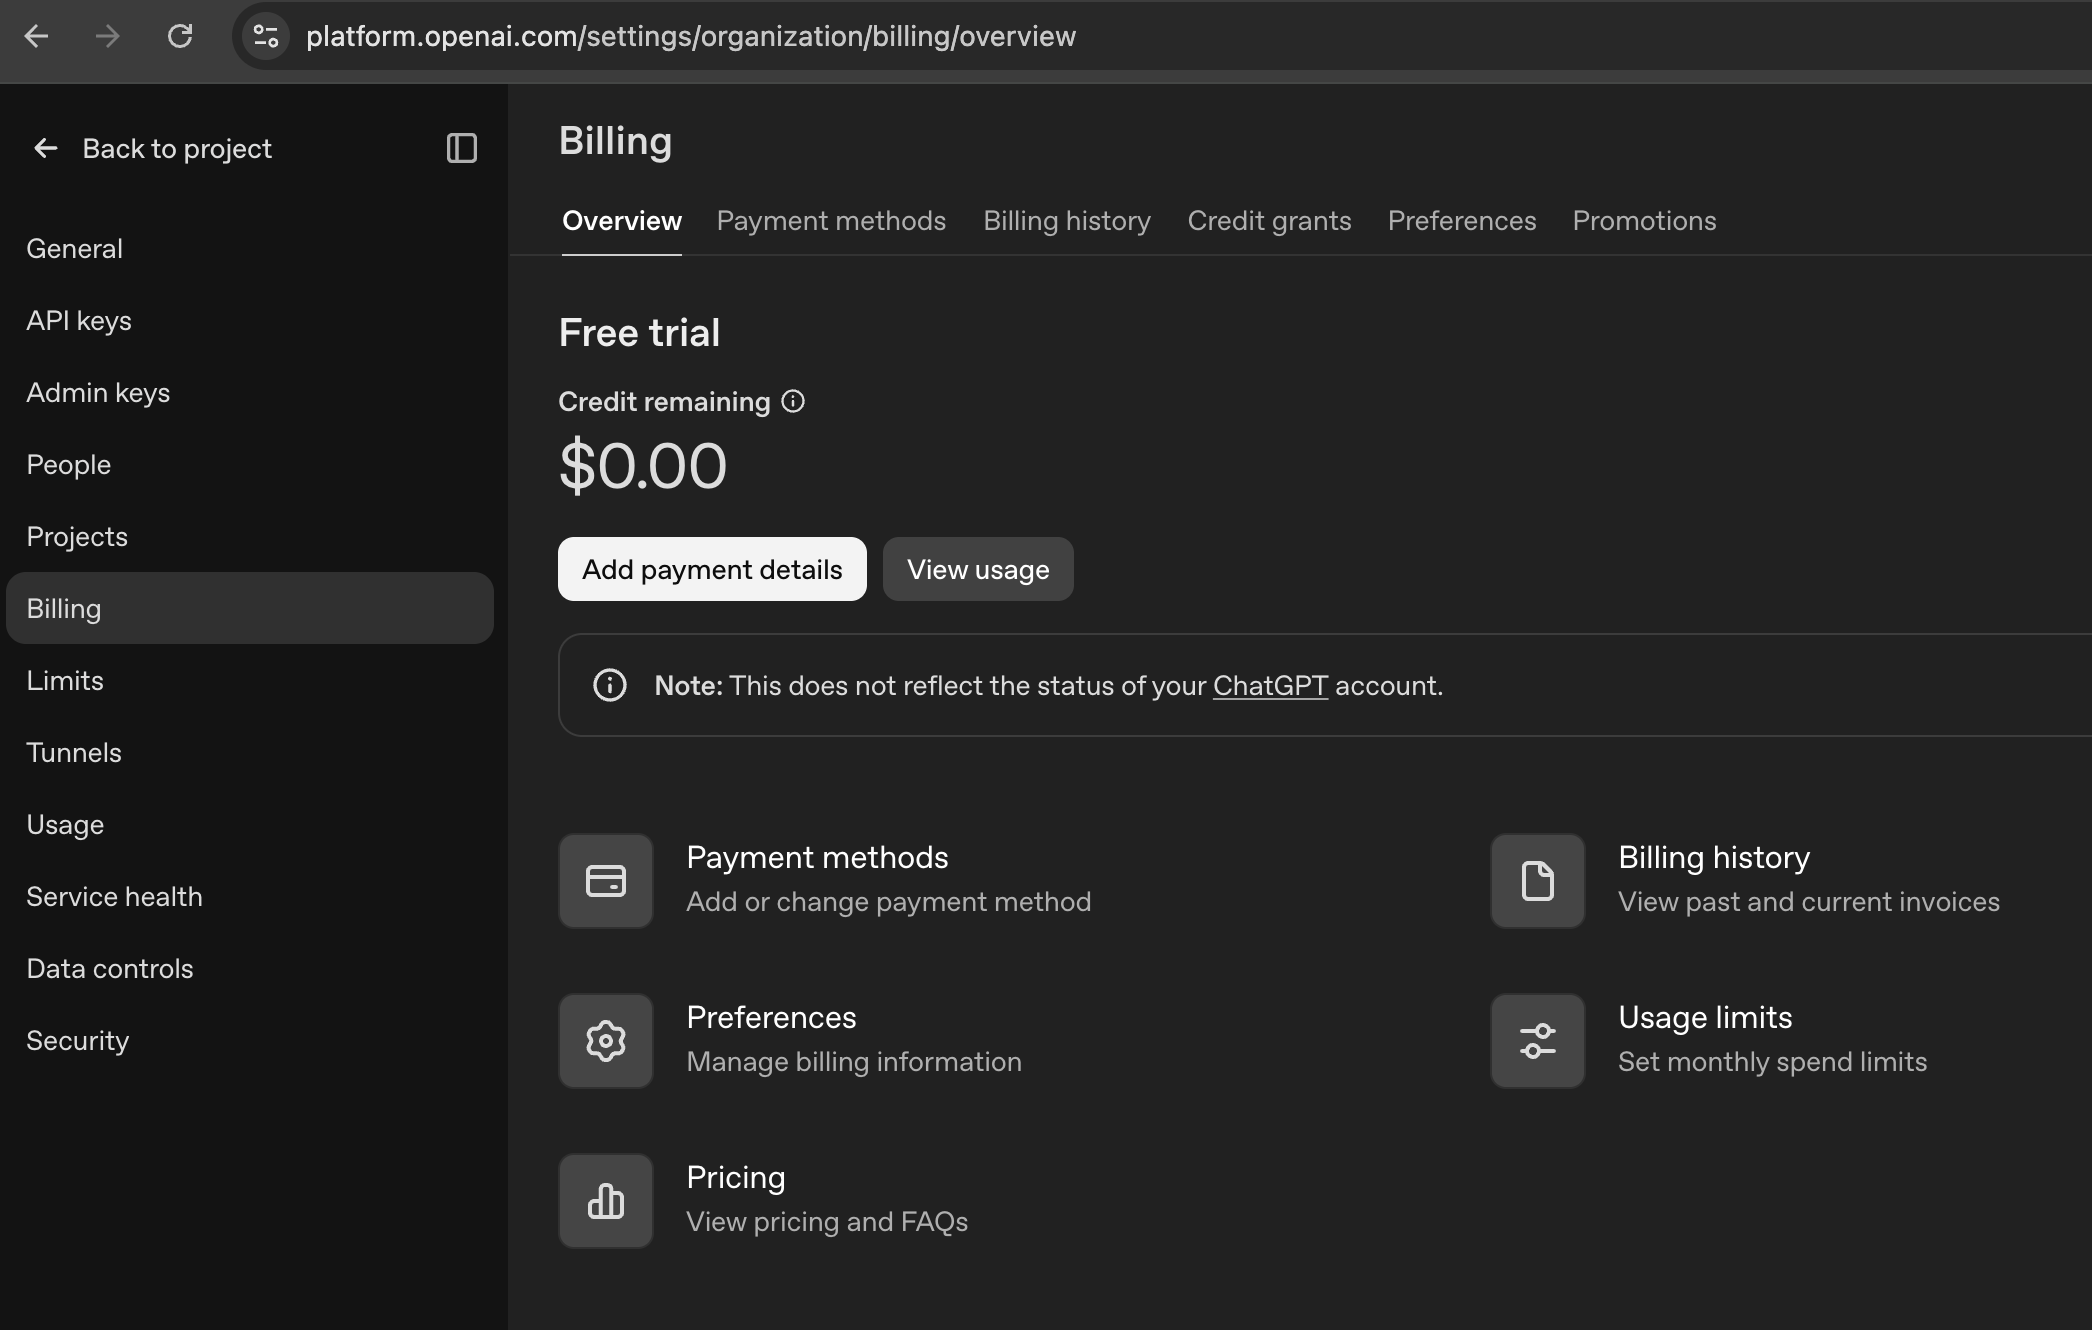
app/services/ai/client.rb:11:in 'Ai::Client#chat': {url: "https://api.openai.com/v1/responses", status: 429, body: {error: {message: "You have no credits remaining. Add credits to continue using the API at https://platform.openai.com/settings/organization/billing/.", type: "insufficient_quota", param: nil, code: "credit_balance_exhausted"}}} (OpenAI::Errors::RateLimitError)
        from (ai-assistant):3:in '<compiled>'
Yes – the error makes sense and there is an important distinction here:
Our ChatGPT subscription and OpenAI API billing are separate.
So even if you can use ChatGPT normally, that does not give your Ruby application free API calls. OpenAI explicitly says ChatGPT and API billing are managed separately. (OpenAI Help Center)
Why you’re seeing You have no credits remaining
Your Rails code is calling the OpenAI API, not ChatGPT:
Rails app
↓
OpenAI API
↓
API billing / credits
The API account associated with your key currently has no usable credits. OpenAI’s current prepaid-billing documentation says API requests stop once the available credit balance is exhausted. (OpenAI Help Center)
“But aren’t basic models free?”
Not generally for the API.
There may be specific free/trial allocations or products with included usage, but you should not assume that a model being available in ChatGPT means the API is free.
For our Rails application, we’re using:
OpenAI::Client
which consumes API usage and is metered separately.
What I recommend for our course
I don’t think we should spend money just to continue learning unless you’re comfortable doing so.
We have three practical paths:
Option 1 – Add a small API balance
Open your OpenAI API billing overview and check your balance. New API users currently use prepaid billing and the documented minimum purchase is $5, with $10 as the default purchase amount. (OpenAI Help Center)
For this course a small balance should be plenty for experimentation because our prompts will be tiny.
Option 2 – Use another provider with a free tier
We could temporarily use a provider that offers some free API usage, while keeping the same architecture:
Ai::Client
↓
Provider
↓
LLM
This is actually useful because later we’ll make our architecture provider-agnostic.
Option 3 – Run a local model
We can install something like Ollama and run an LLM locally:
Rails
↓
Ai::Client
↓
localhost
↓
Local LLM
Advantages:
no API credits
no network dependency
no per-token cost
great for development
The downside is that the model quality may differ from hosted models, and local inference requires reasonable hardware.
One important thing for our architecture
Don’t change this:
Ai::Client
The fact that OpenAI isn’t currently usable doesn’t mean we should redesign the application.
We specifically created:
Rails
↓
Ai::Client
↓
Provider
so that later we can switch:
Ai::Client
↓
OpenAI
to:
Ai::Client
↓
Anthropic
or:
Ai::Client
↓
Ollama
without rewriting our Rails application.
That’s actually an important senior-level design lesson.
What we can do now?
Since our objective is learning AI engineering, not spending money on API calls, first check your API billing page.
If it shows:
Free trial credit remaining: $0.00
then the error is fully explained. OpenAI’s billing documentation uses exactly this sort of balance indicator. (OpenAI Help Center)
We can then decide between a small API credit or a local/free-tier provider.
For this course, I slightly prefer keeping OpenAI as the first provider so you learn the real production API flow, then later we’ll add a second provider/local model to demonstrate the abstraction properly.
4. Get the generated text
Try:
response.output_text
You should get a normal answer such as:
A Ruby block is a chunk of code that can be passed to a method...
This is the first important distinction:
response
↓
entire API response
response.output_text
↓
just the model's text
Don’t immediately throw away the full response. We need the metadata later.
5. Inspect the model
Try:
response.model
This tells you which model actually generated the response.
That’s relevant to our messages.model column.
6. Inspect usage
Now:
response.usage
You should see token-related information.
Inspect it:
response.usage.input_tokens
and:
response.usage.output_tokens
These are directly related to the fields we added earlier:
messages
-------------------
input_tokens
output_tokens
So our database design is now connected to a real API response.
LLM response
│
├── model
├── output text
└── usage
├── input_tokens
└── output_tokens
The SDK’s response models expose usage information as part of the response. (GitHub)
7. One very important experiment
Ask a second question:
response2=client.chat(
message:"What is my name?"
)
You’ll probably notice the model doesn’t know your name from the previous request.
That’s intentional.
We made two independent requests:
Request 1
"Explain Ruby blocks"
Request 2
"What is my name?"
The LLM does not automatically receive our previous request.
This is going to become extremely important when we implement:
Conversation
↓
Messages
↓
Prompt Builder
↓
LLM
Our Rails application will be responsible for providing the appropriate conversation context.
Don’t paste our API key or any sensitive output anywhere.
Now: “Our First LLM request works.”
Then we’ll do the next important step: inspect the raw response structure and improve Ai::Client so it returns a clean Ruby object to the rest of our Rails application.
Modern applications often need to deliver information to the browser as it becomes available, rather than waiting until the entire controller action finishes.
Examples include:
Live progress updates
Long-running exports
Real-time dashboards
AI-generated responses
Build/deployment logs
Notifications
Server-side status updates
Streaming large files
Server-Sent Events (SSE)
Rails provides this capability through ActionController::Live.
Rails 8.1 also exposes a particularly useful companion class:
ActionController::Live::SSE
Together, they provide a relatively simple way to implement HTTP streaming and Server-Sent Events directly from a Rails controller.
One important clarification: ActionController::Live itself is not new in Rails 8.1. It has existed for several Rails versions. However, Rails 8.1 continues to provide and refine the streaming infrastructure, including configuration around execution-state sharing. The examples below are based on the Rails 8.1 API.
What is ActionController::Live?
Normally, a Rails controller behaves conceptually like this:
Browser
|
| HTTP request
v
Rails Controller
|
| execute entire action
|
| generate complete response
v
Browser receives response
For example:
defreport
result=generate_report
renderjson:result
end
The browser generally waits until the action has generated its response.
With ActionController::Live, Rails can instead stream pieces of the response while the action is still executing:
Browser
|
| HTTP request
v
Rails Controller
|
| write chunk #1
|--------------------> Browser
|
| write chunk #2
|--------------------> Browser
|
| write chunk #3
|--------------------> Browser
|
| finish
Rails documents ActionController::Live as a module that allows controller actions to stream data to the client as it is written.
Basic ActionController::Live Example
A minimal controller looks like this:
class StreamsController < ApplicationController
  include ActionController::Live

  def show
    response.headers["Content-Type"] = "text/plain"

    5.times do |i|
      response.stream.write "Chunk #{i + 1}\n"
      sleep 1
    end
  ensure
    response.stream.close
  end
end
The important part is:
includeActionController::Live
and then:
response.stream.write(...)
Instead of constructing one large response, the controller writes directly to the response stream.
What happens internally?
Rails executes the streaming action in a separate thread so that the response can begin flowing to the client while the controller continues producing data. Rails 8.1 uses a dedicated cached thread-pool executor for live controller processing.
That distinction is extremely important for production applications.
What is Server-Sent Events?
ActionController::Live is the general streaming mechanism.
SSE is a specific protocol built on top of HTTP streaming.
Server-Sent Events allow the server to continuously send events to a browser over a long-lived HTTP connection.
The browser uses the standard JavaScript API:
constsource=newEventSource("/events");
source.onmessage=event=>{
console.log(event.data);
};
The communication is one-way:
Server --------------------> Browser
Unlike WebSockets:
Server <-------------------> Browser
SSE is therefore a good choice when the browser mainly needs to listen for server-side updates rather than continuously send messages back to the server. The browser’s EventSource API maintains the persistent connection and automatically handles reconnection.
Rails converts non-string objects to JSON and writes them using SSE formatting.
Building a Rails SSE Endpoint
Let’s build a realistic example.
Controller
class NotificationsController < ApplicationController
  include ActionController::Live

  def index
    response.headers["Content-Type"] = "text/event-stream"
    response.headers["Cache-Control"] = "no-cache"

    sse = ActionController::Live::SSE.new(
      response.stream,
      retry: 3000
    )

    10.times do |i|
      sse.write(
        {
          message: "Notification #{i + 1}",
          timestamp: Time.current.iso8601
        },
        event: "notification",
        id: i + 1
      )

      sleep 2
    end
  ensure
    sse&.close
  end
end
Rails’ SSE implementation supports three primary options:
:event
:retry
:id
event identifies the event type, retry tells the browser how long to wait before reconnecting, and id becomes the event identifier used for Last-Event-ID on reconnect.
JavaScript Client
The browser can consume the endpoint using EventSource.
constsource=newEventSource("/notifications");
source.addEventListener("notification",event=>{
constdata=JSON.parse(event.data);
console.log(data.message);
console.log(data.timestamp);
});
source.onerror=error=>{
console.error("SSE connection error",error);
};
The browser automatically opens a persistent HTTP connection.
The SSE wire format is based on text fields such as event, data, id, and retry, with an empty line terminating each event.
ActionController::Live vs ActionController::Live::SSE
This distinction is worth remembering.
Feature
ActionController::Live
ActionController::Live::SSE
Purpose
Generic HTTP streaming
SSE formatting
Output
Arbitrary stream data
SSE events
Browser API
Depends on your protocol
EventSource
JSON handling
You handle it
Rails can serialize objects
Event names
Manual
Built in
Event IDs
Manual
Built in
Reconnection support
Manual
SSE protocol support
Typical use
CSV/file/log streaming
Notifications/live updates
Think of it like this:
ActionController::Live
        |
        +---- response.stream.write
        |
        +---- send_stream
        |
        +---- SSE
                 |
                 +---- event
                 +---- data
                 +---- id
                 +---- retry
Streaming a Large CSV
ActionController::Live is not limited to SSE.
A very practical use case is exporting a large dataset.
Rails 8.1 exposes send_stream, specifically for generating data progressively rather than buffering the entire file in memory.
For example:
class ReportsController < ApplicationController
  include ActionController::Live

  def export
    send_stream(
      filename: "users.csv",
      type: "text/csv"
    ) do |stream|

      stream.write "id,email,created_at\n"

      User.find_each do |user|
        stream.write(
          "#{user.id},#{user.email},#{user.created_at.iso8601}\n"
        )
      end
    end
  end
end
This is much better than:
csv = User.find_each.map do |user|
  ...
end

send_data csv
for a very large export.
The second approach potentially builds a large amount of data in memory.
The streaming approach allows Rails to send the output progressively.
A Very Interesting Use Case: AI Streaming
Another practical use case is streaming generated text.
Imagine an AI API returns tokens incrementally:
Hello
Hello, I
Hello, I can
Hello, I can help
Hello, I can help you
...
Instead of waiting for the complete response:
response=ai_client.generate(...)
renderjson:response
you could expose a streaming endpoint:
class AiController < ApplicationController
  include ActionController::Live

  def stream
    response.headers["Content-Type"] = "text/event-stream"

    sse = ActionController::Live::SSE.new(
      response.stream,
      event: "token"
    )

    ai_client.stream(prompt) do |token|
      sse.write(
        {
          content: token
        }
      )
    end
  ensure
    sse&.close
  end
end
The browser can then update the UI immediately as chunks arrive.
This is one of the reasons HTTP streaming has become particularly relevant for modern applications.
Rails explicitly warns that failing to close the stream can leave the socket open indefinitely.
A production implementation should therefore almost always look like:
begin
# streaming work
ensure
# close stream
end
Handling Client Disconnects
A browser can disappear at any time.
For example:
User closes tab
|
v
SSE connection disappears
|
v
Rails stream encounters disconnect
Rails exposes:
ActionController::Live::ClientDisconnected
for client disconnect situations.
You can handle it explicitly when appropriate:
rescueActionController::Live::ClientDisconnected
Rails.logger.info("SSE client disconnected")
ensure
sse&.close
end
For long-running streams, disconnect handling is especially important because you don’t want server-side work continuing unnecessarily after the browser is gone.
Proxy and Middleware Buffering
A common mistake is to test streaming locally and assume production will behave identically.
You might write:
response.stream.write"hello"
sleep5
response.stream.write"world"
and expect:
hello
to appear immediately.
But an intermediary could buffer the response.
Possible intermediaries include:
Browser
|
Load Balancer
|
Reverse Proxy
|
Nginx
|
Rails
Rails itself documents that response buffering can interfere with streaming, including interaction with Rack::ETag in relevant Rack versions.
Therefore streaming should always be tested through the same infrastructure path used in production.
SSE vs WebSockets vs Polling
This is one of the most important architectural decisions.
Approach
Direction
Connection
Good For
Polling
Client → Server repeatedly
Short
Simple updates
Long Polling
Mostly server → client
Repeated HTTP
Older architectures
SSE
Server → Client
Long-lived HTTP
Notifications/live feeds
WebSocket
Bidirectional
Persistent socket
Chat/games/collaboration
ActionController::Live
Depends on implementation
Streaming HTTP
Generic streaming
Use SSE when:
Server -> Browser
is the dominant requirement.
Examples:
Order status
Build progress
Notifications
Stock updates
Live dashboard
AI text streaming
Import progress
Use WebSockets when:
Server <-> Browser
needs continuous two-way communication.
Examples:
Chat
Multiplayer applications
Collaborative editing
Interactive sessions
Use normal HTTP when:
You simply need:
request -> response
There is no reason to introduce streaming complexity for an ordinary CRUD endpoint.
Connection Scalability Is Different
A normal HTTP request may live for:
100 ms
500 ms
2 seconds
An SSE connection may remain open for:
5 minutes
30 minutes
several hours
That changes your capacity model.
Suppose:
10,000 users
each maintain an SSE connection.
That means your infrastructure potentially needs to support:
10,000 long-lived connections
You therefore need to think about:
Web server capacity
Worker/thread usage
File descriptors
Load balancers
Reverse proxies
Timeout configuration
Connection limits
Memory
Monitoring
There is also a browser-level consideration: SSE uses persistent HTTP connections, and connection limits can matter especially under HTTP/1.1; HTTP/2 changes the connection model by multiplexing streams.
Be Careful with Active Record Connections
A particularly important Rails concern is database connection usage.
Consider:
loopdo
users=User.where(active:true)
...
sleep1
end
inside every SSE request.
If you have hundreds or thousands of clients, you can easily end up with poor database behavior.
The SSE request should ideally wait for events, rather than continuously hammer the database.
A Better Production Architecture
For example, imagine an order-management application.
When an order changes:
Order updated
|
v
Publish "order.updated"
|
v
Redis / PubSub
|
v
SSE connection
|
v
Browser updates UI
The Rails controller becomes primarily responsible for:
Connection
↓
Subscribe
↓
Receive event
↓
Serialize event
↓
Write SSE
↓
Repeat
rather than:
Connection
↓
Query database
↓
Sleep
↓
Query database
↓
Sleep
↓
Query database
That distinction becomes very important at scale.
Testing an SSE Endpoint
A browser test is useful, but curl is often even more convenient during development.
For example:
curl-N http://localhost:3000/notifications
The -N option prevents curl from buffering output, making the stream easier to observe.
You should see events arrive progressively:
event: notification
id: 1
data: {"message":"Notification 1"}
event: notification
id: 2
data: {"message":"Notification 2"}
This is a very useful debugging technique.
Testing ActionController::Live
For controller tests, streaming requires more consideration than a typical controller action because the response is not necessarily generated as one complete body.
and verify that the generated body contains expected SSE fields.
For more complex streaming behavior, integration/system-level testing is generally more valuable than testing only internal controller implementation details.
A Clean SSE Controller Pattern
For a production-style controller, I prefer keeping the controller small:
class EventsController < ApplicationController
  include ActionController::Live

  def index
    prepare_stream_headers

    sse = ActionController::Live::SSE.new(
      response.stream,
      retry: 3_000
    )

    event_stream.each do |event|
      sse.write(
        event.payload,
        event: event.type,
        id: event.id
      )
    end
  rescue ActionController::Live::ClientDisconnected
    Rails.logger.info("SSE client disconnected")
  ensure
    sse&.close
  end

  private

  def prepare_stream_headers
    response.headers["Content-Type"] = "text/event-stream"
    response.headers["Cache-Control"] = "no-cache"
  end

  def event_stream
    # Redis / PubSub / broker subscription
  end
end
The controller handles HTTP concerns, while the event source is delegated elsewhere.
That separation becomes especially valuable when the event system grows.
Advantages of ActionController::Live
Lower time-to-first-byte
The server can start sending data before the complete operation has finished.
Lower memory usage for large streams
You don’t necessarily need to construct the entire response in memory first.
Native HTTP
There is no requirement for a completely different networking protocol.
SSE is simple for browser clients
The browser already provides:
EventSource
Automatic SSE reconnect behavior
SSE includes protocol support for reconnecting and event IDs.
Fits naturally into Rails controllers
You can continue using Rails authentication, routing, controllers, and application services while introducing streaming only where needed.
Disadvantages
Streaming is not free.
Threading complexity
ActionController::Live executes the action in a separate thread.
Long-lived connections
Unlike conventional requests, connections may remain open for long periods.
Capacity planning becomes important
Thousands of connected browsers can have a very different infrastructure impact than thousands of short requests.
Reverse-proxy configuration matters
Buffering and timeout behavior can break an otherwise-correct implementation.
Database usage can become dangerous
Naive polling inside every streaming connection can put significant pressure on PostgreSQL.
Operational complexity
Logging, monitoring, disconnects, reconnects, retries, and infrastructure timeouts all become part of the design.
When Should a Rails Developer Use It?
A good decision rule is:
Do I need data before the complete response is available?
            |
           Yes
            |
            v
Does the client only need server -> browser updates?
            |
         +--+--+
         |     |
        Yes    No
         |      |
         v      v
       SSE    WebSocket
For generic data/file streaming:
ActionController::Live
For browser-facing event streams:
ActionController::Live::SSE
For ordinary request/response APIs:
render json:
is usually the better choice.
What a Senior Rails Developer Should Know Before Using It
Before introducing ActionController::Live, I would explicitly answer these questions:
1. How long will the connection remain open?
Seconds?
Minutes?
Hours?
2. How many simultaneous clients could exist?
100?
1,000?
100,000?
3. What is the event source?
Database?
Redis?
Kafka?
Another service?
4. What happens when the client disconnects?
Can the server stop work immediately?
5. How will reconnects work?
Will events be lost?
Do you need id and Last-Event-ID?
6. What happens behind the load balancer?
Does it buffer?
Does it timeout idle connections?
7. Is your code thread-safe?
Remember that Rails executes Live actions in a separate thread.
8. How will you monitor connections?
You should be able to answer:
How many active SSE connections exist?
How long have they been open?
How many disconnected unexpectedly?
How many events are being delivered?
What is the event delivery latency?
Final Example
A compact Rails 8.1 SSE implementation can look like this:
class EventsController < ApplicationController
  include ActionController::Live

  def stream
    response.headers["Content-Type"] = "text/event-stream"
    response.headers["Cache-Control"] = "no-cache"

    sse = ActionController::Live::SSE.new(
      response.stream,
      retry: 3_000
    )

    10.times do |i|
      sse.write(
        {
          message: "Event #{i + 1}",
          timestamp: Time.current.iso8601
        },
        event: "update",
        id: i + 1
      )

      sleep 1
    end
  rescue ActionController::Live::ClientDisconnected
    Rails.logger.info("Client disconnected")
  ensure
    sse&.close
  end
end
And the client:
constevents=newEventSource("/events/stream");
events.addEventListener("update",event=>{
constdata=JSON.parse(event.data);
console.log(data.message);
});
events.onerror=error=>{
console.error("Connection error",error);
};
This small example demonstrates the complete concept:
ActionController::Live
↓
HTTP streaming
↓
ActionController::Live::SSE
↓
text/event-stream
↓
Browser EventSource
↓
Real-time UI updates
Conclusion
ActionController::Live is Rails’ low-level mechanism for streaming HTTP responses while the controller is still producing them.
ActionController::Live::SSE builds on that mechanism to provide a convenient implementation of Server-Sent Events.
The most important distinction is:
Live = streaming mechanism
SSE = event-stream protocol
For modern Rails applications, this makes ActionController::Live particularly useful for large exports, progressive responses, logs, long-running operations, and AI output, while SSE is a strong fit for server-to-browser real-time updates.
But the real engineering challenge is usually not writing:
sse.write(...)
The difficult part is designing the surrounding system correctly:
Event source
↓
Concurrency
↓
Connection lifecycle
↓
Reconnect strategy
↓
Proxy/load-balancer behavior
↓
Database/resource usage
↓
Observability
That is where ActionController::Live moves from being a simple Rails API feature to a genuine production architecture decision.
If you want to avoid the ActiveAdmin complexity entirely:
RailsAdmin:
gem 'rails_admin'
✅ No asset pipeline issues
✅ Works with Propshaft out of the box
❌ Less customizable than ActiveAdmin
Trestle:
gem 'trestle'
✅ Modern Bootstrap-based admin
✅ Better Rails 8 compatibility
❌ Smaller community
Adminterface (Deprecated):
🚫 No longer maintained (as shown in search results)
🏆 My Recommendation:
For our production app:Stick with Sprockets + ActiveAdmin 3.x
Why?
Stability – Battle-tested combination
Zero configuration issues
Full feature set available
Easy maintenance
The performance difference between Propshaft and Sprockets won’t significantly impact your admin interface, which is typically used by a small number of internal users.
🔮 Future Outlook:
ActiveAdmin v4 will eventually have better Propshaft support
Rails community is working on solutions
Node.js dependency trend for complex CSS is becoming standard anyway
Bottom Line: Don’t let the asset pipeline take over the application preferences. Our current Sprockets setup is perfectly fine for an admin interface! 🎯
The Reality Check:
We completely replaced Propshaft with Sprockets for the entire application.
Current State:
❌ Propshaft: Completely removed
✅ Sprockets: Handles ALL assets (main app + admin)
✅ Importmaps: Still working (unaffected)
✅ Hotwire/Turbo: Still working (unaffected)
🏗️ How ActiveAdmin Works:
ActiveAdmin is NOT a Rails Engine. It integrates directly into your app:
Routes: ActiveAdmin.routes(self) adds /admin routes to your app
Assets: ActiveAdmin’s CSS/JS becomes part of your asset pipeline
Controllers: ActiveAdmin generates controllers in your app’s namespace
It’s tightly coupled to your application, not isolated.
🤷♂️ So What Are Our Real Options?
Option 1: Accept Current Setup
What we have:
Modern Rails 8 with Importmaps + Hotwire ✅
Sprockets instead of Propshaft ❌ (but works fine)
Full-featured admin interface ✅
Option 2: Use activeadmin_assets Gem
# Replace current ActiveAdmin setup
gem 'activeadmin_assets'  # Pre-compiled assets
gem 'propshaft'           # Back to Rails 8 default
✅ Get Propshaft back
✅ Keep Rails 8 defaults
❌ Can’t customize admin styles
Option 3: Build Custom Admin
Keep your Rails 8 purity but build admin from scratch:
✅ Pure Rails 8
❌ Weeks of development time
🔍 What activeadmin_assets Actually Does:
The activeadmin_assets gem doesn’t replace ActiveAdmin – it provides pre-compiled static assets for ActiveAdmin to work with Propshaft.
But here’s the critical issue for you:
🚨 activeadmin_assets = NO Customization
If you use activeadmin_assets, you get:
✅ ActiveAdmin functionality
✅ Propshaft compatibility
❌ ZERO ability to customize styles/interface
The assets are pre-compiled and frozen – you can’t modify colors, layouts, or styling.
Since We Want Customization:
We’re actually in the BEST setup possible right now!
Our Current Setup Gives You:
✅ Full ActiveAdmin customization (styles, layouts, themes)
✅ Modern Rails 8 (Importmaps, Hotwire, Turbo)
✅ All ActiveAdmin features (filters, actions, forms)
❌ Sprockets instead of Propshaft (minor trade-off)
Customization Examples We Can Do:
Custom CSS themes and colors
Layout modifications
Custom JavaScript behaviors
Brand styling and logos
Advanced form customizations
🎯 Reality Check:
There’s no solution that gives us:
Full ActiveAdmin customization AND
Propshaft AND
Zero complexity
We have to pick 2 out of 3.
💡 My Honest Last Decision:
Keep our current setup! We’re already using:
Modern Rails 8 patterns (95% of your codebase)
Importmaps and Hotwire (exactly as intended)
Sprockets only affects asset serving (invisible to users)
The Propshaft vs Sprockets difference won’t affect your product’s success, but losing admin customization will limit our UX.
Let’s move on to quick development of more react components now. Before that let’s check what we have now and understand it very clear.
📄 File 1:
Our app/javascript/components/App.jsx file:
import React from 'react';

function App() {
  return (
    <div>
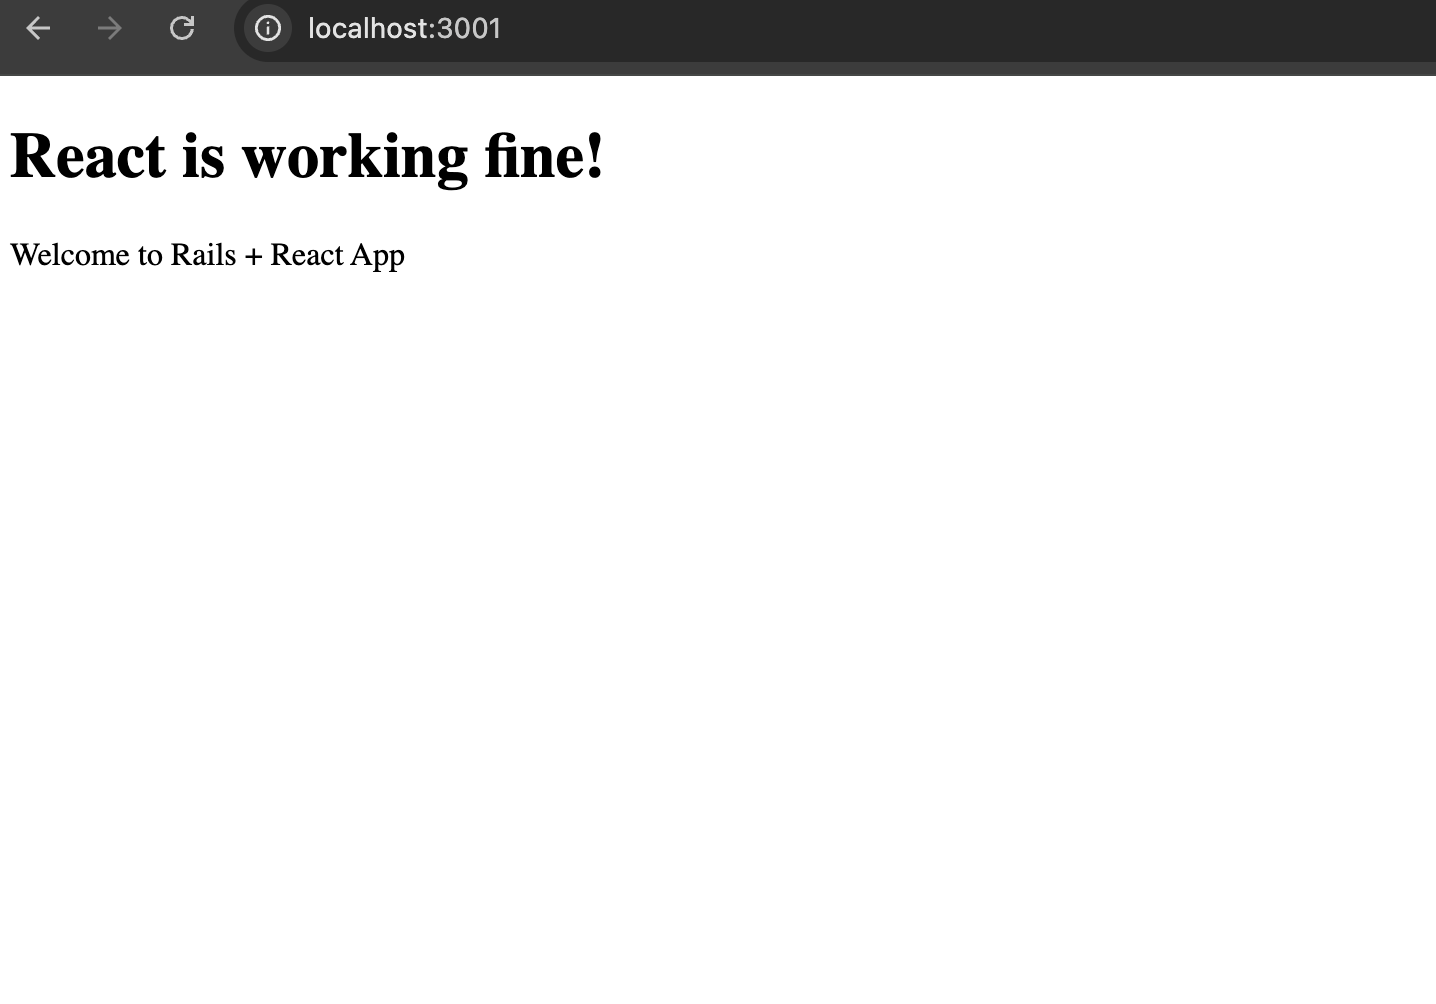
      <h1>React is working fine!</h1>
      <p>Welcome to Rails + React App</p>
    </div>
  );
}

export default App;
Let’s examine this React component step by step:
Line 1: Import React
import React from 'react';
import – ES6 module syntax to bring in external code
React – The main React library
from 'react' – Importing from the npm package named “react”
Why needed? Even though we use --jsx=automatic, we still import React for any hooks or React features we might use.
Function Component: Line 3-9
A React function component is a simple JavaScript function that serves as a building block for user interfaces in React applications. These components are designed to be reusable and self-contained, encapsulating a specific part of the UI and its associated logic.
function App() {
  return (
    <div>
      <h1>React is working fine!</h1>
      <p>Welcome to Rails + React App</p>
    </div>
  );
}
🔍 Breaking this down:
Line 3: Component Declaration
function App() {
function App() – This is a React Function Component
Component naming – Must start with capital letter (App, not app)
What it is – A JavaScript function that returns JSX (user interface)
Line 4-8: JSX Return
return (
  <div>
    <h1>React is working fine!</h1>
    <p>Welcome to Rails + React App</p>
  </div>
);
return – Every React component must return something
JSX – Looks like HTML, but it’s actually JavaScript
<div> – Must have one parent element (React Fragment rule)
<h1> & <p> – Regular HTML elements, but processed by React
Line 11: Export
export default App;
export default – ES6 syntax to make this component available to other files
App – The component name we’re exporting
Why needed? So application.js can import and use this component
📄 File 2:
Our app/javascript/application.js file:
// Entry point for the build script in your package.json
import React from 'react';
import { createRoot } from 'react-dom/client';
import App from './components/App';

document.addEventListener('DOMContentLoaded', () => {
  const container = document.getElementById('react-root');

  if(container) {
    const root = createRoot(container);
    root.render(<App />);
  }
});
This is the entry point that connects React to your Rails app:
Imports: Line 2-4
import React from 'react';
import { createRoot } from 'react-dom/client';
import App from './components/App';
🔍 Breaking down each import:
Line 2:
import React from 'react';
Same as before – importing the React library
Line 3:
import { createRoot } from 'react-dom/client';
{ createRoot } – Named import (notice the curly braces)
react-dom/client – ReactDOM library for browser/DOM manipulation
createRoot – New React 18+ API for rendering components to DOM
Line 4:
import App from './components/App';
App – Default import (no curly braces)
./components/App – Relative path to our App component
Note: We don’t need .jsx extension, esbuild figures it out
createRoot(container) – Create a React “root” at the DOM element
root.render(<App />) – Render our App component inside the container
<App /> – JSX syntax for using our component (self-closing tag)
🎯 Key React Concepts You Just Learned:
1. Components
Functions that return JSX
Must start with capital letter
Reusable pieces of UI
2. JSX
Looks like HTML, actually JavaScript
Must return single parent element
Processed by esbuild into regular JavaScript
3. Import/Export
Default exports:export default App → import App from './App'
Named exports:export { createRoot } → import { createRoot } from 'package'
4. React DOM
createRoot() – Modern way to mount React apps (React 18+)
render() – Display components in the browser
5. Rails Integration
Rails serves the HTML page
React takes over the #react-root element
esbuild bundles everything together
🚀 This pattern is the foundation of every React app! We create components, import them, and render them to the DOM.
📚 Step-by-Step React Learning with Todo List
Now let’s build a Todo List app step by step. I’ll explain each React concept thoroughly as we go. Here’s our learning roadmap:
Step 1: Understanding JSX and Basic Component Structure
First, let’s update our App.jsx to create the basic structure of our Todo app:
import React from 'react';
function App() {
return (
<div className="todo-app">
<h1>My Todo List</h1>
<p>Let's learn React by building a todo app!</p>
{/* This is a JSX comment */}
<div className="todo-container">
<h2>Add a new todo</h2>
<input type="text" placeholder="Enter a todo..." />
<button>Add Todo</button>
<h2>My Todos</h2>
<ul>
<li>Learn React basics</li>
<li>Build a todo app</li>
<li>Master React hooks</li>
</ul>
</div>
</div>
);
}
export default App;
🎯 Key Concepts Explained:
JSX (JavaScript XML):
JSX lets you write HTML-like syntax directly in JavaScript
It’s a syntax extension for JavaScript, not actual HTML
JSX gets compiled to JavaScript function calls
You can use {} to embed JavaScript expressions inside JSX
Important JSX Rules:
Use className instead of class (because class is a reserved word in JavaScript)
You can use single quotes for className values in JSX. Both work perfectly fine:
// Both of these are valid:
<div className='todo-app'> // Single quotes ✅
<div className="todo-app"> // Double quotes ✅
Quote Usage in JSX/JavaScript:
Single quotes vs Double quotes:
JavaScript treats them identically
It’s mostly a matter of personal/team preference
The key is to be consistent throughout your project
Common conventions:
// Option 1: Single quotes for JSX attributes
<div className='todo-app'>
<input type='text' placeholder='Enter todo...' />
</div>
// Option 2: Double quotes for JSX attributes
<div className="todo-app">
<input type="text" placeholder="Enter todo..." />
</div>
// Option 3: Mixed (but stay consistent within each context)
const message = 'Hello World'; // Single for JS strings
<div className="todo-app"> // Double for JSX attributes
When you MUST use specific quotes:
// When the string contains the same quote type
<div className="It's a great day"> // Double quotes needed
<div className='He said "Hello"'> // Single quotes needed
// Or use escape characters
<div className='It\'s a great day'> // Escaping single quote
<div className="He said \"Hello\""> // Escaping double quote
💡 Tip: Many teams use tools like Prettier or ESLint to automatically format and enforce consistent quote usage across the entire project.
All tags must be closed (self-closing tags need / at the end)
JSX comments use {/* */} syntax
Return a single parent element (or use React Fragment <>...</>)
Try updating our App.jsx with this code and see it in your browser!
Step 2: Introduction to State with useState
Now let’s add state to make our app interactive. State is data that can change over time.
import React, { useState } from 'react';
function App() {
// useState Hook - creates state variable and setter function
const [todos, setTodos] = useState([
{ id: 1, text: 'Learn React basics', completed: false },
{ id: 2, text: 'Build a todo app', completed: false },
{ id: 3, text: 'Master React hooks', completed: true }
]);
const [inputValue, setInputValue] = useState('');
return (
<div className="todo-app">
<h1>My Todo List</h1>
<div className="todo-container">
<h2>Add a new todo</h2>
<input
type="text"
placeholder="Enter a todo..."
value={inputValue}
onChange={(e) => setInputValue(e.target.value)}
/>
<button>Add Todo</button>
<h2>My Todos ({todos.length})</h2>
<ul>
{todos.map(todo => (
<li key={todo.id}>
{todo.text} {todo.completed ? '✅' : '⏳'}
</li>
))}
</ul>
</div>
</div>
);
}
export default App;
🎯 Key Concepts Explained:
useState Hook:
useState is a React Hook that lets you add state to functional components
It returns an array with two elements: [currentValue, setterFunction]
const [todos, setTodos] = useState([]) creates a state variable todos and a function setTodos to update it
The initial value is passed as an argument to useState
Controlled Components:
The input field is now “controlled” by React state
value={inputValue} makes the input show what’s in state
onChange={(e) => setInputValue(e.target.value)} updates state when user types
Array.map() for Rendering Lists:
todos.map() transforms each todo into a JSX element
Each list item needs a unique key prop for React’s optimization
{todo.text} embeds the todo text using JSX expressions
Try this code and notice how the input field now responds to typing!
Step 3: Event Handling and Adding Todos
Let’s make the “Add Todo” button work:
import React, { useState } from 'react';
function App() {
const [todos, setTodos] = useState([
{ id: 1, text: 'Learn React basics', completed: false },
{ id: 2, text: 'Build a todo app', completed: false },
{ id: 3, text: 'Master React hooks', completed: true }
]);
const [inputValue, setInputValue] = useState('');
// Function to add a new todo
const addTodo = () => {
if (inputValue.trim() !== '') {
const newTodo = {
id: Date.now(), // Simple ID generation
text: inputValue,
completed: false
};
setTodos([...todos, newTodo]); // Spread operator to add new todo
setInputValue(''); // Clear the input field
}
};
// Function to handle Enter key press
const handleKeyPress = (e) => {
if (e.key === 'Enter') {
addTodo();
}
};
return (
<div className="todo-app">
<h1>My Todo List</h1>
<div className="todo-container">
<h2>Add a new todo</h2>
<input
type="text"
placeholder="Enter a todo..."
value={inputValue}
onChange={(e) => setInputValue(e.target.value)}
onKeyPress={handleKeyPress}
/>
<button onClick={addTodo}>Add Todo</button>
<h2>My Todos ({todos.length})</h2>
<ul>
{todos.map(todo => (
<li key={todo.id}>
{todo.text} {todo.completed ? '✅' : '⏳'}
</li>
))}
</ul>
</div>
</div>
);
}
export default App;
🎯 Key Concepts Explained:
Event Handlers:
onClick={addTodo} – function runs when button is clicked
onKeyPress={handleKeyPress} – function runs when key is pressed
Event handlers receive an event object (e) with information about the event
State Updates:
setTodos([...todos, newTodo]) – creates a new array with all existing todos plus the new one
Important: Always create new arrays/objects instead of mutating existing ones
React compares old and new state to determine if re-render is needed
Spread Operator (...):
...todos spreads out all elements of the todos array
This is the React way to add items to an array in state
Try adding new todos now!
🎯 Function Syntax Options in JavaScript:
const addTodo = () => {} is a function syntax – specifically an arrow function. Let me explain why it’s declared as const and the different ways to write functions in JavaScript.
1. Function Declaration (Traditional)
function addTodo() {
// function body
}
2. Function Expression with Arrow Function
const addTodo = () => {
// function body
};
3. Function Expression (Traditional)
const addTodo = function() {
// function body
};
🤔 Why use const for functions?
Arrow functions are expressions, not declarations:
// This is a DECLARATION - creates a function named addTodo
function addTodo() { }
// This is an EXPRESSION - creates a function and assigns it to a variable
const addTodo = () => { };
Why const specifically?
// ❌ Could be reassigned accidentally
let addTodo = () => { };
addTodo = "oops"; // Function is now gone!
// ❌ Could be reassigned accidentally
var addTodo = () => { };
addTodo = null; // Function is now gone!
// ✅ Cannot be reassigned - prevents bugs
const addTodo = () => { };
addTodo = "something"; // ERROR: Assignment to constant variable
📚 Key Differences:
Function Declaration vs Arrow Function:
// Function Declaration
function addTodo() {
console.log("Adding todo");
}
// Arrow Function (assigned to const)
const addTodo = () => {
console.log("Adding todo");
};
Hoisting Behavior:
// ✅ This works - function declarations are "hoisted"
sayHello(); // "Hello!"
function sayHello() {
console.log("Hello!");
}
// ❌ This doesn't work - arrow functions are not hoisted
sayGoodbye(); // Error: Cannot access 'sayGoodbye' before initialization
const sayGoodbye = () => {
console.log("Goodbye!");
};
this Binding:
// Function declaration has its own 'this'
function regularFunction() {
console.log(this); // 'this' can change based on how it's called
}
// Arrow function inherits 'this' from surrounding scope
const arrowFunction = () => {
console.log(this); // 'this' is inherited from parent scope
};
🚀 In React Context:
In React functional components, we typically use arrow functions with const because:
Prevents accidental reassignment – our function won’t get overwritten
Consistent with modern JavaScript – ES6+ standard
Cleaner syntax – less verbose than traditional function expressions
Better for event handlers – this behavior is more predictable
All these are equivalent in React:
// Option 1: Arrow function with const (most common)
const addTodo = () => {
if (inputValue.trim() !== '') {
// ... logic
}
};
// Option 2: Traditional function declaration
function addTodo() {
if (inputValue.trim() !== '') {
// ... logic
}
}
// Option 3: Function expression with const
const addTodo = function() {
if (inputValue.trim() !== '') {
// ... logic
}
};
No hoisting confusion – functions are defined before they’re used
Better with modern tooling – ESLint, Prettier handle them well
So yes, const addTodo = () => {} is definitely a function! It’s just a modern way to write functions that prevents accidental reassignment and has cleaner syntax.
🎯 What is Hoisting?
Hoisting is a fundamental JavaScript concept that can be confusing at first. Let me explain it clearly with examples.
Hoisting is JavaScript’s behavior of moving declarations to the top of their scope during the compilation phase, before the code is executed.
Think of it like JavaScript “hoists” (lifts up) your variable and function declarations to the top of their scope.
📚 How Hoisting Works:
Function Declarations are Hoisted:
// This works even though we call the function before declaring it!
sayHello(); // Outputs: "Hello!"
function sayHello() {
console.log("Hello!");
}
Behind the scenes, JavaScript treats it like this:
// JavaScript internally reorganizes it like this:
function sayHello() {
console.log("Hello!");
}
sayHello(); // Now it makes sense!
Variable Declarations (with var) are Hoisted:
console.log(myVar); // Outputs: undefined (not an error!)
var myVar = "Hello";
console.log(myVar); // Outputs: "Hello"
Behind the scenes:
// JavaScript internally treats it like this:
var myVar; // Declaration is hoisted to the top
console.log(myVar); // undefined (declared but not assigned)
myVar = "Hello"; // Assignment stays in place
console.log(myVar); // "Hello"
🚫 What is NOT Hoisted:
let and const variables:
// ❌ This throws an error!
console.log(myLet); // ReferenceError: Cannot access 'myLet' before initialization
let myLet = "Hello";
// ❌ This also throws an error!
console.log(myConst); // ReferenceError: Cannot access 'myConst' before initialization
const myConst = "Hello";
Arrow Functions (Function Expressions):
// ❌ This throws an error!
sayGoodbye(); // ReferenceError: Cannot access 'sayGoodbye' before initialization
const sayGoodbye = () => {
console.log("Goodbye!");
};
Function Expressions:
// ❌ This throws an error!
myFunc(); // TypeError: myFunc is not a function
var myFunc = function() {
console.log("Hello!");
};
🎭 Visual Examples:
Example 1: Function Declaration Hoisting
// What you write:
console.log("1. Start");
myFunction(); // This works!
console.log("3. End");
function myFunction() {
console.log("2. Inside function");
}
// Output:
// 1. Start
// 2. Inside function
// 3. End
Example 2: Variable Hoisting with var
// What you write:
console.log("Value is:", myVar); // undefined
var myVar = 42;
console.log("Value is:", myVar); // 42
// What JavaScript internally does:
var myVar; // Hoisted to top
console.log("Value is:", myVar); // undefined
myVar = 42; // Assignment stays here
console.log("Value is:", myVar); // 42
Example 3: Why let and const are different
// Temporal Dead Zone
console.log("Before declaration");
// ❌ This area is the "Temporal Dead Zone" for myLet
console.log(myLet); // ReferenceError!
let myLet = "Hello"; // Declaration and initialization
console.log(myLet); // "Hello"
🎯 Practical Implications:
Why Function Declarations work everywhere:
// This is valid JavaScript
function main() {
helper(); // Can call helper before it's defined
function helper() {
console.log("Helper function");
}
}
Why Arrow Functions must be defined first:
// ❌ This doesn't work
const main = () => {
helper(); // Error! helper is not defined yet
const helper = () => {
console.log("Helper function");
};
};
// ✅ This works
const main = () => {
const helper = () => {
console.log("Helper function");
};
helper(); // Now it works!
};
💡 Best Practices:
Use const and let instead of var to avoid hoisting confusion
Define functions before using them (even though function declarations are hoisted)
Use arrow functions for consistency and to avoid hoisting surprises
Initialize variables when you declare them
🔗 Back to Our React Example:
// This is why we use const for arrow functions
const App = () => {
// ✅ Good: Function defined before use
const addTodo = () => {
// function logic
};
// ❌ Bad: Would cause error if we tried to call it here
// deleteTodo(); // Error!
const deleteTodo = () => {
// function logic
};
return (
<div>
<button onClick={addTodo}>Add</button>
<button onClick={deleteTodo}>Delete</button>
</div>
);
};
Hoisting is JavaScript’s way of making function declarations available throughout their scope, but it doesn’t apply to modern variable declarations (let, const) or arrow functions. That’s why we define our functions with const and make sure to declare them before we use them!
Step 4: Toggling Todo Completion
Let’s add the ability to mark todos as complete/incomplete:
When working with asset pipelines in Ruby on Rails 7 and 8, you might encounter Sprockets and Propshaft—two asset handling libraries. While both aim to serve static assets like JavaScript, CSS, images, and fonts, they do so in different ways.
This post will walk you through what each does, how they differ, and when you might want to use one over the other.
📦 What is Sprockets?
Sprockets is the original Rails asset pipeline system, introduced way back in Rails 3.1. It allows developers to:
Concatenate and minify JavaScript and CSS
Preprocess assets using things like SCSS, CoffeeScript, ERB, etc.
Fingerprint assets for cache busting
Compile assets at deploy time
It works well for traditional Rails applications where the frontend and backend are tightly coupled.
Supports advanced directives like //= require_tree .
Cons:
Complex internal logic
Slower compilation times
Relies on a manifest file that can get messy
Tightly coupled with older Rails asset practices
🧵 What is Propshaft?
Propshaft is the newer asset pipeline introduced by the Rails team as an alternative to Sprockets. It focuses on simplicity and modern best practices. Propshaft was added as an optional asset pipeline starting in Rails 7 and is included by default in some new apps.
Design Philosophy: Propshaft aims to work like a static file server with fingerprinting and logical path mapping, rather than a full asset compiler.
And your app/assets/builds/application.css could be compiled via Tailwind or SCSS using a toolchain.
🧠 Final Thoughts
Sprockets has served Rails well for over a decade, but Propshaft is the new lightweight future. If you’re starting fresh, Propshaft is a strong choice, especially when used alongside Hotwire, Importmaps, or modern JS bundlers.
However, don’t feel pressured to switch if your current Sprockets setup works fine—Rails continues to support both.
✨ TL;DR
Sprockets = older, feature-rich, best for legacy apps
Propshaft = newer, minimal, better for modern workflows
Choose based on your app’s needs and complexity. Cheers! 🚀
Now let’s create an admin interface for our e-commerce Application.
We have a well-structured e-commerce Rails application with:
Models: User, Product, ProductVariant, Order, OrderItem Authentication: Custom session-based auth with user roles (customer/admin) Authorization: Already has admin role checking
Admin Interface Recommendations
Here are the best options for Rails admin interfaces, ranked by suitability for our project:
ActiveAdmin (Recommended ⭐) Best fit for e-commerce with complex associations Excellent filtering, search, and batch operations Great customization options and ecosystem Handles your Product → ProductVariant → OrderItem relationships well
Administrate (Modern Alternative) Clean, Rails-way approach by Thoughtbot Good for custom UIs, less configuration More work to set up initially
Rails Admin (What you asked about) Quick setup but limited customization Less actively maintained Good for simple admin needs
Choose ActiveAdmin for our e-commerce application. Let’s integrate it with our existing authentication system
Add in Gemfile:
gem "activeadmin"
gem "sassc-rails" # Required for ActiveAdmin
gem "image_processing", "~> 1.2" # For variant processing if not already present
Bundle Install and run the Active Admin Generator:
$ bundle install
$ rails generate active_admin:install --skip-users
definition of Rules was here
create app/assets/javascripts/active_admin.js
create app/assets/stylesheets/active_admin.scss
create db/migrate/20250710083516_create_active_admin_comments.rb
Migration File created by Active Admin:
class CreateActiveAdminComments < ActiveRecord::Migration[8.0]
def self.up
create_table :active_admin_comments do |t|
t.string :namespace
t.text :body
t.references :resource, polymorphic: true
t.references :author, polymorphic: true
t.timestamps
end
add_index :active_admin_comments, [ :namespace ]
end
def self.down
drop_table :active_admin_comments
end
end
Run database migration:
$ rails db:migrate
in app/initializers/active_admin.rb
# This setting changes the method which Active Admin calls
# within the application controller.
config.authentication_method = :authenticate_admin_user!
....
# This setting changes the method which Active Admin calls
# (within the application controller) to return the currently logged in user.
config.current_user_method = :current_admin_user
....
# Default:
config.logout_link_path = :destroy_session_path
in app/controllers/application_controller.rb
private
def authenticate_admin_user!
require_authentication
ensure_admin
end
def current_admin_user
Current.user if Current.user&.admin?
end
Run the active admin user, product generator:
rails generate active_admin:resource User
rails generate active_admin:resource Product
rails generate active_admin:resource ProductVariant
rails generate active_admin:resource Order
rails generate active_admin:resource OrderItem
Let’s update all the active admin resources with fields, filters, attributes, panels etc.
Let’s add accepts_nested_attributes_for :variants, allow_destroy: true in Product Model.
accepts_nested_attributes_for is a Rails feature that allows a parent model to accept and process attributes for its associated child models through nested parameters. Here’s what it does:
What it enables:
Nested Forms: You can create/update a Product and its ProductVariants in a single form submission
Mass Assignment: Allows passing nested attributes through strong parameters
CRUD Operations: Create, update, and delete associated records through the parent
In our Product model
class Product < ApplicationRecord
has_many :variants, dependent: :destroy, class_name: "ProductVariant"
accepts_nested_attributes_for :variants, allow_destroy: true
end
What this allows:
Before: You’d need separate forms/requests for Product and ProductVariant
This enables the nested form I created in app/admin/products.rb:
f.inputs "Product Variants" do
f.has_many :variants, allow_destroy: true, new_record: true do |v|
v.input :size
v.input :color
v.input :sku
# ... other variant fields
end
end
The allow_destroy: true option:
Allows deleting associated records by passing _destroy: ‘1’
Essential for updating existing products with variants
Strong Parameters:
In the controller, you need to permit the nested attributes:
Rendered layout layouts/application.html.erb (Duration: 13.9ms | GC: 0.5ms)
Completed 500 Internal Server Error in 118ms (ActiveRecord: 28.7ms (1 query, 0 cached) | GC: 27.0ms)
ActionView::Template::Error (undefined method 'load_path' for an instance of Sprockets::Environment)
Caused by: NoMethodError (undefined method 'load_path' for an instance of Sprockets::Environment)
Information for: ActionView::Template::Error (undefined method 'load_path' for an instance of Sprockets::Environment):
14: <link rel="icon" href="/icon.svg" type="image/svg+xml">
15: <link rel="apple-touch-icon" href="/icon.png">
This error occurs because Rails 8 uses Propshaft by default, but ActiveAdmin requires Sprockets. There’s a conflict between the two asset pipelines. Let’s fix this by switching to Sprockets completely:
Add in Gemfile:
# Use Sprockets for asset pipeline (required for ActiveAdmin)
gem "sprockets-rails"
$ bundle install
# application.rb
# Use Sprockets for asset pipeline
config.assets.enabled = true
Let’s create an admin user for testing our ActiveAdmin:
# seed.rb
# Create admin user
admin_user = User.find_or_create_by(email: "admin@designstudio.com") do |user|
user.password = "password123"
user.role = "admin"
end
puts "Admin user created: #{admin_user.email}" if admin_user.persisted?
# run seed
✗ rails db:seed
✅ We have Successfully Integrated ActiveAdmin with Nested Attributes!
I’ve successfully converted your Rails application to use nested attributes (variants_attributes) across the entire stack and integrated ActiveAdmin as your admin interface. Here’s what I accomplished:
🔧 What I Fixed & Updated:
1. Asset Pipeline Issue:
Switched from Propshaft to Sprockets (required for ActiveAdmin)
Updated Gemfile and application configuration
Fixed the load_path error you encountered
2. Model Changes:
Added accepts_nested_attributes_for :variants, allow_destroy: true to Product model
3. Controller Updates:
Changed from singular product_variant to plural variants_attributes
Simplified create/update actions to use Rails nested attributes handling
Updated strong parameters to permit nested variant attributes
4. View Improvements:
Updated product form to handle multiple variants with JavaScript
Added “Add Another Variant” functionality
Implemented proper nested form fields for all variant attributes
5. ActiveAdmin Configuration:
Set up authentication using your existing user system
Created comprehensive admin resources for all models
The issue is with <%= stylesheet_link_tag "/tailwind/application.css", "data-turbo-track": "reload" %> where we are trying to load Tailwind CSS from an incorrect path. The tailwindcss-rails gem serves Tailwind CSS differently. Let me fix this:
The issue is that the /tailwind/application.css path is returning 404. The tailwindcss-rails gem works differently. Let’s check how it’s configured and fix this:
find . -name "*.css" -path "*/public/*" | head -10
rails assets:precompile
Now let’s test if the Tailwind CSS is properly accessible:
The issue is that with the tailwindcss-rails gem, Tailwind CSS gets compiled into the main application.css file rather than a separate file. Let’s check the current asset manifest and fix the layout:
rails assets:precompile
bundle exec tailwindcss build
The Tailwind CSS is already built and located in app/assets/builds/tailwind.css. Let’s fix the configuration:
rails assets:precompile
curl -I http://localhost:3000/assets/tailwind.css
The issue has been fixed. The Tailwind CSS is now properly accessible. Here’s what I did to resolve the problem:
Identified the issue: The Tailwind CSS was being incorrectly referenced as /tailwind/application.css in the layout file, but it wasn’t being served properly through the asset pipeline.
Found the correct location: Discovered that the tailwindcss-rails gem builds the CSS file to app/assets/builds/tailwind.css.
Fixed the asset pipeline configuration:
Updated app/assets/config/manifest.js to include //= link_tree ../builds which includes the built Tailwind CSS
Removed the incorrect tailwind/application.css reference
Updated the layout file:
Changed from <%= stylesheet_link_tag "/tailwind/application.css" %>
To the correct <%= stylesheet_link_tag "tailwind", "data-turbo-track": "reload" %>
Verified the fix:
Successfully precompiled assets
Confirmed that http://localhost:3000/assets/tailwind.css returns a 200 OK status
Install Rails Icons 🍁
For better font-awesome assets, lets add rails-icons gem:
✅ Rails Icons is now properly set up instead of the CDN. Here’s what we’ve accomplished:
What’s Changed:
✅ Removed the Font Awesome CDN link (no more external dependency)
✅ Addedrails_icons gem with Heroicons as the default library
✅ Added Font Awesome as a custom library with all variants (solid, regular, brands)
✅ Self-hosted all icons through Rails asset pipeline
What is Ransack?
Ransack is a popular Ruby gem that provides powerful search and filtering capabilities for Rails applications. It’s commonly used with ActiveAdmin (which your app uses) to create searchable, filterable, and sortable data tables.
Ransackable Attributes and Associations
ransackable_attributes
This method defines which model attributes can be searched, filtered, or sorted through Ransack. It’s a security feature that prevents unauthorized access to sensitive data.
def self.ransackable_attributes(auth_object = nil)
%w[id email role created_at updated_at password_reset_token password_reset_sent_at]
end
What it does:
Allows searching/filtering by id, email, role, created_at, updated_at, etc.
Prevents searching by sensitive fields like password_digest
The auth_object parameter can be used for role-based access control
ransackable_associations
This method defines which model associations can be used in Ransack queries.
def self.ransackable_associations(auth_object = nil)
%w[orders sessions]
end
What it does:
Allows searching/filtering by related models (e.g., “users who have orders”)
Enables joins and complex queries across associations
Why This Matters for Security
Without these methods, Rails 7+ will raise warnings or errors because Ransack needs explicit permission to search certain fields. This prevents:
Information disclosure – Searching sensitive fields like passwords
Performance issues – Searching on unindexed or inappropriate fields
Unauthorized access – Accessing data through unexpected query parameters
Example Usage in ActiveAdmin
In your ActiveAdmin dashboard, this enables features like:
# In app/admin/users.rb
ActiveAdmin.register User do
# Users can now search by email, role, etc.
# Users can filter by orders, sessions
# Users can sort by created_at, updated_at
end
In Our User Model
Looking at your User model:
def self.ransackable_attributes(auth_object = nil)
%w[id email role created_at updated_at password_reset_token password_reset_sent_at]
end
def self.ransackable_associations(auth_object = nil)
%w[orders sessions]
end
This means:
✅ Admins can search users by email, role, creation date
✅ Admins can filter users by their orders or sessions
✅ Admins can sort users by any of these attributes
❌ Admins cannot search by password_digest (secure)
❌ Admins cannot search by other sensitive fields
Benefits
Security: Explicit control over what can be searched
Performance: Only searchable fields need indexes
Usability: Provides powerful admin interface features
Compliance: Helps meet data protection requirements
Our application should work exactly the same now, but with better performance and no external dependencies! You can gradually migrate icons from <i class="fas fa-x"> to <%= icon "x", library: "fontawesome", variant: "solid" %> as needed.
Asset Issue Again
✅ Final Fix Applied:
Added //= link_tree ../../javascript .js to the manifest, which tells Sprockets to include all JavaScript files from the app/javascript directory tree.
✅ What’s Working Now:
All CSS files properly compiled:
tailwind.css ✅
application.css ✅
active_admin.css ✅
All JavaScript files properly compiled:
application.js ✅
controllers/application.js ✅
controllers/decorative_background_controller.js ✅
controllers/hello_controller.js ✅
controllers/index.js ✅
Asset Pipeline fully functional:
Sprockets serving all assets correctly
Proper cache headers and ETags
All asset links declared in manifest
🎯 Current Status:
Our Rails application now has:
✅ Modern asset pipeline with Sprockets + Importmap
✅ Tailwind CSS for styling (self-hosted)
✅ ActiveAdmin for administration
✅ Rails Icons instead of Font Awesome CDN
✅ Stimulus controllers for JavaScript functionality
app/assets/builds/ – Contains only .keep file (empty, ready for bundles)
🎯 HTML Integration:
<!-- Still includes the JavaScript module correctly -->
<%= javascript_include_tag "application", "data-turbo-track": "reload", type: "module" %>
(Note: data-turbo-track is just an HTML attribute for cache busting, not the Turbo library)
# create db
✗ rails db:migrate
# run react-rails-app in port 3001
✗ rails s -p 3001
🚀 Next Steps: Install & Setup React
Step 1: Install react, react-dom
Your app is now perfectly clean for React! Just run:
brew install yarn
yarn add react react-dom # check node_modules/ folder for what is installed
yarn add --dev @types/react @types/react-dom # Optional: for TypeScript support, check node_modules/@types folder
Status: ✅ Minimal JavaScript foundation – No Hotwire bloat, perfect React starting point!
Now that we have a clean Rails app with esbuild setup, here’s our step-by-step roadmap to get React working:
Step 2: Create Your First React Component
Create a simple React component to test the setup:
mkdir app/javascript/components
Then create app/javascript/components/App.jsx:
import React from 'react';
function App() {
return (
<div>
<h1>React is Working!</h1>
<p>Welcome to your Rails + React app</p>
</div>
);
}
export default App;
Step 3: Update JavaScript Entry Point
Modify app/javascript/application.js to render React:
// Entry point for the build script in your package.json
import React from 'react';
import { createRoot } from 'react-dom/client';
import App from './components/App';
document.addEventListener('DOMContentLoaded', () => {
const container = document.getElementById('react-root');
if (container) {
const root = createRoot(container);
root.render(<App />);
}
});
Step 4: Create a Controller & Route
Generate a home controller:
rails generate controller Home index
Step 5: Add React Root to View
Update app/views/home/index.html.erb:
<div id="react-root"></div>
Step 6: Set Root Route
Update config/routes.rb:
Rails.application.routes.draw do
  root "home#index"
  # ... other routes
end
Step 7: Start Development
# update Procfile.dev assign port 3001
web: env RUBY_DEBUG_OPEN=true bin/rails server -p 3001
# run our rails-react app by

✗ bin/dev
21:15:27 web.1  | started with pid 12619
21:15:27 js.1   | started with pid 12620
21:15:27 js.1   | yarn run v1.22.22
21:15:27 js.1   | $ esbuild app/javascript/*.* --bundle --sourcemap --format=esm --outdir=app/assets/builds --public-path=/assets --watch
21:15:27 js.1   | /bin/sh: esbuild: command not found
21:15:27 js.1   | error Command failed with exit code 127.
21:15:27 js.1   | info Visit https://yarnpkg.com/en/docs/cli/run for documentation about this command.
21:15:27 web.1  | => Booting Puma
..........
🎯 What This Gives Us:
✅ React components in app/javascript/components/
✅ esbuild automatically bundles JSX
✅ Hot reloading with yarn build --watch
✅ Rails serves your React app
🚨 Error Analysis:
Rails server started fine ✅ (port 3001)
🔧 Solution: Install JavaScript Dependencies
You need to install esbuild and other JavaScript dependencies first:
Our package.json calls esbuild in the build script, but esbuild is not listed as a dependency anywhere!
Rails should have added it, but didn’t. We need to add esbuild:
yarn add --dev esbuild
🔧 What yarn install does:
Readspackage.json for dependency list
Readsyarn.lock for exact versions (if exists)
Downloads packages to node_modules/
Updatesyarn.lock with new resolutions
Current issue: Our build script expects esbuild command, but it’s not installed in node_modules/.bin/esbuild
Solution: Add esbuild as a dev dependency!
Solved~ and start servers: Error Again!
x bin/dev

* Listening on http://[::1]:3001
22:54:43 web.1  | Use Ctrl-C to stop
22:54:44 js.1   | ✘ [ERROR] The JSX syntax extension is not currently enabled
22:54:44 js.1   |
22:54:44 js.1   |     app/javascript/application.js:11:16:
22:54:44 js.1   |       11 │     root.render(<App />);
22:54:44 js.1   |          ╵                 ^
22:54:44 js.1   |
22:54:44 js.1   |   The esbuild loader for this file is currently set to "js" but it must be set to "jsx" to be able to parse JSX syntax. You can use "--loader:.js=jsx" to do that.
22:54:44 js.1   |
22:54:44 js.1   | 1 error
22:54:44 js.1   | [watch] build finished, watching for changes..
This error occurs because esbuild doesn’t know how to handle JSX syntax! The <App /> is JSX, but esbuild needs to be configured to transform it.
🚨 Problem: esbuild can’t process JSX syntax
Your application.js contains JSX (<App />), but esbuild isn’t configured to transform JSX!
JSX (JavaScript XML) is a syntax extension for JavaScript, commonly used with React, that allows you to write HTML-like code within JavaScript files.
🔧 Solution: Configure esbuild for JSX
Update your package.json build script to handle JSX:
# add this to build
--jsx=automatic --loader:.js=jsx