Rails Encrypted Credentials: The Git Diff Feature You May Have Been Using Without Knowing

If you have been developing Rails applications for years, there’s a good chance you’ve used:

bin/rails credentials:edit

hundreds of times.

You probably know that Rails stores encrypted credentials in:

config/credentials.yml.enc

and keeps the encryption key separately in:

config/master.key

But did you know that Rails can make:

git diff

show the decrypted, human-readable changes to credentials.yml.enc?

I recently discovered this while working on a Rails 8.1.3.1 application and it was one of those:

“I’ve been using Rails every day for years, and I didn’t know Rails could do this!”

moments.

Let’s see how it works.


First: What is credentials.yml.enc?

Rails encrypted credentials allow us to keep secrets such as:

openai:
  api_key: ...

or:

aws:
  access_key_id: ...
  secret_access_key: ...

inside:

config/credentials.yml.enc

The file is encrypted.

The encryption key is stored separately in:

config/master.key

Rails documentation explicitly states that the encrypted credentials file can be stored in version control as long as the master key remains secure. (Ruby on Rails Guides)

So our repository can contain:

config/
├── credentials.yml.enc ← encrypted, safe to commit
└── master.key ← secret, NEVER commit

Editing Rails Credentials

Normally we edit credentials with:

bin/rails credentials:edit

Rails decrypts the credentials, opens them in your configured editor, and encrypts them again when you save.

Conceptually:

credentials.yml.enc
        │
        │ decrypt
        ▼
   Plain YAML
        │
        │ edit
        ▼
   Plain YAML
        │
        │ encrypt
        ▼
credentials.yml.enc

The plaintext credentials aren’t saved as a normal file.

But What Happens With git diff?

Here’s the interesting part.

If Git simply compared the encrypted files, we’d get something useless:

- 3d9Jx8...random-encrypted-data...
+ 7kP2mL...different-encrypted-data...

We wouldn’t know:

  • Which credential changed?
  • Was a key added?
  • Was a key removed?
  • Did the API key change?
  • Did somebody accidentally modify something?

This is where Rails’ credentials diff integration becomes useful.

Rails + Git textconv

Rails can configure Git to use a special diff driver:

[diff "rails_credentials"]
textconv = bin/rails credentials:diff

In my Rails 8.1 application, I found exactly this in:

.git/config

Git therefore doesn’t simply compare the encrypted contents.

Instead:

git diff
    │
    ▼
Git sees credentials.yml.enc
    │
    ▼
rails_credentials diff driver
    │
    ▼
bin/rails credentials:diff
    │
    ▼
Rails decrypts the credentials
    │
    ▼
Git displays a readable diff

Git itself doesn’t understand Rails encryption.

Rails is providing the text conversion command. Git simply knows how to invoke it.

See It Yourself

Suppose our credentials originally contain:

openai:
api_key: OLD_KEY

We change it to:

openai:
api_key: NEW_KEY

Now:

git diff

can show a useful diff such as:

+
+openai:
+ api_key: 'sdsdssdsdsdwewewddvcfgfgth'

That’s much more useful than comparing encrypted bytes.

The Experiment That Makes This Obvious

This is what made the behavior click for me.

Run:

git diff -- config/credentials.yml.enc

You get the human-readable credentials diff.

Now bypass Git’s text conversion:

git diff --no-textconv -- config/credentials.yml.enc

Now you see the encrypted content.

Something like:

3d9Jx8...encrypted-data...

That’s the proof.

The file itself is still encrypted.

It’s only the diff representation that’s being transformed.

So What Exactly Does Git Know?

Git doesn’t know anything about:

Rails
credentials
master.key
AES
encryption
decryption

Git knows:

diff driver
textconv

Rails configures:

rails_credentials

and tells Git:

When displaying a diff for this file,
run:
bin/rails credentials:diff

That’s a very nice example of two independent tools cooperating:

             Rails
               │
               │ provides
               ▼
       credentials:diff
               │
               ▼
             Git
               │
               │ uses
               ▼
           textconv

How Does Rails Configure It?

Rails provides:

bin/rails credentials:diff --enroll

This enrolls the project in credentials diffing.

The Git attributes include:

config/credentials/*.yml.enc diff=rails_credentials
config/credentials.yml.enc diff=rails_credentials

Rails then ensures the Git diff driver is configured to use:

bin/rails credentials:diff

Rails’ application generator includes this credentials diff enrollment as part of application setup and Rails 7.0 already contained the credentials diffing implementation. (Gem)

So this isn’t actually an 8.1-only feature.

That’s an important distinction.

Is This New in Rails 8.1?

No – and this is an important correction.

The encrypted credentials diff functionality existed before Rails 8.1.

For example, Rails 7.0 already had the credentials:diff implementation, and Rails 7.2’s application generator also enrolled projects in credentials diffing. (Gem)

Rails has supported decrypted Git diffs for encrypted credentials for several versions and Rails 8.x continues to build on the credentials tooling.

Rails 8.1 does introduce other useful credentials functionality. For example, Rails 8.1 added command-line credential fetching, which can be useful for deployment tooling such as Kamal. (Ruby on Rails Guides)

Does This Make My Secrets Unsafe?

No – provided you protect the master key.

The important distinction is:

Git repository
│
├── credentials.yml.enc
│       ↓
│   encrypted
│
└── master.key
        ↓
     SECRET

The encrypted file can be committed.

The master key should not be committed. Rails’ security guide explicitly recommends keeping the master key safe and out of version control. (Ruby on Rails Guides)

One Thing to Remember

The decrypted content can appear in your local terminal output.

For example:

git diff

could display:

+
+openai:
+  api_key: 'sdsdssdsdsdwewewddvcfgfgth'

So don’t casually share terminal screenshots containing credential diffs.

Also be careful when copying terminal output into:

  • Slack
  • GitHub issues
  • Pull requests
  • screenshots
  • blog posts
  • AI assistants

NOTE: The encryption protects the file stored in Git, but a decrypted diff is plaintext.

Rails Developer Takeaway

There are three different things here:

1. Encrypted file

config/credentials.yml.enc

This is what is actually stored in Git.

2. Encryption key

config/master.key

This decrypts the credentials and must remain secret.

3. Git diff representation

bin/rails credentials:diff

This is what allows us to see meaningful changes locally.

So:

                 GitHub
                   │
                   │ encrypted
                   ▼
       credentials.yml.enc
                   ▲
                   │
             master.key
             stays secret


Local git diff:

credentials.yml.enc
        │
        ▼
credentials:diff
        │
        ▼
decrypted representation
        │
        ▼
human-readable diff

Try This Yourself

If you’re working on a Rails application, check:

git config --show-origin --get-regexp 'diff|textconv|filter'

You may find:

file:.git/config diff.rails_credentials.textconv bin/rails credentials:diff

Then:

git diff --no-textconv -- config/credentials.yml.enc

Compare that with:

git diff -- config/credentials.yml.enc

The difference is a great way to understand what’s really happening.

Quick Reference

# Edit credentials
bin/rails credentials:edit

# Enroll project in credential diffing
bin/rails credentials:diff --enroll

# Normal readable diff
git diff

# Show the actual encrypted file diff
git diff --no-textconv -- config/credentials.yml.enc

# Inspect Git's configuration
git config --show-origin --get-regexp 'diff|textconv|filter'

# Check Git attributes
git check-attr diff -- config/credentials.yml.enc

Security rule:

 Y config/credentials.yml.enc → commit it
 X config/master.key          → NEVER commit it


Rails’ official security guide confirms that encrypted credentials can be stored in version control while the master key must remain protected. (Ruby on Rails Guides)

📚 References

Happy Coding!

Ruby’s Mysterious Symbols: The Syntax Every Ruby Developer Should Truly Understand

Ruby is famous for making code expressive.

But that expressiveness comes with a side effect: Ruby contains quite a few symbols and syntax constructs that can look almost cryptic – even to experienced developers coming from other languages.

Consider this:

message = <<~TEXT
  Hello #{user.name},

  Your order has been shipped.

  Thanks!
TEXT

What exactly does <<~TEXT mean?

Or:

users.filter_map { _1.email if _1.active? }

What is _1?

Or:

case response
in { status: 200, body: String => body }
  puts body
end

Why does Ruby allow String =>>>> body inside a pattern?

These aren’t random pieces of syntax. They are examples of Ruby’s philosophy: make common programming operations concise without sacrificing readability.

This article explores some of Ruby 3.4’s most interesting “mysterious” syntax and more importantly explains what each construct means, why it exists, and when a senior developer should use it – or avoid it.


1. <<~ – The Squiggly Heredoc

Let’s start with one of the most useful Ruby syntax features.

message = <<~TEXT
  Hello World
    This is Ruby
  Goodbye
TEXT

The <<~ syntax is called a squiggly heredoc.

What is a heredoc?

A heredoc allows you to define a multiline string:

message = <<TEXT
Hello
World
TEXT

Ruby keeps the newlines inside the string.

The problem is indentation.

In real Ruby code, especially Rails applications, multiline strings are usually nested inside methods, classes, conditionals, etc.

Without squiggly heredoc:

def email_body
  <<TEXT
Hello,
Welcome to our application.
Thank you.
TEXT
end

The heredoc terminator often needs awkward indentation.

<<~ solves that

def email_body
  <<~TEXT
    Hello,
    Welcome to our application.
    Thank you.
  TEXT
end

Ruby removes the common leading indentation.

Conceptually:

source indentation
        ↓
    Hello
    Welcome
    Thank you

becomes:

Hello
Welcome
Thank you

Why is this useful in Rails?

Extremely useful for SQL:

sql = <<~SQL
  SELECT users.*
  FROM users
  INNER JOIN orders ON orders.user_id = users.id
  WHERE users.active = TRUE
SQL

Or HTML:

html = <<~HTML
  <div class="user">
    <h2>#{user.name}</h2>
  </div>
HTML

Or shell commands:

command = <<~BASH
  echo "Starting deployment"
  bundle exec rails db:migrate
  echo "Deployment complete"
BASH

The senior-level takeaway

<<~ isn’t merely a formatting convenience.

It lets the Ruby source code remain properly indented without contaminating the resulting string with that indentation.


2. <<- vs <<~ vs <<

Ruby actually has several heredoc variants.

<<TEXT
...
TEXT

Strict terminator placement.

<<-TEXT
...
  TEXT

Allows the terminator to be indented.

<<~TEXT
...
  TEXT

Allows indentation and removes common indentation from the resulting string.

So in modern Ruby code, <<~ is generally the most readable choice for indented multiline strings.

Read more here: https://railsdrop.com/ruby-more-about-ruby-hearedoc-questions-and-answers/


3. %i[...] – Creating Arrays of Symbols

This:

%i[admin editor viewer]

creates:

[:admin, :editor, :viewer]

Similarly:

%w[admin editor viewer]

creates:

["admin", "editor", "viewer"]

The % syntax is Ruby’s percent literal syntax.

Common forms

%w[one two three]     # strings
%i[one two three]     # symbols
%W[hello #{name}]     # interpolated strings
%I[hello #{name}]     # interpolated symbols

This:

%i[read write delete]

is often cleaner than:

[:read, :write, :delete]

Especially when the list becomes long:

ALLOWED_ROLES = %i[
  admin
  manager
  editor
  viewer
].freeze

Read more here: https://railsdrop.com/ruby-more-about-rubys-percent-literal-syntax/


4. &. – The Safe Navigation Operator

One of the most recognizable Ruby operators:

user&.profile&.address&.city

It means:

Call the next method only if the receiver isn’t nil.

Instead of:

if user
  if user.profile
    if user.profile.address
      user.profile.address.city
    end
  end
end

Ruby lets you write:

user&.profile&.address&.city

But don’t blindly use it

This is an important senior-level distinction.

If the business logic says:

A user must have a profile.

then this:

user&.profile&.address

may hide a data integrity problem.

Sometimes you actually want:

user.profile.address

so that invalid state fails loudly.

Good use

Optional data:

current_user&.avatar&.url

Potentially bad use

Required relationships:

order&.customer&.account&.billing_address

If all those associations are supposed to exist, safe navigation may simply hide broken application state.

Use &. when nil is genuinely expected – not merely because it prevents exceptions.


5. &:method – Symbol-to-Proc Conversion

You’ve probably seen:

users.map(&:email)

It looks strange initially.

It’s effectively shorthand for:

users.map { |user| user.email }

Ruby converts:

:email

into a callable block using &.

So:

users.map(&:email)

is approximately:

users.map { |user| user.email }

Another example

numbers.select(&:even?)

is equivalent to:

numbers.select { |number| number.even? }

Important distinction

These are not the same:

users.map(:email)

and:

users.map(&:email)

The & tells Ruby:

Convert this object into a Proc and pass it as the block.


6. _1, _2, _3 – Numbered Parameters

Modern Ruby provides implicit block parameters.

Instead of:

users.map { |user| user.email }

you can write:

users.map { _1.email }

_1 means:

The first block argument.

Similarly:

array.map { |value, index| ... }

can conceptually be accessed using:

_1
_2

For example:

[10, 20, 30].map { _1 * 2 }

produces:

[20, 40, 60]

Where it works well

Small transformations:

users.map { _1.email }
orders.select { _1.total >> 1000 }
names.map { _1.upcase }

Where it becomes bad

Complex blocks:

users.map { _1.orders.select { _2.paid? }.map { _1.total } }

At this point, explicit names are much easier to understand.

users.map do |user|
user.orders.select { |order| order.paid? }
.map { |order| order.total }
end

Senior Ruby code optimizes for comprehension, not character count.


7. ... – The Argument Forwarding Operator

Ruby’s ... is particularly useful when wrapping methods.

Consider:

def log(*args, **kwargs, &block)
puts "Calling method"
super
end

Modern Ruby allows forwarding arguments directly:

def log(...)
puts "Calling method"
super
end

The ... means:

Forward all positional arguments, keyword arguments, and the block.

For example:

def instrument(...)
  start = Process.clock_gettime(Process::CLOCK_MONOTONIC)

  result = super

  duration = Process.clock_gettime(Process::CLOCK_MONOTONIC) - start
  puts "Took #{duration}s"

  result
end

This is particularly valuable for decorators, wrappers, instrumentation and delegation.


8. * – The Splat Operator

Ruby’s * has several important meanings.

Array expansion

numbers = [1, 2, 3]
puts(*numbers)

is effectively:

puts(1, 2, 3)

Collecting arguments

def sum(*numbers)
numbers.sum
end

Now:

sum(1, 2, 3, 4)

works because numbers becomes:

[1, 2, 3, 4]

Array destructuring

first, *middle, last = [1, 2, 3, 4, 5]

results in:

first # 1
middle # [2, 3, 4]
last # 5

This makes * one of Ruby’s most versatile operators.


9. ** – Keyword Argument Splat

The double splat is the keyword-argument equivalent.

options = {
timeout: 10,
retries: 3
}
client.call(**options)

This expands the hash into keyword arguments.

And:

def connect(**options)
options
end

collects arbitrary keyword arguments.

connect(timeout: 10, retries: 3)

gives:

{
timeout: 10,
retries: 3
}

This becomes particularly important when building APIs, service objects and forwarding methods in modern Ruby.


10. =>>>> Is More Than Hash Syntax

Most Ruby developers first encounter:

{ name: "Abhilash" }

But =>>>> has several meanings.

Hash rockets

{ "name" =>> "Abhilash" }

Pattern matching

Ruby pattern matching also uses =>>>>.

case response
in { status: 200, body: String =>> body }
puts body
end

Here:

String =>> body

means roughly:

Match a String and bind the matched value to body.

This is part of Ruby’s increasingly powerful pattern matching system.


11. Ruby Pattern Matching with in

Ruby’s case statement can do structural matching.

case user
in { name:, role: "admin" }
  puts "#{name} is an admin"
else
  puts "Not an admin"
end

The pattern:

{ name:, role: "admin" }

means:

  • the object should have a name
  • role must equal "admin"
  • bind the name value to the local variable name

This is considerably more powerful than a traditional case comparison.

Array patterns

case coordinates
in [x, y]
  puts "Point: #{x}, #{y}"
end

Why senior developers should care

Pattern matching becomes useful when processing:

  • API responses
  • parsed JSON
  • AST structures
  • event payloads
  • command results
  • structured domain objects

Instead of writing nested conditionals, you can express the expected structure directly.


12. in vs if

Traditional Ruby:

if response.is_a?(Hash) &&
   response[:status] == 200
  ...
end

Pattern matching:

case response
in { status: 200 }
  ...
end

The second version communicates the shape of the data rather than manually checking each property.

That is the deeper value of pattern matching.


13. | – Destructuring and Pattern Alternatives

Ruby’s | isn’t only the bitwise OR operator.

In pattern matching:

case value
in 1 | 2 | 3
puts "Small number"
end

means:

Match 1 OR 2 OR 3.

This makes pattern matching expressive:

case status
in 200 | 201 | 204
puts "Success"
in 400 | 401 | 403
puts "Client error"
end

14. =>>>> in Pattern Matching Can Bind Values

Consider:

case result
in Integer =>> value
puts value
end

This performs a type match and binds the value.

For example:

result = 42

matches:

Integer =>> value

and:

value
# =>> 42

This becomes powerful when patterns become more complex.


15. ... in Ranges

Ruby’s range syntax has two forms:

1..10

and:

1...10

The difference:

1..10

includes 10.

1...10

excludes 10.

Therefore:

(1..10).to_a

gives:

[1,2,3,4,5,6,7,8,9,10]

while:

(1...10).to_a

gives:

[1,2,3,4,5,6,7,8,9]

This is especially useful for array slicing:

numbers[0...3]

returns the first three elements.


16. .. Can Be Used in Conditions

Ruby has another interesting use of ranges.

case number
when 1..10
  puts "Small"
when 11..100
  puts "Medium"
end

This is one reason Ruby ranges are more than simply “start/end values.”


17. =>>>> vs : in Hashes

These are both valid:

{ name: "Ruby" }

and:

{ :name =>> "Ruby" }

But modern Ruby generally prefers:

{ name: "Ruby" }

The hash rocket remains useful when keys aren’t symbols:

{
"Content-Type" =>> "application/json",
"X-Request-ID" =>> request_id
}

This is a good example of Ruby syntax evolving toward readability while retaining backwards compatibility.


18. ? and ! Are Part of Ruby’s API Design

Ruby method names can end with ?:

user.active?

This convention means:

The method answers a yes/no question.

Examples:

empty?
nil?
valid?
persisted?
published?

The ! convention usually communicates:

This method performs a more dangerous, mutating, or exceptional version of an operation.

Examples:

save!
update!
destroy!
compact!

But an important senior-level detail:

Ruby does not enforce the semantic meaning of !.

You can technically write:

def hello!
"hello"
end

The meaning is a convention established by Ruby developers.


19. :: – Constant Lookup and Method Calls

Most developers know:

User::NAME

But :: can also invoke methods:

object::method

although the . form is overwhelmingly more idiomatic for method calls.

The primary modern use is constant/module navigation:

ActiveRecord::Base
Rails::Application
JSON::ParserError

It communicates namespace traversal.


20. @, @@ and $

Ruby has several variable scopes represented visually.

Local variable

name = "Ruby"

Instance variable

@name = "Ruby"

belongs to an object instance.

Class variable

@@name = "Ruby"

is shared across a class hierarchy.

Global variable

$name = "Ruby"

is globally accessible.

From a senior Rails perspective:

Prefer local and instance variables. Be extremely cautious with class variables and globals.

For example, Rails applications rarely need:

@@configuration

or:

$global_state

because they introduce difficult-to-control shared state.


21. ||= – Lazy Initialization

This is everywhere in Ruby:

@client ||= Client.new

It means roughly:

@client = @client || Client.new

If @client is already truthy, Ruby keeps it.

Otherwise, it creates the object.

This is commonly used for memoization:

def expensive_service
@expensive_service ||= ExpensiveService.new
end

But remember

||= checks truthiness, not whether the variable has ever been assigned.

So if:

@value = false

then:

@value ||= calculate_value

will call calculate_value.

That distinction matters when memoizing boolean values.


22. &&= and ||= Are Assignment Operators

Ruby also supports:

value &&= other

and:

value ||= other

For example:

user.active &&= user.verified?

means approximately:

user.active = user.active && user.verified?

These are concise, but they should be used only when the resulting expression remains obvious.


23. +=, -=, *=, /=

Ruby supports compound assignment:

counter += 1

Conceptually:

counter = counter + 1

For object attributes:

user.score += 10

is conceptually equivalent to:

user.score = user.score + 10

Ruby’s expressive assignment syntax is one of the reasons its code can remain compact without introducing a separate statement syntax.


24. defined? – Ask Ruby Whether Something Exists

Ruby provides:

defined?(variable)

For example:

defined?(@user)

may return:

"instance-variable"

You can also inspect constants:

defined?(Rails)

This can be useful for metaprogramming and conditional loading, although it should not be used as a substitute for proper application design.


25. respond_to? – Duck Typing in Action

Ruby’s duck typing philosophy often appears as:

object.respond_to?(:call)

Instead of asking:

object.is_a?(SomeSpecificClass)

you ask:

Can this object perform the operation I need?

For example:

if logger.respond_to?(:info)
logger.info("Processing started")
end

This is particularly useful when designing flexible Ruby APIs.


26. method(:foo) – Turn a Method into an Object

Ruby treats methods as objects through Method:

method = user.method(:email)

Then:

method.call

invokes it.

This is useful in metaprogramming and dynamic dispatch.

For example:

operation = object.method(:calculate)
operation.call

Ruby’s object model makes this possible without requiring a separate function-pointer concept.


27. public_send vs send

Ruby allows dynamic method invocation:

user.send(:email)

But send can invoke private methods.

For user-controlled or externally supplied method names, this can be dangerous.

Prefer:

user.public_send(:email)

when you intentionally want to restrict invocation to public methods.

This distinction becomes important when building generic service layers or DSLs.


28. then / yield_self – Pipeline-Style Ruby

Ruby provides:

object.then do |value|
...
end

For example:

result =
User.new
.then { |user| user.save! }
.then { |user| user.email }

then passes the receiver into the block and returns the block’s result.

It can be useful when constructing transformations without introducing temporary variables.

But don’t turn everything into a pipeline merely because Ruby allows it.


29. _ – The Intentionally Ignored Variable

You’ll frequently see:

users.each do |user, _index|
puts user.name
end

The _ communicates:

This value exists, but I intentionally don’t care about it.

Ruby also allows:

_ = expensive_result

although explicit naming is generally preferable unless you’re intentionally ignoring something.


30. Endless Method Definitions

Ruby allows:

def full_name = "#{first_name} #{last_name}"

instead of:

def full_name
"#{first_name} #{last_name}"
end

This is called an endless method definition.

It’s excellent for very small methods:

def active? = status == "active"
def total = price * quantity

But don’t use it for complex logic.

This:

def process = validate && save && notify && publish

may be syntactically elegant but is much harder to maintain.


31. =>>>> – Rightward Assignment

Modern Ruby also supports rightward assignment:

value =>> variable

For example:

"hello" =>> message

Now:

message
# =>> "hello"

This becomes particularly interesting with pattern matching:

response =>> { status:, body: }

It allows destructuring and binding in a visually different direction.

The feature is useful, but like many Ruby syntactic conveniences, it should be used when it improves readability—not simply because it is available.


32. The Bigger Picture: Ruby Syntax Is a Language of Intent

After seeing all these operators, it is tempting to memorize them as a collection of Ruby tricks.

That would miss the important point.

Ruby’s syntax frequently tries to encode intent.

Compare:

users.map { |user| user.email }

with:

users.map(&:email)

The second says:

Transform each user using its email method.

Compare:

if user && user.profile && user.profile.avatar

with:

user&.profile&.avatar

The second says:

Traverse this optional object graph.

Compare:

message = <<~TEXT
...
TEXT

with manually concatenating strings.

The first says:

This is a multiline piece of text.

And:

case response
in { status: 200, body: String =>> body }

says:

I expect this particular structure.

That is the real power behind Ruby’s “mysterious symbols.”


33. Senior Ruby Developer Rule: Don’t Optimize for Cleverness

A senior Ruby developer should know all of these constructs.

But knowing them doesn’t mean using them everywhere.

For example:

users.map { _1.orders.select(&:paid?).sum(&:total) }

is valid Ruby.

But:

users.map do |user|
  user.orders
      .select(&:paid?)
      .sum(&:total)
end

may be more readable.

And sometimes the best version is:

users.map do |user|
  paid_orders = user.orders.select(&:paid?)
  paid_orders.sum(&:total)
end

Ruby gives you enormous freedom.

Good Ruby isn’t the shortest Ruby.

Good Ruby is code where another experienced developer can understand the intent quickly.


Final Takeaway

Ruby 3.4 contains a rich collection of compact syntax:

<<~TEXT       # squiggly heredoc
%i[...]       # symbol array
%w[...]       # string array
&.            # safe navigation
&:method      # symbol-to-proc
_1            # numbered parameter
*args         # positional splat
**kwargs      # keyword splat
...           # argument forwarding
1...10        # exclusive range
x ||= value   # conditional assignment
def foo = ... # endless method
case x; in... # pattern matching
=>            # hash rocket / pattern binding / rightward assignment

These aren’t merely Ruby “shortcuts.”

They represent Ruby’s broader design philosophy:

Make the code express what the programmer means, while keeping the syntax close to natural language.

For a senior Ruby/Rails developer, the goal isn’t to remember every symbol.

The goal is to recognize when a piece of Ruby syntax improves the expression of intent – and when it merely makes the code clever.

That distinction is what separates knowing Ruby syntax from writing idiomatic, maintainable Ruby.

Happy Rubying!~

Integrate AI with Rails: AI bootcamp for Developers – Day 4 -Practical Course – Part 3

Great. Now we can make the first real LLM request.

We’ll keep this step deliberately small. Our goal is not to build the complete AI assistant yet.

The goal is simply:

Rails
Ai::Client
OpenAI API
LLM
Response

Once this works, we’ll build the Rails service layer around it.

Step 5.11 – Add the OpenAI Ruby SDK

Rather than manually constructing HTTP requests, we’ll start with the official Ruby SDK.

1. Add the gem

Open our Gemfile and add:

gem "openai"

Then run:

bundle install

Verify:

bundle info ruby-openai

You should see where Bundler installed the gem.

Why use an SDK?

We could use Ruby’s Net::HTTP ourselves:

Ruby
Net::HTTP
HTTP request
OpenAI

But then we’d have to manually handle:

  • authentication headers
  • JSON encoding
  • HTTP errors
  • response parsing
  • request formatting

The SDK gives us:

Ruby
OpenAI Ruby SDK
HTTP
OpenAI

Important point: An SDK doesn’t eliminate the HTTP API. It is an abstraction over it.

Step 5.12 – Verify the gem

Run:

bin/rails console

Then:

require "openai"

It should return:

=> true

or possibly:

=> "openai"

depending on the gem’s load behavior.

Then:

OpenAI

should resolve without a NameError.

Exit:

exit

Step 5.13 – Let’s inspect the SDK before using it

This is something I want you to develop as a senior Ruby developer habit.

Instead of blindly copying code from a blog, let’s see what API the installed gem exposes.

Run:

bundle info ruby-openai

Then:

bin/rails console

Inside console:

require "openai"

Then:

OpenAI::Client.instance_method(:initialize).parameters

This tells us what the client’s constructor expects.

Also try:

OpenAI::Client.instance_methods(false)

We’re learning to inspect a Ruby library rather than treating it as magic.

Step 5.14 – Create the OpenAI client

Now let’s modify:

app/services/ai/client.rb

We’ll start with:

class Ai::Client
  def initialize
    @api_key = Rails.application.credentials.dig(:openai, :api_key)

    raise "OpenAI API key is missing" if @api_key.blank?

    @client = OpenAI::Client.new(api_key: @api_key)
  end
end

Now we have:

Ai::Client
   │
   ├── reads Rails credentials
   │
   └── creates OpenAI SDK client

Step 5.15 – Test initialization

Run:

bin/rails console

Then:

client = Ai::Client.new

It should return something similar to:

#<Ai::Client:0x...>

No request has happened yet.

That’s important.

We’ve only done:

Rails credentials
API key
OpenAI::Client

Stop here

Don’t call the LLM yet.

I want you to complete these steps first:

1. Gemfile

gem "openai"

2. Install

bundle install

3. Verify

bundle info ruby-openai

4. Update

app/services/ai/client.rb

with the code above.

5. Test

bin/rails c
client = Ai::Client.new

One note

The Ruby OpenAI SDK’s API can change between versions, so don’t blindly copy the exact request syntax from older tutorials. That’s why we’re checking the version we’ve actually installed before writing the API call.

Now we’ve:

“OpenAI client initialized.”

We’ll make our first actual LLM request and inspect the complete response, including:

response
model
output
usage
input tokens
output tokens

That will lead directly into why we added those fields to our Message model.


@client = OpenAI::Client.new(api_key: @api_key)

We’ll use our installed SDK’s API, not older ruby-openai examples. The current official openai Ruby SDK documents OpenAI::Client.new(api_key: ...) and the Responses API as the current interface. (GitHub)

Step 5.16 – Make the First Real LLM Request

For this step, we’ll do one simple request and inspect the response.

We are not integrating it with Conversation or Message yet.

Our goal is:

Rails console
Ai::Client
OpenAI Responses API
LLM
Response

1. Add a chat method

Open:

app/services/ai/client.rb

Change it to:

class Ai::Client
  def initialize
    @api_key = Rails.application.credentials.dig(:openai, :api_key)

    raise "OpenAI API key is missing" if @api_key.blank?

    @client = OpenAI::Client.new(api_key: @api_key)
  end

  def chat(message)
    @client.responses.create(
      model: "gpt-5.2",
      input: message
    )
  end
end

The SDK’s current Responses API accepts model and input for creating a response. (GitHub)

Why input: message?

We’re deliberately starting with the simplest possible request:

input: "Explain Ruby blocks in simple terms"

Later we’ll send structured conversation history:

input: [
{ role: :system, content: "..." },
{ role: :user, content: "..." }
]

The Responses API supports both simple input and structured message input. (GitHub)

2. Start Rails console

bin/rails c

Create the client:

client = Ai::Client.new

Now make the request:

response = client.chat(
message: "Explain Ruby blocks in simple terms."
)

This is the moment our application makes an actual network request.

3. Inspect the response

First:

response.class

Then:

response

Don’t worry if the output is large.

The current official Ruby SDK returns typed response objects and the response contains the generated output plus metadata such as usage. (GitHub)

But if you get the following output, we can change the model which has free API calls:

ai-assistant(dev):013> client = Ai::Client.new
ai-assistant(dev):003> res = ai.chat('I want to be a expert in Ruby language')
app/services/ai/client.rb:11:in 'Ai::Client#chat': {url: "https://api.openai.com/v1/responses", status: 429, body: {error: {message: "You have no credits remaining. Add credits to continue using the API at https://platform.openai.com/settings/organization/billing/.", type: "insufficient_quota", param: nil, code: "credit_balance_exhausted"}}} (OpenAI::Errors::RateLimitError)
        from (ai-assistant):3:in '<compiled>'

Yes – the error makes sense and there is an important distinction here:

Our ChatGPT subscription and OpenAI API billing are separate.

So even if you can use ChatGPT normally, that does not give your Ruby application free API calls. OpenAI explicitly says ChatGPT and API billing are managed separately. (OpenAI Help Center)

Why you’re seeing You have no credits remaining

Your Rails code is calling the OpenAI API, not ChatGPT:

Rails app
OpenAI API
API billing / credits

The API account associated with your key currently has no usable credits. OpenAI’s current prepaid-billing documentation says API requests stop once the available credit balance is exhausted. (OpenAI Help Center)

“But aren’t basic models free?”

Not generally for the API.

There may be specific free/trial allocations or products with included usage, but you should not assume that a model being available in ChatGPT means the API is free.

For our Rails application, we’re using:

OpenAI::Client

which consumes API usage and is metered separately.


What I recommend for our course

I don’t think we should spend money just to continue learning unless you’re comfortable doing so.

We have three practical paths:

Option 1 – Add a small API balance

Open your OpenAI API billing overview and check your balance. New API users currently use prepaid billing and the documented minimum purchase is $5, with $10 as the default purchase amount. (OpenAI Help Center)

For this course a small balance should be plenty for experimentation because our prompts will be tiny.

Option 2 – Use another provider with a free tier

We could temporarily use a provider that offers some free API usage, while keeping the same architecture:

Ai::Client
Provider
LLM

This is actually useful because later we’ll make our architecture provider-agnostic.

Option 3 – Run a local model

We can install something like Ollama and run an LLM locally:

Rails
Ai::Client
localhost
Local LLM

Advantages:

  • no API credits
  • no network dependency
  • no per-token cost
  • great for development

The downside is that the model quality may differ from hosted models, and local inference requires reasonable hardware.


One important thing for our architecture

Don’t change this:

Ai::Client

The fact that OpenAI isn’t currently usable doesn’t mean we should redesign the application.

We specifically created:

Rails
Ai::Client
Provider

so that later we can switch:

Ai::Client
OpenAI

to:

Ai::Client
Anthropic

or:

Ai::Client
Ollama

without rewriting our Rails application.

That’s actually an important senior-level design lesson.


What we can do now?

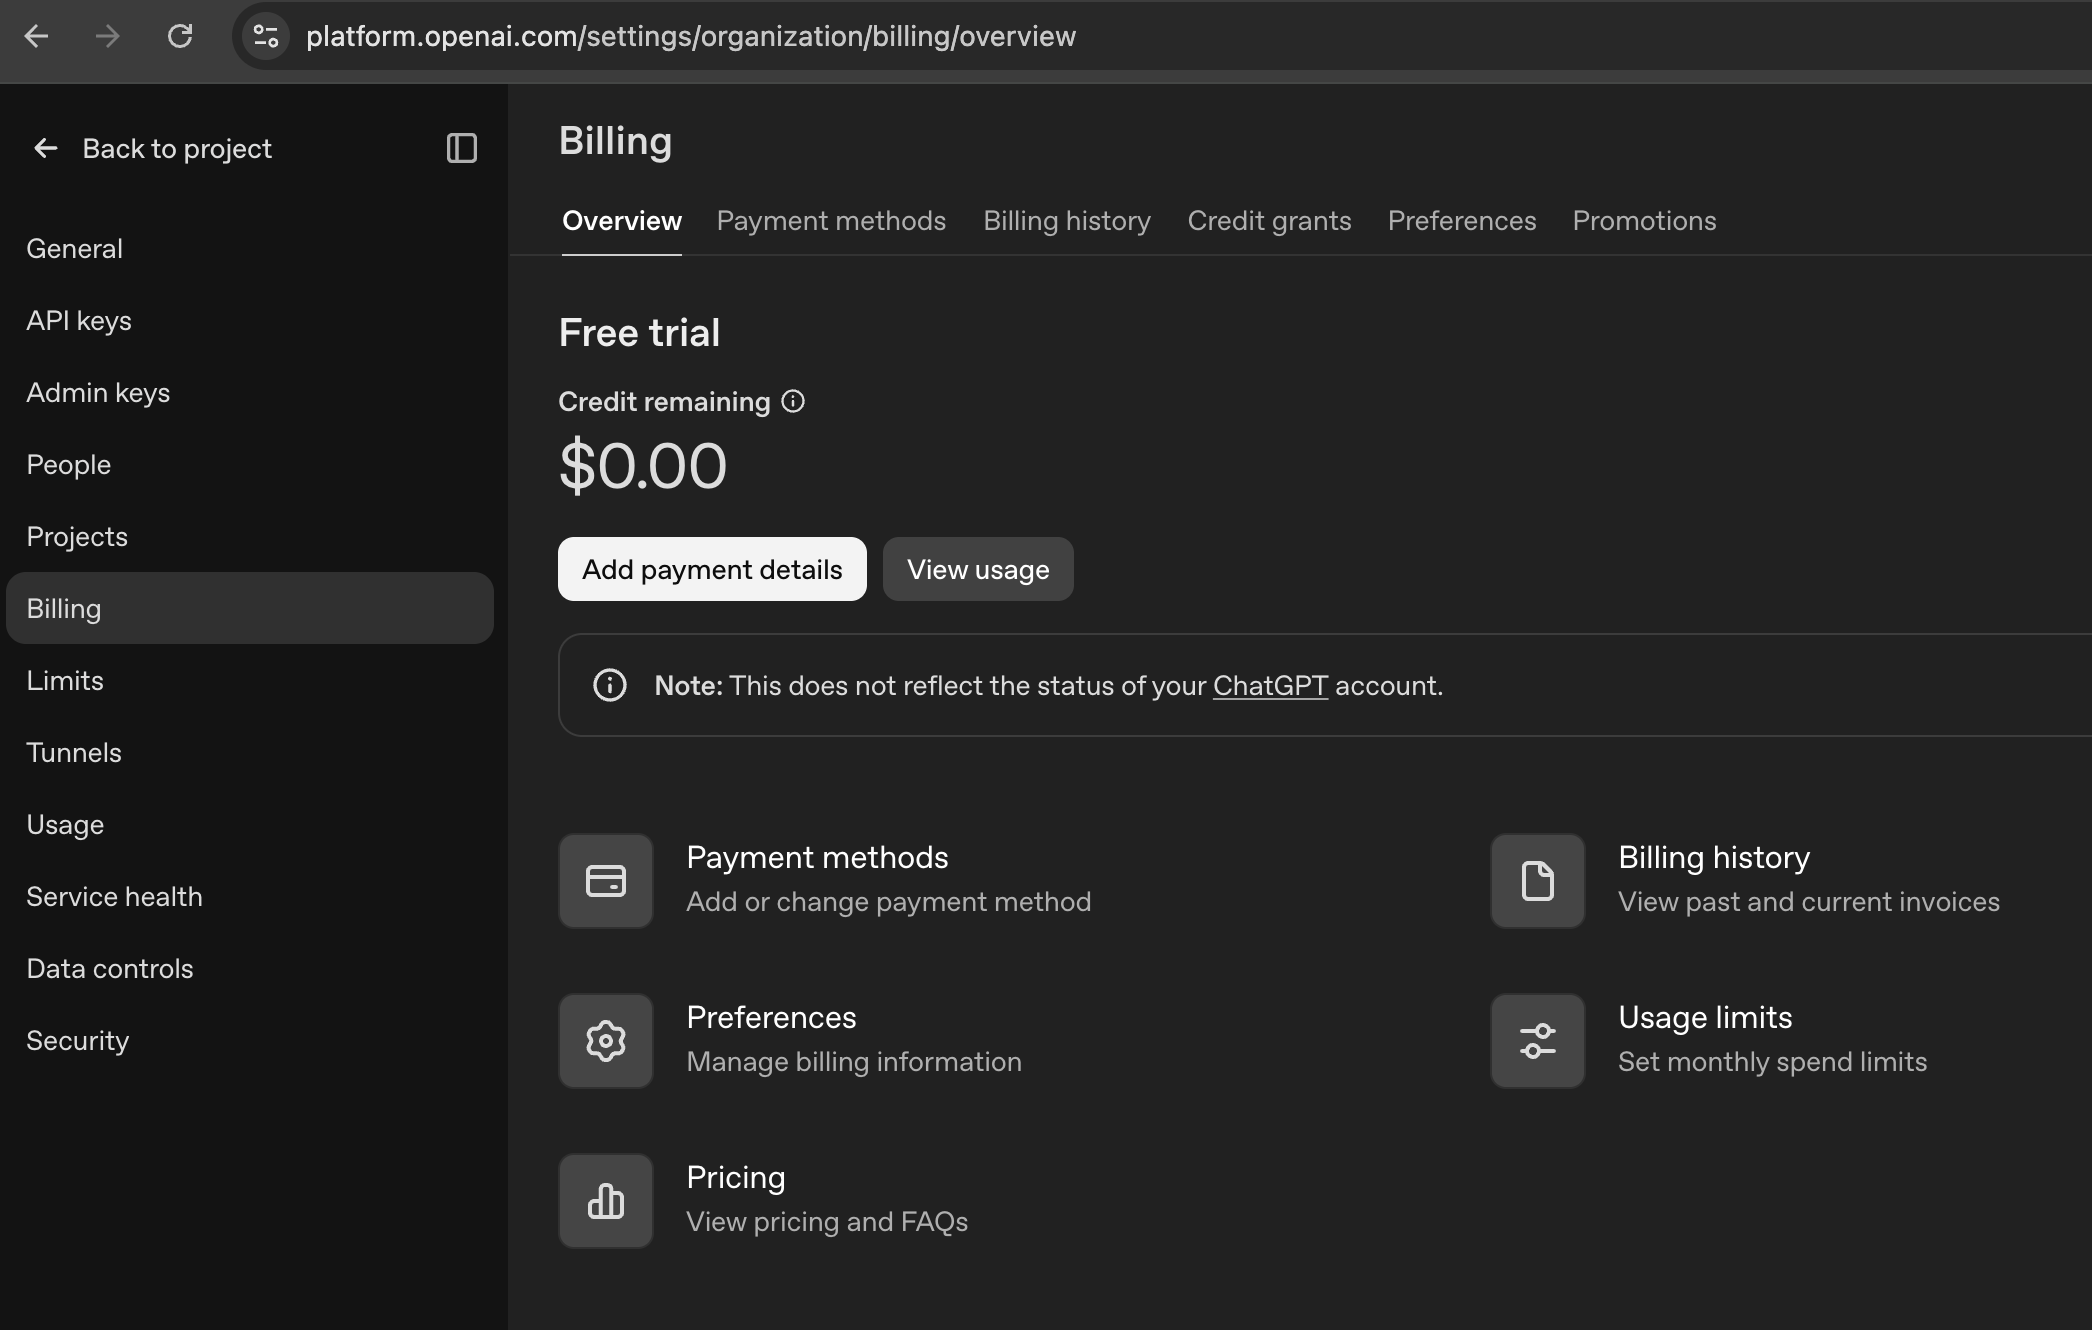
Since our objective is learning AI engineering, not spending money on API calls, first check your API billing page.

If it shows:

Free trial credit remaining: $0.00

then the error is fully explained. OpenAI’s billing documentation uses exactly this sort of balance indicator. (OpenAI Help Center)

We can then decide between a small API credit or a local/free-tier provider.

For this course, I slightly prefer keeping OpenAI as the first provider so you learn the real production API flow, then later we’ll add a second provider/local model to demonstrate the abstraction properly.

4. Get the generated text

Try:

response.output_text

You should get a normal answer such as:

A Ruby block is a chunk of code that can be passed to a method...

This is the first important distinction:

response
entire API response
response.output_text
just the model's text

Don’t immediately throw away the full response. We need the metadata later.

5. Inspect the model

Try:

response.model

This tells you which model actually generated the response.

That’s relevant to our messages.model column.

6. Inspect usage

Now:

response.usage

You should see token-related information.

Inspect it:

response.usage.input_tokens

and:

response.usage.output_tokens

These are directly related to the fields we added earlier:

messages
-------------------
input_tokens
output_tokens

So our database design is now connected to a real API response.

LLM response
├── model
├── output text
└── usage
├── input_tokens
└── output_tokens

The SDK’s response models expose usage information as part of the response. (GitHub)

7. One very important experiment

Ask a second question:

response2 = client.chat(
message: "What is my name?"
)

You’ll probably notice the model doesn’t know your name from the previous request.

That’s intentional.

We made two independent requests:

Request 1
"Explain Ruby blocks"
Request 2
"What is my name?"

The LLM does not automatically receive our previous request.

This is going to become extremely important when we implement:

Conversation
Messages
Prompt Builder
LLM

Our Rails application will be responsible for providing the appropriate conversation context.

8. One thing to notice

We’ve built:

app/services/ai/client.rb

and now:

Ai::Client.new.chat(...)

works.

That’s already a valuable architectural boundary:

Rails application
Ai::Client
OpenAI SDK
OpenAI API

Our controllers won’t need to know:

  • how authentication works,
  • how the SDK works,
  • which API endpoint is used,
  • how OpenAI responses are represented.

That’s why we created the abstraction.

Check our code in this repo: https://github.com/abhilashak/ai_assistant


Stop Here

Run these commands one by one:

bin/rails c
client = Ai::Client.new
response = client.chat(
message: "Explain Ruby blocks in simple terms."
)

Then inspect:

response.output_text
response.model
response.usage
response.usage.input_tokens
response.usage.output_tokens

Don’t paste our API key or any sensitive output anywhere.

Now: “Our First LLM request works.”

Then we’ll do the next important step: inspect the raw response structure and improve Ai::Client so it returns a clean Ruby object to the rest of our Rails application.


Integrate AI with Rails: AI bootcamp for Developers – Day 4 -Practical Course – Part 2

Now let’s move to the next step: make the Message model production-friendly.

We’ll start with the most important field: role.

Step 3 – Design Message.role

Currently our database allows:

role = anything

For example:

"user"
"assistant"
"system"
"foo"
"hello"
"something-invalid"

That’s not what we want.

Our AI application has a defined set of roles:

user
assistant
system

Later, when we introduce tool calling, we may also need to represent tool messages depending on the provider/API design. But for our current application, we’ll keep the persisted roles to these three.

Why use a string instead of an integer?

You may remember our previous discussion about Rails enums.

We could store:

0 = user
1 = assistant
2 = system

But for an AI application, I prefer a string-backed enum.

Database:

role
---------
user
assistant
system

instead of:

role
---------
0
1
2

Why?

1. Database is self-describing

When you run:

SELECT role FROM messages;

you immediately see:

user
assistant
assistant
user
system

2. Easier debugging

When you’re debugging an AI conversation, the actual value is obvious.

3. Safer for external APIs

LLM APIs already use strings such as:

{
"role": "user"
}

So our database representation matches the domain.

Step 3A – Add the Rails enum

Open:

app/models/message.rb

Currently you should have something like:

class Message < ApplicationRecord
belongs_to :conversation
end

Change it to:

class Message < ApplicationRecord
belongs_to :conversation
enum :role, {
user: "user",
assistant: "assistant",
system: "system"
}, validate: true
end

Understand this carefully

This:

enum :role, {
user: "user",
assistant: "assistant",
system: "system"
}, validate: true

doesn’t mean PostgreSQL has an enum type. We’re using a Rails enum backed by a string column.

PostgreSQL still has:

role character varying

Rails gives us a domain API on top of it.

Step 3B – Test the enum

Start Rails console:

bin/rails console

Find our message:

message = Message.first

Check:

message.role

You should get:

"user"

Now:

message.user?

Expected:

true

And:

message.assistant?

Expected:

false

Step 3C – Test the scopes

Rails also gives us useful scopes.

Try:

Message.user

and:

Message.assistant

and:

Message.system

For example:

Message.user

roughly translates to:

SELECT *
FROM messages
WHERE role = 'user';

This is one of the benefits of using an enum.

Step 3D – Test invalid values

Now try:

Message.new(
conversation: Conversation.first,
role: "something_else",
content: "test"
)

Because we specified:

validate: true

Rails should treat the role as invalid.

Check:

message = Message.new(
conversation: Conversation.first,
role: "something_else",
content: "test"
)
message.valid?

Expected:

false

Then:

message.errors.full_messages

You should see an error indicating that the role is not included in the allowed values.

Why validate: true?

This is worth understanding: Without validation, Rails enum behavior can raise an ArgumentError when assigning an invalid value.

With:

validate: true

we get normal ActiveRecord validation behavior:

message.valid?
false

and:

message.errors

contains the validation error.

That’s generally more convenient when the model is receiving user/application input.

Step 3E – One more important layer: Database constraint

There is a subtle issue here.

Rails validation protects you when data enters through Rails.

But PostgreSQL doesn’t know that only these values are valid:

user
assistant
system

Someone could execute:

INSERT INTO messages (conversation_id, role, content)
VALUES (1, 'invalid', '...');

directly against PostgreSQL.

The database would currently allow it.

This leads to an important senior-engineering principle:

Application-level validation and database-level integrity are complementary.

We’ll add a database constraint.

But don’t do that yet. First make sure the Rails enum works.

After that, we’re finally ready for the exciting part:

Rails
Ai::Client
LLM API
Real AI response

Now let’s strengthen the model at the database level.

You currently have Rails validation:

enum :role, {
user: "user",
assistant: "assistant",
system: "system"
}, validate: true

That’s good, but a senior Rails application shouldn’t rely only on model validation for important data integrity.

Step 4 – Add Database Constraints

We want PostgreSQL itself to enforce:

role MUST be:
user
assistant
system

and:

content MUST NOT be NULL
role MUST NOT be NULL

This gives us two layers:

Rails
Model validation
PostgreSQL
Database constraint

4.1 Why NULL matters

Currently this is possible at the database level:

role = NULL

But an AI message without a role doesn’t make sense.

Likewise:

content = NULL

doesn’t represent a meaningful message.

So we’ll make both required.

4.2 Create a new migration

Don’t modify the old migration because it has already been executed and committed.

Generate a new migration:

bin/rails generate migration AddMessageConstraints

Rails should create:

db/migrate/XXXXXXXXXXXXXX_add_message_constraints.rb

Open that file.

4.3 Add NOT NULL constraints

Put this inside change:

class AddMessageConstraints < ActiveRecord::Migration[8.1]
def change
change_column_null :messages, :role, false
change_column_null :messages, :content, false
end
end

So conceptually:

def change
change_column_null :messages, :role, false
change_column_null :messages, :content, false
end

4.4 Add PostgreSQL CHECK constraint

Now we want PostgreSQL to enforce:

role IN ('user', 'assistant', 'system')

Add:

add_check_constraint(
:messages,
"role IN ('user', 'assistant', 'system')",
name: "messages_role_check"
)

Our migration becomes:

class AddMessageConstraints < ActiveRecord::Migration[8.1]
def change
change_column_null :messages, :role, false
change_column_null :messages, :content, false
add_check_constraint(
:messages,
"role IN ('user', 'assistant', 'system')",
name: "messages_role_check"
)
end
end

4.5 Run the migration

Execute:

bin/rails db:migrate

You should see Rails successfully applying the migration.

4.6 Inspect PostgreSQL

This is worth doing because understand what’s actually happening underneath Rails.

Run:

bin/rails dbconsole

Then:

\d messages

Look toward the bottom.

You should see a check constraint similar to:

messages_role_check
CHECK ((role)::text = ANY (...))

The exact display can vary by PostgreSQL version.

Also check:

\d+ messages

4.7 Test the database constraint

Now let’s prove that PostgreSQL protects us even if Rails is bypassed.

Inside psql, try:

INSERT INTO messages
(conversation_id, role, content, created_at, updated_at)
VALUES
(1, 'invalid', 'This should fail', NOW(), NOW());

You should get an error similar to:

ERROR: new row for relation "messages" violates check constraint "messages_role_check"

That’s exactly what we want.

The database is now protecting the data.

Why is this important?

Suppose an int. asks:

“Why do you have both Rails validation and a PostgreSQL constraint?”

A strong senior-level answer would be:

“Rails validations provide application-level feedback and are useful for normal model operations, but they’re not a database integrity guarantee because data can enter through other paths. For important invariants such as message roles, I also enforce the constraint at the PostgreSQL level.”

That’s a much stronger answer than:

“Because Rails has validations.”

4.8 One more design question: content

We’re making:

change_column_null :messages, :content, false

But should an AI message be allowed to contain an empty string?

For example:

content: ""

NOT NULL allows that.

So:

NULL NO
"" technically allowed
"Hello" YES

Whether empty content should be allowed is an application-level business rule.

We can later decide whether to add:

validates :content, presence: true

But don’t add that yet.

There are legitimate AI API situations where a message may not have ordinary text content – for example, tool-related or structured content. We’ll revisit our message representation when we implement tool calling.

4.9 Test a valid message

Exit psql:

\q

Then:

bin/rails c

Run:

conversation = Conversation.first

Then:

message = conversation.messages.create(
role: :user,
content: "What is Ruby?"
)

Check:

message.persisted?

You should get:

true

And:

message.role

should return:

"user"

Stop Here

Please do these in order:

bin/rails generate migration AddMessageConstraints

Edit the migration with the constraints above.

Then:

bin/rails db:migrate

Verify with:

bin/rails dbconsole
\d messages

Then test the invalid role directly in PostgreSQL.

Finally:

git add app/models/message.rb db/migrate
git commit -m "feat: validate message roles"
git push

NOW: “Message constraints are done.”

Then we move to the big milestone: Our First Real LLM API Call


Excellent. We now have a clean foundation:

Ruby 3.4.1
Rails 8.1
PostgreSQL
Conversation
└── Message
├── role
├── content
├── model
├── input_tokens
└── output_tokens
Ai::Client

Now we reach the first real AI step.

Step 5 – Make Our First LLM API Call

We’re going to do this in a deliberately controlled way.

Don’t build the Chat UI yet.

First, we need to understand:

Ruby
Ai::Client
HTTP request
LLM provider
HTTP response
Ruby

Once we understand this, we’ll wrap it nicely into Rails architecture.

5.1 First decision – which provider?

For this practical course, let’s start with OpenAI.

Not because you must use OpenAI in production, but because it gives us a straightforward API to understand the fundamentals.

Later we’ll discuss:

Rails
├── OpenAI
├── Anthropic
└── Gemini

and how to design our Ai::Client so that we’re not tightly coupled to one provider.

5.2 Before writing code – understand the request

Conceptually, we’re going to send something like:

POST /v1/responses
{
"model": "...",
"input": "Explain Ruby blocks in simple terms."
}

The provider’s server processes the request:

Rails
│ HTTPS
OpenAI API
LLM
Response

The important thing to understand is:

An LLM API is an HTTP API.

The Ruby SDK is just a convenient abstraction around HTTP.

5.3 Check our Ai::Client

You already created:

app/services/ai/client.rb

Open it.

If it currently contains nothing useful, that’s completely fine.

For now, make it:

# app/services/ai/client.rb

class Ai::Client
end

Don’t add API code yet.

5.4 Configure the API key securely

Do not put our API key in Ruby source code.

We have two common approaches:

Environment variables

or:

Rails encrypted credentials

For this project, I’m going to use Rails encrypted credentials because it’s a good opportunity to understand how Rails handles secrets.

5.5 Create Rails encrypted credentials

Run:

➜  ai_assistant git:(main) ✗ VISUAL="code --wait" rails credentials:edit

Rails will open our configured editor.

Add:

openai:
api_key: OUR_OPENAI_API_KEY

For example:

openai:
api_key: sk-xxxxxxxxxxxxxxxx

Use our actual API key locally, but never paste it into this conversation or commit it to GitHub.

Save and close the editor

What’s actually happening?

Rails creates/uses:

config/credentials.yml.enc

This file is encrypted.

Our encryption key is stored separately in:

config/master.key

The important rule is:

config/credentials.yml.enc
COMMIT
GitHub

is okay.

But:

config/master.key

should never be committed to GitHub.

Check:

git status

You should not see:

config/master.key

as a file to commit.

5.6 Verify Rails can read the key

Run:

bin/rails console

Then:

Rails.application.credentials.dig(:openai, :api_key)

You should get our key back, just verify that it returns a string rather than nil.

Then:

exit

5.7 Why use dig?

Our credentials structure is:

openai:
api_key: ...

which Rails exposes approximately as:

{
openai: {
api_key: "..."
}
}

So:

Rails.application.credentials.dig(:openai, :api_key)

means:

credentials
openai
api_key

This is cleaner than accessing nested values manually.

5.8 Now configure Ai::Client

Open:

app/services/ai/client.rb

Change it to:

class Ai::Client
def initialize
@api_key = Rails.application.credentials.dig(:openai, :api_key)
end
end

Now the client knows how to retrieve its secret.

5.9 Add a safety check

We don’t want the application to fail mysteriously later.

Add:

class Ai::Client
  def initialize
    @api_key = Rails.application.credentials.dig(:openai, :api_key)

    raise "OpenAI API key is missing" if @api_key.blank?
  end
end

Now:

Ai::Client.new

will fail immediately if the key isn’t configured. This is called fail-fast configuration.

5.10 Test the client

Run:

bin/rails console

Then:

client = Ai::Client.new

If everything is configured correctly, it should return:

#<Ai::Client:0x...>

No API request has happened yet.

We’re only testing:

Rails credentials
Ai::Client

Check our code in this repo: https://github.com/abhilashak/ai_assistant


Stop Here

Don’t make the API request yet.

complete only these steps first:

1. Configure credentials

bin/rails credentials:edit

with:

openai:
api_key: OUR_KEY

2. Verify:

bin/rails console
Rails.application.credentials.dig(:openai, :api_key)

Don’t show me the key.

3. Update:

app/services/ai/client.rb

to:

class Ai::Client
def initialize
@api_key = Rails.application.credentials.dig(:openai, :api_key)
raise "OpenAI API key is missing" if @api_key.blank?
end
end

4. Test:

client = Ai::Client.new

Now: “Ai::Client credentials is done.”

Next topic: Step 5.11: install/configure the OpenAI Ruby client and make the first actual LLM request.

to be continued ..

Rails 7+ API error handling that scales ⚖️

A solid API error strategy gives you:

  • Consistent JSON error shapes
  • Correct HTTP status codes
  • Separation of concerns (domain vs transport)
  • Observability without leaking internals

Below is a practical, production-ready approach that covers controller hooks, controllers, models/libs, background jobs, and more—illustrated with a real scenario from Session::CouponCode.

Core principles

  • Keep transport (HTTP, JSON) in controllers; keep domain logic in models/libs.
  • Map known, expected failures to specific HTTP statuses.
  • Log unexpected failures; return a generic message to clients.
  • Centralize API error rendering in a base controller.

1) A single error boundary for all API controllers

Create a base Error::ApiError and rescue it (plus a safe catch‑all) in your ApiController.

# lib/error/api_error.rb
module Error
  class ApiError < StandardError
    attr_reader :status, :details
    def initialize(message, status = :unprocessable_entity, details: nil)
      super(message)
      @status  = status
      @details = details
    end
  end
end
# app/controllers/api_controller.rb
class ApiController < ActionController::Base
  include LocaleConcern
  skip_forgery_protection

  impersonates :user,
               ......

  # Specific handlers first
  rescue_from Error::ApiError,                          with: :handle_api_error
  rescue_from ActionController::ParameterMissing,       with: :handle_bad_request
  rescue_from ActiveRecord::RecordNotFound,             with: :handle_not_found
  rescue_from ActiveRecord::RecordInvalid,              with: :handle_unprocessable
  rescue_from ActiveRecord::RecordNotUnique,            with: :handle_conflict

  # Catch‑all last
  rescue_from StandardError,                            with: :handle_standard_error

  private

  def handle_api_error(e)
    render json: { success: false, error: e.message, details: e.details }, status: e.status
  end

  def handle_bad_request(e)
    render json: { success: false, error: e.message }, status: :bad_request
  end

  def handle_not_found(_e)
    render json: { success: false, error: 'Not found' }, status: :not_found
  end

  def handle_unprocessable(e)
    render json: { success: false, error: e.record.errors.full_messages }, status: :unprocessable_entity
  end

  def handle_conflict(_e)
    render json: { success: false, error: 'Conflict' }, status: :conflict
  end

  def handle_standard_error(e)
    Rollbar.error(e, path: request.fullpath, client_id: try(:current_client)&.id)
    render json: { success: false, error: 'Something went wrong' }, status: :internal_server_error
  end
end
  • Order matters. Specific rescue_from before StandardError.
  • This pattern avoids duplicating rescue_from across controllers and keeps HTML controllers unaffected.

2) Errors in before actions

Because before_action runs inside controllers, the same rescue_from handlers apply.

Two patterns:

  • Render in the hook for simple guard clauses:
before_action :require_current_client

def require_current_client
  return if current_client
  render json: { success: false, error: 'require_login' }, status: :unauthorized
end
  • Raise a domain/auth error and let rescue_from handle JSON:
# lib/error/unauthorized_error.rb
module Error
  class UnauthorizedError < Error::ApiError
    def initialize(message = 'require_login') = super(message, :unauthorized)
  end
end

before_action :require_current_client

def require_current_client
  raise Error::UnauthorizedError unless current_client
end

Prefer raising if you want consistent global handling and logging.

3) Errors inside controllers

Use explicit renders for happy-path control flow; raise for domain failures:

def create
  form = CreateThingForm.new(params.require(:thing).permit(:name))
  result = CreateThing.new(form: form).call

  if result.success?
    render json: { success: true, thing: result.thing }, status: :created
  else
    # Known domain failure → raise an ApiError to map to 422
    raise Error::ApiError.new(result.message, :unprocessable_entity, details: result.details)
  end
end

Common controller exceptions (auto-mapped above):

  • ActionController::ParameterMissing → 400
  • ActiveRecord::RecordNotFound → 404
  • ActiveRecord::RecordInvalid → 422
  • ActiveRecord::RecordNotUnique → 409

4) Errors in models, services, and libs

Do not call render here. Either:

  • Return a result object (Success/Failure), or
  • Raise a domain‑specific exception that the controller maps to an HTTP response.

Example from our scenario, Session::CouponCode:

# lib/error/session/coupon_code_error.rb
module Error
  module Session
    class CouponCodeError < Error::ApiError; end
  end
end
# lib/session/coupon_code.rb
class Session::CouponCode
  def discount_dollars
    # ...
    case
    when coupon_code.gift_card?
      # ...
    when coupon_code.discount_code?
      # ...
    when coupon_code.multiorder_discount_code?
      # ...
    else
      raise Error::Session::CouponCodeError, 'Unrecognized discount code'
    end
  end
end

Then, in ApiController, the specific handler (or the Error::ApiError handler) renders JSON with a 422.

This preserves separation: models/libs raise; controllers decide HTTP.

5) Other important surfaces

  • ActiveJob / Sidekiq
  • Prefer retry_on, discard_on, and job‑level rescue with logging.
  • Return no HTTP here; jobs are async.
class MyJob < ApplicationJob
  retry_on Net::OpenTimeout, wait: 10.seconds, attempts: 3
  discard_on Error::ApiError
  rescue_from(StandardError) { |e| Rollbar.error(e) }
end
  • Mailers
  • Use rescue_from to avoid bubble‑ups crashing deliveries:
class ApplicationMailer < ActionMailer::Base
  rescue_from Postmark::InactiveRecipientError, Postmark::InvalidEmailRequestError do
    # no-op / log
  end
end
  • Routing / 404
  • For APIs, keep 404 mapping at the controller boundary with rescue_from ActiveRecord::RecordNotFound.
  • For HTML, config.exceptions_app = routes + ErrorsController.
  • Middleware / Rack
  • For truly global concerns, use middleware. This is rarely necessary for controller-scoped API errors in Rails.
  • Validation vs. Exceptions
  • Use validations (ActiveModel/ActiveRecord) for expected user errors.
  • Raise exceptions for exceptional conditions (invariants violated, external systems fail unexpectedly).

6) Observability

  • Always log unexpected errors in the catch‑all (StandardError).
  • Add minimal context: client_id, request.fullpath, feature flags.
  • Avoid leaking stack traces or internal messages to clients. Send generic messages on 500s.

7) Testing

  • Unit test domain services to ensure they raise Error::ApiError (or return Failure).
  • Controller/request specs: assert status codes and JSON shapes for both happy path and error path.
  • Ensure before_action guards either render or raise as intended.

Applying this to our scenario

  • /lib/session/coupon_code.rb raises Error::Session::CouponCodeError on unknown/invalid discount values.
  • /app/controllers/api_controller.rb rescues that error and returns JSON:
  • { success: false, error: e.message } with a 422 (or via Error::ApiError base).

This converts prior 500s into clean API responses and keeps error handling centralized.

When to generalize vs. specialize

  • Keep a catch‑all rescue_from StandardError in ApiController to prevent 500s from leaking internals.
  • Still add specific handlers (or subclass Error::ApiError) for known cases to control the correct status code and message.
  • Do not replace everything with only StandardError—you’ll lose semantics and proper HTTP codes.

  • Key takeaways
  • Centralize API‐wide error handling in ApiController using specific handlers + a safe catch‑all.
  • Raise domain errors in models/libs; render JSON only in controllers.
  • Map common Rails exceptions to correct HTTP statuses; log unexpected errors.
  • Prefer Error::ApiError as a base for consistent message/status handling across the API.

Rails 8 + ActiveAdmin: The Propshaft vs Sprockets Dilemma 😵‍💫

ActiveAdmin traditionally requires Sprockets, but there are actually several alternatives and modern approaches. Let me break down your options:

ActiveAdmin Asset Pipeline Options:

Current Status (2025):

  • ActiveAdmin 3.x still primarily designed for Sprockets
  • It has SCSS files with imports, mixins, and variables that need preprocessing
  • The gem’s CSS compilation expects Sprockets’ asset compilation pipeline

Alternative Approaches:

1. Keep Sprockets (Current Choice)

Pros:

  • ✅ Fully supported, zero configuration issues
  • ✅ All ActiveAdmin features work out-of-the-box
  • ✅ Stable and well-tested

Cons:

  • ❌ Older, slower asset pipeline
  • ❌ More complex than Propshaft
  • ❌ Goes against Rails 8 defaults

2. Hybrid: Propshaft + Manual CSS for ActiveAdmin

We could try keeping Propshaft for our main app and handling ActiveAdmin CSS manually:

ActiveAdmin traditionally requires Sprockets, but the landscape is evolving. Here are your realistic options in 2025:

Current Situation:

ActiveAdmin 3.x: Requires Sprockets (stable)
ActiveAdmin 4.0 beta: Propshaft support is experimental/problematic
Rails 8 default: 🆕 Propshaft (faster, simpler)

https://github.com/activeadmin/activeadmin/releases

Our Options:

Option 1: Stay with Sprockets(Recommended for now)

Pros:

  • ✅ Zero configuration issues
  • ✅ All ActiveAdmin features work perfectly
  • ✅ Battle-tested and stable

Cons:

  • ❌ Slower than Propshaft
  • ❌ More complex asset pipeline
  • ❌ Goes against Rails 8 defaults

Option 2: ActiveAdmin Assets Gem (Simplest alternative)

The activeadmin_assets gem was mentioned as a simple solution! Let me add this option:

# Add to Gemfile
gem 'activeadmin_assets'

Pros:

  • Zero Node.js dependency
  • ✅ Works with Propshaft
  • ✅ Pre-compiled ActiveAdmin assets
  • ✅ Simple one-line installation

Cons:

  • ❌ Can’t customize ActiveAdmin styles
  • ❌ Community-maintained (not official)

Option 3: ActiveAdmin 4.0 Beta + Propshaft ⚠️ (Experimental)

Based on the GitHub discussions, this is possible but complex:

# Rails 8 setup with Propshaft + ActiveAdmin v4 beta
rails new myapp -a propshaft
bundle add activeadmin -v=4.0.0beta15
bundle add cssbundling-rails -v "1.4.1"
bundle add tailwindcss-ruby -v "~> 3.4.17"
yarn add tailwindcss@^3.4.17  # ActiveAdmin uses TailwindCSS v3
rails generate active_admin:install
rails css:install:tailwind
yarn add @activeadmin/activeadmin@4.0.0-beta15
npm pkg set scripts.build:css="tailwindcss -i ./app/assets/stylesheets/active_admin.css -o ./app/assets/builds/active_admin.css --minify -c tailwind-active_admin.config.js"
./bin/dev  # Instead of rails server

Pros:

  • ✅ Modern asset pipeline (Propshaft)
  • ✅ ActiveAdmin v4 features

Cons:

  • Complex setup with many steps
  • Requires Node.js/Yarn (defeats the purpose)
  • Beta software (unstable)
  • TailwindCSS v3/v4 compatibility issues

Option 4: 🔄 Alternative Admin Gems

If you want to avoid the ActiveAdmin complexity entirely:

RailsAdmin:

gem 'rails_admin'
  • ✅ No asset pipeline issues
  • ✅ Works with Propshaft out of the box
  • ❌ Less customizable than ActiveAdmin

Trestle:

gem 'trestle'
  • ✅ Modern Bootstrap-based admin
  • ✅ Better Rails 8 compatibility
  • ❌ Smaller community

Adminterface (Deprecated):

  • 🚫 No longer maintained (as shown in search results)

🏆 My Recommendation:

For our production app: Stick with Sprockets + ActiveAdmin 3.x

Why?

  1. Stability – Battle-tested combination
  2. Zero configuration issues
  3. Full feature set available
  4. Easy maintenance

The performance difference between Propshaft and Sprockets won’t significantly impact your admin interface, which is typically used by a small number of internal users.

🔮 Future Outlook:

  • ActiveAdmin v4 will eventually have better Propshaft support
  • Rails community is working on solutions
  • Node.js dependency trend for complex CSS is becoming standard anyway

Bottom Line: Don’t let the asset pipeline take over the application preferences. Our current Sprockets setup is perfectly fine for an admin interface! 🎯

The Reality Check:

We completely replaced Propshaft with Sprockets for the entire application.

Current State:

  • Propshaft: Completely removed
  • Sprockets: Handles ALL assets (main app + admin)
  • Importmaps: Still working (unaffected)
  • Hotwire/Turbo: Still working (unaffected)

🏗️ How ActiveAdmin Works:

ActiveAdmin is NOT a Rails Engine. It integrates directly into your app:

  1. Routes: ActiveAdmin.routes(self) adds /admin routes to your app
  2. Assets: ActiveAdmin’s CSS/JS becomes part of your asset pipeline
  3. Controllers: ActiveAdmin generates controllers in your app’s namespace

It’s tightly coupled to your application, not isolated.

🤷‍♂️ So What Are Our Real Options?

Option 1: Accept Current Setup

What we have:

  • Modern Rails 8 with Importmaps + Hotwire ✅
  • Sprockets instead of Propshaft ❌ (but works fine)
  • Full-featured admin interface ✅

Option 2: Use activeadmin_assets Gem

# Replace current ActiveAdmin setup
gem 'activeadmin_assets'  # Pre-compiled assets
gem 'propshaft'           # Back to Rails 8 default
  • Get Propshaft back
  • Keep Rails 8 defaults
  • Can’t customize admin styles

Option 3: Build Custom Admin

Keep your Rails 8 purity but build admin from scratch:

  • Pure Rails 8
  • Weeks of development time

🔍 What activeadmin_assets Actually Does:

The activeadmin_assets gem doesn’t replace ActiveAdmin – it provides pre-compiled static assets for ActiveAdmin to work with Propshaft.

But here’s the critical issue for you:

🚨 activeadmin_assets = NO Customization

If you use activeadmin_assets, you get:

  • ✅ ActiveAdmin functionality
  • ✅ Propshaft compatibility
  • ZERO ability to customize styles/interface

The assets are pre-compiled and frozen – you can’t modify colors, layouts, or styling.

Since We Want Customization:

We’re actually in the BEST setup possible right now!

Our Current Setup Gives You:

  • Full ActiveAdmin customization (styles, layouts, themes)
  • Modern Rails 8 (Importmaps, Hotwire, Turbo)
  • All ActiveAdmin features (filters, actions, forms)
  • ❌ Sprockets instead of Propshaft (minor trade-off)

Customization Examples We Can Do:

  • Custom CSS themes and colors
  • Layout modifications
  • Custom JavaScript behaviors
  • Brand styling and logos
  • Advanced form customizations

🎯 Reality Check:

There’s no solution that gives us:

  1. Full ActiveAdmin customization AND
  2. Propshaft AND
  3. Zero complexity

We have to pick 2 out of 3.

💡 My Honest Last Decision:

Keep our current setup! We’re already using:

  • Modern Rails 8 patterns (95% of your codebase)
  • Importmaps and Hotwire (exactly as intended)
  • Sprockets only affects asset serving (invisible to users)

The Propshaft vs Sprockets difference won’t affect your product’s success, but losing admin customization will limit our UX.


Guide: Integrating React ⚛️ into a Rails 8 Application – Part 3 | Start developing react

Let’s move on to quick development of more react components now. Before that let’s check what we have now and understand it very clear.

📄 File 1:

Our app/javascript/components/App.jsx file:

import React from 'react';

function App() {
  return (
    <div>
      <h1>React is working fine!</h1>
      <p>Welcome to Rails + React App</p>
    </div>
  );
}

export default App;

Let’s examine this React component step by step:

Line 1: Import React

import React from 'react';
  • import – ES6 module syntax to bring in external code
  • React – The main React library
  • from 'react' – Importing from the npm package named “react”
  • Why needed? Even though we use --jsx=automatic, we still import React for any hooks or React features we might use.

Function Component: Line 3-9

A React function component is a simple JavaScript function that serves as a building block for user interfaces in React applications. These components are designed to be reusable and self-contained, encapsulating a specific part of the UI and its associated logic.

function App() {
  return (
    <div>
      <h1>React is working fine!</h1>
      <p>Welcome to Rails + React App</p>
    </div>
  );
}

🔍 Breaking this down:

Line 3: Component Declaration

function App() {
  • function App() – This is a React Function Component
  • Component naming – Must start with capital letter (App, not app)
  • What it is – A JavaScript function that returns JSX (user interface)

Line 4-8: JSX Return

return (
  <div>
    <h1>React is working fine!</h1>
    <p>Welcome to Rails + React App</p>
  </div>
);
  • return – Every React component must return something
  • JSX – Looks like HTML, but it’s actually JavaScript
  • <div> – Must have one parent element (React Fragment rule)
  • <h1> & <p> – Regular HTML elements, but processed by React

Line 11: Export

export default App;
  • export default – ES6 syntax to make this component available to other files
  • App – The component name we’re exporting
  • Why needed? So application.js can import and use this component

📄 File 2:

Our app/javascript/application.js file:

// Entry point for the build script in your package.json
import React from 'react';
import { createRoot } from 'react-dom/client';
import App from './components/App';

document.addEventListener('DOMContentLoaded', () => {
  const container = document.getElementById('react-root');

  if(container) {
    const root = createRoot(container);
    root.render(<App />);
  }
});

This is the entry point that connects React to your Rails app:

    Imports: Line 2-4

    import React from 'react';
    import { createRoot } from 'react-dom/client';
    import App from './components/App';
    

    🔍 Breaking down each import:

    Line 2:

    import React from 'react';
    
    • Same as before – importing the React library

    Line 3:

    import { createRoot } from 'react-dom/client';
    
    • { createRoot }Named import (notice the curly braces)
    • react-dom/client – ReactDOM library for browser/DOM manipulation
    • createRoot – New React 18+ API for rendering components to DOM

    Line 4:

    import App from './components/App';
    
    • AppDefault import (no curly braces)
    • ./components/App – Relative path to our App component
    • Note: We don’t need .jsx extension, esbuild figures it out

    DOM Integration: Line 6-12

    document.addEventListener('DOMContentLoaded', () => {
      const container = document.getElementById('react-root');
    
      if(container) {
        const root = createRoot(container);
        root.render(<App />);
      }
    });
    

    🔍 Step by step breakdown:

    Line 6:

    document.addEventListener('DOMContentLoaded', () => {
    
    • document.addEventListener – Standard browser API
    • 'DOMContentLoaded' – Wait until HTML is fully loaded
    • () => { – Arrow function (ES6 syntax)
    • Why needed? Ensures the HTML exists before React tries to find elements

    Line 7:

    const container = document.getElementById('react-root');
    
    • const container – Create a variable to hold the DOM element
    • document.getElementById('react-root') – Find HTML element with id="react-root"
    • Where is it? In your Rails view file: app/views/home/index.html.erb

    Line 9:

    if(container) {
    
    • Safety check – Only proceed if the element exists
    • Prevents errors – If someone visits a page without react-root element

    Line 10-11:

    const root = createRoot(container);
    root.render(<App />);
    
    • createRoot(container) – Create a React “root” at the DOM element
    • root.render(<App />) – Render our App component inside the container
    • <App /> – JSX syntax for using our component (self-closing tag)

    🎯 Key React Concepts You Just Learned:

    1. Components

    • Functions that return JSX
    • Must start with capital letter
    • Reusable pieces of UI

    2. JSX

    • Looks like HTML, actually JavaScript
    • Must return single parent element
    • Processed by esbuild into regular JavaScript

    3. Import/Export

    • Default exports: export default Appimport App from './App'
    • Named exports: export { createRoot }import { createRoot } from 'package'

    4. React DOM

    • createRoot() – Modern way to mount React apps (React 18+)
    • render() – Display components in the browser

    5. Rails Integration

    • Rails serves the HTML page
    • React takes over the #react-root element
    • esbuild bundles everything together

    🚀 This pattern is the foundation of every React app! We create components, import them, and render them to the DOM.


    📚 Step-by-Step React Learning with Todo List

    Now let’s build a Todo List app step by step. I’ll explain each React concept thoroughly as we go. Here’s our learning roadmap:

    Step 1: Understanding JSX and Basic Component Structure

    First, let’s update our App.jsx to create the basic structure of our Todo app:

    import React from 'react';
    
    function App() {
      return (
        <div className="todo-app">
          <h1>My Todo List</h1>
          <p>Let's learn React by building a todo app!</p>
    
          {/* This is a JSX comment */}
          <div className="todo-container">
            <h2>Add a new todo</h2>
            <input type="text" placeholder="Enter a todo..." />
            <button>Add Todo</button>
    
            <h2>My Todos</h2>
            <ul>
              <li>Learn React basics</li>
              <li>Build a todo app</li>
              <li>Master React hooks</li>
            </ul>
          </div>
        </div>
      );
    }
    
    export default App;
    

    🎯 Key Concepts Explained:

    JSX (JavaScript XML):

    • JSX lets you write HTML-like syntax directly in JavaScript
    • It’s a syntax extension for JavaScript, not actual HTML
    • JSX gets compiled to JavaScript function calls
    • You can use {} to embed JavaScript expressions inside JSX

    Important JSX Rules:

    • Use className instead of class (because class is a reserved word in JavaScript)
    • You can use single quotes for className values in JSX. Both work perfectly fine:
    // Both of these are valid:
    <div className='todo-app'>    // Single quotes ✅
    <div className="todo-app">    // Double quotes ✅
    

    Quote Usage in JSX/JavaScript:

    Single quotes vs Double quotes:

    • JavaScript treats them identically
    • It’s mostly a matter of personal/team preference
    • The key is to be consistent throughout your project

    Common conventions:

    // Option 1: Single quotes for JSX attributes
    <div className='todo-app'>
      <input type='text' placeholder='Enter todo...' />
    </div>
    
    // Option 2: Double quotes for JSX attributes  
    <div className="todo-app">
      <input type="text" placeholder="Enter todo..." />
    </div>
    
    // Option 3: Mixed (but stay consistent within each context)
    const message = 'Hello World';  // Single for JS strings
    <div className="todo-app">      // Double for JSX attributes
    

    When you MUST use specific quotes:

    // When the string contains the same quote type
    <div className="It's a great day">        // Double quotes needed
    <div className='He said "Hello"'>        // Single quotes needed
    
    // Or use escape characters
    <div className='It\'s a great day'>       // Escaping single quote
    <div className="He said \"Hello\"">      // Escaping double quote
    

    💡 Tip: Many teams use tools like Prettier or ESLint to automatically format and enforce consistent quote usage across the entire project.

    • All tags must be closed (self-closing tags need / at the end)
    • JSX comments use {/* */} syntax
    • Return a single parent element (or use React Fragment <>...</>)

    Try updating our App.jsx with this code and see it in your browser!


    Step 2: Introduction to State with useState

    Now let’s add state to make our app interactive. State is data that can change over time.

    import React, { useState } from 'react';
    
    function App() {
      // useState Hook - creates state variable and setter function
      const [todos, setTodos] = useState([
        { id: 1, text: 'Learn React basics', completed: false },
        { id: 2, text: 'Build a todo app', completed: false },
        { id: 3, text: 'Master React hooks', completed: true }
      ]);
    
      const [inputValue, setInputValue] = useState('');
    
      return (
        <div className="todo-app">
          <h1>My Todo List</h1>
    
          <div className="todo-container">
            <h2>Add a new todo</h2>
            <input 
              type="text" 
              placeholder="Enter a todo..." 
              value={inputValue}
              onChange={(e) => setInputValue(e.target.value)}
            />
            <button>Add Todo</button>
    
            <h2>My Todos ({todos.length})</h2>
            <ul>
              {todos.map(todo => (
                <li key={todo.id}>
                  {todo.text} {todo.completed ? '✅' : '⏳'}
                </li>
              ))}
            </ul>
          </div>
        </div>
      );
    }
    
    export default App;
    

    🎯 Key Concepts Explained:

    useState Hook:

    • useState is a React Hook that lets you add state to functional components
    • It returns an array with two elements: [currentValue, setterFunction]
    • const [todos, setTodos] = useState([]) creates a state variable todos and a function setTodos to update it
    • The initial value is passed as an argument to useState

    Controlled Components:

    • The input field is now “controlled” by React state
    • value={inputValue} makes the input show what’s in state
    • onChange={(e) => setInputValue(e.target.value)} updates state when user types

    Array.map() for Rendering Lists:

    • todos.map() transforms each todo into a JSX element
    • Each list item needs a unique key prop for React’s optimization
    • {todo.text} embeds the todo text using JSX expressions

    Try this code and notice how the input field now responds to typing!


    Step 3: Event Handling and Adding Todos

    Let’s make the “Add Todo” button work:

    import React, { useState } from 'react';
    
    function App() {
      const [todos, setTodos] = useState([
        { id: 1, text: 'Learn React basics', completed: false },
        { id: 2, text: 'Build a todo app', completed: false },
        { id: 3, text: 'Master React hooks', completed: true }
      ]);
    
      const [inputValue, setInputValue] = useState('');
    
      // Function to add a new todo
      const addTodo = () => {
        if (inputValue.trim() !== '') {
          const newTodo = {
            id: Date.now(), // Simple ID generation
            text: inputValue,
            completed: false
          };
    
          setTodos([...todos, newTodo]); // Spread operator to add new todo
          setInputValue(''); // Clear the input field
        }
      };
    
      // Function to handle Enter key press
      const handleKeyPress = (e) => {
        if (e.key === 'Enter') {
          addTodo();
        }
      };
    
      return (
        <div className="todo-app">
          <h1>My Todo List</h1>
    
          <div className="todo-container">
            <h2>Add a new todo</h2>
            <input 
              type="text" 
              placeholder="Enter a todo..." 
              value={inputValue}
              onChange={(e) => setInputValue(e.target.value)}
              onKeyPress={handleKeyPress}
            />
            <button onClick={addTodo}>Add Todo</button>
    
            <h2>My Todos ({todos.length})</h2>
            <ul>
              {todos.map(todo => (
                <li key={todo.id}>
                  {todo.text} {todo.completed ? '✅' : '⏳'}
                </li>
              ))}
            </ul>
          </div>
        </div>
      );
    }
    
    export default App;
    

    🎯 Key Concepts Explained:

    Event Handlers:

    • onClick={addTodo} – function runs when button is clicked
    • onKeyPress={handleKeyPress} – function runs when key is pressed
    • Event handlers receive an event object (e) with information about the event

    State Updates:

    • setTodos([...todos, newTodo]) – creates a new array with all existing todos plus the new one
    • Important: Always create new arrays/objects instead of mutating existing ones
    • React compares old and new state to determine if re-render is needed

    Spread Operator (...):

    • ...todos spreads out all elements of the todos array
    • This is the React way to add items to an array in state

    Try adding new todos now!

    🎯 Function Syntax Options in JavaScript:

    const addTodo = () => {} is a function syntax – specifically an arrow function. Let me explain why it’s declared as const and the different ways to write functions in JavaScript.

    1. Function Declaration (Traditional)
    function addTodo() {
      // function body
    }
    
    2. Function Expression with Arrow Function
    const addTodo = () => {
      // function body
    };
    
    3. Function Expression (Traditional)
    const addTodo = function() {
      // function body
    };
    

    🤔 Why use const for functions?

    Arrow functions are expressions, not declarations:

    // This is a DECLARATION - creates a function named addTodo
    function addTodo() { }
    
    // This is an EXPRESSION - creates a function and assigns it to a variable
    const addTodo = () => { };
    

    Why const specifically?

    // ❌ Could be reassigned accidentally
    let addTodo = () => { };
    addTodo = "oops"; // Function is now gone!
    
    // ❌ Could be reassigned accidentally  
    var addTodo = () => { };
    addTodo = null; // Function is now gone!
    
    // ✅ Cannot be reassigned - prevents bugs
    const addTodo = () => { };
    addTodo = "something"; // ERROR: Assignment to constant variable
    

    📚 Key Differences:

    Function Declaration vs Arrow Function:

    // Function Declaration
    function addTodo() {
      console.log("Adding todo");
    }
    
    // Arrow Function (assigned to const)
    const addTodo = () => {
      console.log("Adding todo");
    };
    

    Hoisting Behavior:

    // ✅ This works - function declarations are "hoisted"
    sayHello(); // "Hello!"
    
    function sayHello() {
      console.log("Hello!");
    }
    
    // ❌ This doesn't work - arrow functions are not hoisted
    sayGoodbye(); // Error: Cannot access 'sayGoodbye' before initialization
    
    const sayGoodbye = () => {
      console.log("Goodbye!");
    };
    

    this Binding:

    // Function declaration has its own 'this'
    function regularFunction() {
      console.log(this); // 'this' can change based on how it's called
    }
    
    // Arrow function inherits 'this' from surrounding scope
    const arrowFunction = () => {
      console.log(this); // 'this' is inherited from parent scope
    };
    

    🚀 In React Context:

    In React functional components, we typically use arrow functions with const because:

    1. Prevents accidental reassignment – our function won’t get overwritten
    2. Consistent with modern JavaScript – ES6+ standard
    3. Cleaner syntax – less verbose than traditional function expressions
    4. Better for event handlersthis behavior is more predictable

    All these are equivalent in React:

    // Option 1: Arrow function with const (most common)
    const addTodo = () => {
      if (inputValue.trim() !== '') {
        // ... logic
      }
    };
    
    // Option 2: Traditional function declaration
    function addTodo() {
      if (inputValue.trim() !== '') {
        // ... logic  
      }
    }
    
    // Option 3: Function expression with const
    const addTodo = function() {
      if (inputValue.trim() !== '') {
        // ... logic
      }
    };
    

    💡 Why React developers prefer arrow functions:

    1. Shorter syntax for simple functions
    2. Consistent variable declaration (everything uses const)
    3. No hoisting confusion – functions are defined before they’re used
    4. Better with modern tooling – ESLint, Prettier handle them well

    So yes, const addTodo = () => {} is definitely a function! It’s just a modern way to write functions that prevents accidental reassignment and has cleaner syntax.

    🎯 What is Hoisting?

    Hoisting is a fundamental JavaScript concept that can be confusing at first. Let me explain it clearly with examples.

    Hoisting is JavaScript’s behavior of moving declarations to the top of their scope during the compilation phase, before the code is executed.

    Think of it like JavaScript “hoists” (lifts up) your variable and function declarations to the top of their scope.

    📚 How Hoisting Works:

    Function Declarations are Hoisted:

    // This works even though we call the function before declaring it!
    sayHello(); // Outputs: "Hello!"
    
    function sayHello() {
      console.log("Hello!");
    }
    

    Behind the scenes, JavaScript treats it like this:

    // JavaScript internally reorganizes it like this:
    function sayHello() {
      console.log("Hello!");
    }
    
    sayHello(); // Now it makes sense!
    

    Variable Declarations (with var) are Hoisted:

    console.log(myVar); // Outputs: undefined (not an error!)
    var myVar = "Hello";
    console.log(myVar); // Outputs: "Hello"
    

    Behind the scenes:

    // JavaScript internally treats it like this:
    var myVar; // Declaration is hoisted to the top
    console.log(myVar); // undefined (declared but not assigned)
    myVar = "Hello"; // Assignment stays in place
    console.log(myVar); // "Hello"
    

    🚫 What is NOT Hoisted:

    let and const variables:

    // ❌ This throws an error!
    console.log(myLet); // ReferenceError: Cannot access 'myLet' before initialization
    let myLet = "Hello";
    
    // ❌ This also throws an error!
    console.log(myConst); // ReferenceError: Cannot access 'myConst' before initialization
    const myConst = "Hello";
    

    Arrow Functions (Function Expressions):

    // ❌ This throws an error!
    sayGoodbye(); // ReferenceError: Cannot access 'sayGoodbye' before initialization
    
    const sayGoodbye = () => {
      console.log("Goodbye!");
    };
    

    Function Expressions:

    // ❌ This throws an error!
    myFunc(); // TypeError: myFunc is not a function
    
    var myFunc = function() {
      console.log("Hello!");
    };
    

    🎭 Visual Examples:

    Example 1: Function Declaration Hoisting

    // What you write:
    console.log("1. Start");
    myFunction(); // This works!
    console.log("3. End");
    
    function myFunction() {
      console.log("2. Inside function");
    }
    
    // Output:
    // 1. Start
    // 2. Inside function  
    // 3. End
    

    Example 2: Variable Hoisting with var

    // What you write:
    console.log("Value is:", myVar); // undefined
    var myVar = 42;
    console.log("Value is:", myVar); // 42
    
    // What JavaScript internally does:
    var myVar; // Hoisted to top
    console.log("Value is:", myVar); // undefined
    myVar = 42; // Assignment stays here
    console.log("Value is:", myVar); // 42
    

    Example 3: Why let and const are different

    // Temporal Dead Zone
    console.log("Before declaration");
    
    // ❌ This area is the "Temporal Dead Zone" for myLet
    console.log(myLet); // ReferenceError!
    
    let myLet = "Hello"; // Declaration and initialization
    console.log(myLet); // "Hello"
    

    🎯 Practical Implications:

    Why Function Declarations work everywhere:

    // This is valid JavaScript
    function main() {
      helper(); // Can call helper before it's defined
    
      function helper() {
        console.log("Helper function");
      }
    }
    

    Why Arrow Functions must be defined first:

    // ❌ This doesn't work
    const main = () => {
      helper(); // Error! helper is not defined yet
    
      const helper = () => {
        console.log("Helper function");
      };
    };
    
    // ✅ This works
    const main = () => {
      const helper = () => {
        console.log("Helper function");
      };
    
      helper(); // Now it works!
    };
    

    💡 Best Practices:

    1. Use const and let instead of var to avoid hoisting confusion
    2. Define functions before using them (even though function declarations are hoisted)
    3. Use arrow functions for consistency and to avoid hoisting surprises
    4. Initialize variables when you declare them

    🔗 Back to Our React Example:

    // This is why we use const for arrow functions
    const App = () => {
      // ✅ Good: Function defined before use
      const addTodo = () => {
        // function logic
      };
    
      // ❌ Bad: Would cause error if we tried to call it here
      // deleteTodo(); // Error!
    
      const deleteTodo = () => {
        // function logic
      };
    
      return (
        <div>
          <button onClick={addTodo}>Add</button>
          <button onClick={deleteTodo}>Delete</button>
        </div>
      );
    };
    

    Hoisting is JavaScript’s way of making function declarations available throughout their scope, but it doesn’t apply to modern variable declarations (let, const) or arrow functions. That’s why we define our functions with const and make sure to declare them before we use them!


    Step 4: Toggling Todo Completion

    Let’s add the ability to mark todos as complete/incomplete:

    import React, { useState } from 'react';
    
    function App() {
      const [todos, setTodos] = useState([
        { id: 1, text: 'Learn React basics', completed: false },
        { id: 2, text: 'Build a todo app', completed: false },
        { id: 3, text: 'Master React hooks', completed: true }
      ]);
    
      const [inputValue, setInputValue] = useState('');
    
      const addTodo = () => {
        if (inputValue.trim() !== '') {
          const newTodo = {
            id: Date.now(),
            text: inputValue,
            completed: false
          };
    
          setTodos([...todos, newTodo]);
          setInputValue('');
        }
      };
    
      // Function to toggle todo completion
      const toggleTodo = (id) => {
        setTodos(todos.map(todo => 
          todo.id === id 
            ? { ...todo, completed: !todo.completed } // Toggle completed status
            : todo // Keep todo unchanged
        ));
      };
    
      const handleKeyPress = (e) => {
        if (e.key === 'Enter') {
          addTodo();
        }
      };
    
      return (
        <div className="todo-app">
          <h1>My Todo List</h1>
    
          <div className="todo-container">
            <h2>Add a new todo</h2>
            <input 
              type="text" 
              placeholder="Enter a todo..." 
              value={inputValue}
              onChange={(e) => setInputValue(e.target.value)}
              onKeyPress={handleKeyPress}
            />
            <button onClick={addTodo}>Add Todo</button>
    
            <h2>My Todos ({todos.length})</h2>
            <ul>
              {todos.map(todo => (
                <li key={todo.id}>
                  <span 
                    onClick={() => toggleTodo(todo.id)}
                    style={{ 
                      textDecoration: todo.completed ? 'line-through' : 'none',
                      cursor: 'pointer',
                      color: todo.completed ? '#888' : '#000'
                    }}
                  >
                    {todo.text}
                  </span>
                  {todo.completed ? ' ✅' : ' ⏳'}
                </li>
              ))}
            </ul>
          </div>
        </div>
      );
    }
    
    export default App;
    

    🎯 Key Concepts Explained:

    Array.map() for Updates:

    • todos.map() creates a new array where each todo is either updated or kept the same
    • todo.id === id ? { ...todo, completed: !todo.completed } : todo
    • This pattern is very common in React for updating items in arrays

    Conditional Rendering:

    • todo.completed ? '✅' : '⏳' – ternary operator for conditional display
    • textDecoration: todo.completed ? 'line-through' : 'none' – conditional styling

    Arrow Functions in JSX:

    • onClick={() => toggleTodo(todo.id)} – arrow function to pass arguments to event handlers
    • Without the arrow function, toggleTodo(todo.id) would execute immediately

    Now you can click on todos to toggle their completion status!


    🤔 What we’ve learned so far:

    1. ✅ JSX syntax and rules
    2. ✅ useState hook for state management
    3. ✅ Event handling (onClick, onChange, onKeyPress)
    4. ✅ Controlled components
    5. ✅ Array mapping for rendering lists
    6. ✅ Conditional rendering
    7. ✅ State updates with spread operator

    Next Steps: In the following steps, we’ll cover:

    • Deleting todos
    • Component composition (breaking into smaller components)
    • Props passing
    • Filtering todos
    • More advanced state management

    Let’s see in Part 4. Happy React Development! 🚀

    📦 Sprockets vs 🧵 Propshaft in Ruby on Rails 7/8 – What’s the Difference?

    When working with asset pipelines in Ruby on Rails 7 and 8, you might encounter Sprockets and Propshaft—two asset handling libraries. While both aim to serve static assets like JavaScript, CSS, images, and fonts, they do so in different ways.

    This post will walk you through what each does, how they differ, and when you might want to use one over the other.


    📦 What is Sprockets?

    Sprockets is the original Rails asset pipeline system, introduced way back in Rails 3.1. It allows developers to:

    • Concatenate and minify JavaScript and CSS
    • Preprocess assets using things like SCSS, CoffeeScript, ERB, etc.
    • Fingerprint assets for cache busting
    • Compile assets at deploy time

    It works well for traditional Rails applications where the frontend and backend are tightly coupled.

    Pros:

    • Mature and stable
    • Rich preprocessing pipeline (SCSS, CoffeeScript, ERB, etc.)
    • Supports advanced directives like //= require_tree .

    Cons:

    • Complex internal logic
    • Slower compilation times
    • Relies on a manifest file that can get messy
    • Tightly coupled with older Rails asset practices

    🧵 What is Propshaft?

    Propshaft is the newer asset pipeline introduced by the Rails team as an alternative to Sprockets. It focuses on simplicity and modern best practices. Propshaft was added as an optional asset pipeline starting in Rails 7 and is included by default in some new apps.

    Design Philosophy:
    Propshaft aims to work like a static file server with fingerprinting and logical path mapping, rather than a full asset compiler.

    Key Features:

    • Uses logical paths (e.g., /assets/application.css)
    • No preprocessing pipeline by default (but supports it via extensions like Tailwind or Sass)
    • Supports digesting (fingerprinting) of assets
    • Leaner and faster than Sprockets
    • Easier to integrate with modern JavaScript bundlers (like importmaps, esbuild, or webpack)

    Pros:

    • Lightweight and fast
    • Easier to debug
    • Works great with importmaps and Hotwire
    • Modern, forward-looking approach

    Cons:

    • No advanced preprocessing by default
    • Limited plugin ecosystem (still maturing)
    • Doesn’t support old Sprockets directives

    🔍 Key Differences at a Glance

    FeatureSprocketsPropshaft
    Introduced InRails 3.1Rails 7
    Default in RailsRails 6 and earlierOptional from Rails 7+
    Preprocessing SupportYes (SCSS, ERB, CoffeeScript, etc.)No (only raw assets by default)
    SpeedSlowerFaster
    Configuration ComplexityHigherMinimal
    Plugin EcosystemLarge and matureNew and growing
    Use With Importmaps/HotwireCan work, but heavierIdeal
    DebuggingHarder due to complexityEasier

    🧰 When Should You Use Sprockets?

    Choose Sprockets if:

    • You are upgrading a legacy Rails app
    • Your project already relies on Sprockets
    • You use heavy asset preprocessing
    • You need compatibility with gems that depend on Sprockets

    ⚡ When Should You Use Propshaft?

    Choose Propshaft if:

    • You are starting a new Rails 7/8 project
    • You use Importmaps or Hotwire/Turbo
    • You prefer faster and simpler asset handling
    • You don’t need complex preprocessing

    Propshaft pairs particularly well with modern frontend workflows like Tailwind CSS (via build tools) or StimulusJS (with importmaps).

    🛠️ Switching from Sprockets to Propshaft

    If you’re migrating, here are basic steps:

    1. Remove sprockets-rails gem from your Gemfile: # Gemfile # gem "sprockets-rails"
    2. Add propshaft: gem "propshaft"
    3. Update config/application.rb: config.assets.resolver = Propshaft::Resolver.new( paths: [Rails.root.join("app/assets")] )
    4. Remove app/assets/config/manifest.js (used by Sprockets)
    5. Move all assets to the correct logical paths under app/assets
    6. Use digested URLs as needed (asset_path("application.css") etc.)

    🧪 Real Example in Rails 8

    Here’s how your application.html.erb might look using Propshaft:

    <%= stylesheet_link_tag "application", "data-turbo-track": "reload" %>
    <%= javascript_include_tag "application", "data-turbo-track": "reload", defer: true %>


    And your app/assets/builds/application.css could be compiled via Tailwind or SCSS using a toolchain.


    🧠 Final Thoughts

    Sprockets has served Rails well for over a decade, but Propshaft is the new lightweight future. If you’re starting fresh, Propshaft is a strong choice, especially when used alongside Hotwire, Importmaps, or modern JS bundlers.

    However, don’t feel pressured to switch if your current Sprockets setup works fine—Rails continues to support both.


    ✨ TL;DR

    • Sprockets = older, feature-rich, best for legacy apps
    • Propshaft = newer, minimal, better for modern workflows

    Choose based on your app’s needs and complexity. Cheers! 🚀

    Design Studio – Rails 8 e-commerce application: Integrate active admin

    Now let’s create an admin interface for our e-commerce Application.

    We have a well-structured e-commerce Rails application with:

    Models: User, Product, ProductVariant, Order, OrderItem
    Authentication: Custom session-based auth with user roles (customer/admin)
    Authorization: Already has admin role checking

    Admin Interface Recommendations

    Here are the best options for Rails admin interfaces, ranked by suitability for our project:

    1. ActiveAdmin (Recommended ⭐)
      Best fit for e-commerce with complex associations
      Excellent filtering, search, and batch operations
      Great customization options and ecosystem
      Handles your Product → ProductVariant → OrderItem relationships well
    2. Administrate (Modern Alternative)
      Clean, Rails-way approach by Thoughtbot
      Good for custom UIs, less configuration
      More work to set up initially
    3. Rails Admin (What you asked about)
      Quick setup but limited customization
      Less actively maintained
      Good for simple admin needs
    4. Avo (Modern Premium)
      Beautiful modern UI
      Some features require paid version

      https://avohq.io/rails-admin
      https://docs.avohq.io/3.0/

    Choose ActiveAdmin for our e-commerce application. Let’s integrate it with our existing authentication system

    Add in Gemfile:

    gem "activeadmin"
    gem "sassc-rails" # Required for ActiveAdmin
    gem "image_processing", "~> 1.2" # For variant processing if not already present
    

    Bundle Install and run the Active Admin Generator:

    $ bundle install
    $ rails generate active_admin:install --skip-users
    definition of Rules was here
    create app/assets/javascripts/active_admin.js
    create app/assets/stylesheets/active_admin.scss
    create db/migrate/20250710083516_create_active_admin_comments.rb
    

    Migration File created by Active Admin:

    class CreateActiveAdminComments < ActiveRecord::Migration[8.0]
      def self.up
        create_table :active_admin_comments do |t|
          t.string :namespace
          t.text   :body
          t.references :resource, polymorphic: true
          t.references :author, polymorphic: true
          t.timestamps
        end
        add_index :active_admin_comments, [ :namespace ]
      end
    
      def self.down
        drop_table :active_admin_comments
      end
    end
    

    Run database migration:

    $ rails db:migrate
    

    in app/initializers/active_admin.rb

    # This setting changes the method which Active Admin calls
      # within the application controller.
      config.authentication_method = :authenticate_admin_user!
    ....
    # This setting changes the method which Active Admin calls
      # (within the application controller) to return the currently logged in user.
      config.current_user_method = :current_admin_user
    ....
     # Default:
      config.logout_link_path = :destroy_session_path
    

    in app/controllers/application_controller.rb

    private
    
      def authenticate_admin_user!
        require_authentication
        ensure_admin
      end
    
      def current_admin_user
        Current.user if Current.user&.admin?
      end
    

    Run the active admin user, product generator:

    rails generate active_admin:resource User
    rails generate active_admin:resource Product
    rails generate active_admin:resource ProductVariant
    rails generate active_admin:resource Order
    rails generate active_admin:resource OrderItem
    

    Let’s update all the active admin resources with fields, filters, attributes, panels etc.

    Let’s add accepts_nested_attributes_for :variants, allow_destroy: true in Product Model.

    accepts_nested_attributes_for is a Rails feature that allows a parent model to accept and process attributes for its associated child models through nested parameters. Here’s what it does:

    What it enables:

    1. Nested Forms: You can create/update a Product and its ProductVariants in a single form submission
    2. Mass Assignment: Allows passing nested attributes through strong parameters
    3. CRUD Operations: Create, update, and delete associated records through the parent

    In our Product model

    class Product < ApplicationRecord
      has_many :variants, dependent: :destroy, class_name: "ProductVariant"
      accepts_nested_attributes_for :variants, allow_destroy: true
    end
    

    What this allows:

    Before: You’d need separate forms/requests for Product and ProductVariant

    # Create product first
    product = Product.create(name: "T-Shirt", brand: "Nike")
    
    # Then create variants separately
    product.variants.create(size: "M", color: "Red", sku: "NIKE-001-M-RED")
    product.variants.create(size: "L", color: "Blue", sku: "NIKE-001-L-BLUE")
    

    After: You can do it all in one go:

    Product.create(
      name: "T-Shirt",
      brand: "Nike",
      variants_attributes: [
        { size: "M", color: "Red", sku: "NIKE-001-M-RED" },
        { size: "L", color: "Blue", sku: "NIKE-001-L-BLUE" }
      ]
    )
    

    In ActiveAdmin context:

    This enables the nested form I created in app/admin/products.rb:

    f.inputs "Product Variants" do
      f.has_many :variants, allow_destroy: true, new_record: true do |v|
        v.input :size
        v.input :color
        v.input :sku
        # ... other variant fields
      end
    end
    
    The allow_destroy: true option:
    • Allows deleting associated records by passing _destroy: ‘1’
    • Essential for updating existing products with variants
    Strong Parameters:

    In the controller, you need to permit the nested attributes:

    permit_params :name, :brand, :category, 
                  variants_attributes: [:id, :size, :color, :sku, :mrp, :discount_percent, :_destroy]
    

    Propshaft vs Sprockets

    We have an error after integrating ActiveAdmin:

     Rendered layout layouts/application.html.erb (Duration: 13.9ms | GC: 0.5ms)
    Completed 500 Internal Server Error in 118ms (ActiveRecord: 28.7ms (1 query, 0 cached) | GC: 27.0ms)
    
    ActionView::Template::Error (undefined method 'load_path' for an instance of Sprockets::Environment)
    Caused by: NoMethodError (undefined method 'load_path' for an instance of Sprockets::Environment)
    
    Information for: ActionView::Template::Error (undefined method 'load_path' for an instance of Sprockets::Environment):
        14:     <link rel="icon" href="/icon.svg" type="image/svg+xml">
        15:     <link rel="apple-touch-icon" href="/icon.png">
    

    This error occurs because Rails 8 uses Propshaft by default, but ActiveAdmin requires Sprockets. There’s a conflict between the two asset pipelines. Let’s fix this by switching to Sprockets completely:

    Add in Gemfile:

    # Use Sprockets for asset pipeline (required for ActiveAdmin)
    gem "sprockets-rails"
    
    $ bundle install
    
    # application.rb
    
    # Use Sprockets for asset pipeline
    config.assets.enabled = true


    Let’s create an admin user for testing our ActiveAdmin:

    # seed.rb
    # Create admin user
    admin_user = User.find_or_create_by(email: "admin@designstudio.com") do |user|
      user.password = "password123"
      user.role = "admin"
    end
    
    puts "Admin user created: #{admin_user.email}" if admin_user.persisted?
    
    # run seed
    ✗ rails db:seed
    

    ✅ We have Successfully Integrated ActiveAdmin with Nested Attributes!

    I’ve successfully converted your Rails application to use nested attributes (variants_attributes) across the entire stack and integrated ActiveAdmin as your admin interface. Here’s what I accomplished:

    🔧 What I Fixed & Updated:

    1. Asset Pipeline Issue:

    • Switched from Propshaft to Sprockets (required for ActiveAdmin)
    • Updated Gemfile and application configuration
    • Fixed the load_path error you encountered

    2. Model Changes:

    • Added accepts_nested_attributes_for :variants, allow_destroy: true to Product model

    3. Controller Updates:

    • Changed from singular product_variant to plural variants_attributes
    • Simplified create/update actions to use Rails nested attributes handling
    • Updated strong parameters to permit nested variant attributes

    4. View Improvements:

    • Updated product form to handle multiple variants with JavaScript
    • Added “Add Another Variant” functionality
    • Implemented proper nested form fields for all variant attributes

    5. ActiveAdmin Configuration:

    • Set up authentication using your existing user system
    • Created comprehensive admin resources for all models
    • Added nested variant management in product forms
    • Built an informative dashboard with key metrics

    🎯 Admin Features You Now Have:

    1. Dashboard – Key metrics, recent activity, revenue overview
    2. User Management – Role management, order history
    3. Product Management – Full CRUD with image uploads and nested variants
    4. Order Management – Status updates, batch actions
    5. Inventory Management – ProductVariant and OrderItem tracking

    🔑 Admin Access:

    • URL: http://localhost:3000/admin
    • Email: admin@designstudio.com
    • Password: password123

    📊 Comparison vs Rails Admin:

    ActiveAdmin Advantages:

    • ✅ Better for complex e-commerce relationships
    • ✅ Excellent filtering and search capabilities
    • ✅ Powerful batch operations
    • ✅ Highly customizable forms and views
    • ✅ Active development and community

    Rails Admin:

    • ❌ Less actively maintained
    • ❌ Limited customization options
    • ❌ Not as suitable for complex nested relationships

    🚀 What’s Working Now:

    1. Nested Variants: Create/edit products with multiple variants in one form
    2. Image Management: Upload multiple product images
    3. Order Processing: Admin can update order statuses with batch actions
    4. User Management: Promote users to admin, view order history
    5. Dashboard Analytics: Revenue tracking, popular products, recent activity

    Visit /admin to explore your new admin interface, Cheers!

    Check docs: https://activeadmin.info/0-installation.html

    ⚠️ Tailwind UI Issue after moving to Sprockets

    The issue is with <%= stylesheet_link_tag "/tailwind/application.css", "data-turbo-track": "reload" %> where we are trying to load Tailwind CSS from an incorrect path. The tailwindcss-rails gem serves Tailwind CSS differently. Let me fix this:

    ls -la app/assets/tailwind/
    
    curl -I http://localhost:3000/tailwind/application.css
    
    rails routes | grep -i tailwind
    

    The issue is that the /tailwind/application.css path is returning 404. The tailwindcss-rails gem works differently. Let’s check how it’s configured and fix this:

    find . -name "*.css" -path "*/public/*" | head -10
    
    rails assets:precompile
    

    Now let’s test if the Tailwind CSS is properly accessible:

    curl -I http://localhost:3000/assets/tailwind/application.css
    

    The issue is that with the tailwindcss-rails gem, Tailwind CSS gets compiled into the main application.css file rather than a separate file. Let’s check the current asset manifest and fix the layout:

    rails assets:precompile
    
    bundle exec tailwindcss build
    

    The Tailwind CSS is already built and located in app/assets/builds/tailwind.css. Let’s fix the configuration:

    rails assets:precompile
    
    curl -I http://localhost:3000/assets/tailwind.css
    

    The issue has been fixed. The Tailwind CSS is now properly accessible. Here’s what I did to resolve the problem:

    1. Identified the issue: The Tailwind CSS was being incorrectly referenced as /tailwind/application.css in the layout file, but it wasn’t being served properly through the asset pipeline.
    2. Found the correct location: Discovered that the tailwindcss-rails gem builds the CSS file to app/assets/builds/tailwind.css.
    3. Fixed the asset pipeline configuration:
    • Updated app/assets/config/manifest.js to include //= link_tree ../builds which includes the built Tailwind CSS
    • Removed the incorrect tailwind/application.css reference
    1. Updated the layout file:
    • Changed from <%= stylesheet_link_tag "/tailwind/application.css" %>
    • To the correct <%= stylesheet_link_tag "tailwind", "data-turbo-track": "reload" %>
    1. Verified the fix:
    • Successfully precompiled assets
    • Confirmed that http://localhost:3000/assets/tailwind.css returns a 200 OK status

    Install Rails Icons 🍁

    For better font-awesome assets, lets add rails-icons gem:

    # Rails Icons - Modern icon library support
    gem "rails_icons"
    
    $ rails generate rails_icons:install --help
    $ rails generate rails_icons:install --libraries=heroicons
    
    $ npm install @fortawesome/fontawesome-free
    

    How to migrate from the CDN to Rails Icons

    For a production Rails application, it’s generally better to use a gem rather than a CDN for Font Awesome. Here’s why:

    CDN Issues:

    • External dependency (can fail if CDN is down)
    • Privacy concerns (external requests)
    • No version control
    • Requires internet connection
    • Not cacheable with your assets

    Gem Benefits:

    • Self-hosted (no external dependencies)
    • Better performance (served with your assets)
    • Version control
    • Works offline
    • Follows Rails conventions
    • Better for production

    Based on my research, adding a gem is definitely the better approach for a production Rails application. Here are the best options:

    Option 1: Modern approach with npm package (Recommended)

    Since we’re using Rails 8 with modern tooling, I’d recommend using the npm package:

    yarn add @fortawesome/fontawesome-free
    
    npm --version
    
    which node
    

    However, given your current setup, I’d recommend Option 2 which is more Rails-native:

    Option 2: Rails Icons gem (Recommended for our setup)

    This is a modern gem that supports Font Awesome and other icon libraries with a clean Rails API:

    bundle install
    
    rails generate rails_icons:install --help
    
    rails generate rails_icons:install --libraries=heroicons
    

    Let’s remove the CDN and set up Rails Icons properly. Since we’re already using Font Awesome extensively, let’s add Font Awesome as a custom library:

    rails generate rails_icons:initializer --custom=fontawesome
    
    npm install @fortawesome/fontawesome-free
    
    find node_modules/@fortawesome/fontawesome-free -name "*.svg" -type f | head -5
    
    cp -r node_modules/@fortawesome/fontawesome-free/svgs/* app/assets/svg/icons/fontawesome/
    

    Rails Icons is now properly set up instead of the CDN. Here’s what we’ve accomplished:

    What’s Changed:

    1. Removed the Font Awesome CDN link (no more external dependency)
    2. Added rails_icons gem with Heroicons as the default library
    3. Added Font Awesome as a custom library with all variants (solid, regular, brands)
    4. Self-hosted all icons through Rails asset pipeline

    What is Ransack?

    Ransack is a popular Ruby gem that provides powerful search and filtering capabilities for Rails applications. It’s commonly used with ActiveAdmin (which your app uses) to create searchable, filterable, and sortable data tables.

    Ransackable Attributes and Associations

    ransackable_attributes

    This method defines which model attributes can be searched, filtered, or sorted through Ransack. It’s a security feature that prevents unauthorized access to sensitive data.

    def self.ransackable_attributes(auth_object = nil)
      %w[id email role created_at updated_at password_reset_token password_reset_sent_at]
    end
    

    What it does:

    • Allows searching/filtering by id, email, role, created_at, updated_at, etc.
    • Prevents searching by sensitive fields like password_digest
    • The auth_object parameter can be used for role-based access control

    ransackable_associations

    This method defines which model associations can be used in Ransack queries.

    def self.ransackable_associations(auth_object = nil)
      %w[orders sessions]
    end
    

    What it does:

    • Allows searching/filtering by related models (e.g., “users who have orders”)
    • Enables joins and complex queries across associations

    Why This Matters for Security

    Without these methods, Rails 7+ will raise warnings or errors because Ransack needs explicit permission to search certain fields. This prevents:

    1. Information disclosure – Searching sensitive fields like passwords
    2. Performance issues – Searching on unindexed or inappropriate fields
    3. Unauthorized access – Accessing data through unexpected query parameters

    Example Usage in ActiveAdmin

    In your ActiveAdmin dashboard, this enables features like:

    # In app/admin/users.rb
    ActiveAdmin.register User do
      # Users can now search by email, role, etc.
      # Users can filter by orders, sessions
      # Users can sort by created_at, updated_at
    end
    

    In Our User Model

    Looking at your User model:

    def self.ransackable_attributes(auth_object = nil)
      %w[id email role created_at updated_at password_reset_token password_reset_sent_at]
    end
    
    def self.ransackable_associations(auth_object = nil)
      %w[orders sessions]
    end
    

    This means:

    • ✅ Admins can search users by email, role, creation date
    • ✅ Admins can filter users by their orders or sessions
    • ✅ Admins can sort users by any of these attributes
    • ❌ Admins cannot search by password_digest (secure)
    • ❌ Admins cannot search by other sensitive fields

    Benefits

    1. Security: Explicit control over what can be searched
    2. Performance: Only searchable fields need indexes
    3. Usability: Provides powerful admin interface features
    4. Compliance: Helps meet data protection requirements

    Migration Guide:

    Old CDN way:

    <i class="fas fa-user"></i>          <!-- solid -->
    <i class="far fa-star"></i>          <!-- regular -->
    <i class="fab fa-facebook-f"></i>    <!-- brands -->
    

    New Rails Icons way:

    <%= icon "user", library: "fontawesome", variant: "solid", class: "size-6" %>
    <%= icon "star", library: "fontawesome", variant: "regular", class: "size-6" %>
    <%= icon "facebook-f", library: "fontawesome", variant: "brands", class: "size-6" %>
    

    Or use modern Heroicons (recommended for new icons):

    <%= icon "user", class: "size-6" %>
    <%= icon "star", class: "size-6" %>
    <%= icon "heart", class: "size-6" %>
    

    Benefits:

    • No external dependencies (works offline)
    • Better performance (served with your assets)
    • Version control over icons
    • Multiple libraries (Font Awesome + Heroicons + more)
    • Consistent API across all icon libraries
    • Better for production and privacy

    Our application should work exactly the same now, but with better performance and no external dependencies! You can gradually migrate icons from <i class="fas fa-x"> to <%= icon "x", library: "fontawesome", variant: "solid" %> as needed.

    Asset Issue Again

    ✅ Final Fix Applied:

    Added //= link_tree ../../javascript .js to the manifest, which tells Sprockets to include all JavaScript files from the app/javascript directory tree.

    ✅ What’s Working Now:

    1. All CSS files properly compiled:
    • tailwind.css ✅
    • application.css ✅
    • active_admin.css ✅
    1. All JavaScript files properly compiled:
    • application.js ✅
    • controllers/application.js ✅
    • controllers/decorative_background_controller.js ✅
    • controllers/hello_controller.js ✅
    • controllers/index.js ✅
    1. Asset Pipeline fully functional:
    • Sprockets serving all assets correctly
    • Proper cache headers and ETags
    • All asset links declared in manifest

    🎯 Current Status:

    Our Rails application now has:

    • ✅ Modern asset pipeline with Sprockets + Importmap
    • ✅ Tailwind CSS for styling (self-hosted)
    • ✅ ActiveAdmin for administration
    • ✅ Rails Icons instead of Font Awesome CDN
    • ✅ Stimulus controllers for JavaScript functionality
    • ✅ All assets properly precompiled and served

    Check Github: Active admin changes

    📋 Clean Commit History Summary:

    1. ✅ Phase 1: feat: Add Rails Icons gem with Font Awesome and Heroicons support #94
    • Replaced Font Awesome CDN with self-hosted icons
    • Added Rails Icons with unified API for multiple icon libraries
    1. ✅ Phase 2: task: Migrate from Propshaft to Sprockets asset pipeline #96
    • Switched from Propshaft to Sprockets for ActiveAdmin compatibility
    • Fixed asset compilation and linking issues
    1. ✅ Phase 3: feat: Integrate ActiveAdmin for comprehensive admin interface #94
    • Complete ActiveAdmin setup with authentication
    • Full admin resources for all e-commerce models
    1. ✅ Phase 4: fix: Resolve ActiveAdmin PostgreSQL and Ransack security issues #94
    • Fixed PostgreSQL GROUP BY errors in dashboard
    • Added Ransack security configuration for all models

    🚀 Our ActiveAdmin is now fully functional!

    You should now be able to:

    • ✅ Access the admin dashboard at localhost:3000/admin
    • ✅ View analytics and statistics without GROUP BY errors
    • ✅ Search and filter all resources safely with Ransack
    • ✅ Manage Users, Products, Variants, Orders, and Order Items
    • ✅ Use nested attributes for product variants
    • ✅ Perform batch operations and advanced filtering

    Test it out: Visit localhost:3000/admin and log in with your admin credentials to see the beautiful, fully-functional admin interface! 🎯

    to be continued 🚀…

    Guide: Integrating React.js ⚛️ into a Rails 8 Application – Part 2: Install React | Add esbuild, Jsx | Integrate React View

    Throw back:

    rails new design_studio_react --database=postgresql -j esbuild --skip-hotwire
    

    Here’s what our Rails app looks like after skipping Hotwire with the --skip-hotwire flag:

    Current JavaScript/Node.js Setup (Clean & Minimal)

    📦 Package Management:

    • package.json – Clean setup with only esbuild script
    • .node-version – Node.js version 24.1.0
    • No dependencies – Ready for React installation

    📁 JavaScript File Structure (Ultra-Clean):

    app/javascript/
    └── application.js          # Empty entry point (2 lines total!)
    

    app/javascript/application.js content:

    // Entry point for the build script in your package.json
    

    🚫 What Got Successfully Removed:

    • No Turbo/Stimulus imports in application.js
    • No controllers/ directory at all
    • No Hotwire gems in Gemfile (only jsbundling-rails remains)
    • No @hotwired/turbo-rails or @hotwired/stimulus dependencies

    ⚙️ Configuration Files (Minimal – Only 4):

    1. package.json – esbuild build script only
    2. .node-version – Node.js version pinning
    3. Procfile.dev – Development processes (js: yarn build --watch)
    4. app/javascript/application.js – Empty entry point

    🔧 esbuild Configuration:

    {
      "scripts": {
        "build": "esbuild app/javascript/*.* --bundle --sourcemap --format=esm --outdir=app/assets/builds --public-path=/assets"
      }
    }
    

    📂 Build Output:

    • app/assets/builds/ – Contains only .keep file (empty, ready for bundles)

    🎯 HTML Integration:

    <!-- Still includes the JavaScript module correctly -->
    <%= javascript_include_tag "application", "data-turbo-track": "reload", type: "module" %>
    

    (Note: data-turbo-track is just an HTML attribute for cache busting, not the Turbo library)

    # create db
    ✗ rails db:migrate
    
    # run react-rails-app in port 3001
    ✗ rails s -p 3001
    

    🚀 Next Steps: Install & Setup React

    Step 1: Install react, react-dom

    Your app is now perfectly clean for React! Just run:

    brew install yarn
    yarn add react react-dom # check node_modules/ folder for what is installed
    yarn add --dev @types/react @types/react-dom  # Optional: for TypeScript support, check node_modules/@types folder
    

    Status: ✅ Minimal JavaScript foundation – No Hotwire bloat, perfect React starting point!

    Now that we have a clean Rails app with esbuild setup, here’s our step-by-step roadmap to get React working:

    Step 2: Create Your First React Component

    Create a simple React component to test the setup:

    mkdir app/javascript/components
    

    Then create app/javascript/components/App.jsx:

    import React from 'react';
    
    function App() {
      return (
        <div>
          <h1>React is Working!</h1>
          <p>Welcome to your Rails + React app</p>
        </div>
      );
    }
    
    export default App;
    

    Step 3: Update JavaScript Entry Point

    Modify app/javascript/application.js to render React:

    // Entry point for the build script in your package.json
    import React from 'react';
    import { createRoot } from 'react-dom/client';
    import App from './components/App';
    
    document.addEventListener('DOMContentLoaded', () => {
      const container = document.getElementById('react-root');
      if (container) {
        const root = createRoot(container);
        root.render(<App />);
      }
    });
    

    Step 4: Create a Controller & Route

    Generate a home controller:

    rails generate controller Home index
    

    Step 5: Add React Root to View

    Update app/views/home/index.html.erb:

    <div id="react-root"></div>
    

    Step 6: Set Root Route

    Update config/routes.rb:

    Rails.application.routes.draw do
      root "home#index"
      # ... other routes
    end
    

    Step 7: Start Development

    # update Procfile.dev assign port 3001
    web: env RUBY_DEBUG_OPEN=true bin/rails server -p 3001
    
    # run our rails-react app by
    
    ✗ bin/dev
    21:15:27 web.1  | started with pid 12619
    21:15:27 js.1   | started with pid 12620
    21:15:27 js.1   | yarn run v1.22.22
    21:15:27 js.1   | $ esbuild app/javascript/*.* --bundle --sourcemap --format=esm --outdir=app/assets/builds --public-path=/assets --watch
    21:15:27 js.1   | /bin/sh: esbuild: command not found
    21:15:27 js.1   | error Command failed with exit code 127.
    21:15:27 js.1   | info Visit https://yarnpkg.com/en/docs/cli/run for documentation about this command.
    21:15:27 web.1  | => Booting Puma
    ..........
    

    🎯 What This Gives Us:

    • ✅ React components in app/javascript/components/
    • ✅ esbuild automatically bundles JSX
    • ✅ Hot reloading with yarn build --watch
    • ✅ Rails serves your React app

    🚨 Error Analysis:

    1. Rails server started fine ✅ (port 3001)

    🔧 Solution: Install JavaScript Dependencies

    You need to install esbuild and other JavaScript dependencies first:

    yarn install
    

    📋 Files yarn install Checks:

    1. Primary: package.json

    {
      "name": "app",
      "private": true,
      "scripts": {
        "build": "esbuild app/javascript/*.* --bundle --sourcemap --format=esm --outdir=app/assets/builds --public-path=/assets"
      },
      "dependencies": {
        "react": "^19.1.0",           # ✅ Already added
        "react-dom": "^19.1.0"       # ✅ Already added  
      },
      "devDependencies": {
        "@types/react": "^19.1.8",      # ✅ Already added
        "@types/react-dom": "^19.1.6"   # ✅ Already added
      }
    }
    

    2. Lockfile: yarn.lock

    • Ensures exact versions for reproducible installs
    • Contains resolved URLs and integrity hashes

    🚨 The Problem: Missing esbuild!

    Our package.json calls esbuild in the build script, but esbuild is not listed as a dependency anywhere!

    Rails should have added it, but didn’t. We need to add esbuild:

    yarn add --dev esbuild
    

    🔧 What yarn install does:

    1. Reads package.json for dependency list
    2. Reads yarn.lock for exact versions (if exists)
    3. Downloads packages to node_modules/
    4. Updates yarn.lock with new resolutions

    Current issue: Our build script expects esbuild command, but it’s not installed in node_modules/.bin/esbuild

    Solution: Add esbuild as a dev dependency!

    Solved~ and start servers: Error Again!

    x bin/dev
    
    * Listening on http://[::1]:3001
    22:54:43 web.1  | Use Ctrl-C to stop
    22:54:44 js.1   | ✘ [ERROR] The JSX syntax extension is not currently enabled
    22:54:44 js.1   |
    22:54:44 js.1   |     app/javascript/application.js:11:16:
    22:54:44 js.1   |       11 │     root.render(<App />);
    22:54:44 js.1   |          ╵                 ^
    22:54:44 js.1   |
    22:54:44 js.1   |   The esbuild loader for this file is currently set to "js" but it must be set to "jsx" to be able to parse JSX syntax. You can use "--loader:.js=jsx" to do that.
    22:54:44 js.1   |
    22:54:44 js.1   | 1 error
    22:54:44 js.1   | [watch] build finished, watching for changes..
    

    This error occurs because esbuild doesn’t know how to handle JSX syntax! The <App /> is JSX, but esbuild needs to be configured to transform it.

    🚨 Problem: esbuild can’t process JSX syntax

    Your application.js contains JSX (<App />), but esbuild isn’t configured to transform JSX!

    JSX (JavaScript XML) is a syntax extension for JavaScript, commonly used with React, that allows you to write HTML-like code within JavaScript files.

    🔧 Solution: Configure esbuild for JSX

    Update your package.json build script to handle JSX:

    # add this to build
    --jsx=automatic --loader:.js=jsx 
    

    Fixed! Added JSX support:

    What I added:

    • --jsx=automatic – Enables React’s automatic JSX runtime
    • --loader:.js=jsx – Treats .js files as JSX files

    📝 What this means:

    • ✅ esbuild can now process <App /> syntax
    • ✅ You don’t need to import React in every JSX file
    • ✅ Your .js files can contain JSX
    bin/dev
    

    Whola!!

    Let’s see in Part 3. Happy React configuration! 🚀