
In this session we will be building prompt builder to build the prompt that we send to the AI model. We save every conversation in memory and create a chat feature backend architecture.
Step 7 – Conversation Memory + Prompt Builder
Right now our Ai::ChatService sends only:
current user message
So this:
User: My name is Abhilash.User: What is my name?
doesn’t reliably work as a conversation because the second request doesn’t include the first message.
We need:
Conversation
   ↓
Messages
   ↓
Prompt Builder
   ↓
LLM
1. Change Ai::Client to accept messages
Open:
app/services/ai/client.rb
Change chat from:
def chat(message:)
  ...
end
to:
def chat(messages:)
  response = @client.chat.completions.create(
    model: MODEL,
    messages: messages
  )

  {
    content: response.choices.first.message.content,
    model: response.model,
    input_tokens: response.usage.prompt_tokens,
    output_tokens: response.usage.completion_tokens
  }
end
The client should now know nothing about conversations.
It simply receives:
messages = [ { role: "system", content: "..." }, { role: "user", content: "..." }, { role: "assistant", content: "..." }]
2. Create PromptBuilder
Create:
app/services/ai/prompt_builder.rb
Add:
class Ai::PromptBuilder
  SYSTEM_PROMPT = <<~PROMPT
    You are a helpful AI assistant.
    Answer clearly and concisely.
    If you are unsure about something, say so.
  PROMPT

  def initialize(conversation:)
    @conversation = conversation
  end

  def build
    [
      {
        role: "system",
        content: SYSTEM_PROMPT.strip
      },
      *@conversation.messages.order(:created_at).map do |message|
        {
          role: message.role,
          content: message.content
        }
      end
    ]
  end
end
Now our database becomes the source of conversation history.
3. Update Ai::ChatService
Change it to:
class Ai::ChatService
  def initialize(
    ai_client: Ai::Client.new,
    prompt_builder_class: Ai::PromptBuilder
  )
    @ai_client = ai_client
    @prompt_builder_class = prompt_builder_class
  end

  def call(conversation:, user_message:)
    conversation.transaction do
      conversation.messages.create!(
        role: :user,
        content: user_message
      )

      messages = @prompt_builder_class
        .new(conversation: conversation)
        .build

      result = @ai_client.chat(messages: messages)

      conversation.messages.create!(
        role: :assistant,
        content: result[:content],
        model: result[:model],
        input_tokens: result[:input_tokens],
        output_tokens: result[:output_tokens]
      )
    end
  end
end
Notice the order:
1. Save user message2. Load conversation history3. Build LLM messages4. Call LLM5. Save assistant response
4. Test it manually
Run:
bin/rails c
Create a fresh conversation:
conversation = Conversation.create!(title: "Memory Test")
First question:
Ai::ChatService.new.call( conversation: conversation, user_message: "My name is Abhilash.")
Then:
Ai::ChatService.new.call( conversation: conversation, user_message: "What is my name?")
Now, we should see approximately:
ai-assistant(dev):031> puts conversation.messages.map {|m| "Role: #{m.role}\n Content: #{m.content}" }.join("\n")
Role: user
 Content: My name is Adam Bean
Role: assistant
 Content: Hello Adam Bean! How can I assist you today?

Role: user
 Content: What is my name?
Role: assistant
 Content: Your name is Adam Bean.
=> nil
This is our first real conversation memory implementation.
The LLM did not magically remember the first request.
Rails retrieved the previous messages and sent them again.
That’s a very important int. concept.
5. Understand the architecture
We now have:
                    Conversation
                         │
                         ▼
                    ChatService
                         │
             ┌───────────┴───────────┐
             ▼                       ▼
       PromptBuilder            Ai::Client
             │                       │
             │ messages              │
             └───────────┬───────────┘
                         ▼
                       LLM
                         │
                         ▼
                  Assistant Message
                         │
                         ▼
                    PostgreSQL
The responsibilities are now nicely separated:
Conversation
Persistence.
PromptBuilder
Converts application state into LLM input.
Ai::Client
Talks to the provider.
ChatService
Orchestrates the workflow.
Now we built a solid Rails architecture.
6. Important problem: context growth
Our current implementation sends:
every previous message
on every request.
That eventually becomes:
Message 1Message 2...Message 500+New Message
Problems:
- more tokens
- more cost
- more latency
- eventually context-window limits
This is one of the reasons production AI systems eventually introduce:
conversation summarization+recent-message window+RAG
Note: We’ll address this later.
Next Major Step – Chat UI
Now we have the backend flow:
User ↓ChatService ↓PromptBuilder ↓LLM ↓PostgreSQL
The next thing we’ll build is the actual Rails chat interface:
┌──────────────────────────────┐│ AI Assistant │├──────────────────────────────┤│ You: What is Ruby? ││ ││ AI: Ruby is... ││ ││ You: Explain blocks. ││ ││ AI: A block is... │├──────────────────────────────┤│ [ Ask something... ] [Send] │└──────────────────────────────┘
We’ll use Rails + Turbo/Stimulus, then add streaming immediately after that.
That will turn the backend we’ve built into an actual usable AI application.
Let’s move straight to the Chat UI + controller flow, then we can add streaming. We’ll keep this as one cohesive implementation step.
Step 8 – Build the Rails Chat UI
Our backend already does:
Conversation ↓ChatService ↓PromptBuilder ↓Ai::Client ↓LLM ↓Message
Now we’ll expose it through HTTP.
8.1 Generate the controller
Run:
bin/rails g controller Conversations show
This gives us a starting point:
app/controllers/conversations_controller.rbapp/views/conversations/show.html.erb
But we also need an endpoint for sending messages.
8.2 Define routes
Open:
config/routes.rb
Use:
Rails.application.routes.draw do
  resources :conversations, only: [:create, :show] do
    resources :messages, only: [:create]
  end

  root "conversations#new"
end
We don’t have new yet, so let’s instead make a simple root action ourselves.
Change to:
Rails.application.routes.draw do
  resources :conversations, only: [:create, :show] do
    resources :messages, only: [:create]
  end

  root "conversations#new"
end
Then generate new:
bin/rails g controller Conversations new
8.3 Conversation controller
Open:
app/controllers/conversations_controller.rb
Use:
class ConversationsController < ApplicationController
  def new
    @conversation = Conversation.new
  end

  def create
    @conversation = Conversation.create!(title: params[:title].presence || "New conversation")

    redirect_to conversation_path(@conversation)
  end

  def show
    @conversation = Conversation.find(params[:id])
    @messages = @conversation.messages.order(:created_at)
  end
end
For now we’re deliberately keeping authentication out of the project.
Later we’ll add authorization when we make this production-oriented.
8.4 Create the messages controller
Run:
bin/rails g controller Messages
Open:
app/controllers/messages_controller.rb
Add:
class MessagesController < ApplicationController
  def create
    conversation = Conversation.find(params[:conversation_id])

    Ai::ChatService.new.call(
      conversation: conversation,
      user_message: params.require(:content)
    )

    redirect_to conversation_path(conversation)
  end
end
The request flow is now:
POST /conversations/:id/messages ↓ MessagesController ↓ Ai::ChatService ↓ LLM
8.5 Build the new conversation page
Open:
app/views/conversations/new.html.erb
<h1>AI Assistant</h1><%= form_with model: @conversation, local: true do |form| %> <%= form.text_field :title, placeholder: "Conversation title" %> <%= form.submit "Start conversation" %><% end %>
Now run:
bin/rails server
Open:
http://localhost:3000
Create a conversation.
8.6 Build the chat page
Open:
app/views/conversations/show.html.erb
Use:
<h1><%= @conversation.title %></h1>

<div id="messages">
  <% @messages.each do |message| %>
    <div>
      <strong><%= message.role.capitalize %>:</strong>
      <%= message.content %>
    </div>
  <% end %>
</div>

<hr>

<%= form_with url: conversation_messages_path(@conversation), method: :post, local: true do |form| %>
  <%= form.text_area :content, rows: 4, placeholder: "Ask something..." %>

  <%= form.submit "Send" %>
<% end %>
Now we have an actual chat interface.
8.7 Test the complete flow
Open:
http://localhost:3000
Create:
Ruby Questions
Then ask:
What is a Ruby block?
The flow should be:
Browser
   ↓
POST /conversations/1/messages
   ↓
MessagesController
   ↓
Ai::ChatService
   ↓
PromptBuilder
   ↓
OpenRouter
   ↓
Assistant response
   ↓
Message saved
   ↓
Redirect
   ↓
Conversation page
You should see:
User: What is a Ruby block?Assistant: ...
Then ask:
Can you show me an example?
Rails should send the previous conversation history through PromptBuilder.
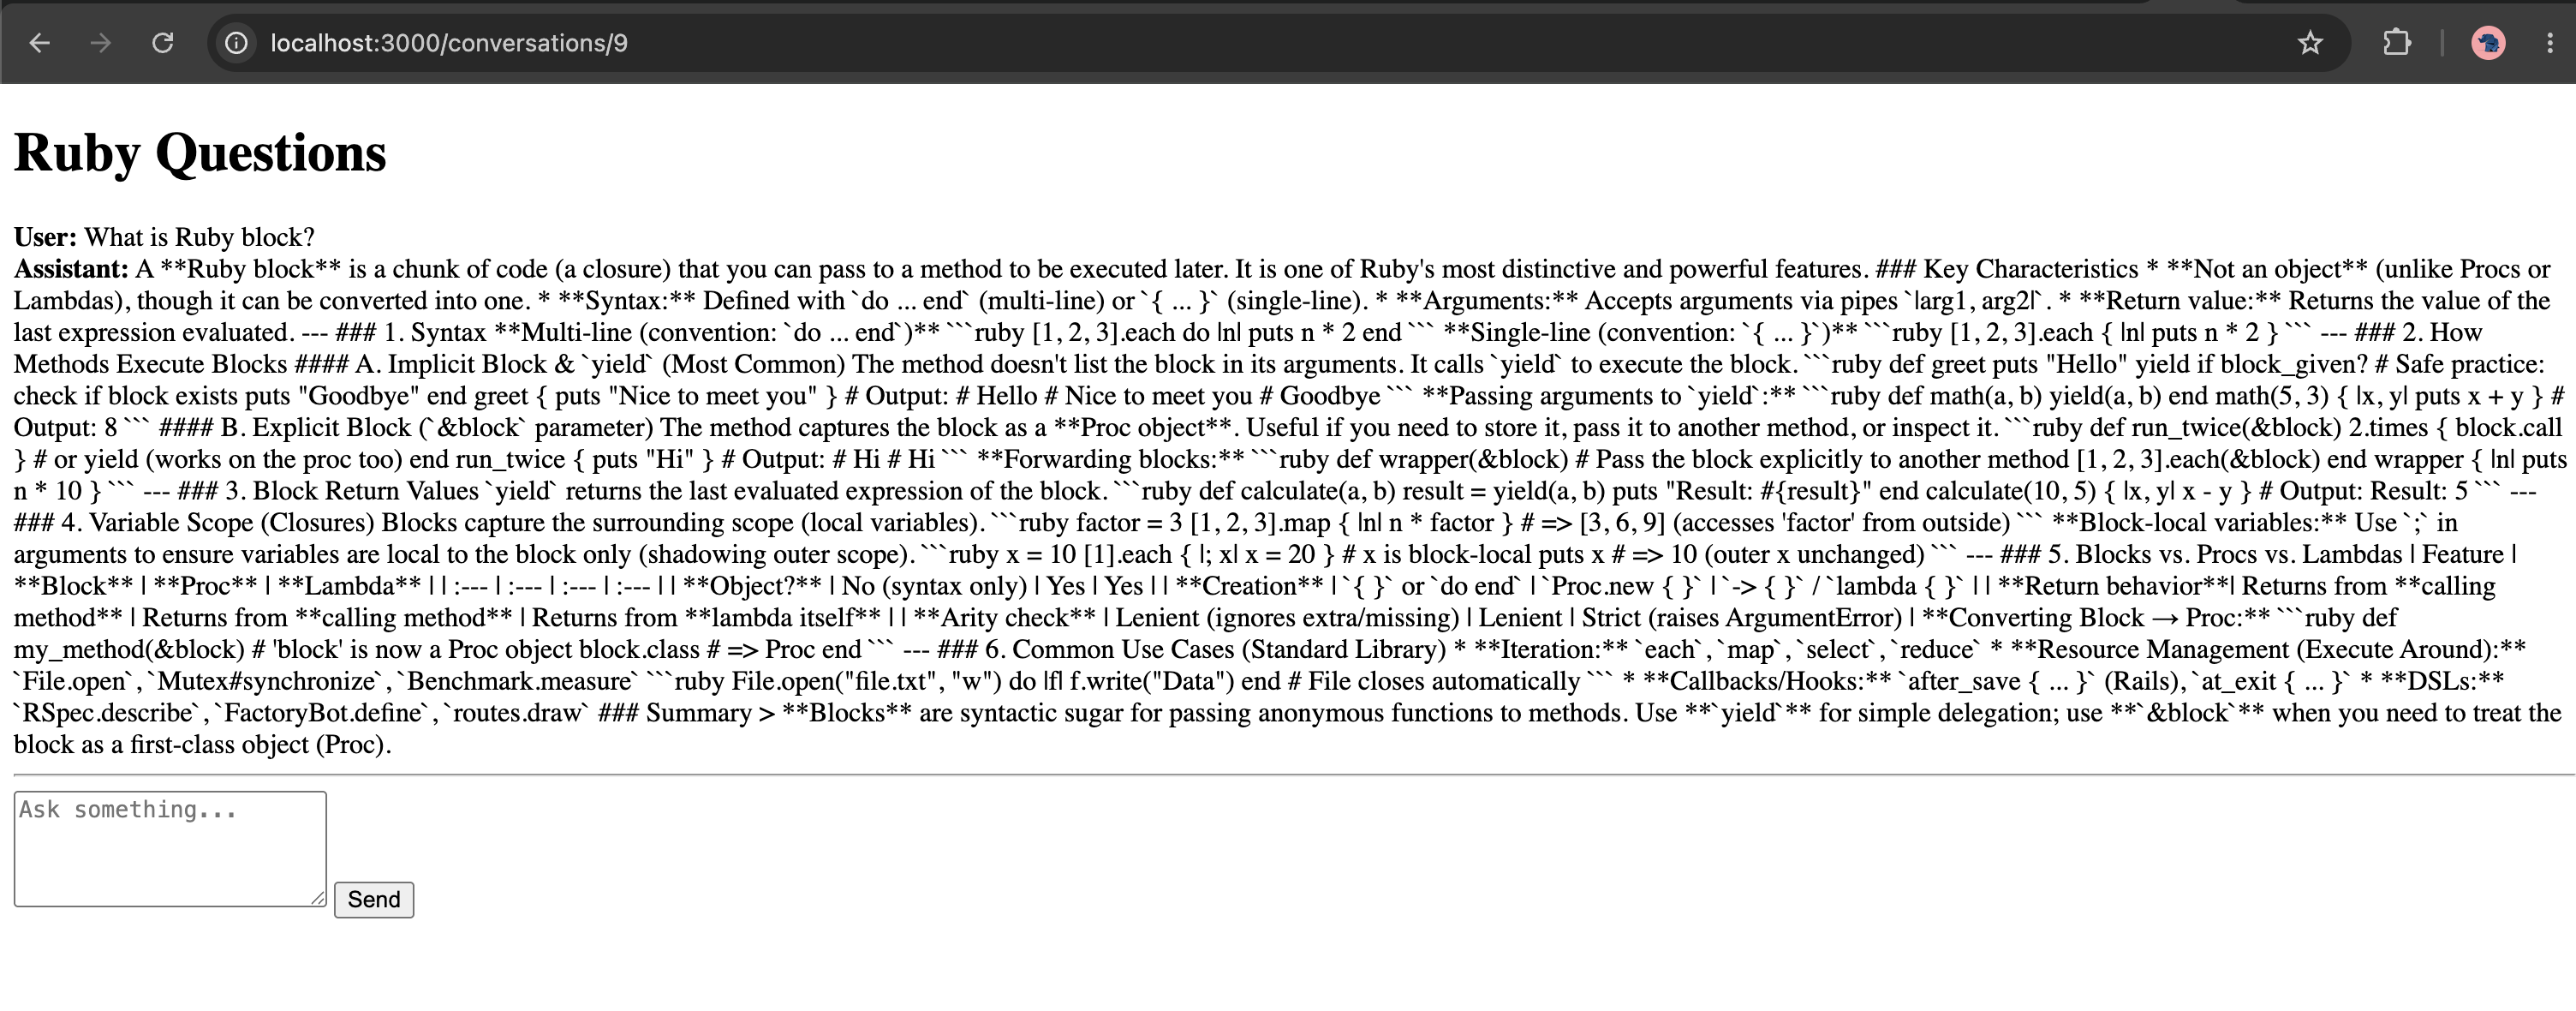
8.8 One important issue with our current implementation
We’re currently doing:
Ai::ChatService.new.call(...)
inside the HTTP request.
That means:
Browser
  ↓
Rails request
  ↓
wait for LLM
  ↓
save response
  ↓
response
If the LLM takes 8 seconds, our web request can take 8 seconds.
That’s acceptable for our learning version, but not what we ultimately want.
The next step is streaming.
8.9 Also notice an architectural limitation
Right now we’re doing:
redirect_to conversation_path(conversation)
After the LLM finishes.
That’s why the user sees:
wait...wait...wait...complete response
ChatGPT-style applications instead do:
User message
      ↓
LLM starts generating
      ↓
token
      ↓
token
      ↓
token
      ↓
browser updates
We’ll implement that next.
8.10 Add a little UI structure
We can improve the view slightly now:
<h1><%= @conversation.title %></h1>

<div id="messages">
  <% @messages.each do |message| %>
    <article class="message <%= message.role %>">
      <strong><%= message.role.capitalize %></strong>
      <p><%= simple_format(message.content) %></p>
    </article>
  <% end %>
</div>

<%= form_with url: conversation_messages_path(@conversation), method: :post, local: true do |form| %>
  <%= form.text_area :content,
      rows: 4,
      placeholder: "Ask something..." %>

  <%= form.submit "Send" %>
<% end %>
Don’t spend time on styling yet. We care about architecture first.
Fix Chat UI Markdown problem
If we use the following for showing the content:
<p><%= simple_format(message.content) %></p>Or<p><%= sanitize(message.content) %></p>
The issue is that sanitize is not a Markdown renderer.
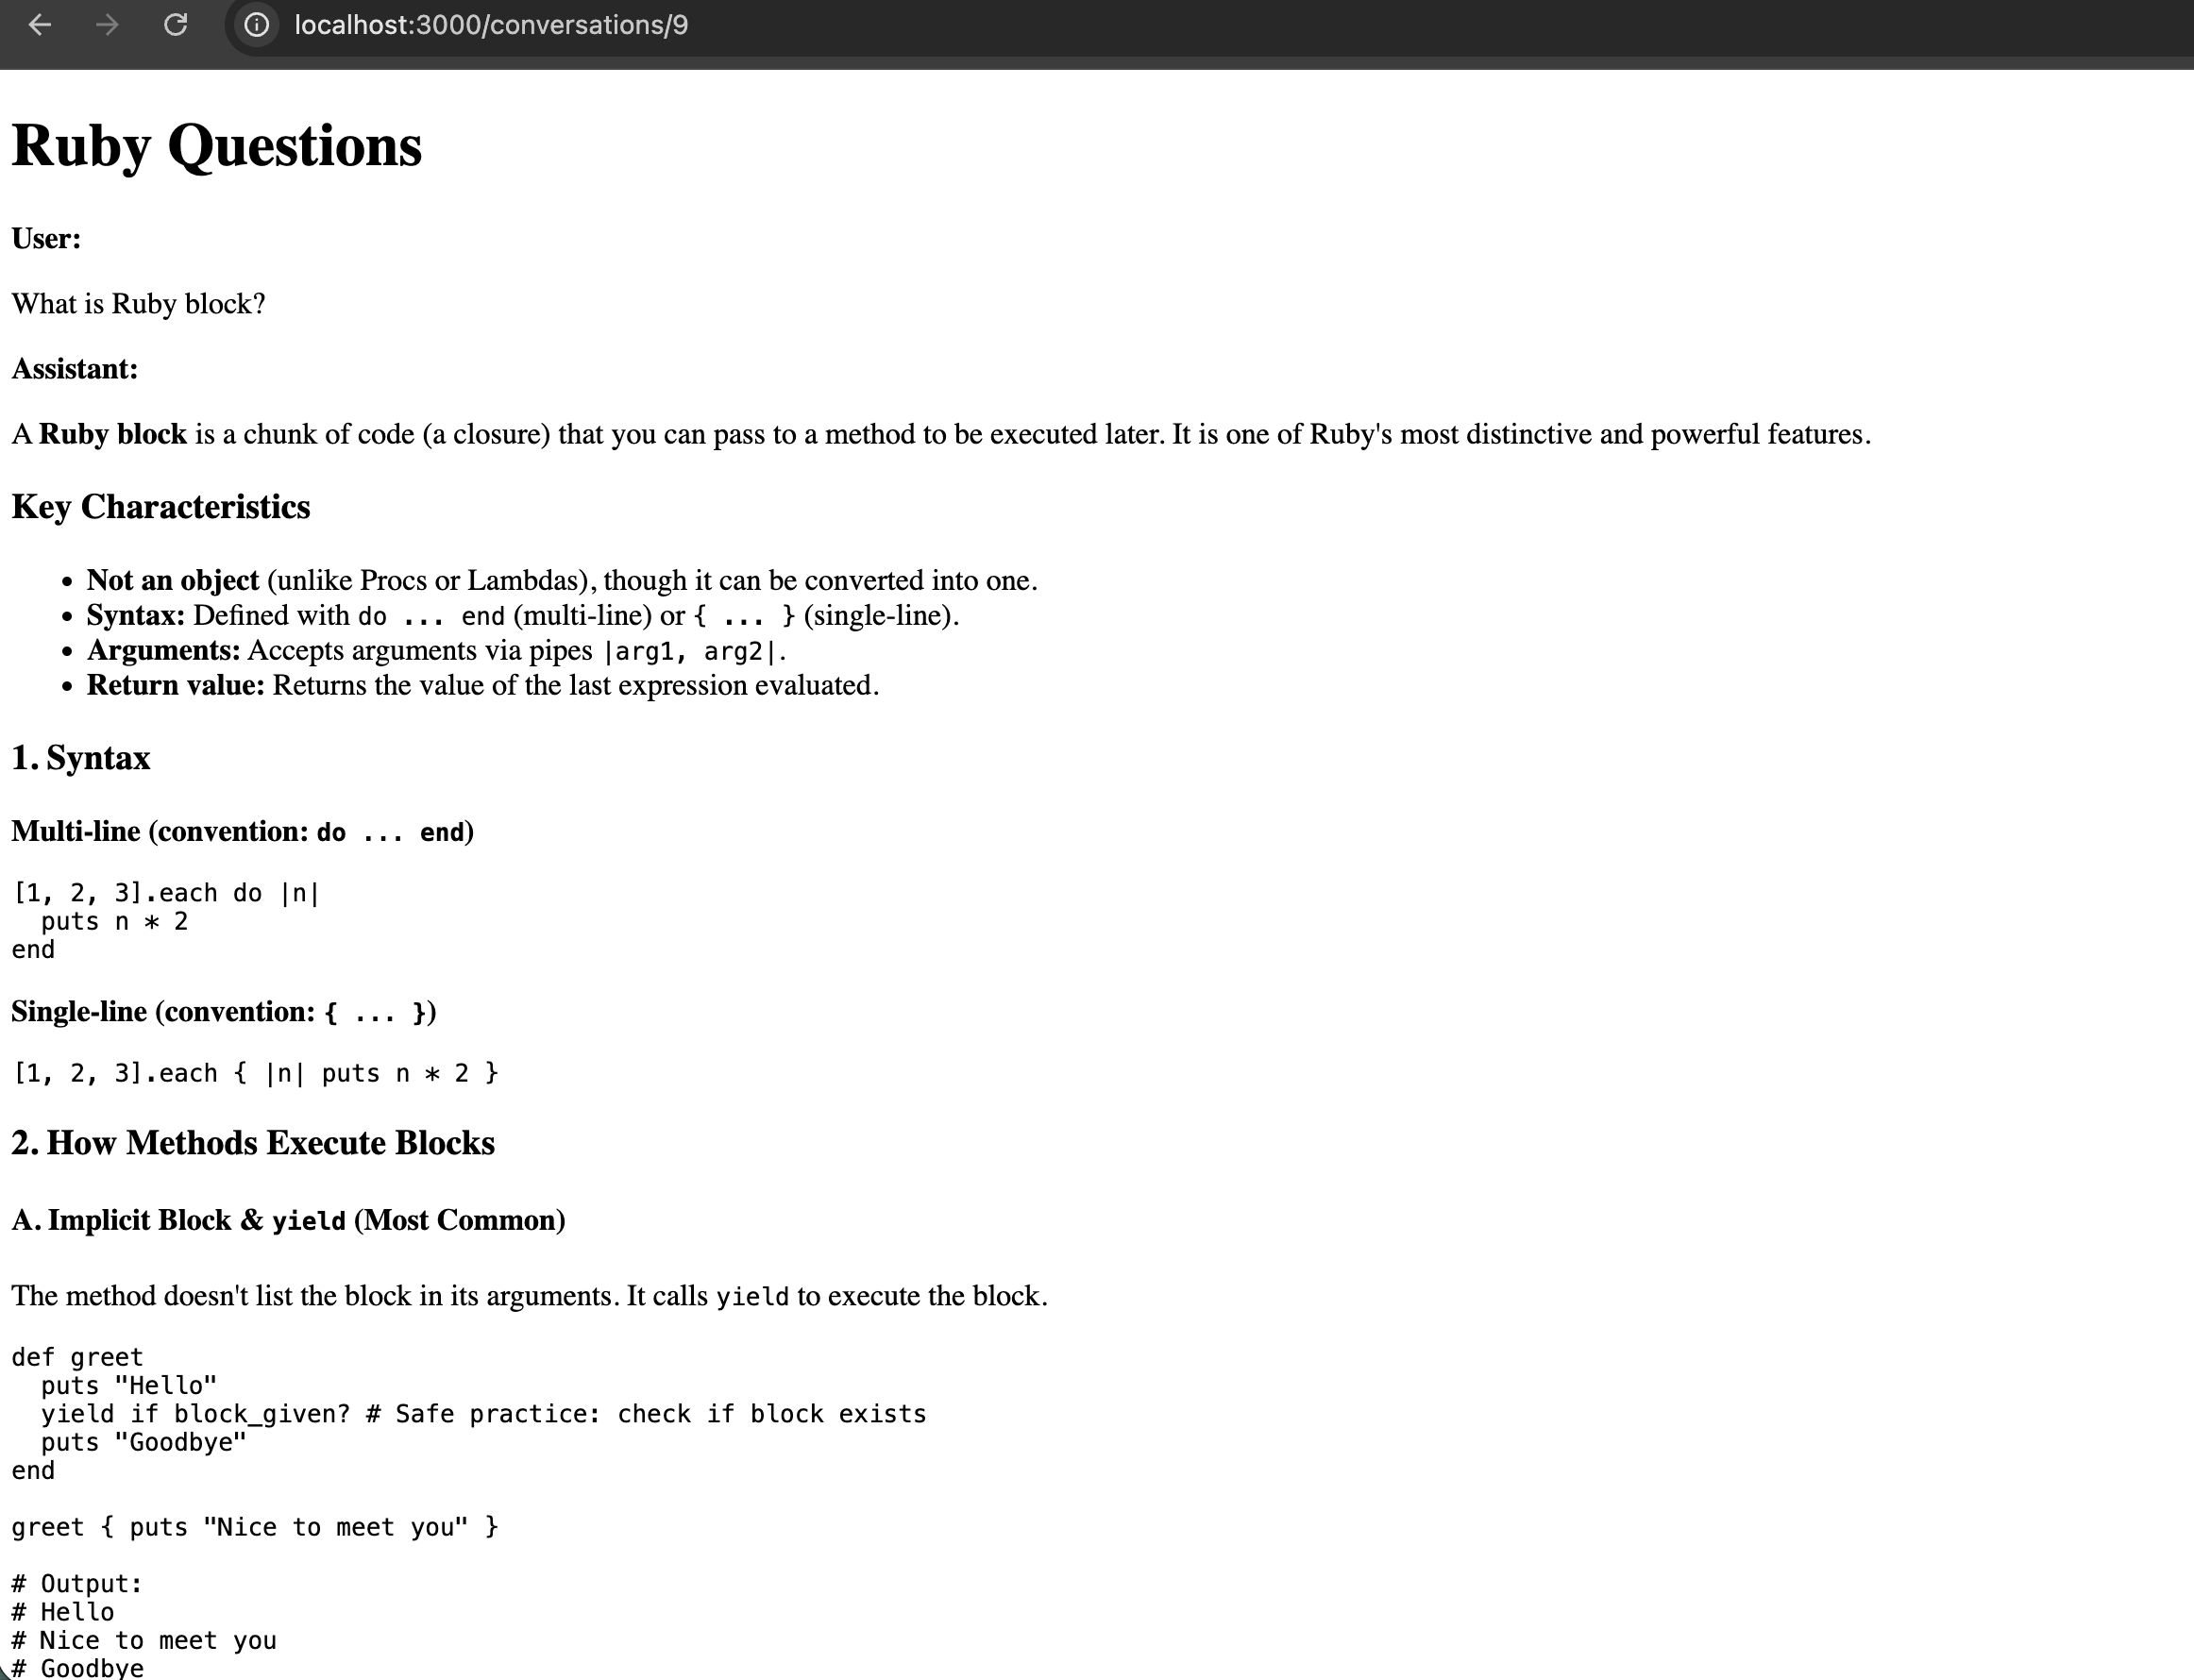
Our LLM is returning Markdown:
**Ruby block**### Key Characteristics* Not an object
Rails’ sanitize only sanitizes HTML that already exists. It doesn’t convert Markdown → HTML.
So this:
<%= sanitize(message.content) %>
won’t turn:
**Ruby**
into:
<strong>Ruby</strong>
Recommended approach
For an AI chat application, use:
LLM Markdown ↓Markdown renderer ↓HTML ↓sanitize ↓Browser
1. Add a Markdown gem
For Rails, a simple choice is commonmarker.
Add to Gemfile:
gem "commonmarker"
Then:
bundle install
2. Create a Markdown helper
Create:
app/helpers/markdown_helper.rb
module MarkdownHelper
  def render_markdown(text)
    html = Commonmarker.to_html(text.to_s)

    sanitize(
      html,
      tags: %w[
        p
        br
        strong
        em
        del
        h1
        h2
        h3
        h4
        ul
        ol
        li
        blockquote
        pre
        code
        a
      ],
      attributes: %w[href title]
    )
  end
end
The important distinction is:
Commonmarker.to_html(...)
does the Markdown conversion.
Then:
sanitize(...)
does the HTML security filtering.
3. Change your view
Currently you probably have:
<p><%= simple_format(message.content) %></p>
or:
<%= sanitize(message.content) %>
Change it to:
<div class="message-content"> <%= render_markdown(message.content) %></div>
Now your response:
A **Ruby block** is...### Key Characteristics* Not an object* Can be passed to a method
will render approximately as:
A Ruby block is…
4. Important security point
Do not do this:
<%= raw(Commonmarker.to_html(message.content)) %>
without sanitization.
The LLM output is still untrusted input.
Keep:
sanitize(Commonmarker.to_html(text))
as your pipeline.
That’s a good senior-level AI security practice:
LLM output ↓Markdown parser ↓HTML ↓Sanitizer ↓Browser
What we’ve built so far
We’re no longer just experimenting with an API.
We now have:
                    Rails AI Assistant

Browser
   │
   ▼
Conversation UI
   │
   ▼
MessagesController
   │
   ▼
Ai::ChatService
   │
   ├── Conversation history
   │
   ▼
Ai::PromptBuilder
   │
   ▼
Ai::Client
   │
   ▼
OpenRouter
   │
   ▼
Free LLM
   │
   ▼
Message
   │
   ▼
PostgreSQL
That is already something we can discuss in a senior int.
Check our code in this repo: https://github.com/abhilashak/ai_assistant
Next: Step 9 – Streaming
We’ll now replace:
submit → wait → redirect
with:
submit ↓Rails ↓LLM streaming ↓token-by-token response ↓browser
We’ll use the Rails 8.1 stack appropriately and discuss SSE vs Turbo Streams vs Action Cable, rather than merely copying a ChatGPT-style implementation.
Happy AI Integration!


