
Ruby on Rails Concurrency: Understanding Puma, Threads, Workers and Database Connection Pools

One of the most common Rails questions is:

How does Puma handle multiple HTTP requests? How do threads work and what happens when multiple requests access the database simultaneously?

To understand this properly, we need to understand four concepts:

  1. Processes and threads.
  2. I/O-bound requests.
  3. Database connections and connection pools.
  4. Database locking and concurrent queries.

Let’s start from the beginning.

1. Why Did Rails Move from WEBrick to Puma?

Historically, WEBrick was commonly used as the default Rails development server.

With Rails 5.0, Rails changed its default development server from WEBrick to Puma.

One important reason was the introduction of Action Cable in Rails 5.

Action Cable introduced WebSocket support for real-time features such as chat, notifications and presence. It needed to operate alongside the Rails application in development.

Puma provided a better fit for this concurrent application-server architecture.

Puma provides:

  • Multithreading: Handles multiple requests using separate threads.
  • Multiprocessing: Supports multiple worker processes.
  • Better concurrency: Allows requests waiting for I/O to overlap.
  • Copy-on-write memory optimisation when using application preloading.
  • Production-oriented server capabilities.

One clarification: WEBrick could also create threads for requests. The change wasn’t simply because WEBrick could only process one request at a time. Puma offered a more suitable combination of thread-based and process-based concurrency.

Also, WEBrick’s removal from Ruby’s standard library in Ruby 3.0 was a separate event, not the original reason Rails moved to Puma.

Q) Does puma developed as a ruby library? Or puma has been written in another language and created in ruby as a gem?

Yes! Puma is a Ruby web server, distributed as a Ruby gem, and primarily written in Ruby.

It is not a web server written in another language with a Ruby wrapper.

You install it directly into a Rails application:

# Gemfile
gem "puma"

And start it using:

bundle exec puma

Puma runs inside the Ruby runtime (MRI/CRuby, JRuby, etc.). It uses Ruby’s threading and process capabilities to handle concurrent HTTP requests.

There is one interesting implementation detail: Puma is primarily Ruby, but it also uses native code for performance-critical components.

For example:

  • Most server logic is implemented in Ruby.
  • Its HTTP parser is based on Mongrel’s parser, implemented using Ragel and compiled to native C (or Java for certain Ruby implementations).
  • It uses Ruby’s thread and process APIs to manage concurrent requests.

How does Puma fit into Rails?

              HTTP Request
                   |
                   v
              Puma Server
             (Ruby Gem)
                   |
             Rack Interface
                   |
                   v
           Rails Middleware
                   |
                   v
             Rails Router
                   |
                   v
          Controller / Model
                   |
                   v
              PostgreSQL

Puma is not part of Ruby itself, nor is it part of the Rails framework core. It is an independent Ruby gem that serves Rack applications, including Rails.

Ianswer:

Puma is a Ruby-based, multithreaded and multiprocess HTTP server distributed as a Ruby gem. It implements the Rack interface, allowing it to serve Rails applications. Most of its implementation is Ruby, with native extensions for performance-critical components such as HTTP parsing.

You can also explore its actual source code: Puma GitHub Repository. It’s a useful project to study as a senior Ruby developer.

2. What Is the Difference Between a Process and a Thread?

This is fundamental to understanding Puma.

Process

A process is an independent running instance of an application.

Each process has its own:

  • Memory space.
  • Ruby interpreter state.
  • Global VM Lock (GVL) under MRI Ruby.
  • Active Record connection pool.

Processes are isolated from one another.

Thread

A thread is an execution unit running inside a process.

Multiple threads within the same process share:

  • Application memory.
  • Loaded classes and modules.
  • Global variables.
  • Other process-level resources.

However, each thread has its own execution context and can handle a different HTTP request.

Example

Suppose Puma is configured with:

workers 2
threads 3, 3

This means:

  • 2 worker processes.
  • 3 request threads per worker.

Total request-thread capacity:

2 workers × 3 threads = 6 concurrent requests

Conceptually:

                 Puma Master Process
                         |
              ---------------------
              |                   |
         Worker 1             Worker 2
         Process               Process
              |                   |
         -----------          -----------
         |    |    |          |    |    |
        T1   T2   T3          T1   T2   T3

        3 threads             3 threads

             Total: 6 request threads

A worker is a process, not a thread.

This distinction is extremely important in ints.

3. What Is the Global VM Lock (GVL)?

When using MRI Ruby (the standard CRuby implementation), Ruby has a Global VM Lock.

The GVL ensures that only one thread within a process executes Ruby code at a time.

For example:

Thread.new do
  1_000_000.times { |i| i * 2 }
end

Thread.new do
  1_000_000.times { |i| i * 2 }
end

Although two threads exist, they cannot execute Ruby bytecode simultaneously within the same MRI process.

Then why do we need multiple threads?

Because not all application work involves executing Ruby code.

A Rails application spends significant time waiting for external operations:

  • Database queries.
  • HTTP requests to third-party APIs.
  • Redis operations.
  • File and network I/O.

During blocking I/O, Ruby can release the GVL, allowing another thread to execute.

Important distinction:

  • Threads improve concurrency by overlapping waiting time.
  • Multiple processes allow MRI Ruby code to execute in parallel across CPU cores.

Puma supports both.

4. What Are I/O-Bound Requests?

An I/O-bound request spends a significant portion of its execution time waiting for an external operation to complete.

Consider this Rails action:

def show
  user = User.find(params[:id])

  response = HTTParty.get(
    "https://api.example.com/profile"
  )

  render json: {
    user: user,
    external_profile: response.parsed_response
  }
end

Imagine:

OperationTime
Ruby processing10 ms
Database query50 ms
External API request500 ms
JSON response processing10 ms
Total570 ms

The application spends only 20 ms actively processing Ruby code.

The remaining 550 ms is waiting for external operations.

This is an I/O-bound request.

How do Puma threads help?

Imagine three requests arrive simultaneously.

Without useful concurrency, a single execution path might spend time waiting for each external API response.

With Puma:

Thread 1: Ruby code -> Wait for API -> Resume -> Response
Thread 2: Ruby code -> Wait for API -> Resume -> Response
Thread 3: Ruby code -> Wait for API -> Resume -> Response

While Thread 1 waits for its API response, Thread 2 or Thread 3 can execute.

The server uses waiting time more efficiently.

This improves throughput and reduces unnecessary request queuing.

What about CPU-bound requests?

Consider:

def calculate
  result = 0

  100_000_000.times do |i|
    result += i * 2
  end

  render json: { result: result }
end

This request spends most of its time executing Ruby code.

Increasing Puma threads does not provide true parallel Ruby execution within one MRI process because of the GVL.

For CPU-heavy Ruby workloads, multiple worker processes are more useful because each process has its own GVL.

5. Does Accessing the Database Lock It for Other Requests?

This is an important question.

No. A database connection or a database query does not automatically lock the entire database.

We need to distinguish three different things:

  1. Database connection.
  2. Database connection pool.
  3. Database locks.

They are not the same.

Database connections

A database connection represents a communication session between your Rails process and PostgreSQL.

Multiple connections can exist simultaneously.

For example:

Rails Thread 1 ---- DB Connection 1 ---- PostgreSQL
Rails Thread 2 ---- DB Connection 2 ---- PostgreSQL
Rails Thread 3 ---- DB Connection 3 ---- PostgreSQL

Each connection can execute its own SQL queries.

PostgreSQL is designed to handle concurrent database sessions.

What happens when two requests access the same table?

Consider two requests:

# Request 1
User.find(10)

# Request 2
User.find(20)

Both requests can read users simultaneously.

They don’t block each other simply because they access the same table.

PostgreSQL uses MVCC (Multi-Version Concurrency Control).

MVCC allows transactions to read consistent snapshots of data while other transactions are modifying records.

For normal PostgreSQL reads, a SELECT does not generally block an UPDATE and an UPDATE does not generally block a normal SELECT.

What happens when two requests update the same record?

Consider:

# Request 1
Account.find(10).update!(balance: 500)

# Request 2
Account.find(10).update!(balance: 300)

If both transactions try to update the same row concurrently, PostgreSQL may make one transaction wait for the other to finish.

This is because PostgreSQL uses row-level locking for conflicting writes.

For example:

Transaction 1:
    UPDATE accounts SET balance = 500 WHERE id = 10

    Acquires row lock

Transaction 2:
    UPDATE accounts SET balance = 300 WHERE id = 10

    Waits for Transaction 1

Transaction 1:
    COMMIT

Transaction 2:
    Continues

This prevents conflicting updates from being applied simultaneously without coordination.

You can also explicitly lock records using:

Account.transaction do
  account = Account.lock.find(10)

  account.update!(
    balance: account.balance - 100
  )
end

This uses PostgreSQL’s row-locking mechanism through SELECT ... FOR UPDATE.

Remember:

  • A database connection is not a database lock.
  • Multiple database connections can execute queries concurrently.
  • Conflicting writes may wait for row locks.
  • Normal SELECT queries generally don’t block writes in PostgreSQL because of MVCC.

6. What Is an Active Record Connection Pool?

Now let’s connect Puma threads with the database.

Creating a new database connection for every SQL query would be expensive.

Instead, Rails maintains a pool of reusable database connections.

This is called the Active Record Connection Pool.

Consider:

# config/database.yml

production:
  adapter: postgresql
  database: my_application_production
  pool: 5
  checkout_timeout: 5

The pool: 5 setting means that this Active Record connection pool can provide up to five simultaneous database connections.

It doesn’t mean that only five requests can execute in Rails.

It means that only five threads can hold a connection from this particular pool at the same time.

How does the connection pool work?

Suppose three Puma threads receive requests.

Puma Worker Process
       |
       |
  Active Record
  Connection Pool
       |
  ---------------------
  |         |         |
 DB Conn 1  DB Conn 2  DB Conn 3
  |         |         |
  ---------------------
       |
   PostgreSQL

Here’s what happens:

  1. Thread 1 receives a request.
  2. Thread 1 executes an Active Record query.
  3. Active Record checks out a connection from the pool.
  4. The connection executes SQL against PostgreSQL.
  5. The request completes.
  6. Rails returns the acquired connection to the pool.

The connection becomes available to another thread.

The pool creates connections as needed, up to its configured limit.

What happens if all connections are busy?

Suppose:

pool: 2

But three threads simultaneously need database connections.

Thread 1 -> Connection 1 (Busy)
Thread 2 -> Connection 2 (Busy)
Thread 3 -> Waiting for a connection

Thread 3 waits until one of the connections becomes available.

If it cannot obtain a connection before checkout_timeout expires, Rails raises:

ActiveRecord::ConnectionTimeoutError

This is a common production issue when the connection pool is too small for the application’s database workload.

7. How Do Puma Workers and Active Record Connection Pools Work Together?

This is where everything comes together.

Remember that every Puma worker is a separate process.

Each worker process maintains its own Active Record connection pool.

For example:

# config/puma.rb

workers 3
threads 5, 5

And:

# config/database.yml

production:
  adapter: postgresql
  database: my_application_production
  pool: 5

Let’s calculate the capacity.

ComponentValue
Puma worker processes3
Threads per worker5
Total request threads15
DB connections per worker5
Total potential DB connections15

The calculation:

3 Puma workers × 5 DB connections = 15 DB connections

Each worker has its own connection pool.

                 Puma Master
                      |
          -------------------------
          |           |           |
       Worker 1    Worker 2    Worker 3
          |           |           |
       Pool 1      Pool 2      Pool 3
        (5)         (5)         (5)
          |           |           |
          -------- PostgreSQL -----

Notice that the three pools are independent.

A connection checked out by a thread in Worker 1 cannot be used by a thread in Worker 2.

What if we configure 5 Puma threads but only 2 DB connections?

workers 1
threads 5, 5
pool: 2

Five requests can be in progress, but only two threads can hold database connections simultaneously.

The remaining threads may wait for an available connection.

This can increase response latency and eventually cause connection timeouts.

What should the connection pool size be?

A useful starting rule is:

Set the connection pool at least as large as the maximum number of concurrent threads that need database connections in that process.

For example:

threads 5, 5

A pool size of five is a sensible starting point.

You may need a larger pool when using additional concurrent database consumers, such as asynchronous Active Record query executors.

You don’t always need one database connection for every Puma thread if only some requests access the database. A smaller pool is possible, but it introduces connection-pool contention.

What about Sidekiq?

Sidekiq is another process that can execute multiple jobs concurrently.

Suppose:

# config/sidekiq.yml
:concurrency: 10

If ten Sidekiq threads can execute database operations simultaneously, its Active Record connection pool should generally support at least ten connections per relevant database pool.

Remember:

  • Puma has its own database pool per worker process.
  • Sidekiq has its own database pool per process.
  • Console sessions and other application processes also consume database connections.

Always calculate total possible database connections across the entire application deployment.

A useful formula is:

Total DB connections =
  (Puma workers × Puma pool size)
  + (Sidekiq processes × Sidekiq pool size)
  + Other application connections

This total must fit within your database connection capacity, leaving room for administration and other required sessions.

8. How Can We Configure Puma for Better Rails Performance?

Puma configuration mainly involves two important settings:

  1. Number of worker processes.
  2. Number of threads per worker.

Example configuration

# config/puma.rb

max_threads = ENV.fetch("RAILS_MAX_THREADS", 3).to_i

min_threads = ENV.fetch(
  "RAILS_MIN_THREADS",
  max_threads
).to_i

threads min_threads, max_threads

workers ENV.fetch("WEB_CONCURRENCY", 2).to_i

preload_app!

Start the application:

bundle exec puma -C config/puma.rb

A. Configure the number of threads

threads 3, 3

This configures three request threads per worker.

You can increase the thread count for applications with substantial I/O waiting.

However, don’t blindly increase it.

More threads can increase:

  • Memory consumption.
  • GVL contention.
  • Database connection demand.
  • External service concurrency.

Rails 7.2 changed its generated Puma thread default from five to three after observing that excessive threading could increase GVL contention and request latency.

B. Configure the number of workers

workers 2

This starts two worker processes.

Each process has its own Ruby execution environment and GVL.

Multiple workers allow MRI Ruby code to execute in parallel on different CPU cores.

However, workers also consume memory and increase the total number of possible database connections.

Don’t blindly set workers equal to the number of available CPUs without considering memory and database capacity.

C. Application preloading

preload_app!

This loads the application before Puma forks its worker processes.

It can reduce memory usage through an operating-system feature called Copy-on-Write (CoW).

When memory pages are shared and neither process modifies them, the operating system can avoid duplicating those pages.

Preloading is useful in clustered deployments, but it has lifecycle implications. In particular, it cannot be combined with Puma’s phased restart feature.

When configuring preloading, follow the connection and background-thread lifecycle requirements of your Puma version and Rails application.

D. What is the best configuration?

There is no universal best configuration.

For a typical I/O-heavy Rails application, start with a modest number of threads and workers, then benchmark.

For example:

workers 2
threads 3, 3

This provides six simultaneous request slots.

Measure:

  • Request throughput (requests per second).
  • P95 and P99 response latency.
  • Worker memory consumption.
  • CPU utilisation.
  • Database connection-pool wait time.
  • Database CPU and query latency.

Increase workers or threads only when measurements show that the current configuration is limiting performance.

9. Putting Everything Together

Let’s consider a real-world example.

A Rails application receives 100 HTTP requests.

Puma is configured with:

workers 2
threads 3, 3

The application can process six requests concurrently across its two worker processes.

The remaining requests wait in the server’s request-handling queue.

Now assume every request needs a database connection.

Each worker has:

pool: 3

Therefore:

Worker 1: 3 concurrent DB connections
Worker 2: 3 concurrent DB connections
Total: 6 possible DB connections

PostgreSQL can execute queries using these independent connections.

If one transaction updates a particular row, another transaction attempting to update the same row may wait for the lock to be released.

Meanwhile, other unrelated queries can continue.

This is how Puma, Active Record and PostgreSQL work together to handle concurrent Rails requests.

10. Common Interview Questions

1. What is the difference between a Puma worker and a thread?

A worker is an independent operating-system process. A thread is an execution unit inside that process. Puma uses both to handle concurrent requests.

2. What are I/O-bound requests?

Requests that spend considerable time waiting for external operations such as database queries, HTTP calls, Redis, or file I/O.

3. Does MRI Ruby support multithreading?

Yes. MRI supports multiple threads, but the GVL prevents multiple threads in the same process from executing Ruby bytecode simultaneously. Threads can still overlap blocking I/O.

4. Why does Puma use multiple processes?

Multiple processes allow Ruby code to execute in parallel across CPU cores despite the MRI GVL. They also provide process isolation.

5. Does every Puma thread need a database connection?

Not necessarily at every moment. However, when multiple threads simultaneously require database connections, each needs its own checked-out connection.

6. What happens when the connection pool is exhausted?

Threads wait for a connection. If one does not become available before the checkout timeout, Rails raises ActiveRecord::ConnectionTimeoutError.

7. Does PostgreSQL lock an entire table when a record is updated?

Not normally. PostgreSQL uses MVCC and row-level locking for conflicting updates. Certain operations, such as some DDL commands, can acquire table-level locks.

8. Why not increase the number of Puma threads to 100?

Too many threads can increase GVL contention, memory usage, database connection requirements and request latency. Thread count must be tuned based on the workload.

9. What is the difference between concurrency and parallelism?

Concurrency means multiple tasks make progress during overlapping periods. Parallelism means multiple tasks execute simultaneously, typically on different CPU cores.

10. How do you troubleshoot Active Record connection-pool exhaustion?

Check the configured pool size, Puma thread count, Sidekiq concurrency, connection checkout wait time, long-running transactions and database connection limits. Increase the pool only after checking total database capacity.

🏁 Final Takeaway

Remember these relationships:

  • Puma workers = independent processes.
  • Puma threads = concurrent request execution within each process.
  • MRI GVL = one thread executes Ruby bytecode at a time per process.
  • I/O-bound operations = threads can make progress while another thread waits.
  • Active Record connection pool = manages reusable database connections for threads.
  • Database connection = a communication session, not a database lock.
  • PostgreSQL MVCC = allows concurrent access to consistent data snapshots.
  • Database row locks = coordinate conflicting writes.

Once you understand how these components interact, Puma configuration and Rails concurrency become much easier to reason about.

Happy Configuring!
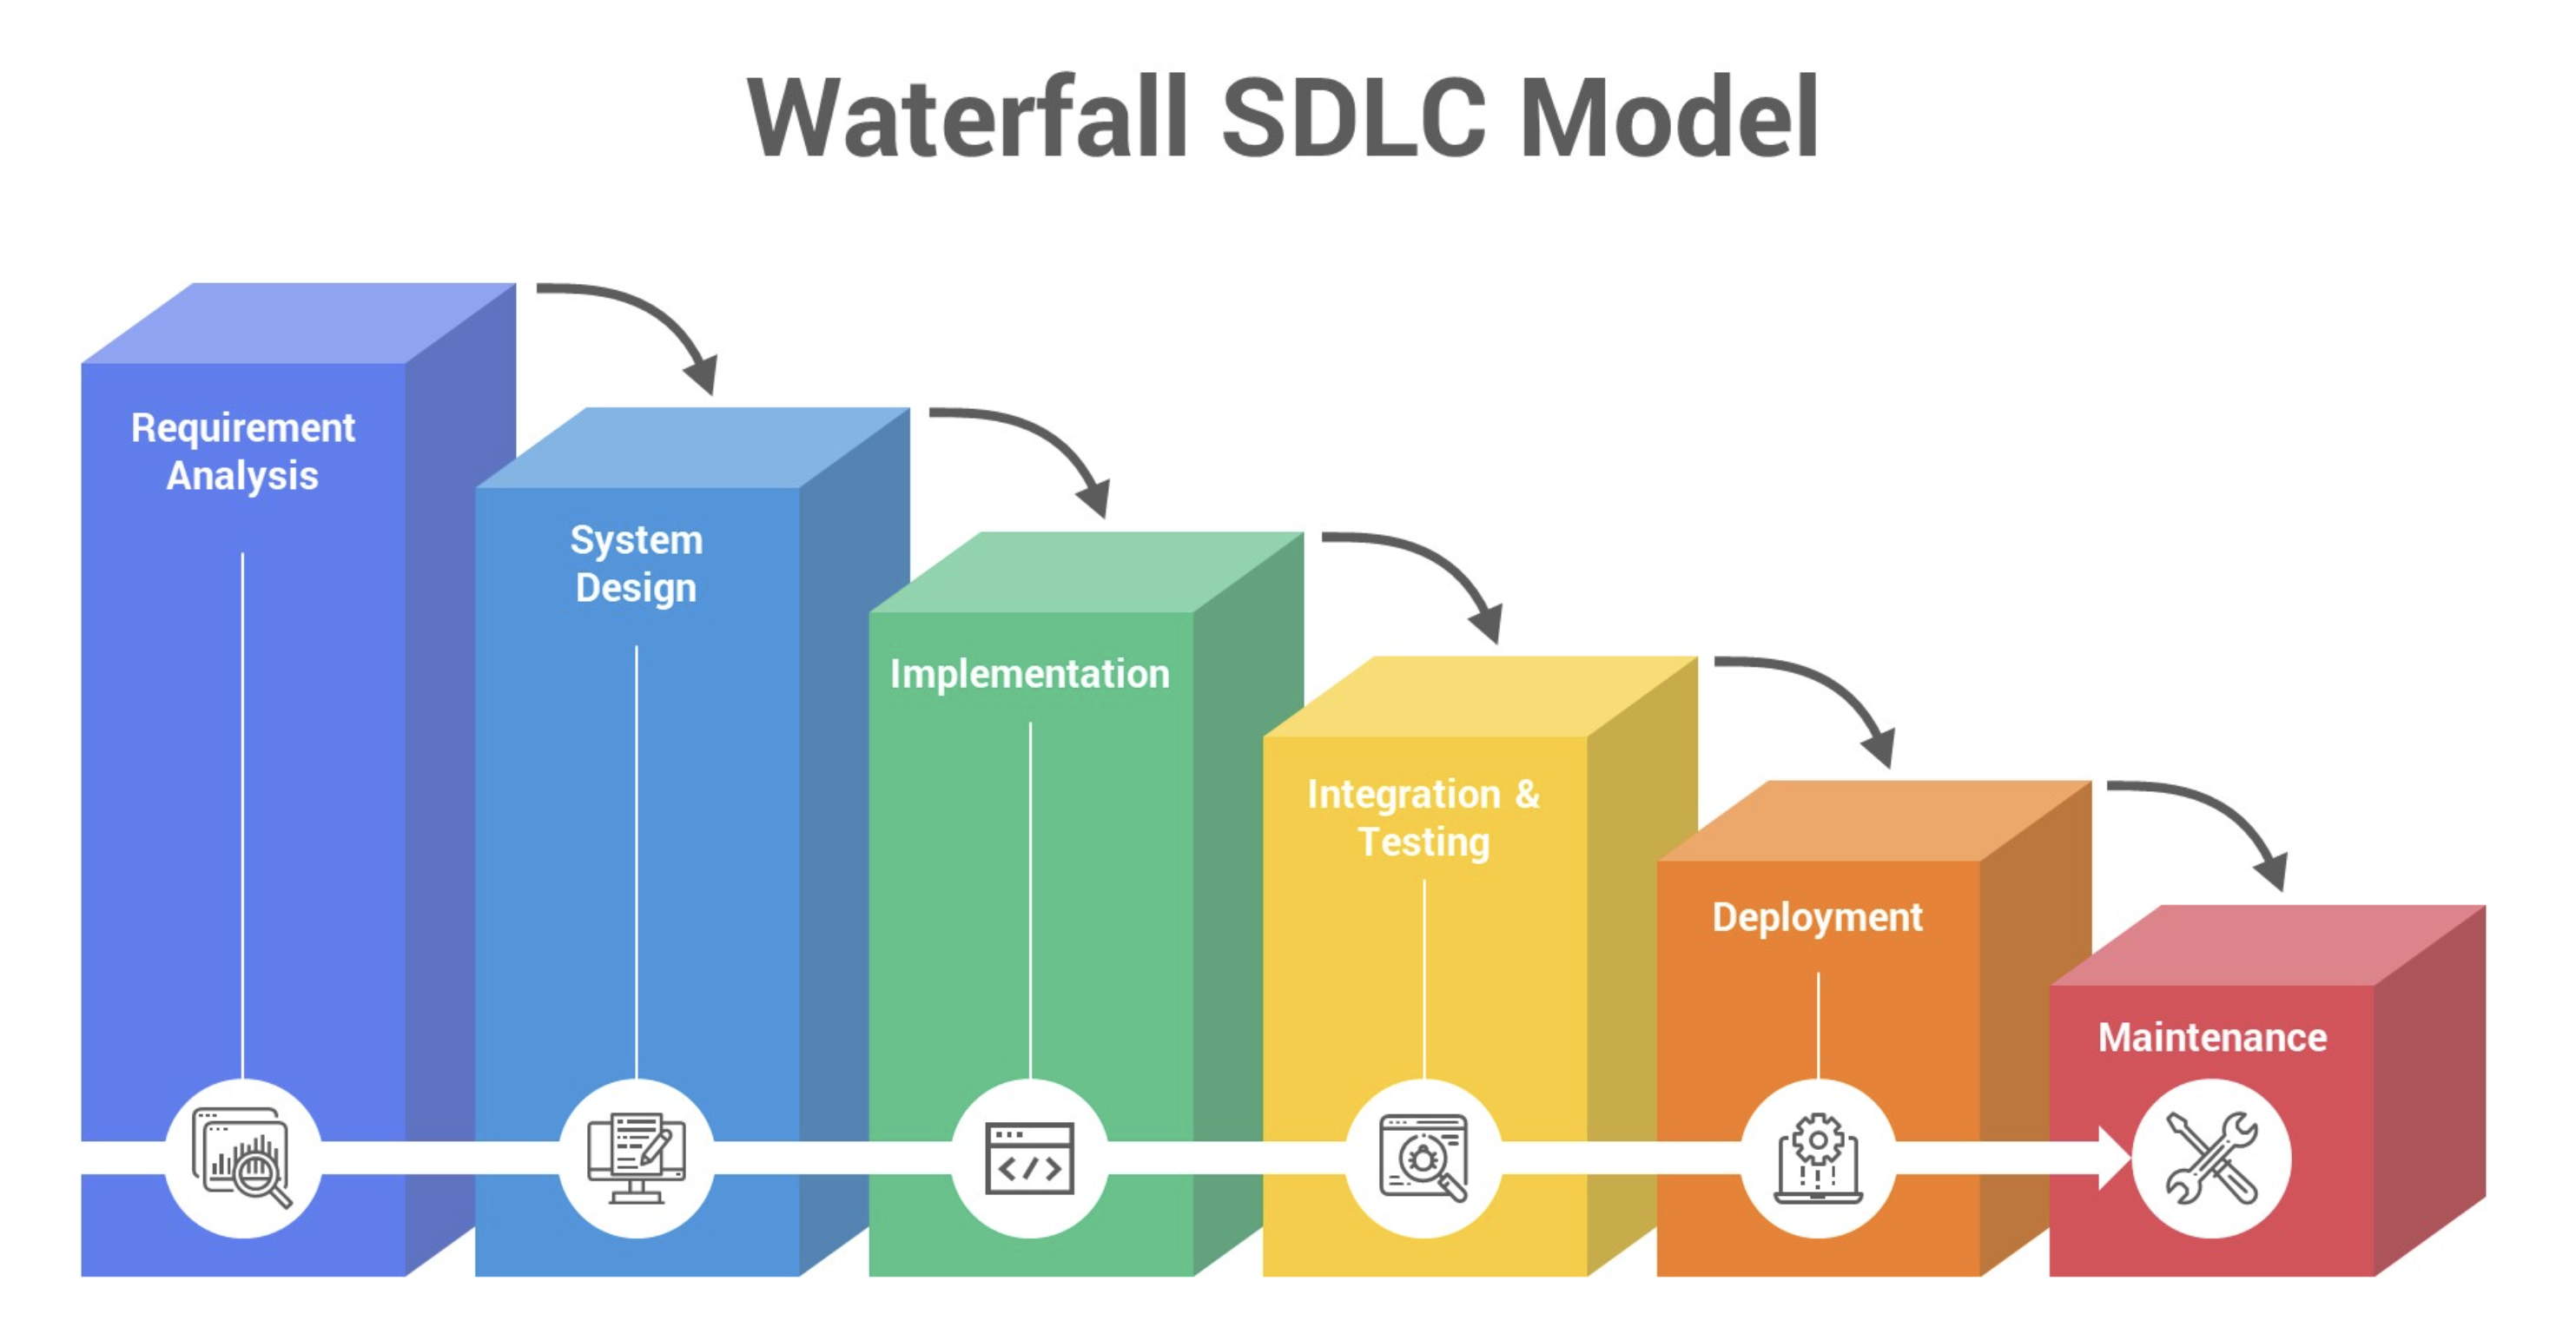
Software Development Methodologies: A Deep Dive into the Waterfall Model: Part 2 📈

Software development methodologies provide structured approaches to planning, managing, and executing software projects. Among these, the Waterfall model stands as one of the most traditional and well-known methodologies. In this comprehensive guide, I’ll explain software development methodologies in general and then focus specifically on the Waterfall model, including its phases, advantages, disadvantages, and practical examples.

Understanding Software Development Methodologies

Software development methodologies are frameworks used to structure, plan, and control the process of developing information systems. They define project steps, roles, responsibilities, activities, communication standards, and deliverables . The diversity in methodologies allows organizations to choose approaches that align with their specific needs and project requirements .

Methodologies can be broadly categorized into:

  1. Sequential/Plan-driven methodologies (like Waterfall)
  2. Agile methodologies (like Scrum, Kanban)
  3. Hybrid approaches (combining elements of both)

The choice of methodology depends on factors like project size, complexity, requirement stability, team size, and organizational culture .

The Waterfall Model: A Sequential Approach

The Waterfall model is the most classic and sequential method of software development, developed in 1970 . It follows a linear workflow where the development process is divided into distinct phases that must be completed sequentially, much like a waterfall flowing downward through several stages .

Waterfall Model Phases

  1. Requirements Analysis: Gathering and documenting all system requirements
  2. System Design: Creating architectural and detailed designs
  3. Implementation: Writing the actual code
  4. Testing: Verifying the system against requirements
  5. Deployment: Releasing the product to users
  6. Maintenance: Fixing issues and making updates

Diagram: Sequential phases of the Waterfall model

Key Characteristics of Waterfall

  1. Linear and sequential: Each phase must be completed before the next begins
  2. Document-heavy: Extensive documentation is produced at each stage
  3. Fixed requirements: Requirements are frozen after the initial phase
  4. Limited customer involvement: Mainly at the beginning (requirements) and end (testing)

Advantages of Waterfall

  1. Simple and easy to understand: Its linear nature makes it accessible, especially for beginners
  2. Clear milestones and deliverables: Each phase has defined outputs
  3. Good for stable requirements: Works well when requirements are well-understood upfront
  4. Easier to manage: Due to its structured nature
  5. Comprehensive documentation: Helps in maintenance and future updates

Disadvantages of Waterfall

  1. Inflexible to changes: Difficult to accommodate changing requirements
  2. Late testing: Testing occurs only after implementation is complete
  3. Delayed working software: No working product until late in the cycle
  4. High risk: Errors in requirements may not be discovered until late
  5. Limited customer feedback: Customers don’t see the product until it’s nearly complete

When to Use Waterfall

The Waterfall model is suitable for:

  • Projects with well-defined, unchanging requirements
  • Small to medium-sized projects
  • Projects where technology is well-understood
  • Situations where timeline and budget control is critical
  • Projects with predictable outcomes
  • Teams with inexperienced developers

Real-World Example: Building a Bridge

The Waterfall model works well for projects like bridge construction:

  1. Requirements: Determine load capacity, length, materials needed
  2. Design: Create blueprints and engineering plans
  3. Implementation: Actually construct the bridge
  4. Testing: Stress-test the completed bridge
  5. Deployment: Open the bridge to traffic
  6. Maintenance: Regular inspections and repairs

Just as you wouldn’t change bridge specifications midway through construction, Waterfall works best when requirements are fixed early on.

Variations of Waterfall

  1. V-Model: An extension that emphasizes testing in parallel with development
  2. Sashimi Model: Allows some overlap between phases

Comparison with Other Methodologies

Unlike Agile methodologies which embrace change, Waterfall assumes requirements can be fully defined upfront . While Agile is like jazz (improvisational), Waterfall is like classical music (precisely planned) .

Conclusion

The Waterfall model remains relevant for certain types of projects despite the popularity of Agile approaches. Its structured, document-driven approach works best when requirements are stable and well-understood. However, for projects with evolving requirements or needing frequent customer feedback, more flexible methodologies like Agile may be more appropriate.

Understanding the strengths and limitations of Waterfall helps teams select the right methodology for their specific project needs, balancing structure with flexibility as required.


Stay tuned! 🚀

Introduction to Software Development Methodologies 📊: Part 1

Software development is not just about writing code; it’s about building high-quality, maintainable, and scalable systems that deliver value to users. To achieve this consistently, teams follow structured approaches known as software development methodologies. These methodologies provide a roadmap for planning, designing, developing, testing, and delivering software.

In this three-part blog series, we’ll explore key methodologies and best practices in software development, using Ruby and Ruby on Rails examples wherever appropriate.

What Are Software Development Methodologies?

Software development methodologies are structured processes or frameworks that guide the planning and execution of software projects. They help teams manage complexity, collaborate effectively, reduce risk, and deliver projects on time.

Common Goals of Any Methodology:

  • Define clear project scope and goals
  • Break down work into manageable tasks
  • Encourage communication among team members
  • Track progress and measure success
  • Deliver working software iteratively or incrementally

Why Methodologies Matter

Without a methodology, software projects often suffer from unclear requirements, missed deadlines, buggy releases, or scope creep. A good methodology:

  • Increases team productivity
  • Ensures better quality and maintainability
  • Reduces time-to-market
  • Improves customer satisfaction

In Ruby and Rails projects, where rapid development is a key feature, following a methodology keeps things under control and makes collaboration more effective.

A Brief Overview of Popular Software Development Methodologies

We’ll explore these in detail in Part 2, but here are the major ones:

1. Waterfall

A linear approach where each phase (Requirements → Design → Implementation → Testing → Deployment) happens one after another.

2. Agile

An iterative and incremental model that encourages adaptive planning, early delivery, and continuous improvement.

3. Scrum

A popular Agile framework that structures work in sprints and emphasizes team roles, ceremonies, and artifacts.

4. Kanban

A flow-based Agile method that uses visual boards to manage work and improve process efficiency.

5. Extreme Programming (XP)

Focuses on engineering excellence, including practices like pair programming, TDD, and continuous integration. Ruby and Rails communities highly embrace XP.

6. DevOps

Combines software development and IT operations to shorten the development lifecycle and deliver high-quality software continuously.

✨ Ruby On Rails: A Natural Fit for Agile and XP

Ruby and Rails were built with developer happiness and productivity in mind. They naturally complement Agile and XP methodologies.

Example:

  • Ruby on Rails encourages convention over configuration, which speeds up development.
  • It supports Test-Driven Development (TDD) out of the box via tools like RSpec and Minitest.
  • Features like scaffolding align well with the iterative nature of Agile.

Coming Up in Part 2

In the next part of this series, I’ll do a deep dive into each of the above methodologies, with pros, cons, and real-world use cases. I’ll also show examples of how Rails developers apply these in practice.


Stay tuned! 🚀

Software Architect Guide:💡 Understanding Design Patterns & Anti-Patterns in Ruby

In the world of software development, design patterns and anti-patterns play a critical role in writing maintainable, clean, and scalable code. As a Ruby developer, mastering these concepts will help you design robust applications and avoid common pitfalls.

What are Design Patterns?

Design patterns are time-tested, reusable solutions to common problems in software design. They aren’t code snippets but conceptual templates you can adapt based on your needs. Think of them as architectural blueprints.

Common Ruby Design Patterns

1. Singleton Pattern

the_logger = Logger.new
class Logger
  @@instance = Logger.new

  def self.instance
    @@instance
  end

  private_class_method :new
end

Use when only one instance of a class should exist (e.g., logger, configuration manager).

What is the Singleton Pattern?

The Singleton Pattern ensures that only one instance of a class exists during the lifetime of an application. This is useful for managing shared resources like:

  • a logger (so logs are not duplicated or misdirected),
  • a configuration manager (so all parts of the app read/write the same config),
  • or a database connection pool.

Why private_class_method :new?

This line prevents other parts of the code from calling Logger.new, like this:

Logger.new  # ❌ Will raise a NoMethodError

So, you’re restricting object creation from outside the class.

Q) Then how do you get an object of Logger?

By using a class method like Logger.instance that returns the only instance of the class.

Full Singleton Example in Ruby

class Logger
  # Create and store the single instance
  @@instance = Logger.new

  # Provide a public way to access that instance
  def self.instance
    @@instance
  end

  # Prevent external instantiation
  private_class_method :new

  # Example method
  def log(message)
    puts "[LOG] #{message}"
  end
end

# Usage
logger1 = Logger.instance
logger2 = Logger.instance

logger1.log("Singleton works!")

puts logger1.object_id == logger2.object_id  # true

🧾 Explanation:

  • @@instance = Logger.new: Creates the only instance when the class is loaded.
  • Logger.instance: The only way to access that object.
  • private_class_method :new: Prevents creation of new objects using Logger.new.
  • logger1 == logger2: ✅ True, because they point to the same object.

💬 Think of a Real-World Example

Imagine a central control tower at an airport:

  • There should only be one control tower instance managing flights.
  • If each plane connected to a new tower, it would be chaos!

The Singleton pattern in Ruby ensures there’s just one control tower (object) shared globally.

2. Observer Pattern

class Order
  include Observable

  def place_order
    changed
    notify_observers(self)
  end
end

class EmailNotifier
  def update(order)
    puts "Email sent for order #{order.id}"
  end
end

order = Order.new
order.add_observer(EmailNotifier.new)
order.place_order

Use when one change in an object should trigger actions in other objects.

Observer Pattern in Ruby – Explained in Detail

The Observer Pattern is a behavioral design pattern that lets one object (the subject) notify other objects (the observers) when its state changes.

Ruby has built-in support for this through the Observable module in the standard library (require 'observer').

How it Works

  1. The Subject (e.g., Order) includes the Observable module.
  2. The subject calls:
    • changed → marks the object as changed.
    • notify_observers(data) → notifies all subscribed observers.
  3. Observers (e.g., EmailNotifier) implement an update method.
  4. Observers are registered using add_observer(observer_object).

Complete Working Example

require 'observer'

class Order
  include Observable
  attr_reader :id

  def initialize(id)
    @id = id
  end

  def place_order
    puts "Placing order #{@id}..."
    changed                      # Mark this object as changed
    notify_observers(self)       # Notify all observers
  end
end

class EmailNotifier
  def update(order)
    puts "📧 Email sent for Order ##{order.id}"
  end
end

class SMSNotifier
  def update(order)
    puts "📱 SMS sent for Order ##{order.id}"
  end
end

# Create subject and observers
order = Order.new(101)
order.add_observer(EmailNotifier.new)
order.add_observer(SMSNotifier.new)

order.place_order

# Output:
# Placing order 101...
# 📧 Email sent for Order #101
# 📱 SMS sent for Order #101

When to Use the Observer Pattern

  • You have one object whose changes should automatically update other dependent objects.
  • Examples:
    • UI updates in response to data changes
    • Logging, email, or analytics triggers after a user action
    • Notification systems in event-driven apps

Updated Observer Pattern

require 'observer'

class Order
  include Observable
  attr_reader :id

  def initialize(id)
    @id = id
  end

  def place_order
    changed
    notify_observers(self)
  end
end

class EmailNotifier
  def update(order)
    puts "📧 Email sent for Order ##{order.id}"
  end
end

order = Order.new(42)
order.add_observer(EmailNotifier.new)
order.place_order

What’s Happening?

  • Order includes the Observable module to gain observer capabilities.
  • add_observer registers an observer object.
  • When place_order is called:
    • changed marks the state as changed.
    • notify_observers(self) triggers the observer’s update method.
  • EmailNotifier reacts to the change — in this case, it simulates sending an email.

🧩 Use this pattern when one change should trigger multiple actions — like sending notifications, logging, or syncing data across objects.

Check: https://docs.ruby-lang.org/en/2.2.0/Observable.html

3. Decorator Pattern

class SimpleCoffee
  def cost
    2
  end
end

class MilkDecorator
  def initialize(coffee)
    @coffee = coffee
  end

  def cost
    @coffee.cost + 0.5
  end
end

coffee = MilkDecorator.new(SimpleCoffee.new)
puts coffee.cost  # => 2.5

Add responsibilities to objects dynamically without modifying their code.


4. Strategy Pattern

The Strategy Pattern allows choosing an algorithm’s behaviour at runtime. This pattern is useful when you have multiple interchangeable ways to perform a task.

Example: Text Formatter Strategies

Let’s say you have a system that outputs text in different formats – plain, HTML, or Markdown.

❌ Before Using Strategy Pattern – Hardcoded Conditional Formatting

class TextFormatter
  def initialize(format)
    @format = format
  end

  def format(text)
    case @format
    when :plain
      text
    when :html
      "<p>#{text}</p>"
    when :markdown
      "**#{text}**"
    else
      raise "Unknown format: #{@format}"
    end
  end
end

# Usage
formatter1 = TextFormatter.new(:html)
puts formatter1.format("Hello, World")       # => <p>Hello, World</p>

formatter2 = TextFormatter.new(:markdown)
puts formatter2.format("Hello, World")       # => **Hello, World**

⚠️ Problems With This Approach

  • All formatting logic is stuffed into one method.
  • Adding a new format (like XML) means modifying this method (violates Open/Closed Principle).
  • Not easy to test or extend individual formatting behaviors.
  • Harder to maintain and violates SRP (Single Responsibility Principle).

This sets the stage perfectly to apply the Strategy Pattern, where each format becomes its own class with a clear responsibility.

Instead of writing if/else logic everywhere, use strategy objects:

# Strategy Interface
class TextFormatter
  def self.for(format)
    case format
    when :plain
      PlainFormatter.new
    when :html
      HtmlFormatter.new
    when :markdown
      MarkdownFormatter.new
    else
      raise "Unknown format"
    end
  end
end

# Concrete Strategies
class PlainFormatter
  def format(text)
    text
  end
end

class HtmlFormatter
  def format(text)
    "<p>#{text}</p>"
  end
end

class MarkdownFormatter
  def format(text)
    "**#{text}**"
  end
end

# Usage
def render_text(text, format)
  formatter = TextFormatter.for(format)
  formatter.format(text)
end

puts render_text("Hello, world", :html)     # => <p>Hello, world</p>
puts render_text("Hello, world", :markdown) # => **Hello, world**

📌 Why It’s Better

  • Adds new formats easily without changing existing code.
  • Keeps formatting logic isolated in dedicated classes.
  • Follows the Open/Closed Principle.

💳 Strategy Pattern in Rails: Payment Gateway Integration

Here’s a Rails-specific Strategy Pattern example. This example uses a service to handle different payment gateways (e.g., Stripe, PayPal, Razorpay), which are chosen dynamically based on configuration or user input.

Problem:

You want to process payments, but the actual logic differs depending on which gateway (Stripe, PayPal, Razorpay) is being used. Avoid if/else or case all over your controller or service.

✅ Solution Using Strategy Pattern

# app/services/payment_processor.rb
class PaymentProcessor
  def self.for(gateway)
    case gateway.to_sym
    when :stripe
      StripeGateway.new
    when :paypal
      PaypalGateway.new
    when :razorpay
      RazorpayGateway.new
    else
      raise "Unsupported payment gateway"
    end
  end
end

# app/services/stripe_gateway.rb
class StripeGateway
  def charge(amount, user)
    # Stripe API integration here
    puts "Charging #{user.name} ₹#{amount} via Stripe"
  end
end

# app/services/paypal_gateway.rb
class PaypalGateway
  def charge(amount, user)
    # PayPal API integration here
    puts "Charging #{user.name} ₹#{amount} via PayPal"
  end
end

# app/services/razorpay_gateway.rb
class RazorpayGateway
  def charge(amount, user)
    # Razorpay API integration here
    puts "Charging #{user.name} ₹#{amount} via Razorpay"
  end
end

# app/controllers/payments_controller.rb
class PaymentsController < ApplicationController
  def create
    user = User.find(params[:user_id])
    gateway = params[:gateway] # e.g., 'stripe', 'paypal', etc.
    amount = params[:amount].to_i

    processor = PaymentProcessor.for(gateway)
    processor.charge(amount, user)

    render json: { message: \"Payment processed via #{gateway.capitalize}\" }
  end
end

Benefits in Rails Context

  • Keeps your controller slim and readable.
  • Each gateway integration is encapsulated in its own class.
  • Easy to test, extend, and maintain (open/closed principle).
  • Avoids future code smell like “Shotgun Surgery”.

What are Anti-Patterns?

Anti-patterns are poor programming practices or ineffective solutions that seem helpful at first but cause long-term issues like unmaintainable code or hidden bugs.

Common Ruby Anti-Patterns

1. God Object

A class that knows too much or does too much.

class UserManager
  def create_user
    # logic
  end

  def send_email
    # unrelated responsibility
  end

  def generate_report
    # another unrelated responsibility
  end
end

Fix: Follow the Single Responsibility Principle. Split into smaller, focused classes.

Shotgun Surgery

Tiny changes require touching many different places in code.

# Example of Shotgun Surgery - Business rule spread across many files

# In order.rb
class Order
  def eligible_for_discount?
    user.vip? && total > 1000
  end
end

# In invoice.rb
class Invoice
  def apply_discount(order)
    if order.user.vip? && order.total > 1000
      # apply discount logic
    end
  end
end

# In email_service.rb
class EmailService
  def send_discount_email(order)
    if order.user.vip? && order.total > 1000
      # send congratulatory email
    end
  end
end

Here, the logic user.vip? && total > 1000 is repeated in multiple places. If the discount eligibility rules change (e.g., change the threshold to 2000 or add a new condition), you’ll have to update every occurrence.

✅ Fix: Centralize the Logic

class DiscountPolicy
  def self.eligible?(order)
    order.user.vip? && order.total > 1000
  end
end

Now all files can use DiscountPolicy.eligible?(order), ensuring consistency and easier maintenance.

3. Spaghetti Code

Unstructured and difficult-to-follow code.

def calculate_discount(user, items)
  if user.vip?
    # deeply nested logic
    total = items.sum { |i| i.price }
    total * 0.2
  else
    if user.new_customer?
      total = items.sum { |i| i.price }
      total * 0.1
    else
      total = items.sum { |i| i.price }
      total * 0.05
    end
  end
end

This code is hard to read, hard to extend, and violates SRP (Single Responsibility Principle).

Fix: Break into smaller methods, use polymorphism or strategy patterns.

✅ Refactored with Strategy Pattern

# Strategy Interface
class DiscountStrategy
  def self.for(user)
    if user.vip?
      VipDiscount.new
    elsif user.new_customer?
      NewCustomerDiscount.new
    else
      RegularDiscount.new
    end
  end
end

# Concrete Strategies
class VipDiscount
  def apply(items)
    total = items.sum(&:price)
    total * 0.2
  end
end

class NewCustomerDiscount
  def apply(items)
    total = items.sum(&:price)
    total * 0.1
  end
end

class RegularDiscount
  def apply(items)
    total = items.sum(&:price)
    total * 0.05
  end
end

# Usage
def calculate_discount(user, items)
  strategy = DiscountStrategy.for(user)
  strategy.apply(items)
end

🎯 Benefits

  • No nested conditionals
  • Easy to add new discount types (open/closed principle)
  • Each class has one responsibility
  • Testable and readable

🔍 How to Detect Anti-Patterns in Ruby Code

  1. Code Smells:
    • Long methods
    • Large classes
    • Repetition (DRY violations)
    • Deep nesting
  2. Code Review Checklist:
    • Is each class doing only one thing?
    • Can this method be broken down?
    • Are we repeating business logic?
    • Is the code testable?
  3. Use Static Analysis Tools:
    • Rubocop for style and complexity checks
    • Reek for code smells
    • Flog for measuring code complexity

How to Refactor Anti-Patterns

  • Use Service Objects: Extract complex logic into standalone classes.
  • Apply Design Patterns: Choose the right pattern that matches your need (Strategy, Adapter, etc).
  • Keep Methods Small: Limit to a single task; ideally under 10 lines.
  • Write Tests First: Test-driven development (TDD) helps spot untestable designs.

🎯 Conclusion

Understanding design patterns and identifying anti-patterns is crucial for writing better Ruby code. While patterns guide you toward elegant solutions, anti-patterns warn you about common mistakes. With good design principles, automated tools, and thoughtful reviews, your Ruby codebase can remain healthy, scalable and developer-friendly.


Happy Ruby Coding!

SOLID Principles in Ruby: A Practical Guide with Real-World Examples

SOLID is a collection of five object-oriented design principles that help developers build maintainable, flexible and testable applications.

As Ruby on Rails developers, we frequently work with classes, modules, services, models and dependency injection. Understanding SOLID helps us decide where responsibilities belong and how different components should communicate.

Let’s understand each principle with practical Ruby examples.

What Does SOLID Stand For?

PrincipleMeaningMain idea
SSingle Responsibility PrincipleOne responsibility per class
OOpen/Closed PrincipleOpen for extension, closed for modification
LLiskov Substitution PrincipleSubtypes should be interchangeable
IInterface Segregation PrinciplePrefer small, focused interfaces
DDependency Inversion PrincipleDepend on abstractions, not concrete implementations

Let’s look at three practical examples covering all five principles.

1. Single Responsibility Principle (SRP)

A class should have one reason to change.

This does not mean a class should contain only one method. It means that the class should have one clearly defined responsibility.

❌ Bad example

Imagine an Order class responsible for:

  • Calculating order totals.
  • Saving orders to the database.
  • Sending confirmation emails.
class Order
  def initialize(items)
    @items = items
  end

  def calculate_total
    @items.sum(&:price)
  end

  def save
    # Database persistence
  end

  def send_confirmation_email
    # Email delivery
  end
end

What’s wrong here?

Suppose we change the email provider. We need to modify the Order class.

Suppose we change the persistence mechanism. Again, we modify Order.

The class has multiple reasons to change.

✅ Better example

Separate responsibilities into dedicated classes.

class Order
  def initialize(items)
    @items = items
  end

  def total
    @items.sum(&:price)
  end
end

class OrderRepository
  def save(order)
    order.save!
  end
end

class ReceiptMailer
  def deliver(order)
    OrderMailer.confirmation(order).deliver_later
  end
end

class CheckoutService
  def initialize(repository:, receipt_mailer:)
    @repository = repository
    @receipt_mailer = receipt_mailer
  end

  def call(order)
    @repository.save(order)
    @receipt_mailer.deliver(order)
  end
end

Now each class has a focused responsibility.

Rails application example:

  • Models handle domain behaviour and persistence.
  • Service objects coordinate business operations.
  • Query objects encapsulate complex read queries.
  • Mailers handle email composition and delivery.

Avoid putting every business operation inside a single model or controller.

2. Open/Closed Principle (OCP)

Software entities should be open for extension but closed for modification.

This means we should be able to introduce new behaviour without continuously modifying existing, stable code.

❌ Bad example

Consider an application that calculates discounts.

class OrderCalculator
  def calculate(total, discount_type)
    case discount_type
    when :percentage
      total * 0.10
    when :fixed
      100
    when :seasonal
      total * 0.20
    end
  end
end

Every time we introduce a new discount type, we must modify the existing class.

This becomes difficult to maintain as the number of conditions increases.

✅ Better example using Ruby classes

Create separate discount strategies.

module Discounts
  class Percentage
    def initialize(rate:)
      @rate = rate
    end

    def call(total)
      total * @rate
    end
  end

  class FixedAmount
    def initialize(amount:)
      @amount = amount
    end

    def call(_total)
      @amount
    end
  end
end

class OrderCalculator
  def initialize(discount:)
    @discount = discount
  end

  def calculate(total)
    total - @discount.call(total)
  end
end

Usage:

discount = Discounts::Percentage.new(rate: 0.10)

calculator = OrderCalculator.new(
  discount: discount
)

calculator.calculate(1000)
# => 900.0

Later, we can introduce a new discount:

module Discounts
  class Seasonal
    def call(total)
      total * 0.20
    end
  end
end

We don’t need to modify OrderCalculator.

This approach uses the Strategy pattern.

Important: Ruby supports this naturally through duck typing. Different objects can implement the same expected method without requiring inheritance.

3. Liskov Substitution, Interface Segregation and Dependency Inversion

These three principles are closely related when designing integrations such as payment gateways, notification providers, or storage services.

A. Liskov Substitution Principle (LSP)

Objects of a parent type should be replaceable with objects of its subtype without breaking application behaviour.

Imagine a payment system supporting different payment providers.

Every payment gateway must follow the same contract:

module Chargeable
  def charge(amount:, currency:)
    raise NotImplementedError
  end
end

Implementations:

class StripeGateway
  include Chargeable

  def charge(amount:, currency:)
    # Call Stripe API
    # Return a consistent payment result
  end
end

class WalletGateway
  include Chargeable

  def charge(amount:, currency:)
    # Call wallet provider
    # Return the same payment result contract
  end
end

Both gateways should respect the same expected behaviour.

For example, if CheckoutService expects a payment result with success?, every implementation must provide that behaviour consistently.

Otherwise, replacing StripeGateway with WalletGateway might break CheckoutService.

That’s an LSP violation.

B. Interface Segregation Principle (ISP)

Clients should not be forced to depend on methods they don’t use.

Suppose we create one large payment interface:

module PaymentGateway
  def charge; end
  def refund; end
  def cancel; end
  def recurring_payment; end
end

But some payment providers support charging only. Others support refunds and recurring payments.

Forcing every provider to implement all these methods creates unnecessary dependencies.

Instead, separate capabilities:

module Chargeable
  def charge(amount:, currency:)
    raise NotImplementedError
  end
end

module Refundable
  def refund(transaction_id:, amount:)
    raise NotImplementedError
  end
end

Now a gateway can implement only the capabilities it supports.

class GiftCardGateway
  include Chargeable

  def charge(amount:, currency:)
    # Gift card payment implementation
  end
end

A provider supporting refunds can include both modules.

Ruby modules provide a useful way of expressing these contracts, although Ruby does not enforce interfaces at compile time. Tests should verify that implementations meet their contracts.

C. Dependency Inversion Principle (DIP)

High-level modules should not depend directly on low-level modules. Both should depend on abstractions.

Consider a checkout operation.

❌ Bad example

class CheckoutService
  def initialize
    @gateway = StripeGateway.new
  end

  def call(amount)
    @gateway.charge(
      amount: amount,
      currency: "USD"
    )
  end
end

CheckoutService is tightly coupled to StripeGateway.

Switching to another provider requires changing the service.

✅ Better example

Inject the dependency.

class CheckoutService
  def initialize(payment_gateway:)
    @payment_gateway = payment_gateway
  end

  def call(amount)
    @payment_gateway.charge(
      amount: amount,
      currency: "USD"
    )
  end
end

Usage:

checkout = CheckoutService.new(
  payment_gateway: StripeGateway.new
)

checkout.call(500)

For testing:

fake_gateway = FakePaymentGateway.new

checkout = CheckoutService.new(
  payment_gateway: fake_gateway
)

Now CheckoutService doesn’t know whether the implementation uses Stripe, a wallet, or a test double.

This makes the code easier to test, replace and maintain.

SOLID in a Ruby on Rails Application

Here’s how these principles translate into everyday Rails development.

PrincipleRails example
SRPKeep controllers thin and isolate responsibilities into services or query objects
OCPUse strategies or polymorphism instead of continuously adding conditional logic
LSPEnsure alternative implementations respect the same behavioural contract
ISPSeparate provider capabilities into small interfaces/modules
DIPInject dependencies instead of directly creating concrete service objects

Remember that SOLID does not mean creating a class for every method or introducing unnecessary abstractions.

Apply these principles when they solve a real maintainability or testing problem.

Common Interview Questions

1. What are SOLID principles?

SOLID is a set of five object-oriented design principles that improve maintainability, flexibility and testability. They are SRP, OCP, LSP, ISP and DIP.

2. What is the difference between SRP and OCP?

SRP focuses on giving a class one responsibility. OCP focuses on allowing new behaviour without modifying existing stable code.

3. How does Ruby support interfaces?

Ruby doesn’t have traditional compile-time interfaces like Java. We commonly use duck typing, modules and conventions to define expected behaviour.

4. What is dependency injection?

Dependency injection is a technique where an object receives its dependencies from outside rather than creating them internally. It reduces coupling and makes testing easier.

5. Are SOLID principles mandatory in every class?

No. They are design guidelines, not strict rules. Over-engineering small classes can introduce unnecessary complexity.

🏁 Final Takeaway

When designing Ruby applications, ask yourself:

  • Does this class have multiple reasons to change?
  • Can I add new behaviour without modifying existing code?
  • Can I replace one implementation with another safely?
  • Am I forcing objects to implement methods they don’t need?
  • Am I depending on concrete implementations unnecessarily?

These questions help identify SOLID violations during code reviews and system design discussions.

📋 Software Architect Guide: Designs | Patterns | Coding | Architectures

About

Technical assessment platforms used by employers to screen candidates via timed online tests. Key characteristics include:

  • Mixed question formats: multiple-choice, fill-in-the-blank, coding tasks, and design scenarios.
  • Language & framework coverage: supports Ruby, Rails, React, Angular, AWS, SQL, DevOps and more.
  • Time-boxed: each test typically runs 30–60 minutes, depending on role complexity. Each tests (1/12) allocated 2-8 mins depending on complexity.
  • Auto-grading + manual review: coding tasks are auto-checked against test cases; system-design answers may be manually reviewed.
  • Real-world scenarios: questions often mimic production challenges rather than classic white-board puzzles.

Software Architect Test Structure

On these type of platforms, a Software Architect assessment usually combines:

  1. System & API Design
  2. Coding & Code Review
  3. Architecture Patterns
  4. DevOps & Cloud
  5. Database & Performance
  6. Front-end Integration

Below is a breakdown with sample questions you can practice.

1. System & API Design

1.1 Design a RESTful API

  • Prompt: Sketch endpoints (URL, HTTP verbs, request/response JSON) for a multi-tenant blogging platform.
  • What’s tested: URI naming, resource nesting, versioning, authentication.

https://railsdrop.com/2025/07/02/software-architect-guide-designing-a-restful-api-for-a-multi-tenant-blogging-platform/

1.2 High-Level Architecture Diagram

  • Prompt: Draw (in ASCII or pseudo-UML) a scalable order-processing system that integrates with payment gateways, queues, and microservices.
  • What’s tested: service decomposition, message brokering, fault tolerance.

Premium: https://railsdrop.com/2025/07/03/software-architect-guide-designing-a-scalable-order-processing-architecture-with-micro-services/


❓Questions

Q) Why is layering an application important while executing a project?

https://railsdrop.com/2025/07/04/software-architect-guide-layering-an-app/

2. Coding & Code Review

2.1 Ruby/Rails Coding Task

2.2 Code Quality Review


3. Architecture Patterns

3.1 Design Patterns Identification

3.2 Event-Driven vs Request-Driven


4. DevOps & Cloud (AWS)

4.1 AWS CI/CD Pipeline

4.2 Server Scaling Strategy


5. Database & Performance (SQL)

5.1 Query Optimization

5.2 Schema Design

  • Prompt: Design a relational schema for a multi-language product catalog, ensuring easy localization and high read throughput.
  • What’s tested: normalization, partitioning/sharding strategies.

6. Front-end Integration

6.1 React Component Design

  • Prompt: Build a stateless React component that fetches and paginates API data. Outline props, state hooks, and error handling.
  • What’s tested: Hooks, prop-drilling vs context, error boundaries.

6.2 Angular vs React Trade-offs

  • Prompt: Compare how you’d structure a large-scale dashboard in Angular vs React. Focus on modules, lazy loading, and state management.
  • What’s tested: NgModules, Redux/MobX/NgRx, bundle splitting.

6.3 React Native Considerations

  • Prompt: You don’t have React Native experience—explain how you’d architect code-sharing between web (React) and mobile (React Native).
  • What’s tested: Monorepo setups (e.g. Yarn Workspaces), shared business logic, native module stubs.

💡Preparation Tips

  • Hands-on practice: Spin up mini-projects (e.g. Rails API with React front-end, deployed on AWS).
  • Mock interviews: Time yourself on similar Platform problems – aim for clarity and brevity.
  • Review fundamentals: Brush up on design patterns, AWS core services, SQL indexing strategies, and front-end state management.
  • Document trade-offs: Always justify architecture decisions with pros/cons.

Good luck, Architect to Greatness! 🚀