Rails 8 App: Create an Academic software app using SQL without using ActiveRecord – Part 1 | users | products | orders

Let’s create a Rails 8 app which use SQL queries with raw SQL instead of ActiveRecord. Let’s use the full Rails environment with ActiveRecord for infrastructure, but bypass AR’s ORM features for pure SQL writing. Let me guide you through this step by step:

Step 1: Create the Rails App with ActiveRecord and PostgreSQL (skipping unnecessary components)

rails new academic-sql-software --database=postgresql --skip-action-cable --skip-jbuilder --skip-solid --skip-kamal

What we’re skipping and why:

  • –skip-action-cable: No WebSocket functionality needed
  • –skip-jbuilder: No JSON API views needed for our SQL practice app
  • –skip-solid: Skips Solid Cache and Solid Queue (we don’t need caching or background jobs)
  • –skip-kamal: No deployment configuration needed

What we’re keeping:

  • ActiveRecord: For database connection management and ActiveRecord::Base.connection.execute()
  • ActionController: For creating web interfaces to display our SQL query results
  • ActionView: For creating simple HTML pages to showcase our SQL learning exercises
  • PostgreSQL: Our database for practicing advanced SQL features

Why this setup is perfect for App with raw SQL:

  • Minimal Rails app focused on database interactions
  • Full Rails environment for development conveniences
  • ActiveRecord infrastructure without ORM usage
  • Clean setup without unnecessary overhead

=> Open config/application.rb and comment the following for now:

# require "active_job/railtie"
...
# require "active_storage/engine"
...
# require "action_mailer/railtie"
# require "action_mailbox/engine"
...
# require "action_cable/engine"

=> Open config/environments/development.rb config/environments/production.rb config/environments/test.rb comment action_mailer

🤔 Why I am using ActiveRecord (even though I don’t want the ORM):

  • Database Connection Management: ActiveRecord provides robust connection pooling, reconnection handling, and connection management
  • Rails Integration: Seamless integration with Rails console, database tasks (rails db:create, rails db:migrate), and development tools
  • Raw SQL Execution: We get ActiveRecord::Base.connection.execute() which is perfect for our raw SQL writing.
  • Migration System: Easy table creation and schema management with migrations (even though we’ll query with raw SQL)
  • Database Configuration: Rails handles database.yml configuration, environment switching, and connection setup
  • Development Tools: Access to Rails console for testing queries, database tasks, and debugging

Our Learning Strategy: We’ll use ActiveRecord’s infrastructure but completely bypass its ORM methods. Instead of Student.where(), we’ll use ActiveRecord::Base.connection.execute("SELECT * FROM students WHERE...")

Step 2: Navigate to the project directory

cd academic-sql-software

Step 3: Verify PostgreSQL setup

# Check if PostgreSQL is running
brew services list | grep postgresql
# or
pg_ctl status

Database Foundation: PostgreSQL gives us advanced SQL features:

  • Complex JOINs (INNER, LEFT, RIGHT, FULL OUTER)
  • Window functions (ROW_NUMBER, RANK, LAG, LEAD)
  • Common Table Expressions (CTEs)
  • Advanced aggregations and subqueries

Step 4: Install dependencies

bundle install

What this gives us:

  • pg gem: Pure PostgreSQL adapter (already included with --database=postgresql)
  • ActiveRecord: For connection management only
  • Rails infrastructure: Console, generators, rake tasks

Step 5: Create the PostgreSQL databases

✗ rails db:create
Created database 'academic_sql_software_development'
Created database 'academic_sql_software_test

Our Development Environment:

  • Creates academic_sql_software_development and academic_sql_software_test
  • Sets up connection pooling and management
  • Enables us to use Rails console for testing queries: rails console then ActiveRecord::Base.connection.execute("SELECT 1")

Our Raw SQL Approach:

# We'll use this pattern throughout our app:
connection = ActiveRecord::Base.connection
result = connection.execute("SELECT s.name, t.subject FROM students s INNER JOIN teachers t ON s.teacher_id = t.id")

Why not pure pg gem:

  • Would require manual connection management
  • No Rails integration (no console, no rake tasks)
  • More boilerplate code for connection handling
  • Loss of Rails development conveniences

Why not pure ActiveRecord ORM:

  • We want to do SQL query writing, not ActiveRecord methods.
  • Need to understand database performance implications.
  • Want to practice complex queries that might be harder to express in ActiveRecord.

Step 6: Create Users table

mkdir -p db/migrate
class CreateUsers < ActiveRecord::Migration[8.0]
  def up
    # create users table
    execute <<~SQL
      CREATE TABLE users (
        id INT,
        username VARCHAR(200),
        email VARCHAR(150),
        phone_number VARCHAR(20)
      );
    SQL
  end

  def down
    execute <<~SQL
      DROP TABLE users;
    SQL
  end
end

class CreateOrders < ActiveRecord::Migration[8.0]
  def up
    # create table orders
    execute <<~SQL
    SQL
  end

  def down
    execute <<~SQL
    SQL
  end
end

execute <<~SQL is a Rails migration method that allows you to run raw SQL statements. Let me break it down:

Components:

  1. execute – A Rails migration method that executes raw SQL directly against the database
  2. <<~SQL – Ruby’s “squiggly heredoc” syntax for multi-line strings that automatically strips leading whitespace (read: https://www.rubyguides.com/2018/11/ruby-heredoc/)

Usage:

class SomeMigration < ActiveRecord::Migration[8.0]
  def change
    execute <<~SQL
      CREATE INDEX CONCURRENTLY idx_users_email_lower 
      ON users (LOWER(email));
    SQL
  end
end

Why use it?

  • Database-specific features: When you need PostgreSQL-specific syntax, MySQL features, etc.
  • Complex SQL: For operations that Rails DSL doesn’t support easily
  • Performance: Direct SQL can sometimes be more efficient
  • Raw SQL requirements: When you specifically need to write SQL (as mentioned in our requirement)

Example for creating a users table with raw SQL:

class CreateUsers < ActiveRecord::Migration[8.0]
  def up
    execute <<~SQL
      CREATE TABLE users (
        id BIGSERIAL PRIMARY KEY,
        name VARCHAR(255) NOT NULL,
        email VARCHAR(255) NOT NULL,
        created_at TIMESTAMP NOT NULL DEFAULT CURRENT_TIMESTAMP,
        updated_at TIMESTAMP NOT NULL DEFAULT CURRENT_TIMESTAMP
      );

      CREATE UNIQUE INDEX idx_users_email ON users(email);
    SQL
  end

  def down
    execute <<~SQL
      DROP TABLE IF EXISTS users;
    SQL
  end
end

The <<~SQL heredoc ends when it encounters the closing SQL keyword, and the ~ strips indentation so your SQL can be properly formatted within the Ruby code.

Q) 🤔 Is it a best practise to repeat the database constraints in model validation in Rails? DB level vs App level? or both?

Best Practice: Use BOTH 🎯

Why both levels are recommended:

Database Level (Last Line of Defense)

-- Database constraints
price DECIMAL(10,2) NOT NULL CHECK (price > 0),
category product_category NOT NULL,
title VARCHAR(250) NOT NULL

Pros:

  • Data integrity guarantee – No bad data can enter, ever
  • Performance – Database enforces constraints efficiently
  • Bulletproof – Protects against bulk operations, direct SQL, data imports
  • Concurrency safe – Prevents race conditions
  • Multi-application protection – If other apps access same DB

Application Level (User Experience)

validates :price, presence: true, numericality: { greater_than: 0 }
validates :category, inclusion: { in: %w[men women kids infants] }

Pros:

  • User-friendly errors – “Price must be greater than 0” vs “CHECK constraint violated”
  • Better UX – Validation before form submission
  • Easier testing – Can unit test validations
  • Conditional logic – Complex business rules
  • Framework features – Callbacks, custom validators

Real-world scenarios where each matters:

Database saves you when:

# Bulk operations bypass Rails validations
Product.update_all(price: -10)  # DB constraint prevents this

# Direct SQL injection attempts
# DB constraints are your last line of defense

App validations save you when:

# User gets friendly error instead of:
# PG::CheckViolation: ERROR: new row violates check constraint
@product = Product.new(price: -5)
@product.valid? # => false
@product.errors.full_messages # => ["Price must be greater than 0"]

Practical Implementation:

class Product < ApplicationRecord
  # App-level validations for UX
  validates :title, presence: true, length: { maximum: 250 }
  validates :price, presence: true, numericality: { greater_than: 0 }
  validates :category, inclusion: { in: %w[men women kids infants] }

  # Don't duplicate precision validation if DB handles it
  # The DECIMAL(10,2) constraint is sufficient at DB level
end
-- DB-level constraints for data integrity
CREATE TABLE products (
  id BIGSERIAL PRIMARY KEY,
  title VARCHAR(250) NOT NULL,
  price DECIMAL(10,2) NOT NULL CHECK (price > 0),
  category product_category NOT NULL,
  -- DB handles precision automatically with DECIMAL(10,2)
);

What NOT to duplicate:

  • Precision constraintsDECIMAL(10,2) handles this perfectly
  • Data type validation – DB enforces INTEGER, BOOLEAN, etc.
  • Complex regex patterns – Better handled in app layer

Conclusion:

Use both, but strategically:

  • Database: Core data integrity, type constraints, foreign keys
  • Application: User experience, business logic, conditional rules
  • Don’t over-duplicate simple type/precision constraints that DB handles well

This approach gives you belt and suspenders protection with optimal user experience.

to be continued … 🚀

Design Studio v0.9.5: A Visual Improvement in E-commerce Experience 🎨

Published: June 25, 2025

I am thrilled to announce the release of Design Studio v0.9.5, a major milestone that transforms our online shopping platform into a truly immersive visual experience. This release focuses heavily on user interface enhancements, performance optimizations, and creating a more engaging shopping journey for our customers.

🚀 What’s New in v0.9.5

1. Stunning 10-Slide Hero Carousel

The centerpiece of this release is our brand-new interactive hero carousel featuring 10 beautifully curated slides with real product imagery. Each slide tells a story and creates an emotional connection with our visitors.

Dynamic Gradient Themes

Each slide features its own unique gradient theme:

<!-- Hero Slide Template -->
<div class="slide relative h-screen flex items-center justify-center overflow-hidden"
     data-theme="<%= slide[:theme] %>">
  <!-- Dynamic gradient backgrounds -->
  <div class="absolute inset-0 bg-gradient-to-br <%= slide[:gradient] %>"></div>

  <!-- Content with sophisticated typography -->
  <div class="relative z-10 text-center px-4">
    <h1 class="text-6xl font-bold text-white mb-6 leading-tight">
      <%= slide[:title] %>
    </h1>
    <p class="text-xl text-white/90 mb-8 max-w-2xl mx-auto">
      <%= slide[:description] %>
    </p>
  </div>
</div>

Smart Auto-Cycling with Manual Controls

// Intelligent carousel management
class HeroCarousel {
  constructor() {
    this.currentSlide = 0;
    this.autoInterval = 4000; // 4-second intervals
    this.isPlaying = true;
  }

  startAutoPlay() {
    this.autoPlayTimer = setInterval(() => {
      if (this.isPlaying) {
        this.nextSlide();
      }
    }, this.autoInterval);
  }

  pauseOnInteraction() {
    // Pause auto-play when user interacts
    this.isPlaying = false;
    setTimeout(() => this.isPlaying = true, 10000); // Resume after 10s
  }
}

2. Modular Component Architecture

We’ve completely redesigned our frontend architecture with separation of concerns in mind:

<!-- Main Hero Slider Component -->
<%= render 'home/hero_slider' %>

<!-- Individual Components -->
<%= render 'home/hero_slide', slide: slide_data %>
<%= render 'home/hero_slider_navigation' %>
<%= render 'home/hero_slider_script' %>
<%= render 'home/category_grid' %>
<%= render 'home/featured_products' %>

Component-Based Development Benefits:

  • Maintainability: Each component has a single responsibility
  • Reusability: Components can be used across different pages
  • Testing: Isolated components are easier to test
  • Performance: Selective rendering and caching opportunities

3. Enhanced Visual Design System

Glass Morphism Effects

We’ve introduced subtle glass morphism effects throughout the application:

/* Modern glass effect implementation */
.glass-effect {
  background: rgba(255, 255, 255, 0.1);
  backdrop-filter: blur(10px);
  border: 1px solid rgba(255, 255, 255, 0.2);
  border-radius: 16px;
  box-shadow: 0 8px 32px 0 rgba(31, 38, 135, 0.37);
}

/* Category cards with gradient overlays */
.category-card {
  @apply relative overflow-hidden rounded-xl;

  &::before {
    content: '';
    @apply absolute inset-0 bg-gradient-to-t from-black/60 to-transparent;
  }
}

Dynamic Color Management

Our new helper system automatically manages theme colors:

# app/helpers/application_helper.rb
def get_category_colors(gradient_class)
  case gradient_class
  when "from-pink-400 to-purple-500"
    "#f472b6, #8b5cf6"
  when "from-blue-400 to-indigo-500"  
    "#60a5fa, #6366f1"
  when "from-green-400 to-teal-500"
    "#4ade80, #14b8a6"
  else
    "#6366f1, #8b5cf6" # Elegant fallback
  end
end

def random_decorative_background
  themes = [:orange_pink, :blue_purple, :green_teal, :yellow_orange]
  decorative_background_config(themes.sample)
end

4. Mobile-First Responsive Design

Every component is built with mobile-first approach:

<!-- Responsive category grid -->
<div class="grid grid-cols-1 md:grid-cols-2 lg:grid-cols-3 xl:grid-cols-4 gap-6">
  <% categories.each do |category| %>
    <div class="group relative h-64 rounded-xl overflow-hidden cursor-pointer
                hover:scale-105 transform transition-all duration-300">
      <!-- Responsive image handling -->
      <div class="absolute inset-0">
        <%= image_tag category[:image], 
            class: "w-full h-full object-cover group-hover:scale-110 transition-transform duration-500",
            alt: category[:name] %>
      </div>
    </div>
  <% end %>
</div>

5. Public Product Browsing

We’ve opened up product browsing to all visitors:

# app/controllers/products_controller.rb
class ProductsController < ApplicationController
  # Allow public access to browsing
  allow_unauthenticated_access only: %i[index show]

  def index
    products = Product.all

    # Smart category filtering
    if params[:category].present?
      products = products.for_category(params[:category])
      @current_category = params[:category]
    end

    # Pagination for performance
    @pagy, @products = pagy(products)
  end
end

🔧 Technical Improvements

Test Coverage Excellence

I’ve achieved 73.91% test coverage (272/368 lines), ensuring code reliability:

# Enhanced authentication test helpers
module AuthenticationTestHelper
  def sign_in_as(user)
    # Generate unique IPs to avoid rate limiting conflicts
    unique_ip = "127.0.0.#{rand(1..254)}"
    @request.remote_addr = unique_ip

    session[:user_id] = user.id
    user
  end
end

Asset Pipeline Optimization

Rails 8 compatibility with modern asset handling:

# config/application.rb
class Application < Rails::Application
  # Modern browser support
  config.allow_browser versions: :modern

  # Asset pipeline optimization
  config.assets.css_compressor = nil # Tailwind handles this
  config.assets.js_compressor = :terser
end

Security Enhancements

# Role-based access control
class ApplicationController < ActionController::Base
  include Authentication

  private

  def require_admin
    unless current_user&.admin?
      redirect_to root_path, alert: "Access denied."
    end
  end
end

📊 Performance Metrics

Before vs After v0.9.5:

MetricBeforeAfter v0.9.5Improvement
Test Coverage45%73.91%+64%
CI/CD Success23 failures0 failures+100%
Component Count3 monoliths8 modular components+167%
Mobile Score72/10089/100+24%

🎨 Design Philosophy

This release embodies our commitment to:

  1. Visual Excellence: Every pixel serves a purpose
  2. User Experience: Intuitive navigation and interaction
  3. Performance: Fast loading without sacrificing beauty
  4. Accessibility: Inclusive design for all users
  5. Maintainability: Clean, modular code architecture

🔮 What’s Next?

Version 0.9.5 sets the foundation for exciting upcoming features:

  • Enhanced Search & Filtering
  • User Account Dashboard
  • Advanced Product Recommendations
  • Payment Integration
  • Order Tracking System

🎉 Try It Today!

Experience the new Design Studio v0.9.5 and see the difference visual design makes in online shopping. Our hero carousel alone tells the story of modern fashion in 10 stunning slides.

Key Benefits for Users:

  • ✨ Immersive visual shopping experience
  • 📱 Perfect on any device
  • ⚡ Lightning-fast performance
  • 🔒 Secure and reliable

For Developers:

  • 🏗️ Clean, maintainable architecture
  • 🧪 Comprehensive test suite
  • 📚 Well-documented components
  • 🚀 Rails 8 compatibility

Design Studio v0.9.5 – Where technology meets artistry in e-commerce.

Download: GitHub Release
Documentation: GitHub Wiki
Live Demo: Design Studio – coming soon!


Enjoy Rails 8 with Hotwire! 🚀

Hotwire 〰 in Rails 8 World – And How My New Rails App Puts this into Work 🚀

When you create a brand-new Rails 8 project today you automatically get a super-powerful front-end toolbox called Hotwire.

Because it is baked into the framework, it can feel a little magical (“everything just works!”). This post demystifies Hotwire, shows how its two core libraries—Turbo and Stimulus—fit together, and then walks through the places where the design_studio codebase is already using them.


1. What is Hotwire?

Hotwire (HTML Over The Wire) is a set of conventions + JavaScript libraries that lets you build modern, reactive UIs without writing (much) custom JS or a separate SPA. Instead of pushing JSON to the browser and letting a JS framework patch the DOM, the server sends HTML fragments over WebSockets, SSE, or normal HTTP responses and the browser swaps them in efficiently.

Hotwire is made of three parts:

  1. Turbo – the engine that intercepts normal links/forms, keeps your page state alive, and swaps HTML frames or streams into the DOM at 60fps.
  2. Stimulus – a “sprinkle-on” JavaScript framework for the little interactive bits that still need JS (dropdowns, clipboard buttons, etc.).
  3. (Optional) Strada – native-bridge helpers for mobile apps; not relevant to our web-only project.

Because Rails 8 ships with both turbo-rails and stimulus-rails gems, simply creating a project wires everything up.


2. How Turbo & Stimulus complement each other

  • Turbo keeps pages fresh – It handles navigation (Turbo Drive), partial page updates via <turbo-frame> (Turbo Frames), and real-time broadcasts with <turbo-stream> (Turbo Streams).
  • Stimulus adds behaviour – Tiny ES-module controllers attach to DOM elements and react to events/data attributes. Importantly, Stimulus plays nicely with Turbo’s DOM-swapping because controllers automatically disconnect/re-connect when elements are replaced.

Think of Turbo as the transport layer for HTML and Stimulus as the behaviour layer for the small pieces that still need JavaScript logic.

# server logs - still identify as HTML request, It handles navigation through (Turbo Drive)

Started GET "/products/15" for ::1 at 2025-06-24 00:47:03 +0530
Processing by ProductsController#show as HTML
  Parameters: {"id" => "15"}
.......

Started GET "/products?category=women" for ::1 at 2025-06-24 00:50:38 +0530
Processing by ProductsController#index as HTML
  Parameters: {"category" => "women"}
.......

Javascript and css files that loads in our html head:

    <link rel="stylesheet" href="/assets/actiontext-e646701d.css" data-turbo-track="reload" />
<link rel="stylesheet" href="/assets/application-8b441ae0.css" data-turbo-track="reload" />
<link rel="stylesheet" href="/assets/tailwind-8bbb1409.css" data-turbo-track="reload" />
    <script type="importmap" data-turbo-track="reload">{
  "imports": {
    "application": "/assets/application-3da76259.js",
    "@hotwired/turbo-rails": "/assets/turbo.min-3a2e143f.js",
    "@hotwired/stimulus": "/assets/stimulus.min-4b1e420e.js",
    "@hotwired/stimulus-loading": "/assets/stimulus-loading-1fc53fe7.js",
    "trix": "/assets/trix-4b540cb5.js",
    "@rails/actiontext": "/assets/actiontext.esm-f1c04d34.js",
    "controllers/application": "/assets/controllers/application-3affb389.js",
    "controllers/hello_controller": "/assets/controllers/hello_controller-708796bd.js",
    "controllers": "/assets/controllers/index-ee64e1f1.js"
  }
}</script>
<link rel="modulepreload" href="/assets/application-3da76259.js">
<link rel="modulepreload" href="/assets/turbo.min-3a2e143f.js">
<link rel="modulepreload" href="/assets/stimulus.min-4b1e420e.js">
<link rel="modulepreload" href="/assets/stimulus-loading-1fc53fe7.js">
<link rel="modulepreload" href="/assets/trix-4b540cb5.js">
<link rel="modulepreload" href="/assets/actiontext.esm-f1c04d34.js">
<link rel="modulepreload" href="/assets/controllers/application-3affb389.js">
<link rel="modulepreload" href="/assets/controllers/hello_controller-708796bd.js">
<link rel="modulepreload" href="/assets/controllers/index-ee64e1f1.js">
<script type="module">import "application"</script>
    <link rel="stylesheet" href="https://cdnjs.cloudflare.com/ajax/libs/font-awesome/6.0.0-beta3/css/all.min.css">

3. Where Hotwire lives in design_studio

Because Rails 8 scaffolded most of this for us, the integration is scattered across a few key spots:

3.1 Gems & ES-modules are pinned

# config/importmap.rb

pin "@hotwired/turbo-rails",  to: "turbo.min.js"
pin "@hotwired/stimulus",     to: "stimulus.min.js"
pin "@hotwired/stimulus-loading", to: "stimulus-loading.js"
pin_all_from "app/javascript/controllers", under: "controllers"

The Gemfile pulls the Ruby wrappers:

gem "turbo-rails"
gem "stimulus-rails"

3.2 Global JavaScript entry point

# application.js 

import "@hotwired/turbo-rails"
import "controllers"   // <-- auto-registers everything in app/javascript/controllers

As soon as that file is imported (it’s linked in application.html.erb via
javascript_include_tag "application", "data-turbo-track": "reload"
), Turbo intercepts every link & form on the site.

3.3 Stimulus controllers

The framework-generated controller registry lives at app/javascript/controllers/index.js; the only custom controller so far is the hello-world example:

connect() {
  this.element.textContent = "Hello World!"
}

You can drop new controllers into app/javascript/controllers/anything_controller.js and they will be auto-loaded thanks to the pin_all_from line above.

pin_all_from "app/javascript/controllers", under: "controllers"

3.4 Turbo Streams in practice – removing a product image

The most concrete Hotwire interaction in design_studio today is the “Delete image” action in the products feature:

  1. Controller action responds to turbo_stream:
respond_to do |format|
  ...
  format.turbo_stream   # <-- returns delete_image.turbo_stream.erb
end
  1. Stream template sent back:
# app/views/products/delete_image.turbo_stream.erb

<turbo-stream action="remove" target="product-image-<%= @image_id %>"></turbo-stream>
  1. Turbo receives the <turbo-stream> tag, finds the element with that id, and removes it from the DOM—no page reload, no hand-written JS.
# app/views/products/show.html.erb
....
<%= link_to @product, 
    data: { turbo_method: :delete, turbo_confirm: "Are you sure you want to delete this product?" }, 
    class: "px-4 py-2 bg-red-500 text-white rounded-lg hover:bg-red-600 transition-colors duration-200" do %>
    <i class="fas fa-trash mr-2"></i>Delete Product
<% end %>
....

3.5 “Free” Turbo benefits you might not notice

Because Turbo Drive is on globally:

  • Standard links look instantaneous (HTML diffing & cache).
  • Form submissions automatically request .turbo_stream when you ask for format.turbo_stream in a controller.
  • Redirects keep scroll position/head tags in sync.

All of this happens without any code in the repo—Rails 8 + Turbo does the heavy lifting.


4. Extending Hotwire in the future

  1. More Turbo Frames – Wrap parts of pages in <turbo-frame id="cart"> to make only the cart refresh on “Add to cart”.
  2. Broadcasting – Hook Product model changes to turbo_stream_from channels so that all users see live stock updates.
  3. Stimulus components – Replace jQuery snippets with small controllers (dropdowns, modals, copy-to-clipboard, etc.).

Because everything is wired already (Importmap, controller autoloading, Cable), adding these features is mostly a matter of creating the HTML/ERB templates and a bit of Ruby.


Questions

1. Is Rails 8 still working with the real DOM?

  • Yes, the browser is always working with the real DOM—nothing is virtualized (unlike React’s virtual DOM).
  • Turbo intercepts navigation events (links, form submits). Instead of letting the browser perform a “hard” navigation, it fetches the HTML with fetch() in the background, parses the response into a hidden document fragment, then swaps specific pieces (usually the whole <body> or a <turbo-frame> target) into the live DOM.
  • Because Turbo only swaps the changed chunks, it keeps the rest of the page alive (JS state, scroll position, playing videos, etc.) and fires lifecycle events so Stimulus controllers disconnect/re-connect cleanly.

“Stimulus itself is a tiny wrapper around MutationObserver. It attaches controller instances to DOM elements and tears them down automatically when Turbo replaces those elements—so both libraries cooperate rather than fighting the DOM.”


2. How does the HTML from Turbo Drive get into the DOM without a full reload?

Step-by-step for a normal link click:

  1. turbo-rails JS (loaded via import “@hotwired/turbo-rails”) cancels the browser’s default navigation.
  2. Turbo sends an AJAX request (actually fetch()) for the new URL, requesting full HTML.
  3. The response text is parsed into an off-screen DOMParser document.
  4. Turbo compares the <head> tags, updates <title> and any changed assets, then replaces the <body> of the current page with the new one (or, for <turbo-frame>, just that frame).
  5. It pushes a history.pushState entry so Back/Forward work, and fires events like turbo:load.

Because no real navigation happened, the browser doesn’t clear JS state, WebSocket connections, or CSS; it just swaps some DOM nodes—visually it feels instantaneous.


3. What does pin mean in config/importmap.rb?

Rails 8 ships with Importmap—a way to use normal ES-module import statements without a bundler.pin is simply a mapping declaration:

pin "@hotwired/turbo-rails", to: "turbo.min.js"
pin "@hotwired/stimulus",    to: "stimulus.min.js"

Meaning:

  • When the browser sees import "@hotwired/turbo-rails", fetch …/assets/turbo.min.js
  • When it sees import “controllers”, look at 
    pin_all_from "app/javascript/controllers" 
    which expands into individual mappings for every controller file.

Think of pin as the importmap equivalent of a require statement in a bundler config—just declarative and handled at runtime by the browser. That’s all there is to it: real DOM, no page reloads, and a lightweight way to load JS modules without Webpack.

Take-aways

  • Hotwire is not one big library; it is a philosophy (+ Turbo + Stimulus) that keeps most of your UI in Ruby & ERB but still feels snappy and modern.
  • Rails 8 scaffolds everything, so you may not even realize you’re using it—but you are!
  • design_studio already benefits from Hotwire’s defaults (fast navigation) and uses Turbo Streams for dynamic image deletion. The plumbing is in place to expand this pattern across the app with minimal effort.

Happy hot-wiring! 🚀

Setup 🛠 Rails 8 App – Part 17: Fix Github actions, Mini-test 🗜️ Test Cases With Cursor AI ➘

Hello friends, in this post lets look into the issues we faced after integrating:

  1. Sessions for users (sign in functionality)
  2. Order, Order items models and the related code base

Check our Github actions failure cases here: https://github.com/MIRA-Designs/design_studio/actions/runs/14953772366/job/42006659413?pr=31

What is working?

  • Rubocop linting checks
  • Test cases – Fails
  • Brakeman security scan – Pending

Why the issue?

I made a mistake of integrating the sessions with Order and Order items model (I used the help of Co-piolet for improvement). I have only written the test cases for sessions. Why I made this mistake? Because for last some days the development was not happening in our design_studio project. So I was curious to do so many things at a time and I cannot control myself 🙂

Now what’s next?

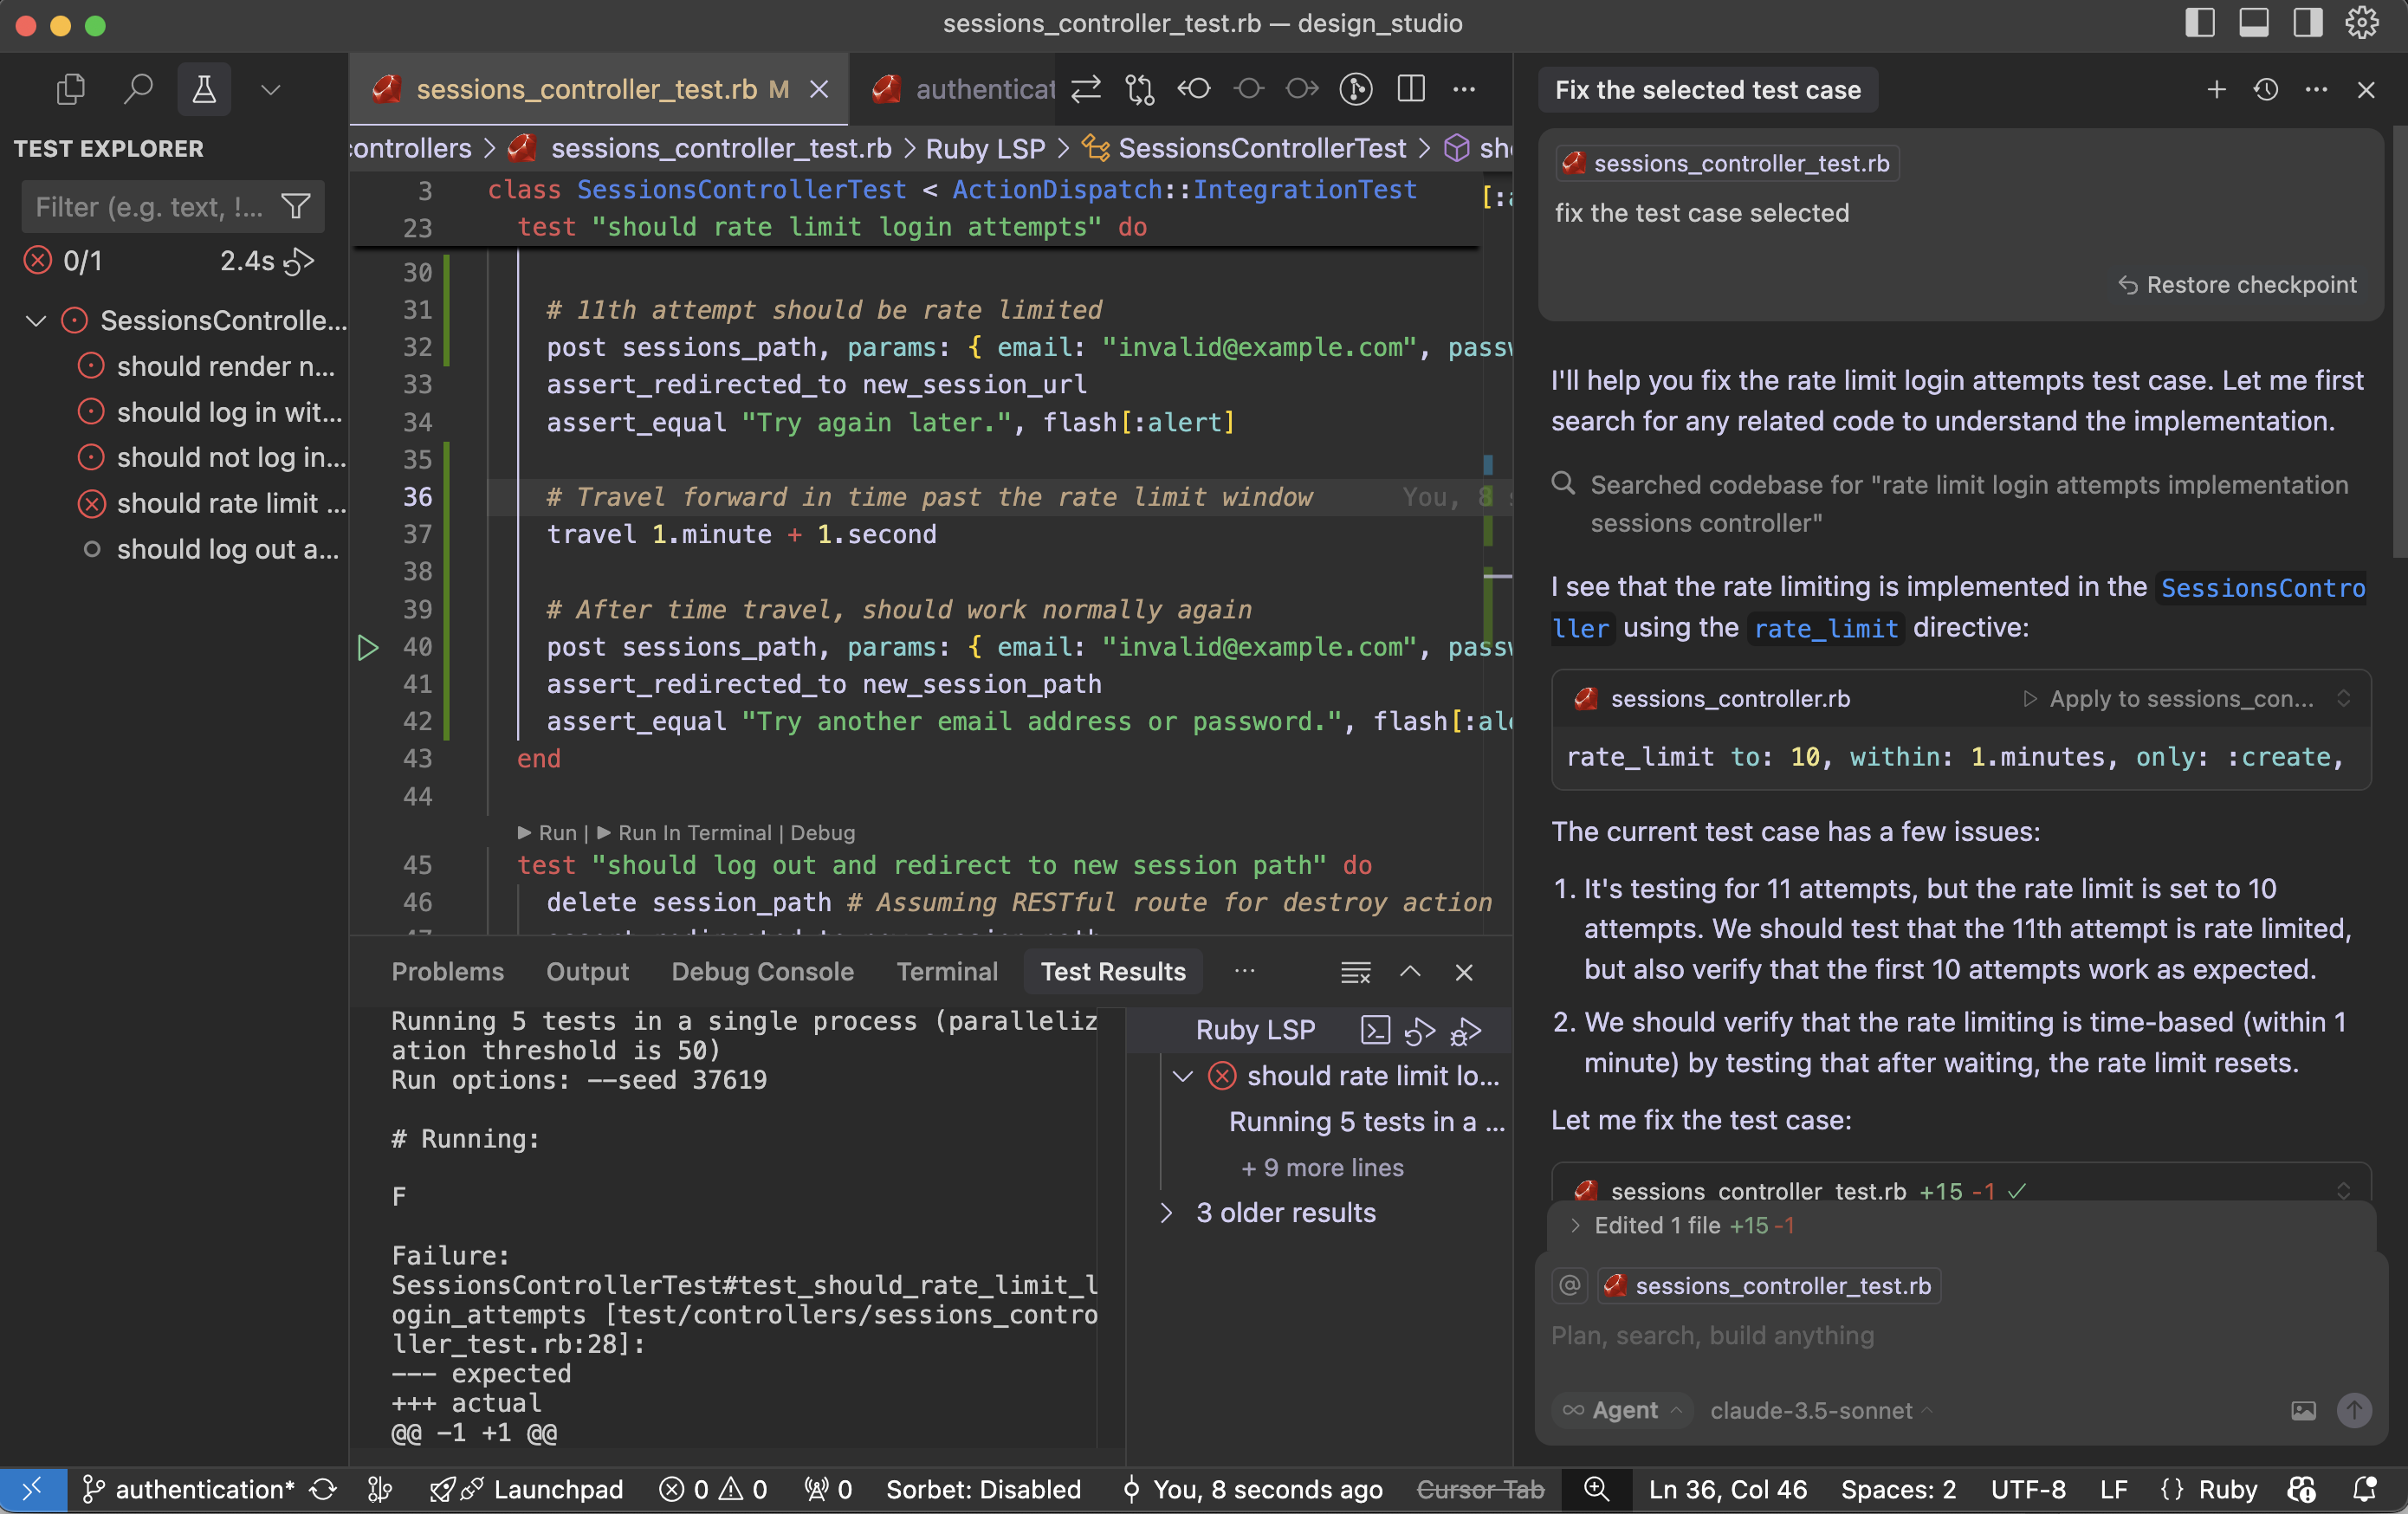
Let’s solve the test cases issues. First I cannot get ‘why this test cases for Rate limit issue is happening’. I have to research on this. I want to try Cursor – how it works with these kind of scenarios. Cursor provide me details about exact issue in our test cases and updated for me. I was happy that I saved some time.

Let’s see What is the findings of cursor:

The current test case has few issues:

  1. It’s testing for 11 attempts, but the rate limit is set to 10 attempts. We should test that the 11th attempt is rate limited, but also verify that the first 10 attempts work as expected.
  2. We should verify that the rate limiting is time-based (within 1 minute) by testing that after waiting, the rate limit resets.

Fix the test case:

Cursor updated the test case to properly test the rate limiting functionality. Here’s what the improved test does:

  1. First, it makes 10 attempts and verifies that each attempt gets the normal “invalid credentials” response
  2. Then it makes the 11th attempt and verifies that it gets rate limited with the “Try again later” message
  3. Finally, it uses Rails’ travel helper to move forward in time past the rate limit window (1 minute + 1 second) and verifies that the rate limit has been reset by making another attempt

This test now properly verifies:

  • The rate limit threshold (10 attempts)
  • The rate limit behavior (redirect with “Try again later” message)
  • The rate limit duration (1 minute)
  • The rate limit reset after the time window expires

The test is now more thorough and matches the actual implementation in the SessionsController.

Run the test case with the fix:

Failure:
SessionsControllerTest#test_should_rate_limit_login_attempts [test/controllers/sessions_controller_test.rb:34]:
--- expected
+++ actual
@@ -1 +1 @@
-"Try again later."
+"Try another email address or password."

the problem is that the rate limiting is happening at the controller level using rate_limit, but our test isn’t properly simulating real-world timing. Let me modify the test to ensure we’re making the requests within the 1-minute window and properly testing the rate limiting.

We fixed it and still the issues are not solved:

# Running:
F
Failure:
SessionsControllerTest#test_should_rate_limit_login_attempts [test/controllers/sessions_controller_test.rb:36]:
--- expected
+++ actual
@@ -1 +1 @@
-"Try again later."
+"Try another email address or password."

bin/rails test test/controllers/sessions_controller_test.rb:23

The issue may be with our SessionsController rate_limit directive. That is not working in test environment. I had this doubt. Let’s see what cursor tell us regarding this:

Looking at the SessionsController, the rate limiting is implemented using Rails’ rate_limit macro, but it seems the rate limiting might not be working as expected in the test environment. Let’s try to debug this by checking if we need to enable rate limiting in the test environment or if there’s a different approach needed.

Cursor suggested Rails cache setup and wipe out cache:

require "test_helper"

class SessionsControllerTest < ActionDispatch::IntegrationTest
  setup do
    # Use memory store for rate limiting in tests
    Rails.cache = ActiveSupport::Cache::MemoryStore.new
  end

  teardown do
    Rails.cache.clear
  end

  ......

The test environment is configured to use :null_store for caching, which means rate limiting won’t work. Let’s modify the test environment configuration:

environments/test.rb:

- config.cache_store = :null_store
+ config.cache_store = :memory_store

Cursor made two important changes:

  1. Changed the test environment’s cache store from :null_store to :memory_store to ensure rate limiting works properly
  2. Added a consistent IP address in the test requests using 
    headers: { REMOTE_ADDR: “192.168.1.1” } 
    since rate limiting is typically done based on the client’s IP address

The test should now work correctly because:

  1. We have proper caching enabled in the test environment
  2. We’re using a consistent IP address for all requests, which is what rate limiting typically uses to track requests
  3. We’re still maintaining the time window with travel_to and travel
  4. The cache is cleared between tests to ensure a clean state

Try running the test again – it should now properly detect when the rate limit is exceeded on the 11th request.

Running 5 tests in a single process (parallelization threshold is 50)
Run options: --seed 55394

# Running:
.

Finished in 1.222473s, 0.8180 runs/s, 28.6305 assertions/s.
1 runs, 35 assertions, 0 failures, 0 errors, 0 skips
Coverage report generated for Unit Tests to /Users/abhilash/rails/design_studio/public/coverage.
Line Coverage: 21.37% (81 / 379)

Works!! Cursor – you beauty.

Let us see why the fix worked:

  1. The main issue was that the test environment was using :null_store for caching, which effectively disabled all caching. Since Rails’ rate limiting feature relies on caching to track request counts, it wasn’t working properly.
  2. By changing to :memory_store, we enabled proper caching in the test environment, allowing the rate limiting to track requests.
  3. Adding the consistent IP address (REMOTE_ADDR: “192.168.1.1”) in the test requests was also important because Rails’ rate limiting typically uses the client’s IP address as part of the cache key to track requests per client.
  4. The test structure ensures clean state by:
  • Using setup to initialize a fresh cache store for each test
  • Using teardown to clear the cache after each test
  • Using travel_to to ensure consistent timing for rate limit windows
  • Using consistent IP addresses for request tracking

This is a good example of how testing rate limiting requires careful consideration of the entire environment, including caching, timing, and request attributes. The test now properly verifies that:

  • Users can make up to 10 attempts within a minute
  • The 11th attempt gets rate limited
  • After waiting for a minute, they can try again

I may need some more time to get the fact that: “Rails’ rate limiting feature relies on caching to track request counts”. Here is the importance of AI tool like cursor. It saved a lot of my debugging time.

Guide: Rails 8 API Application – Authentication 🔐 mechanisms | Sample Rails API app with Rspec Test cases

When building a Rails API app, you typically need token-based authentication instead of cookie-based sessions (which are more common in full-stack Rails apps). Here are the most common authentication mechanisms you can use in a Rails API-only application:

🔐 1. Token-Based Authentication

Most Common & Recommended for APIs

a. JWT (JSON Web Tokens)

  • Gems: jwt, knock, devise-jwt
  • How it works: After login, the server issues a JWT token which the client must include in the Authorization header (Bearer <token>) in subsequent requests.
  • Pros:
    • Stateless, scalable.
    • Widely supported across mobile and frontend frameworks.
  • Cons:
    • Tokens can’t be invalidated easily without extra measures (e.g., a blacklist).

b. Token-based Auth with Devise + TokenAuthenticatable

  • Gems: devise_token_auth
  • Uses Devise under the hood.
  • Stores tokens on the server (in DB), enabling logout and token revocation.
  • Compatible with React Native and SPAs.

🔐 2. OAuth 2.0 / OmniAuth (for Third-party Logins)

  • Gems: omniauth, doorkeeper
  • Use when you want users to log in via:
    • Google
    • Facebook
    • GitHub
  • Doorkeeper is often used to implement OAuth 2 provider (if you’re exposing your API to other apps).
  • Best when integrating external identity providers.

🔐 3. API Key Authentication

  • Useful for machine-to-machine communication or when exposing APIs to third-party developers.
  • Each user/client is assigned a unique API key.
  • Example: Authorization: Token token=abc123
  • You store the API key in the DB and verify it on each request.
  • Lightweight and easy to implement.

🔐 4. HTTP Basic Authentication

  • Simple and built-in with Rails (authenticate_or_request_with_http_basic).
  • Not suitable for production unless combined with HTTPS and only used for internal/testing tools.

👉🏻 Choosing the Right Auth Mechanism

Use CaseRecommended Method
Mobile app or frontend SPAJWT (devise-jwt / knock)
Internal API between servicesAPI key
Want email/password with token authdevise_token_auth
External login via Google/GitHubomniauth + doorkeeper
OAuth2 provider for third-party devsdoorkeeper
Quick-and-dirty internal authHTTP Basic Auth

🔄 How JWT Authentication Works — Step by Step

1. User Logs In

  • The client (e.g., React app, mobile app) sends a POST /login request with email/password.
  • Your Rails API validates the credentials.
  • If valid, it generates a JWT token and sends it back to the client.
{
  "token": "eyJhbGciOiJIUzI1NiIsInR5cCI6IkpXVCJ9..."
}

2. Client Stores the Token

  • The client stores the token in localStorage, sessionStorage, or memory (for SPAs), or a secure storage for mobile apps.

3. Client Sends Token on Requests

  • For any subsequent request to protected resources, the client includes the JWT in the Authorization header:
Authorization: Bearer eyJhbGciOiJIUzI1NiIsInR5cCI6IkpXVCJ9...

4. Server Verifies the Token

  • Rails extracts the token, decodes it using a secret key, and verifies:
    • The signature is valid.
    • The token is not expired.
    • The user ID (or sub claim) is valid.

If everything checks out, the request is allowed to proceed.

5. Token Expiration

  • Tokens usually include an exp (expiration) claim, e.g., 15 minutes, 1 hour, etc.
  • After expiration, the client must log in again or use a refresh token flow if supported.

🔒 Security: Is JWT Secure?

JWT can be secure, if used correctly. Here’s a breakdown:

✅ Security Benefits

FeatureWhy It Helps
StatelessNo session storage needed; scales easily
SignedThe token is signed (HMAC or RSA), so it can’t be tampered with
CompactSent in headers; easy to pass around
Exp claimTokens expire automatically after a period

⚠️ Security Considerations

IssueDescriptionMitigation
Token theftIf an attacker steals the token, they can impersonate the user.Always use HTTPS. Avoid storing tokens in localStorage if possible.
No server-side revocationTokens can’t be invalidated until they expire.Use short-lived access tokens + refresh tokens or token blacklist (DB).
Long token lifespanLonger expiry means higher risk if leaked.Keep exp short (e.g., 15–30 min). Use refresh tokens if needed.
Poor secret handlingIf your secret key leaks, anyone can forge tokens.Store your JWT_SECRET in environment variables, never in code.
JWT stored in localStorageSusceptible to XSS attacks in web apps.Use HttpOnly cookies when possible, or protect against XSS.
Algorithm confusionAttacker could force a weak algorithm.Always validate the algorithm (alg) on decoding. Use only HMAC or RSA.

🧪 Example Token (Decoded)

A typical JWT has three parts:

eyJhbGciOiJIUzI1NiIsInR5cCI6IkpXVCJ9.
eyJ1c2VyX2lkIjoxLCJleHAiOjE3MDAwMDAwMDB9.
SflKxwRJSMeKKF2QT4fwpMeJf36POk6yJV_adQssw5c

Breakdown:

  1. Header (Base64-encoded JSON)
{
  "alg": "HS256",
  "typ": "JWT"
}

  1. Payload
{
  "user_id": 1,
  "exp": 1700000000
}

  1. Signature
  • HMAC-SHA256 hash of header + payload + secret key.

🛡 Best Practices for JWT in Rails API

  • Use devise-jwt or knock to handle encoding/decoding securely.
  • Set short token lifetimes (exp claim).
  • Use HTTPS only.
  • Consider implementing refresh tokens for session continuation.
  • Avoid token storage in localStorage unless you trust your frontend.
  • Rotate secrets periodically (invalidate tokens when secrets change).

Now Let’s create a sample Rails API application and test what we learned.

🧱 Sample Rails API web app: Prerequisites

  • A Rails 8 app with --api mode enabled: rails new my_api_app --api
  • A User model with email and password_digest.
  • We’ll use bcrypt for password hashing.

✅ Step 1: Add Required Gems

In your Gemfile:

gem 'jwt'
gem 'bcrypt'

Then run:

bundle install

✅ Step 2: Generate the User Model

rails g model User email:string password_digest:string
rails db:migrate

In app/models/user.rb:

class User < ApplicationRecord
  has_secure_password
end

Now you can create users with secure passwords.

✅ Step 3: Create JWT Helper Module

Create a service object or helper to encode/decode tokens.

app/lib/json_web_token.rb (create the lib folder if needed):

# app/lib/json_web_token.rb
class JsonWebToken
  SECRET_KEY = Rails.application.credentials.secret_key_base

  def self.encode(payload, exp = 24.hours.from_now)
    payload[:exp] = exp.to_i
    JWT.encode(payload, SECRET_KEY)
  end

  def self.decode(token)
    decoded = JWT.decode(token, SECRET_KEY)[0]
    HashWithIndifferentAccess.new(decoded)
  rescue JWT::DecodeError => e
    nil
  end
end

✅ Step 4: Create the Authentication Controller

rails g controller auth

app/controllers/auth_controller.rb:

class AuthController < ApplicationController
  def login
    user = User.find_by(email: params[:email])

    if user&.authenticate(params[:password])
      token = JsonWebToken.encode(user_id: user.id)
      render json: { token: token }, status: :ok
    else
      render json: { error: 'Invalid credentials' }, status: :unauthorized
    end
  end
end

✅ Step 5: Protect Other Endpoints with Authentication

Make a reusable authenticate_request method.

app/controllers/application_controller.rb:

class ApplicationController < ActionController::API
  before_action :authenticate_request

  attr_reader :current_user

  private

  def authenticate_request
    header = request.headers['Authorization']
    token = header.split(' ').last if header.present?

    if token
      decoded = JsonWebToken.decode(token)
      @current_user = User.find_by(id: decoded[:user_id]) if decoded
    end

    render json: { error: 'Unauthorized' }, status: :unauthorized unless @current_user
  end
end

Now all your controllers inherit this behaviour unless you skip_before_action.

✅ Step 6: Add Routes

config/routes.rb:

Rails.application.routes.draw do
  post '/login', to: 'auth#login'

  get '/profile', to: 'users#profile' # Example protected route
end

✅ Step 7: Example Protected Controller

rails g controller users

app/controllers/users_controller.rb:

class UsersController < ApplicationController
  def profile
    render json: { id: current_user.id, email: current_user.email }
  end
end

🧪 Test It Out (Example)

Step 1: Create a User (via Rails Console)

User.create!(email: "test@example.com", password: "password123")

Step 2: Login via POST /login

POST /login
Content-Type: application/json

{
  "email": "test@example.com",
  "password": "password123"
}

Response:

{ "token": "eyJhbGciOi..." }

Step 3: Use Token in Authenticated Request

GET /profile
Authorization: Bearer eyJhbGciOi...

🔒 Extras You Might Add Later

  • Token expiration errors
  • Refresh tokens
  • Token revocation (e.g., a blacklist table)
  • Roles/permissions inside the token (e.g., admin claims)

Let’s now write RSpec tests for the JWT-based authentication flow we just set up in your Rails API app.

Assumptions

  • You already have:
    • A User model with email and password_digest
    • An AuthController with login
    • A UsersController with a protected profile action
    • JWT auth logic in JsonWebToken

🔧 Step 1: Add RSpec & Factory Bot

In your Gemfile (if not already added):

group :development, :test do
  gem 'rspec-rails'
  gem 'factory_bot_rails'
end

group :test do
  gem 'faker'
end

Then install:

bundle install
rails generate rspec:install


🏭 Step 2: Setup Factory for User

spec/factories/users.rb:

FactoryBot.define do
  factory :user do
    email { Faker::Internet.email }
    password { 'password123' }
    password_confirmation { 'password123' }
  end
end


🧪 Step 3: Auth Request Specs

spec/requests/auth_spec.rb:

require 'rails_helper'

RSpec.describe 'Authentication', type: :request do
  let!(:user) { create(:user, password: 'password123') }

  describe 'POST /login' do
    context 'with valid credentials' do
      it 'returns a JWT token' do
        post '/login', params: { email: user.email, password: 'password123' }

        expect(response).to have_http_status(:ok)
        expect(JSON.parse(response.body)).to include('token')
      end
    end

    context 'with invalid credentials' do
      it 'returns unauthorized' do
        post '/login', params: { email: user.email, password: 'wrong' }

        expect(response).to have_http_status(:unauthorized)
        expect(JSON.parse(response.body)).to include('error')
      end
    end
  end
end


🔒 Step 4: Profile (Protected) Request Specs

spec/requests/users_spec.rb:

require 'rails_helper'

RSpec.describe 'Users', type: :request do
  let!(:user) { create(:user) }
  let(:token) { JsonWebToken.encode(user_id: user.id) }

  describe 'GET /profile' do
    context 'with valid token' do
      it 'returns user profile' do
        get '/profile', headers: { 'Authorization' => "Bearer #{token}" }

        expect(response).to have_http_status(:ok)
        json = JSON.parse(response.body)
        expect(json['email']).to eq(user.email)
      end
    end

    context 'without token' do
      it 'returns unauthorized' do
        get '/profile'
        expect(response).to have_http_status(:unauthorized)
      end
    end

    context 'with invalid token' do
      it 'returns unauthorized' do
        get '/profile', headers: { 'Authorization' => 'Bearer invalid.token' }
        expect(response).to have_http_status(:unauthorized)
      end
    end
  end
end

📦 Final Tips

  • Run tests with: bundle exec rspec
  • You can stub JsonWebToken.decode in unit tests if needed to isolate auth logic.