When writing tests in RSpec, especially in modern Rails 7+ apps with Ruby 3+, understanding test doubles, stubs, and mocks is essential for writing clean, fast, and maintainable tests.
In this guide, we’ll break down:
What are doubles, stubs, and mocks
When to use each
Common RSpec methods (let, let!, subject, allow, expect)
RSpec is the most popular testing framework for Ruby and Rails applications. This comprehensive guide covers everything from basic RSpec syntax to advanced Rails 7+ testing patterns, with real-world examples and scenarios.
RSpec.describe User do
  describe "#full_name" do
    context "when first and last name are present" do
      # tests here
    end

    context "when only first name is present" do
      # tests here
    end
  end

  describe ".active_users" do
    context "with active users in database" do
      # tests here
    end
  end
end
it – Individual Test Cases
it "returns the user's full name" do
  user = User.new(first_name: "John", last_name: "Doe")
  expect(user.full_name).to eq("John Doe")
end

it "handles missing last name gracefully" do
  user = User.new(first_name: "John")
  expect(user.full_name).to eq("John")
end
Core RSpec Methods
let and let!
Lazy Evaluation with let
RSpec.describe Session::Discount do
  let(:cookies) { CookiesStub.new }
  let(:code) { create_code(10) }
  let(:customer) { init_customer }
  let(:customer_code) { create_customer_code(customer) }

  it "uses lazy evaluation" do
    # code is only created when first accessed
    expect(code.amount).to eq(10)
  end
end
Immediate Evaluation with let!
let!(:user) { User.create(name: "John") }  # Created immediately
let(:profile) { user.profile }             # Created when accessed

it "has user already created" do
  expect(User.count).to eq(1)  # user already exists
end
subject
Implicit Subject
RSpec.describe User do
  let(:user_params) { { name: "John", email: "john@example.com" } }

  subject { User.new(user_params) }

  it { is_expected.to be_valid }
  it { is_expected.to respond_to(:full_name) }
end
Named Subject
describe '#initial_discount' do
  subject(:initial_discount_in_rupee) {
    described_class.new(cookies: cookies).initial_discount_in_rupee
  }

  it 'returns initial discount for customer' do
    accessor.set_customer_code(customer_code: customer_code)
    expect(initial_discount_in_rupee).to eq(expected_amount)
  end
end
expect and Matchers
Basic Matchers
# Equality
expect(user.name).to eq("John")
expect(user.age).to be > 18
expect(user.email).to include("@")

# Boolean checks
expect(user).to be_valid
expect(user.active?).to be true
expect(user.admin?).to be_falsy

# Type checks
expect(user.created_at).to be_a(Time)
expect(user.tags).to be_an(Array)
# spec/rails_helper.rb
require 'spec_helper'
ENV['RAILS_ENV'] ||= 'test'
require_relative '../config/environment'

abort("The Rails environment is running in production mode!") if Rails.env.production?
require 'rspec/rails'

RSpec.configure do |config|
  config.fixture_path = "#{::Rails.root}/spec/fixtures"
  config.use_transactional_fixtures = true
  config.infer_spec_type_from_file_location!
  config.filter_rails_from_backtrace!
end
Testing Controllers
RSpec.describe Api::V1::SessionsController, type: :controller do
  let(:user) { create(:user) }
  let(:valid_params) { { email: user.email, password: "password" } }

  describe "POST #create" do
    context "with valid credentials" do
      it "returns success response" do
        post :create, params: valid_params
        expect(response).to have_http_status(:success)
        expect(JSON.parse(response.body)["success"]).to be true
      end

      it "sets authentication token" do
        post :create, params: valid_params
        expect(response.cookies["auth_token"]).to be_present
      end
    end

    context "with invalid credentials" do
      it "returns unauthorized status" do
        post :create, params: { email: user.email, password: "wrong" }
        expect(response).to have_http_status(:unauthorized)
      end
    end
  end
end
Testing Models
RSpec.describe User, type: :model do
  describe "validations" do
    it { is_expected.to validate_presence_of(:email) }
    it { is_expected.to validate_uniqueness_of(:email) }
    it { is_expected.to validate_length_of(:password).is_at_least(8) }
  end

  describe "associations" do
    it { is_expected.to have_many(:orders) }
    it { is_expected.to belong_to(:organization) }
    it { is_expected.to have_one(:profile) }
  end

  describe "scopes" do
    let!(:active_user) { create(:user, :active) }
    let!(:inactive_user) { create(:user, :inactive) }

    it "returns only active users" do
      expect(User.active).to include(active_user)
      expect(User.active).not_to include(inactive_user)
    end
  end
end
Testing Scenarios
Testing Service Objects
RSpec.describe Session::Discount do
  let(:cookies) { CookiesStub.new }
  let(:accessor) { Session::CookieDiscount.new(cookies) }

  describe '#initialize' do
    it 'calls ClearDiscountCode' do
      expect_any_instance_of(Session::ClearDiscountCode).to receive(:run)
      described_class.new(cookies: cookies)
    end

    it 'removes discount_code if referral_code presented' do
      accessor.set_code(discount)
      accessor.set_referral_code(referral_code: code)

      described_class.new(cookies: cookies)
      expect(accessor.discount).to be nil
    end
  end
end
Testing API Endpoints
RSpec.describe "API V1 Sessions", type: :request do
  let(:headers) { { "Content-Type" => "application/json" } }

  describe "POST /api/v1/sessions" do
    let(:user) { create(:user) }
    let(:params) do
      {
        session: {
          email: user.email,
          password: "password"
        }
      }
    end

    it "creates a new session" do
      post "/api/v1/sessions", params: params.to_json, headers: headers

      expect(response).to have_http_status(:created)
      expect(json_response["user"]["id"]).to eq(user.id)
      expect(json_response["token"]).to be_present
    end

    context "with invalid credentials" do
      before { params[:session][:password] = "wrong_password" }

      it "returns error" do
        post "/api/v1/sessions", params: params.to_json, headers: headers

        expect(response).to have_http_status(:unauthorized)
        expect(json_response["error"]).to eq("Invalid credentials")
      end
    end
  end
end
Testing Background Jobs
RSpec.describe EmailNotificationJob, type: :job do
  include ActiveJob::TestHelper

  let(:user) { create(:user) }

  describe "#perform" do
    it "sends welcome email" do
      expect {
        EmailNotificationJob.perform_now(user.id, "welcome")
      }.to change { ActionMailer::Base.deliveries.count }.by(1)
    end

    it "enqueues job" do
      expect {
        EmailNotificationJob.perform_later(user.id, "welcome")
      }.to have_enqueued_job(EmailNotificationJob)
    end
  end
end
Testing with Database Transactions
RSpec.describe OrderProcessor do
  describe "#process" do
    let(:order) { create(:order, :pending) }
    let(:payment_method) { create(:payment_method) }

    it "processes order successfully" do
      expect {
        OrderProcessor.new(order).process(payment_method)
      }.to change { order.reload.status }.from("pending").to("completed")
    end

    it "handles payment failures" do
      allow(payment_method).to receive(:charge).and_raise(PaymentError)

      expect {
        OrderProcessor.new(order).process(payment_method)
      }.to raise_error(PaymentError)

      expect(order.reload.status).to eq("failed")
    end
  end
end
Advanced Features
Shared Examples
# spec/support/shared_examples/auditable.rb
RSpec.shared_examples "auditable" do
  it "tracks creation" do
    expect(subject.created_at).to be_present
    expect(subject.created_by).to eq(current_user)
  end

  it "tracks updates" do
    subject.update(name: "Updated Name")
    expect(subject.updated_by).to eq(current_user)
  end
end

# Usage in specs
RSpec.describe User do
  let(:current_user) { create(:user) }
  subject { create(:user) }

  it_behaves_like "auditable"
end
Custom Matchers
# spec/support/matchers/be_valid_email.rb
RSpec::Matchers.define :be_valid_email do
  match do |actual|
    actual =~ /\A[\w+\-.]+@[a-z\d\-]+(\.[a-z\d\-]+)*\.[a-z]+\z/i
  end

  failure_message do |actual|
    "expected #{actual} to be a valid email address"
  end
end

# Usage
expect(user.email).to be_valid_email
Hooks and Callbacks
RSpec.describe User do
  before(:each) do
    @original_time = Time.current
    travel_to Time.zone.parse("2023-01-01 12:00:00")
  end

  after(:each) do
    travel_back
  end

  before(:all) do
    # Runs once before all tests in this describe block
    @test_data = create_test_data
  end

  around(:each) do |example|
    Rails.logger.silence do
      example.run
    end
  end
end
Stubbing and Mocking
describe "external API integration" do
  let(:api_client) { instance_double("APIClient") }

  before do
    allow(APIClient).to receive(:new).and_return(api_client)
  end

  it "calls external service" do
    expect(api_client).to receive(:get_user_data).with(user.id)
      .and_return({ name: "John", email: "john@example.com" })

    result = UserDataService.fetch(user.id)
    expect(result[:name]).to eq("John")
  end

  it "handles API errors gracefully" do
    allow(api_client).to receive(:get_user_data).and_raise(Net::TimeoutError)

    expect {
      UserDataService.fetch(user.id)
    }.to raise_error(ServiceUnavailableError)
  end
end
Testing Time-dependent Code
describe "subscription expiry" do
  let(:subscription) { create(:subscription, expires_at: 2.days.from_now) }

  it "is not expired when current" do
    expect(subscription).not_to be_expired
  end

  it "is expired when past expiry date" do
    travel_to 3.days.from_now do
      expect(subscription).to be_expired
    end
  end
end
Factory Bot Integration
Basic Factory Setup
# spec/factories/users.rb
FactoryBot.define do
  factory :user do
    sequence(:email) { |n| "user#{n}@example.com" }
    first_name { "John" }
    last_name { "Doe" }
    password { "password123" }

    trait :admin do
      role { "admin" }
    end

    trait :with_profile do
      after(:create) do |user|
        create(:profile, user: user)
      end
    end

    factory :admin_user, traits: [:admin]
  end
end

# Usage in tests
let(:user) { create(:user) }
let(:admin) { create(:user, :admin) }
let(:user_with_profile) { create(:user, :with_profile) }
Advanced Factory Patterns
# spec/factories/orders.rb
FactoryBot.define do
  factory :order do
    user
    total_amount { 100.00 }
    status { "pending" }

    factory :completed_order do
      status { "completed" }
      completed_at { Time.current }

      after(:create) do |order|
        create_list(:order_item, 3, order: order)
      end
    end
  end
end
Testing Different Types
Feature Tests (System Tests)
RSpec.describe "User Registration", type: :system do
  it "allows user to register" do
    visit "/signup"

    fill_in "Email", with: "test@example.com"
    fill_in "Password", with: "password123"
    fill_in "Confirm Password", with: "password123"

    click_button "Sign Up"

    expect(page).to have_content("Welcome!")
    expect(page).to have_current_path("/dashboard")
  end
end
Mailer Tests
RSpec.describe UserMailer, type: :mailer do
  describe "#welcome_email" do
    let(:user) { create(:user) }
    let(:mail) { UserMailer.welcome_email(user) }

    it "sends to correct recipient" do
      expect(mail.to).to eq([user.email])
    end

    it "has correct subject" do
      expect(mail.subject).to eq("Welcome to Our App!")
    end

    it "includes user name in body" do
      expect(mail.body.encoded).to include(user.first_name)
    end
  end
end
Helper Tests
RSpec.describe ApplicationHelper, type: :helper do
  describe "#format_currency" do
    it "formats positive amounts" do
      expect(helper.format_currency(100.50)).to eq("$100.50")
    end

    it "handles zero amounts" do
      expect(helper.format_currency(0)).to eq("$0.00")
    end

    it "formats negative amounts" do
      expect(helper.format_currency(-50.25)).to eq("-$50.25")
    end
  end
end
Best Practices
1. Clear Test Structure
# Good: Clear, descriptive names
describe User do
  describe "#full_name" do
    context "when both names are present" do
      it "returns concatenated first and last name" do
        # test implementation
      end
    end
  end
end

# Bad: Unclear names
describe User do
  it "works" do
    # test implementation
  end
end
2. One Assertion Per Test
# Good: Single responsibility
it "validates email presence" do
  user = User.new(email: nil)
  expect(user).not_to be_valid
end

it "validates email format" do
  user = User.new(email: "invalid-email")
  expect(user).not_to be_valid
end

# Bad: Multiple assertions
it "validates email" do
  user = User.new(email: nil)
  expect(user).not_to be_valid

  user.email = "invalid-email"
  expect(user).not_to be_valid

  user.email = "valid@email.com"
  expect(user).to be_valid
end
3. Use let for Test Data
# Good: Reusable and lazy-loaded
let(:user) { create(:user, email: "test@example.com") }
let(:order) { create(:order, user: user, total: 100) }

it "calculates tax correctly" do
  expect(order.tax_amount).to eq(8.50)
end

# Bad: Repeated setup
it "calculates tax correctly" do
  user = create(:user, email: "test@example.com")
  order = create(:order, user: user, total: 100)
  expect(order.tax_amount).to eq(8.50)
end
4. Meaningful Error Messages
# Good: Custom error messages
expect(discount.amount).to eq(50),
  "Expected discount amount to be $50 for premium users"

# Good: Descriptive matchers
expect(user.subscription).to be_active,
  "User subscription should be active after successful payment"
5. Test Edge Cases
describe "#divide" do
  it "divides positive numbers" do
    expect(calculator.divide(10, 2)).to eq(5)
  end

  it "handles division by zero" do
    expect { calculator.divide(10, 0) }.to raise_error(ZeroDivisionError)
  end

  it "handles negative numbers" do
    expect(calculator.divide(-10, 2)).to eq(-5)
  end

  it "handles float precision" do
    expect(calculator.divide(1, 3)).to be_within(0.001).of(0.333)
  end
end
Rails 7+ Specific Features
Testing with ActionText
RSpec.describe Post, type: :model do
  describe "rich text content" do
    let(:post) { create(:post) }

    it "can store rich text content" do
      post.content = "<p>Hello <strong>world</strong></p>"
      expect(post.content.to_s).to include("Hello")
      expect(post.content.to_s).to include("<strong>world</strong>")
    end
  end
end
Testing with Active Storage
RSpec.describe User, type: :model do
  describe "avatar attachment" do
    let(:user) { create(:user) }
    let(:image) { fixture_file_upload("spec/fixtures/avatar.jpg", "image/jpeg") }

    it "can attach avatar" do
      user.avatar.attach(image)
      expect(user.avatar).to be_attached
      expect(user.avatar.content_type).to eq("image/jpeg")
    end
  end
end
Testing Hotwire/Turbo
RSpec.describe "Todo Management", type: :system do
  it "updates todo via turbo stream" do
    todo = create(:todo, title: "Original Title")

    visit todos_path
    click_link "Edit"
    fill_in "Title", with: "Updated Title"
    click_button "Update"

    expect(page).to have_content("Updated Title")
    expect(page).not_to have_content("Original Title")
    # Verify it was updated via AJAX, not full page reload
    expect(page).not_to have_selector(".flash-message")
  end
end
# spec/rails_helper.rb
require 'database_cleaner/active_record'

RSpec.configure do |config|
  config.before(:suite) do
    DatabaseCleaner.strategy = :transaction
    DatabaseCleaner.clean_with(:truncation)
  end

  config.around(:each) do |example|
    DatabaseCleaner.cleaning do
      example.run
    end
  end
end
This comprehensive guide covers the essential RSpec patterns you’ll use in Rails 7+ applications. The examples shown are based on real-world scenarios and follow current best practices for maintainable, reliable test suites.
Remember: Good tests are documentation for your code – they should clearly express what your application does and how it should behave under different conditions.
Test‑Driven Development (TDD) and Behavior‑Driven Development (BDD) are complementary testing approaches that help teams build robust, maintainable software by defining expected behaviour before writing production code. In TDD, developers write small, focused unit tests that fail initially, then implement just enough code to make them pass, ensuring each component meets its specification. BDD extends this idea by framing tests in a global language that all stakeholders—developers, QA, and product owners—can understand, using human-readable scenarios to describe system behaviour. While TDD emphasizes the correctness of individual units, BDD elevates collaboration and shared understanding by specifying the “why” and “how” of features in a narrative style, driving development through concrete examples of desired outcomes.
Mindset: “Does this behave as expected from user’s perspective?”
Style: More natural language, business-focused
🛠️ Frameworks Support Both Approaches
📋 RSpec (Primarily BDD-oriented)
# BDD Style - describing behavior
describe "TwoSum" do
  context "when given an empty array" do
    it "should inform user about insufficient data" do
      expect(two_sum([], 9)).to eq('Provide an array with length 2 or more')
    end
  end
end
⚙️ Minitest (Supports Both TDD and BDD)
🔧 TDD Style with Minitest
class TestTwoSum < Minitest::Test
  # Testing implementation correctness
  def test_empty_array_returns_error
    assert_equal 'Provide an array with length 2 or more', two_sum([], 9)
  end

  def test_valid_input_returns_indices
    assert_equal [0, 1], two_sum([2, 7], 9)
  end
end
🎭 BDD Style with Minitest
describe "TwoSum behavior" do
  describe "when user provides empty array" do
    it "guides user to provide sufficient data" do
      _(two_sum([], 9)).must_equal 'Provide an array with length 2 or more'
    end
  end

  describe "when user provides valid input" do
    it "finds the correct pair indices" do
      _(two_sum([2, 7], 9)).must_equal [0, 1]
    end
  end
end
🎯 Key Differences in Practice
🔄 TDD Approach
# 1. Write failing test
def test_two_sum_with_valid_input
  assert_equal [0, 1], two_sum([2, 7], 9)  # This will fail initially
end

# 2. Write minimal code to pass
def two_sum(nums, target)
  [0, 1]  # Hardcoded to pass
end

# 3. Refactor and improve
def two_sum(nums, target)
  # Actual implementation
end
🎭 BDD Approach
# 1. Describe the behavior first
describe "Finding two numbers that sum to target" do
  context "when valid numbers exist" do
    it "returns their indices" do
      # This describes WHAT should happen, not HOW
      expect(two_sum([2, 7, 11, 15], 9)).to eq([0, 1])
    end
  end
end
📊 Summary Table
Aspect
TDD
BDD
Focus
Implementation correctness
User behavior
Language
Technical
Business/Natural
Frameworks
Any (Minitest, RSpec, etc.)
Any (RSpec, Minitest spec, etc.)
Test Names
test_method_returns_value
"it should behave like..."
Audience
Developers
Stakeholders + Developers
🎪 The Reality
RSpec encourages BDD but can be used for TDD
Minitest is framework-agnostic – supports both approaches equally
Your choice of methodology (TDD vs BDD) is independent of your framework choice
Many teams use hybrid approaches – BDD for acceptance tests, TDD for unit tests
The syntax doesn’t determine the methodology – it’s about how you think and approach the problem!
System Tests 💻⚙️
System tests in Rails (located in test/system/*) are full-stack integration tests that simulate real user interactions with your web application. They’re the highest level of testing in the Rails testing hierarchy and provide the most realistic testing environment.
System tests actually launch a real web browser (or headless browser) and interact with your application just like a real user would. Looking at our Rails app’s configuration: design_studio/test/application_system_test_case.rb
# frozen_string_literal: true

# :markup: markdown

gem "capybara", ">= 3.26"

require "capybara/dsl"
require "capybara/minitest"
require "action_controller"
require "action_dispatch/system_testing/driver"
require "action_dispatch/system_testing/browser"
require "action_dispatch/system_testing/server"
require "action_dispatch/system_testing/test_helpers/screenshot_helper"
require "action_dispatch/system_testing/test_helpers/setup_and_teardown"

module ActionDispatch
  # # System Testing
  #
  # System tests let you test applications in the browser. Because system tests
  # use a real browser experience, you can test all of your JavaScript easily from
  # your test suite.
  #
  # To create a system test in your application, extend your test class from
  # `ApplicationSystemTestCase`. System tests use Capybara as a base and allow you
  # to configure the settings through your `application_system_test_case.rb` file
  # that is generated with a new application or scaffold.
  #
  # Here is an example system test:
  #
  #     require "application_system_test_case"
  #
  #     class Users::CreateTest < ApplicationSystemTestCase
  #       test "adding a new user" do
  #         visit users_path
  #         click_on 'New User'
  #
  #         fill_in 'Name', with: 'Arya'
  #         click_on 'Create User'
  #
  #         assert_text 'Arya'
  #       end
  #     end
  #
  # When generating an application or scaffold, an
  # `application_system_test_case.rb` file will also be generated containing the
  # base class for system testing. This is where you can change the driver, add
  # Capybara settings, and other configuration for your system tests.
  #
  #     require "test_helper"
  #
  #     class ApplicationSystemTestCase < ActionDispatch::SystemTestCase
  #       driven_by :selenium, using: :chrome, screen_size: [1400, 1400]
  #     end
  #
  # By default, `ActionDispatch::SystemTestCase` is driven by the Selenium driver,
  # with the Chrome browser, and a browser size of 1400x1400.
  #
  # Changing the driver configuration options is easy. Let's say you want to use
  # the Firefox browser instead of Chrome. In your
  # `application_system_test_case.rb` file add the following:
  #
  #     require "test_helper"
  #
  #     class ApplicationSystemTestCase < ActionDispatch::SystemTestCase
  #       driven_by :selenium, using: :firefox
  #     end
  #
  # `driven_by` has a required argument for the driver name. The keyword arguments
  # are `:using` for the browser and `:screen_size` to change the size of the
  # browser screen. These two options are not applicable for headless drivers and
  # will be silently ignored if passed.
  #
  # Headless browsers such as headless Chrome and headless Firefox are also
  # supported. You can use these browsers by setting the `:using` argument to
  # `:headless_chrome` or `:headless_firefox`.
  #
  # To use a headless driver, like Cuprite, update your Gemfile to use Cuprite
  # instead of Selenium and then declare the driver name in the
  # `application_system_test_case.rb` file. In this case, you would leave out the
  # `:using` option because the driver is headless, but you can still use
  # `:screen_size` to change the size of the browser screen, also you can use
  # `:options` to pass options supported by the driver. Please refer to your
  # driver documentation to learn about supported options.
  #
  #     require "test_helper"
  #     require "capybara/cuprite"
  #
  #     class ApplicationSystemTestCase < ActionDispatch::SystemTestCase
  #       driven_by :cuprite, screen_size: [1400, 1400], options:
  #         { js_errors: true }
  #     end
  #
  # Some drivers require browser capabilities to be passed as a block instead of
  # through the `options` hash.
  #
  # As an example, if you want to add mobile emulation on chrome, you'll have to
  # create an instance of selenium's `Chrome::Options` object and add capabilities
  # with a block.
  #
  # The block will be passed an instance of `<Driver>::Options` where you can
  # define the capabilities you want. Please refer to your driver documentation to
  # learn about supported options.
  #
  #     class ApplicationSystemTestCase < ActionDispatch::SystemTestCase
  #       driven_by :selenium, using: :chrome, screen_size: [1024, 768] do |driver_option|
  #         driver_option.add_emulation(device_name: 'iPhone 6')
  #         driver_option.add_extension('path/to/chrome_extension.crx')
  #       end
  #     end
  #
  # Because `ActionDispatch::SystemTestCase` is a shim between Capybara and Rails,
  # any driver that is supported by Capybara is supported by system tests as long
  # as you include the required gems and files.
  class SystemTestCase < ActiveSupport::TestCase
    include Capybara::DSL
    include Capybara::Minitest::Assertions
    include SystemTesting::TestHelpers::SetupAndTeardown
    include SystemTesting::TestHelpers::ScreenshotHelper

    ..........
How They Work
System tests can:
Navigate pages: visit products_url
Click elements: click_on "New product"
Fill forms: fill_in "Title", with: @product.title
Verify content: assert_text "Product was successfully created"
test "visiting the index" do
  visit products_url
  assert_selector "h1", text: "Products"
end
Complex user workflow (from profile_test.rb):
def sign_in_user(user)
  visit new_session_path
  fill_in "Email", with: user.email
  fill_in "Password", with: "password"
  click_button "Log In"

  # Wait for redirect and verify we're not on the login page anymore
  # Also wait for the success notice to appear
  assert_text "Logged in successfully", wait: 10
  assert_no_text "Log in to your account", wait: 5
end
Key Benefits
End-to-end testing: Tests the complete user journey
JavaScript testing: Can test dynamic frontend behavior
Real browser environment: Tests CSS, responsive design, and browser compatibility
User perspective: Validates the actual user experience
When to Use System Tests
Critical user workflows (login, checkout, registration)
Complex page interactions (forms, modals, AJAX)
Cross-browser compatibility
Responsive design validation
Our profile_test.rb is a great example – it tests the entire user authentication flow, profile page navigation, and various UI interactions that a real user would perform.
As a Ruby developer working through LeetCode problems, I found myself facing a common challenge: how to ensure all my solutions remain working as I refactor and optimize them? With multiple algorithms per problem and dozens of solution files, manual testing was becoming a bottleneck.
Today, I’ll share how I set up a comprehensive GitHub Actions CI/CD pipeline that automatically tests all my LeetCode solutions, providing instant feedback and maintaining code quality.
🤔 The Problem: Testing Chaos
My LeetCode repository structure looked like this:
Complete Validation: Ensures all solutions work together
Cleaner CI History: Single status check per push/PR
Auto-Discovery: Automatically finds new test folders
❌ Rejected Alternative (Separate Actions):
More complex maintenance
Higher resource usage
Fragmented test results
More configuration overhead
🛠️ The Solution: Intelligent Test Discovery
Here’s the GitHub Actions workflow that changed everything:
name: Run All LeetCode Tests

on:
  push:
    branches: [ main, develop ]
  pull_request:
    branches: [ main ]

jobs:
  test:
    runs-on: ubuntu-latest

    steps:
    - uses: actions/checkout@v4

    - name: Set up Ruby
      uses: ruby/setup-ruby@v1
      with:
        ruby-version: '3.2'
        bundler-cache: true

    - name: Install dependencies
      run: |
        gem install minitest
        # Add any other gems your tests need

    - name: Run all tests
      run: |
        echo "🧪 Running LeetCode Solution Tests..."

        # Colors for output
        GREEN='\033[0;32m'
        RED='\033[0;31m'
        YELLOW='\033[1;33m'
        NC='\033[0m' # No Color

        # Track results
        total_folders=0
        passed_folders=0
        failed_folders=()

        # Find all folders with test files
        for folder in */; do
          folder_name=${folder%/}

          # Skip if no test files in folder
          if ! ls "$folder"test_*.rb 1> /dev/null 2>&1; then
            continue
          fi

          total_folders=$((total_folders + 1))
          echo -e "\n${YELLOW}📁 Testing folder: $folder_name${NC}"

          # Run tests for this folder
          cd "$folder"
          test_failed=false

          for test_file in test_*.rb; do
            if [ -f "$test_file" ]; then
              echo "  🔍 Running $test_file..."
              if ruby "$test_file"; then
                echo -e "  ${GREEN}✅ $test_file passed${NC}"
              else
                echo -e "  ${RED}❌ $test_file failed${NC}"
                test_failed=true
              fi
            fi
          done

          if [ "$test_failed" = false ]; then
            echo -e "${GREEN}✅ All tests passed in $folder_name${NC}"
            passed_folders=$((passed_folders + 1))
          else
            echo -e "${RED}❌ Some tests failed in $folder_name${NC}"
            failed_folders+=("$folder_name")
          fi

          cd ..
        done

        # Summary
        echo -e "\n🎯 ${YELLOW}TEST SUMMARY${NC}"
        echo "📊 Total folders tested: $total_folders"
        echo -e "✅ ${GREEN}Passed: $passed_folders${NC}"
        echo -e "❌ ${RED}Failed: $((total_folders - passed_folders))${NC}"

        if [ ${#failed_folders[@]} -gt 0 ]; then
          echo -e "\n${RED}Failed folders:${NC}"
          for folder in "${failed_folders[@]}"; do
            echo "  - $folder"
          done
          exit 1
        else
          echo -e "\n${GREEN}🎉 All tests passed successfully!${NC}"
        fi
🔍 What Makes This Special?
🎯 Intelligent Auto-Discovery
The script automatically finds folders containing test_*.rb files:
# Skip if no test files in folder
if ! ls "$folder"test_*.rb 1> /dev/null 2>&1; then
  continue
fi
This means new problems automatically get tested without workflow modifications!
The status badge is a visual indicator that shows the current status of your GitHub Actions workflow. It’s a small image that displays whether your latest tests are passing or failing.
🎨 What It Looks Like:
✅ When tests pass: ❌ When tests fail: 🔄 When tests are running:
📋 What Information It Shows:
Workflow Name: “Run All LeetCode Tests” (or whatever you named it)
Current Status:
Green ✅: All tests passed
Red ❌: Some tests failed
Yellow 🔄: Tests are currently running
Real-time Updates: Automatically updates when you push code
# Compare solution_v1.rb vs solution_v2.rb performance
💡 Conclusion: Why This Matters
This GitHub Actions setup transformed my LeetCode practice from a manual, error-prone process into a professional, automated workflow. The key benefits:
🎯 For Individual Practice
Confidence: Refactor without fear
Speed: Instant validation of changes
Quality: Consistent test coverage
🎯 For Team Collaboration
Standards: Enforced testing practices
Reviews: Clear CI status on pull requests
Documentation: Professional presentation
🎯 For Career Development
Portfolio: Demonstrates DevOps knowledge
Best Practices: Shows understanding of CI/CD
Professionalism: Industry-standard development workflow
🚀 Take Action
Ready to implement this in your own LeetCode repository? Here’s what to do next:
Copy the workflow file into .github/workflows/test.yml
Ensure consistent naming with test_*.rb pattern
Push to GitHub and watch the magic happen
Add the status badge to your README
Start coding fearlessly with automated testing backup!
Welcome to my new series where I combine the power of Ruby with the discipline of Test-Driven Development (TDD) to tackle popular algorithm problems from LeetCode! 🧑💻💎 Whether you’re a Ruby enthusiast looking to sharpen your problem-solving skills, or a developer curious about how TDD can transform the way you approach coding challenges, you’re in the right place. In each episode, I’ll walk through a classic algorithm problem, show how TDD guides my thinking, and share insights I gain along the way. Let’s dive in and discover how writing tests first can make us better, more thoughtful programmers – one problem at a time! 🚀
🎯 Why I chose this approach
When I decided to level up my algorithmic thinking, I could have simply jumped into solving problems and checking solutions afterward. But I chose a different path – Test-Driven Development with Ruby – and here’s why this combination is pure magic ✨. Learning algorithms through TDD forces me to think before I code, breaking down complex problems into small, testable behaviors. Instead of rushing to implement a solution, I first articulate what the function should do in various scenarios through tests.
This approach naturally leads me to discover edge cases I would have completely missed otherwise – like handling empty arrays, negative numbers, or boundary conditions that only surface when you’re forced to think about what could go wrong. Ruby’s expressive syntax makes writing these tests feel almost conversational, while the red-green-refactor cycle ensures I’m not just solving the problem, but solving it elegantly. Every failing test becomes a mini-puzzle to solve, every passing test builds confidence, and every refactor teaches me something new about both the problem domain and Ruby itself. It’s not just about getting the right answer – it’s about building a robust mental model of the problem while writing maintainable, well-tested code. 🚀
🎲 Episode 1: The Two Sum Problem
#####################################
#   Problem 1: The Two Sum Problem
#####################################

# Given an array of integers nums and an integer target, return indices of the two numbers such that they add up to target.

# You may assume that each input would have exactly one solution, and you may not use the same element twice.

# You can return the answer in any order.
# Example 1:

# Input: nums = [2,7,11,15], target = 9
# Output: [0,1]
# Explanation: Because nums[0] + nums[1] == 9, we return [0, 1].
# Example 2:

# Input: nums = [3,2,4], target = 6
# Output: [1,2]
# Example 3:

# Input: nums = [3,3], target = 6
# Output: [0,1]

# Constraints:
# Only one valid answer exists.

# We are not considering following concepts for now:
# 2 <= nums.length <= 104
# -109 <= nums[i] <= 109
# -109 <= target <= 109

# Follow-up: Can you come up with an algorithm that is less than O(n2) time complexity?
🔧 Setting up the TDD environment
Create a test file first and add the first test case.
# frozen_string_literal: true

require 'minitest/autorun'
require_relative 'two_sum'

###############################
# This is the test case for finding the index of two numbers in an array
# such that adding both numbers should be equal to the target number provided
#
#  Ex:
#    two_sum(num, target)
#    num: [23, 4, 8, 92], tatget: 12
#    output: [1, 2] => index of the two numbers whose sum is equal to target
##############################
class TestTwoSum < Minitest::Test
  def setup
    ####
  end

  def test_array_is_an_empty_array
    assert_equal 'Provide an array with length 2 or more', two_sum([], 9)
  end
end
Create the problem file: two_sum.rb with empty method first.
ruby test_two_sum.rb

Run options: --seed 58910
# Running:
F
Finished in 0.008429s, 118.6380 runs/s, 118.6380 assertions/s.

  1) Failure:
TestTwoSum#test_array_is_an_empty_array [test_two_sum.rb:21]:
--- expected
+++ actual
@@ -1 +1 @@
-"Provide an array with length 2 or more"
+nil

1 runs, 1 assertions, 1 failures, 0 errors, 0 skips
✅ Green: Making it pass
# frozen_string_literal: true

# @param {Integer[]} nums
# @param {Integer} target
# @return {Integer[]}

def two_sum(nums, target)
  'Provide an array with length 2 or more' if nums.empty?
end
♻️ Refactor: Optimizing the solution
❌
# frozen_string_literal: true

# @param {Integer[]} nums
# @param {Integer} target
# @return {Integer[]}

def two_sum(nums, target)
  return 'Provide an array with length 2 or more' if nums.empty?

  nums.each_with_index do |selected_num, selected_index|
    nums.each_with_index do |num, index|
      if selected_index != index
        sum = selected_num[selected_index] + num[index]
        return [selected_index, index] if sum == target
      end
    end
  end
end
❌
# frozen_string_literal: true

# @param {Integer[]} nums
# @param {Integer} target
# @return {Integer[]}

def two_sum(nums, target)
  return 'Provide an array with length 2 or more' if nums.empty?

  nums.each_with_index do |selected_num, selected_index|
    nums.each_with_index do |num, index|
      next if selected_index == index

      sum = selected_num[selected_index] + num[index]
      return [selected_index, index] if sum == target
    end
  end
end
✅
# frozen_string_literal: true

# @param {Integer[]} nums
# @param {Integer} target
# @return {Integer[]}

def two_sum(nums, target)
  return 'Provide an array with length 2 or more' if nums.empty?

  nums.each_with_index do |selected_num, selected_index|
    nums.each_with_index do |num, index|
      next if index <= selected_index

      return [selected_index, index] if selected_num + num == target
    end
  end
end
Final
# frozen_string_literal: true

require 'minitest/autorun'
require_relative 'two_sum'

###############################
# This is the test case for finding the index of two numbers in an array
# such that adding both numbers should be equal to the target number provided
#
#  Ex:
#    two_sum(num, target)
#    num: [23, 4, 8, 92], tatget: 12
#    output: [1, 2] => index of the two numbers whose sum is equal to target
##############################
class TestTwoSum < Minitest::Test
  def setup
    ####
  end

  def test_array_is_an_empty_array
    assert_equal 'Provide an array with length 2 or more elements', two_sum([], 9)
  end

  def test_array_with_length_one
    assert_equal 'Provide an array with length 2 or more elements', two_sum([9], 9)
  end

  def test_array_with_length_two
    assert_equal [0, 1], two_sum([9, 3], 12)
  end

  def test_array_with_length_three
    assert_equal [1, 2], two_sum([9, 3, 4], 7)
  end

  def test_array_with_length_four
    assert_equal [1, 3], two_sum([9, 3, 4, 8], 11)
  end

  def test_array_with_length_ten
    assert_equal [7, 8], two_sum([9, 3, 9, 8, 23, 20, 19, 5, 30, 14], 35)
  end
end
# Solution 1 ✅

# frozen_string_literal: true

# @param {Integer[]} nums
# @param {Integer} target
# @return {Integer[]}

def two_sum(nums, target)
  return 'Provide an array with length 2 or more elements' if nums.length < 2

  nums.each_with_index do |selected_num, selected_index|
    nums.each_with_index do |num, index|
      already_added = index <= selected_index
      next if already_added

      return [selected_index, index] if selected_num + num == target
    end
  end
end
Let us analyze the time complexity of Solution 1 ✅ algorithm: Our current algorithm is not less than O(n^2) time complexity. In fact, it is exactly O(n^2). This means for an array of length n, you are potentially checking about n(n−1)/2 pairs, which is O(n^2).
🔍 Why?
You have two nested loops:
The outer loop iterates over each element (nums.each_with_index)
The inner loop iterates over each element after the current one (nums.each_with_index)
For each pair, you check if their sum equals the target.
♻️ Refactor: Try to find a solution below n(^2) time complexity
# Solution 2 ✅

#####################################
# Solution 2
# TwoSum.new([2,7,11,15], 9).indices
#####################################
class TwoSum
  def initialize(nums, target)
    @numbers_array = nums
    @target = target
  end

  # @return [index_1, index_2]
  def indices
    return 'Provide an array with length 2 or more elements' if @numbers_array.length < 2

    @numbers_array.each_with_index do |num1, index1|
      next if num1 > @target # number already greater than target

      remaining_array = @numbers_array[index1..(@numbers_array.length - 1)]
      num2 = find_number(@target - num1, remaining_array)

      return [index1, @numbers_array.index(num2)] if num2
    end
  end

  private

  def find_number(number, array)
    array.each do |num|
      return num if num == number
    end
    nil
  end
end
Let us analyze the time complexity of Solution 2 ✅ algorithm:
In the indices method:
We have an outer loop that iterates through @numbers_array (O(n))
For each iteration: => Creating a new array slice remaining_array (O(n) operation) => Calling find_number which is O(n) as it iterates through the remaining array => Using @numbers_array.index(num2) which is another O(n) operation
So the total complexity is:
O(n) for the outer loop
For each iteration:
O(n) for array slicing
O(n) for find_number
O(n) for index lookup
This gives us:
O(n * (n + n + n)) = O(n * 3n) = O(3n²) = O(n²)
The main bottlenecks are:
Creating a new array slice in each iteration
Using index method to find the second number’s position
Linear search in find_number
Solution 3 ✅
To make this truly O(n), we should:
# Use a hash map to store numbers and their indices

# Solution 3 ✅  - Use Hash Map

# frozen_string_literal: true

# @param {Integer[]} nums
# @param {Integer} target
# @return {Integer[]}

class TwoSum
  def initialize(nums, target)
    @numbers_array = nums
    @target = target
  end

  # @return [index_1, index_2]
  def indices
    return 'Provide an array with length 2 or more elements' if @numbers_array.length < 2

    hash = {}

    @numbers_array.each_with_index do |num, index|
      complement = @target - num

      # store first number to hash
      if index == 0
        hash[num] = index
      else
        # if not first number check store has
        return [hash[complement], index] if hash.key?(complement)

        # if not found store the num
        hash[num] = index
      end
    end
  end
end
Let us analyze the complexity of the current code:
def indices
  return 'Provide an array with length 2 or more elements' if @numbers_array.length < 2

  hash = {}

  @numbers_array.each_with_index do |num, index|
    complement = @target - num

    # store first number to hash
    if index == 0
      hash[num] = index
    else
      # if not first number check store has
      if hash.key?(complement)
        return [hash[complement], index]
      else
        # if not found store the num
        hash[num] = index
      end
    end
  end
end
The complexity is O(n) because:
Single pass through the array: O(n)
For each iteration:
Hash lookup (hash.key?(complement)): O(1)
Hash insertion (hash[num] = index): O(1)
Basic arithmetic (@target - num): O(1)
Total complexity = O(n) * O(1) = O(n)
The code is still efficient because:
We only traverse the array once
All operations inside the loop are constant time
We don’t have any nested loops or array slicing
Hash operations (lookup and insertion) are O(1)
♻️ Refactor Solution 3 ✅
This is still O(n):
Use a hash map to store numbers and their indices
Avoid array slicing
Avoid using index method
Make a single pass through the array
# ♻️ Refactor Solution 3 ✅  - Use Hash Map

# frozen_string_literal: true

# @param {Integer[]} nums
# @param {Integer} target
# @return {Integer[]}

class TwoSum
  def initialize(nums, target)
    @numbers_array = nums
    @target = target
  end

  # @return [index_1, index_2]
  def indices
    return 'Provide an array with length 2 or more elements' if @numbers_array.length < 2

    hash = {}

    @numbers_array.each_with_index do |num, index|
      complement = @target - num

      return [hash[complement], index] if hash.key?(complement)

      hash[num] = index
    end
  end
end
This refactored solution has O(n) time complexity because:
Single pass through the array: O(n)
Hash operations (insertion and lookup) are O(1)
No array slicing or linear searches
Total complexity is O(n)
The algorithm works by:
For each number, calculate its complement (target – current_number)
Check if the complement exists in our hash
If found, return both indices
If not found, store the current number and its index in the hash
The key differences:
Instead of searching for complements in the remaining array, we store numbers we’ve seen in a hash
When we see a new number, we check if its complement exists in our hash
If found, we return both indices
If not found, we store the current number and its index
Detailed explanation of refactored solution 3
I’ll explain how the hash map solution works step by step using the example:
# Input Sample
TwoSum.new([2,7,11,15], 9)
Initial State:
   hash = {}  # Empty hash map
   target = 9
First Iteration (num = 2, index = 0):
   complement = 9 - 2 = 7
   hash = {}  # Empty, so complement 7 not found
   hash[2] = 0  # Store 2 with its index 0
@numbers_array.each_with_index do |num, index|
  complement = @target - num  # Calculate what number we need

  if hash.key?(complement)   # Check if we've seen the number we need
    return [hash[complement], index]  # If found, return both indices
  end

  hash[num] = index  # If not found, store current number and its index
end
Key points:
We only need to store each number once in the hash
The hash stores numbers as keys and their indices as values
We check for complements before storing the current number
We only need one pass through the array
This is efficient because:
Hash lookups are O(1)
We only traverse the array once
We don’t need to search through the array multiple times
We don’t need to create array slices
Why the index order has complement index first?
The order of indices in the return statement [hash[complement], index] is important because:
hash[complement] gives us the index of the first number we found (the complement)
index gives us the current position (the second number)
We return them in this order because:
The complement was stored in the hash earlier in the array
The current number is found later in the array
This maintains the order of appearance in the original array
For example, with [2,7,11,15] and target 9:
When we see 7 at index 1:
We look for complement 2 (9-7)
2 was stored at index 0
So we return [0, 1] (indices of [2,7])
If we returned [index, hash[complement]], we would get [1, 0] instead, which would be the reverse order. While the problem allows returning the answer in any order, returning them in the order they appear in the array is more intuitive and matches the example outputs in the problem description.
✅ Solution 4
# Solution 4 ✅  - Use Hash Map
# @param {Integer[]} nums
# @param {Integer} target
# @return {Integer[]}
def two_sum(nums, target)
  return 'Provide an array with length 2 or more elements' if nums.length < 2

  # number index store, use hash map, store first number in store
  store = { nums[0] => 0}

  # check the pair from second element
  nums.each_with_index do |num, index|
    next if index == 0 # already stored first
    pair = target - num

    return [store[pair], index] if store[pair]

    store[num] = index
  end
end
I made a mistake of integrating the sessions with Order and Order items model (I used the help of Co-piolet for improvement). I have only written the test cases for sessions. Why I made this mistake? Because for last some days the development was not happening in our design_studio project. So I was curious to do so many things at a time and I cannot control myself 🙂
Now what’s next?
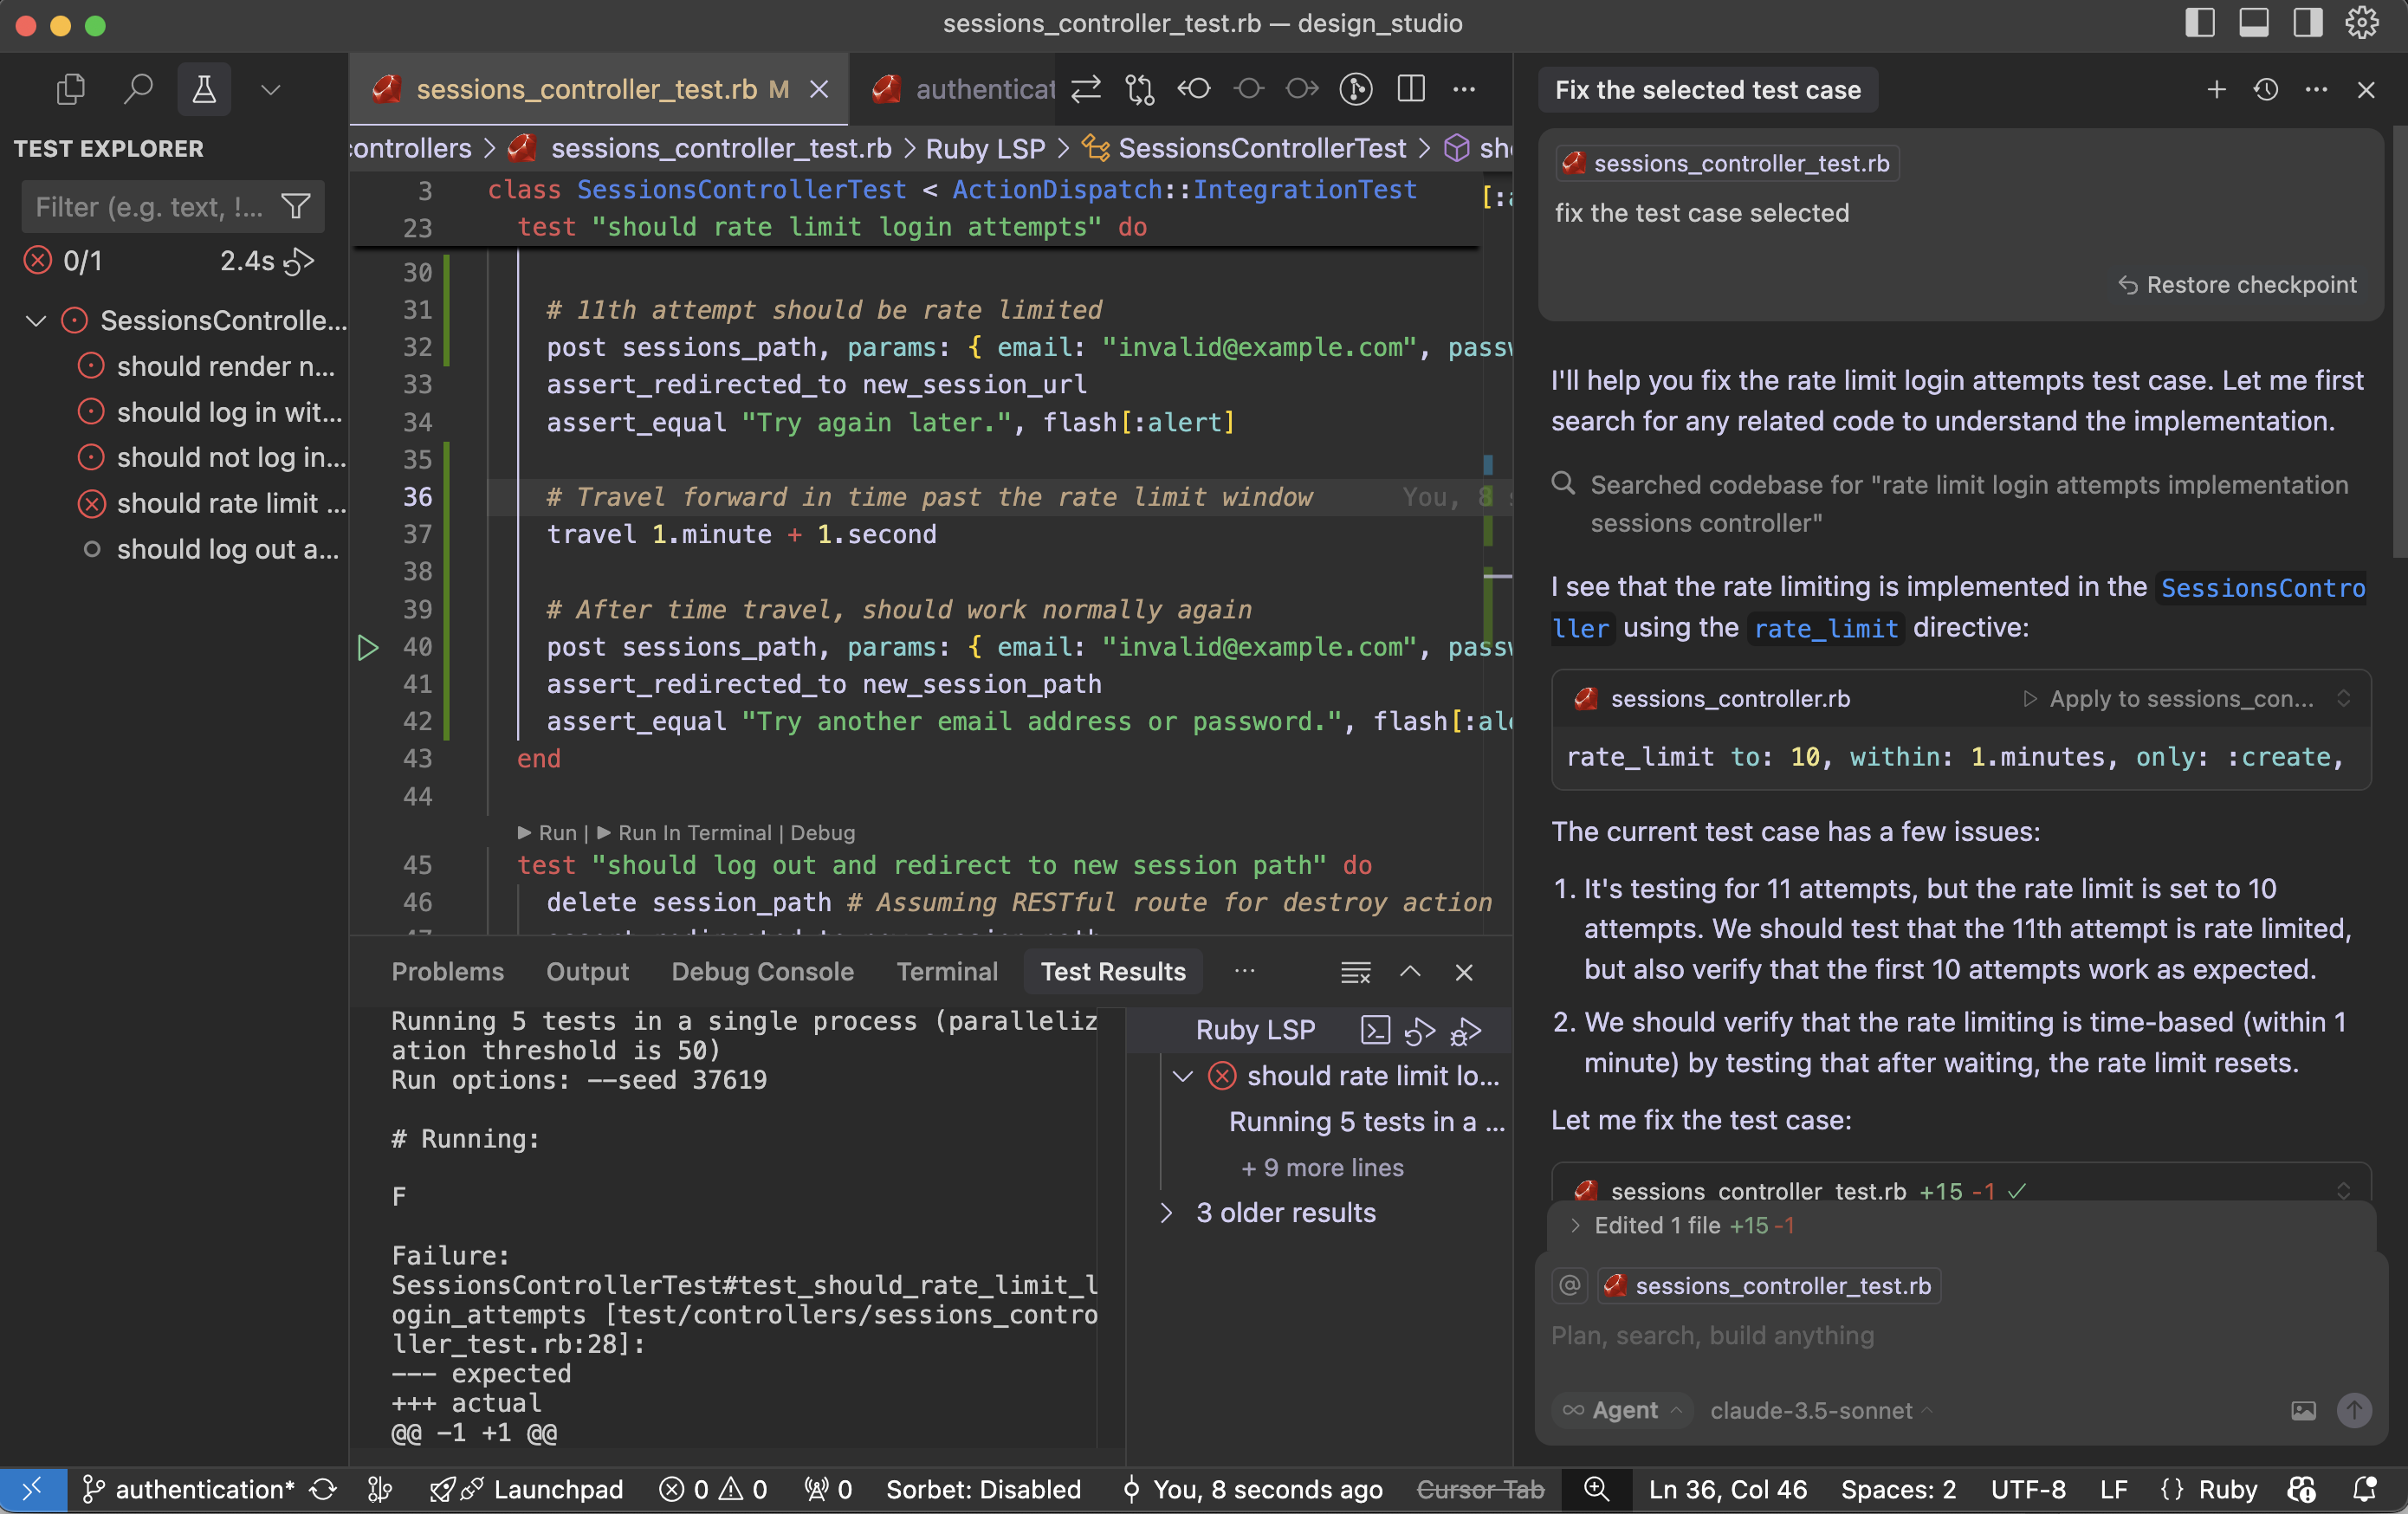
Let’s solve the test cases issues. First I cannot get ‘why this test cases for Rate limit issue is happening’. I have to research on this. I want to try Cursor – how it works with these kind of scenarios. Cursor provide me details about exact issue in our test cases and updated for me. I was happy that I saved some time.
Let’s see What is the findings of cursor:
The current test case has few issues:
It’s testing for 11 attempts, but the rate limit is set to 10 attempts. We should test that the 11th attempt is rate limited, but also verify that the first 10 attempts work as expected.
We should verify that the rate limiting is time-based (within 1 minute) by testing that after waiting, the rate limit resets.
Fix the test case:
Cursor updated the test case to properly test the rate limiting functionality. Here’s what the improved test does:
First, it makes 10 attempts and verifies that each attempt gets the normal “invalid credentials” response
Then it makes the 11th attempt and verifies that it gets rate limited with the “Try again later” message
Finally, it uses Rails’ travel helper to move forward in time past the rate limit window (1 minute + 1 second) and verifies that the rate limit has been reset by making another attempt
This test now properly verifies:
The rate limit threshold (10 attempts)
The rate limit behavior (redirect with “Try again later” message)
The rate limit duration (1 minute)
The rate limit reset after the time window expires
The test is now more thorough and matches the actual implementation in the SessionsController.
Run the test case with the fix:
Failure:
SessionsControllerTest#test_should_rate_limit_login_attempts [test/controllers/sessions_controller_test.rb:34]:
--- expected
+++ actual
@@ -1 +1 @@
-"Try again later."
+"Try another email address or password."
the problem is that the rate limiting is happening at the controller level using rate_limit, but our test isn’t properly simulating real-world timing. Let me modify the test to ensure we’re making the requests within the 1-minute window and properly testing the rate limiting.
We fixed it and still the issues are not solved:
# Running:
F
Failure:
SessionsControllerTest#test_should_rate_limit_login_attempts [test/controllers/sessions_controller_test.rb:36]:
--- expected
+++ actual
@@ -1 +1 @@
-"Try again later."
+"Try another email address or password."

bin/rails test test/controllers/sessions_controller_test.rb:23
The issue may be with our SessionsControllerrate_limit directive. That is not working in test environment. I had this doubt. Let’s see what cursor tell us regarding this:
Looking at the SessionsController, the rate limiting is implemented using Rails’ rate_limit macro, but it seems the rate limiting might not be working as expected in the test environment. Let’s try to debug this by checking if we need to enable rate limiting in the test environment or if there’s a different approach needed.
Cursor suggested Rails cache setup and wipe out cache:
require "test_helper"

class SessionsControllerTest < ActionDispatch::IntegrationTest
  setup do
    # Use memory store for rate limiting in tests
    Rails.cache = ActiveSupport::Cache::MemoryStore.new
  end

  teardown do
    Rails.cache.clear
  end

  ......
The test environment is configured to use :null_store for caching, which means rate limiting won’t work. Let’s modify the test environment configuration:
Changed the test environment’s cache store from :null_store to :memory_store to ensure rate limiting works properly
Added a consistent IP address in the test requests using headers: { REMOTE_ADDR: “192.168.1.1” } since rate limiting is typically done based on the client’s IP address
The test should now work correctly because:
We have proper caching enabled in the test environment
We’re using a consistent IP address for all requests, which is what rate limiting typically uses to track requests
We’re still maintaining the time window with travel_to and travel
The cache is cleared between tests to ensure a clean state
Try running the test again – it should now properly detect when the rate limit is exceeded on the 11th request.
Running 5 tests in a single process (parallelization threshold is 50)
Run options: --seed 55394

# Running:
.

Finished in 1.222473s, 0.8180 runs/s, 28.6305 assertions/s.
1 runs, 35 assertions, 0 failures, 0 errors, 0 skips
Coverage report generated for Unit Tests to /Users/abhilash/rails/design_studio/public/coverage.
Line Coverage: 21.37% (81 / 379)
Works!! Cursor – you beauty.
Let us see why the fix worked:
The main issue was that the test environment was using :null_store for caching, which effectively disabled all caching. Since Rails’ rate limiting feature relies on caching to track request counts, it wasn’t working properly.
By changing to :memory_store, we enabled proper caching in the test environment, allowing the rate limiting to track requests.
Adding the consistent IP address (REMOTE_ADDR: “192.168.1.1”) in the test requests was also important because Rails’ rate limiting typically uses the client’s IP address as part of the cache key to track requests per client.
The test structure ensures clean state by:
Using setup to initialize a fresh cache store for each test
Using teardown to clear the cache after each test
Using travel_to to ensure consistent timing for rate limit windows
Using consistent IP addresses for request tracking
This is a good example of how testing rate limiting requires careful consideration of the entire environment, including caching, timing, and request attributes. The test now properly verifies that:
Users can make up to 10 attempts within a minute
The 11th attempt gets rate limited
After waiting for a minute, they can try again
I may need some more time to get the fact that: “Rails’ rate limiting feature relies on caching to track request counts”. Here is the importance of AI tool like cursor. It saved a lot of my debugging time.
When choosing between RSpec and Minitest for writing tests in a Ruby on Rails application, both are solid options, but the best choice depends on your project goals, team preferences, and ecosystem alignment.
♦️ Use RSpec if:
You want a rich DSL for expressive, readable tests (describe, context, it, etc.).
You’re working on a large project or with a team familiar with RSpec.
You want access to a larger ecosystem of gems/plugins (e.g., FactoryBot, Shoulda Matchers).
You like writing spec-style tests and separating tests by type (spec/models, spec/controllers, etc.).
Example RSpec syntax:
describe User do
  it "is valid with a name and email" do
    user = User.new(name: "Alice", email: "alice@example.com")
    expect(user).to be_valid
  end
end
♦️ Use Minitest if:
You prefer simplicity and speed — it’s built into Rails and requires no setup.
You value convention over configuration and a more Ruby-like test style.
You’re working on a small-to-medium project or want to avoid extra dependencies.
You like tests integrated with rails test without RSpec’s additional structure.
Example Minitest syntax:
class UserTest < ActiveSupport::TestCase
  test "is valid with a name and email" do
    user = User.new(name: "Alice", email: "alice@example.com")
    assert user.valid?
  end
end
🚦Recommendation:
Go with RSpec if you want a full-featured testing suite, lots of documentation, and are okay with learning a custom DSL.
Stick with Minitest if you want fast boot time, minimal dependencies, and simpler syntax.
Below is a side-by-side comparison of RSpec and Minitest in a Rails 8 context. For each aspect—setup, syntax, assertions, fixtures/factories, controller tests, etc.—you’ll see how you’d do the same thing in RSpec (left) versus Minitest (right). Wherever possible, the examples mirror each other so you can quickly spot the differences.
1. Setup & Configuration
Aspect
RSpec
Minitest
Gem inclusion
Add to your Gemfile: ruby<br>group :development, :test do<br> gem 'rspec-rails', '~> 6.0' # compatible with Rails 8<br>end<br>Then run:bash<br>bundle install<br>rails generate rspec:install<br>This creates spec/ directory with spec/spec_helper.rb and spec/rails_helper.rb.
Built into Rails. No extra gems required. When you generate your app, Rails already configures Minitest.By default you have test/ directory with test/test_helper.rb.
spec/support/... (you can require them via rails_helper.rb)
test/helpers/... (auto-loaded via test_helper.rb)
3. Basic Model Validation Example
RSpec (spec/models/user_spec.rb)
# spec/models/user_spec.rb
require 'rails_helper'

RSpec.describe User, type: :model do
  context "validations" do
    it "is valid with a name and email" do
      user = User.new(name: "Alice", email: "alice@example.com")
      expect(user).to be_valid
    end

    it "is invalid without an email" do
      user = User.new(name: "Alice", email: nil)
      expect(user).not_to be_valid
      expect(user.errors[:email]).to include("can't be blank")
    end
  end
end
Minitest (test/models/user_test.rb)
# test/models/user_test.rb
require "test_helper"

class UserTest < ActiveSupport::TestCase
  test "valid with a name and email" do
    user = User.new(name: "Alice", email: "alice@example.com")
    assert user.valid?
  end

  test "invalid without an email" do
    user = User.new(name: "Alice", email: nil)
    refute user.valid?
    assert_includes user.errors[:email], "can't be blank"
  end
end
4. Using Fixtures vs. Factories
RSpec (with FactoryBot)
Gemfile: group :development, :test do gem 'rspec-rails', '~> 6.0' gem 'factory_bot_rails' end
Factory definition (spec/factories/users.rb): # spec/factories/users.rb FactoryBot.define do factory :user do name { "Bob" } email { "bob@example.com" } end end
Spec using factory: # spec/models/user_spec.rb require 'rails_helper' RSpec.describe User, type: :model do it "creates a valid user via factory" do user = FactoryBot.build(:user) expect(user).to be_valid end end
Minitest (with Fixtures or Minitest Factories)
Default fixture (test/fixtures/users.yml): alice: name: Alice email: alice@example.com bob: name: Bob email: bob@example.com
Test using fixture: # test/models/user_test.rb require "test_helper" class UserTest < ActiveSupport::TestCase test "fixture user is valid" do user = users(:alice) assert user.valid? end end
(Optional) Using minitest-factory_bot: If you prefer factory style, you can add gem 'minitest-factory_bot', define factories similarly under test/factories, and then: # test/models/user_test.rb require "test_helper" class UserTest < ActiveSupport::TestCase include FactoryBot::Syntax::Methods test "factory user is valid" do user = build(:user) assert user.valid? end end
5. Assertions vs. Expectations
Category
RSpec (expectations)
Minitest (assertions)
Check truthiness
expect(some_value).to be_truthy
assert some_value
Check false/nil
expect(value).to be_falsey
refute value
Equality
expect(actual).to eq(expected)
assert_equal expected, actual
Inclusion
expect(array).to include(item)
assert_includes array, item
Change/Count difference
expect { action }.to change(Model, :count).by(1)
assert_difference 'Model.count', 1 do <br> action<br>end
# spec/models/post_spec.rb
require 'rails_helper'

RSpec.describe Post, type: :model do
  it "increments Post.count by 1 when created" do
    expect { Post.create!(title: "Hello", content: "World") }
      .to change(Post, :count).by(1)
  end
end
Minitest:
# test/models/post_test.rb
require "test_helper"

class PostTest < ActiveSupport::TestCase
  test "creation increases Post.count by 1" do
    assert_difference 'Post.count', 1 do
      Post.create!(title: "Hello", content: "World")
    end
  end
end
6. Controller (Request/Integration) Tests
6.1 Controller‐Level Test
RSpec (spec/controllers/users_controller_spec.rb)
# spec/controllers/users_controller_spec.rb
require 'rails_helper'

RSpec.describe UsersController, type: :controller do
  let!(:user) { FactoryBot.create(:user) }

  describe "GET #show" do
    it "returns http success" do
      get :show, params: { id: user.id }
      expect(response).to have_http_status(:success)
    end

    it "assigns @user" do
      get :show, params: { id: user.id }
      expect(assigns(:user)).to eq(user)
    end
  end

  describe "POST #create" do
    context "with valid params" do
      let(:valid_params) { { user: { name: "Charlie", email: "charlie@example.com" } } }

      it "creates a new user" do
        expect {
          post :create, params: valid_params
        }.to change(User, :count).by(1)
      end

      it "redirects to user path" do
        post :create, params: valid_params
        expect(response).to redirect_to(user_path(User.last))
      end
    end

    context "with invalid params" do
      let(:invalid_params) { { user: { name: "", email: "" } } }

      it "renders new template" do
        post :create, params: invalid_params
        expect(response).to render_template(:new)
      end
    end
  end
end
# test/controllers/users_controller_test.rb
require "test_helper"

class UsersControllerTest < ActionDispatch::IntegrationTest
  setup do
    @user = users(:alice)  # from fixtures
  end

  test "should get show" do
    get user_url(@user)
    assert_response :success
    assert_not_nil assigns(:user)   # note: assigns may need enabling in Rails 8
  end

  test "should create user with valid params" do
    assert_difference 'User.count', 1 do
      post users_url, params: { user: { name: "Charlie", email: "charlie@example.com" } }
    end
    assert_redirected_to user_url(User.last)
  end

  test "should render new for invalid params" do
    post users_url, params: { user: { name: "", email: "" } }
    assert_response :success        # renders :new with 200 status by default
    assert_template :new
  end
end
Note:
In Rails 8, controller tests are typically integration tests (ActionDispatch::IntegrationTest) rather than old‐style unit tests. RSpec’s type: :controller still works, but you can also use type: :request (see next section).
assigns(...) is disabled by default in modern Rails controller tests. In Minitest, you might enable it or test via response body or JSON instead.
6.2 Request/Integration Test
RSpec Request Spec (spec/requests/users_spec.rb)
# spec/requests/users_spec.rb
require 'rails_helper'

RSpec.describe "Users API", type: :request do
  let!(:user) { FactoryBot.create(:user) }

  describe "GET /api/v1/users/:id" do
    it "returns the user in JSON" do
      get api_v1_user_path(user), as: :json
      expect(response).to have_http_status(:ok)
      json = JSON.parse(response.body)
      expect(json["id"]).to eq(user.id)
      expect(json["email"]).to eq(user.email)
    end
  end

  describe "POST /api/v1/users" do
    let(:valid_params) { { user: { name: "Dana", email: "dana@example.com" } } }

    it "creates a user" do
      expect {
        post api_v1_users_path, params: valid_params, as: :json
      }.to change(User, :count).by(1)
      expect(response).to have_http_status(:created)
    end
  end
end
Minitest Integration Test (test/integration/users_api_test.rb)
# test/integration/users_api_test.rb
require "test_helper"

class UsersApiTest < ActionDispatch::IntegrationTest
  setup do
    @user = users(:alice)
  end

  test "GET /api/v1/users/:id returns JSON" do
    get api_v1_user_path(@user), as: :json
    assert_response :success
    json = JSON.parse(response.body)
    assert_equal @user.id, json["id"]
    assert_equal @user.email, json["email"]
  end

  test "POST /api/v1/users creates a user" do
    assert_difference 'User.count', 1 do
      post api_v1_users_path, params: { user: { name: "Dana", email: "dana@example.com" } }, as: :json
    end
    assert_response :created
  end
end
Slower boot time because it loads extra files (rails_helper.rb, support files, matchers).
Rich DSL can make tests slightly slower, but you get clearer, more descriptive output.
Minitest
Faster boot time since it’s built into Rails and has fewer abstractions.
Ideal for a smaller codebase or when you want minimal overhead.
Benchmarks: While exact numbers vary, many Rails 8 teams report ~20–30% faster test suite runtime on Minitest vs. RSpec for comparable test counts. If speed is critical and test suite size is moderate, Minitest edges out.
10. Community, Ecosystem & Plugins
Feature
RSpec
Minitest
Popularity
By far the most popular Rails testing framework⸺heavily used, many tutorials.
Standard in Rails. Fewer third-party plugins than RSpec, but has essential ones (e.g., minitest-rails, minitest-factory_bot).
Common plugins/gems
• FactoryBot• Shoulda Matchers (for concise model validations)• Database Cleaner (though Rails 8 encourages use_transactional_tests)• Capybara built-in support
Abundant (RSPEC official guides, many blog posts, StackOverflow).
Good coverage in Rails guides; fewer dedicated tutorials but easy to pick up if you know Ruby.
CI Integration
Excellent support in CircleCI, GitHub Actions, etc. Many community scripts to parallelize RSpec.
Equally easy to integrate; often faster out of the box due to fewer dependencies.
11. Example: Complex Query Test (Integration of AR + Custom Validation)
RSpec
# spec/models/order_spec.rb
require 'rails_helper'

RSpec.describe Order, type: :model do
  describe "scopes and validations" do
    before do
      @user       = FactoryBot.create(:user)
      @valid_attrs = { user: @user, total_cents: 1000, status: "pending" }
    end

    it "finds only completed orders" do
      FactoryBot.create(:order, user: @user, status: "completed")
      FactoryBot.create(:order, user: @user, status: "pending")
      expect(Order.completed.count).to eq(1)
    end

    it "validates total_cents is positive" do
      order = Order.new(@valid_attrs.merge(total_cents: -5))
      expect(order).not_to be_valid
      expect(order.errors[:total_cents]).to include("must be greater than or equal to 0")
    end
  end
end
Minitest
# test/models/order_test.rb
require "test_helper"

class OrderTest < ActiveSupport::TestCase
  setup do
    @user = users(:alice)
    @valid_attrs = { user: @user, total_cents: 1000, status: "pending" }
  end

  test "scope .completed returns only completed orders" do
    Order.create!(@valid_attrs.merge(status: "completed"))
    Order.create!(@valid_attrs.merge(status: "pending"))
    assert_equal 1, Order.completed.count
  end

  test "validates total_cents is positive" do
    order = Order.new(@valid_attrs.merge(total_cents: -5))
    refute order.valid?
    assert_includes order.errors[:total_cents], "must be greater than or equal to 0"
  end
end
12. When to Choose Which?
Choose RSpec if …
You want expressive, English-like test descriptions (describe, context, it).
Your team is already comfortable with RSpec.
You need a large ecosystem of matchers/plugins (e.g., shoulda-matchers, faker, etc.).
You prefer separating specs into spec/ with custom configurations in rails_helper.rb and spec_helper.rb.
Choose Minitest if …
You want zero additional dependencies—everything is built into Rails.
You value minimal configuration and convention over configuration.
You need faster test suite startup and execution.
Your tests are simple enough that a minimal DSL is sufficient.
13. 📋 Summary Table
Feature
RSpec
Minitest
Built-in with Rails
No (extra gem)
Yes
DSL Readability
“describe/context/it” blocks → very readable
Plain Ruby test classes & methods → idiomatic but less English-like
Ecosystem & Plugins
Very rich (FactoryBot, Shoulda, etc.)
Leaner, but you can add factories & reporters if needed
Setup/Boot Time
Slower (loads extra config & DSL)
Faster (built-in)
Fixtures vs. Factory preference
FactoryBot (by convention)
Default YAML fixtures or optionally minitest-factory_bot
Integration Test Support
Built-in type: :request
Built-in ActionDispatch::IntegrationTest
Community Adoption
More widely adopted for large Rails teams
Standard for many smaller Rails projects
✍️ Final Note
If you’re just starting out and want something up and running immediately—Minitest is the simplest path since it requires no extra gems. You can always add more complexity later (e.g., add minitest-factory_bot or minitest-reporters).
If you plan to write a lot of tests—model validations, request specs, feature specs, etc.—with very expressive descriptions (and you don’t mind a slightly longer boot time), RSpec tends to be the de facto choice in many Rails codebases.
Feel free to pick whichever aligns best with your team’s style. Both ecosystems are mature and well-documented.
Minitest provides a complete suite of testing facilities supporting TDD, BDD, mocking, and benchmarking.
minitest/test is a small and incredibly fast unit testing framework. It provides a rich set of assertions to make your tests clean and readable.
minitest/spec is a functionally complete spec engine. It hooks onto minitest/test and seamlessly bridges test assertions over to spec expectations.
minitest/benchmark is an awesome way to assert the performance of your algorithms in a repeatable manner. Now you can assert that your newb co-worker doesn’t replace your linear algorithm with an exponential one!
minitest/mock by Steven Baker, is a beautifully tiny mock (and stub) object framework.
minitest/pride shows pride in testing and adds coloring to your test output
minitest/test_task – a full-featured and clean rake task generator. – Minitest Github
♦️ Incredibly small and fast runner, but no bells and whistles.
Let’s take the given example in the doc, we’d like to test the following class:
class Meme
  def i_can_has_cheezburger?
    "OHAI!"
  end

  def will_it_blend?
    "YES!"
  end
end
🧪 Unit tests
Define your tests as methods beginning with test_.
require "minitest/autorun"

class TestMeme < Minitest::Test
  def setup
    @meme = Meme.new
  end

  def test_that_kitty_can_eat
    assert_equal "OHAI!", @meme.i_can_has_cheezburger?
  end

  def test_that_it_will_not_blend
    refute_match /^no/i, @meme.will_it_blend?
  end

  def test_that_will_be_skipped
    skip "test this later"
  end
end
# File lib/minitest/test.rb, line 153
def setup; end
♦️ Runs before every test. Use this to set up before each test run.
The terms “unit test” and “spec” are often used in software testing, and while they can overlap, they have some key differences:
🧪 Unit Test vs 📋 Spec: Key Differences
🔬Unit Test
Purpose: Tests a single unit of code (typically a method, function, or class) in isolation
Scope: Very focused and narrow – tests one specific piece of functionality
Style: Usually follows a more traditional testing approach with setup, execution, and assertion
Framework examples: Minitest (like in your Ruby file), JUnit, pytest
Structure: Often uses test_ prefix or Test classes with assertion methods
📝 Spec (Specification)
Purpose: Describes the behavior and requirements of the system in a more readable, documentation-like format
Scope: Can cover unit-level, integration, or acceptance testing
Style: Uses natural language descriptions that read like specifications
Framework examples: RSpec, Jasmine, Mocha, Jest
Structure: Uses descriptive blocks like describe, it, should
⚖️ Key Differences
1. ✍️ Writing Style:
Unit Test: def test_array_is_empty with assertions
Spec: describe "when array is empty" do it "should return error message"
2. 👁️ Readability:
Unit Test: More code-focused, technical
Spec: More human-readable, business-focused
3. 🎯 Philosophy:
Unit Test: Test the implementation
Spec: Specify the behavior (BDD – Behavior Driven Development)
📊 Example Comparison
🏷️ Our current Minitest code:
def array_is_an_empty_array
  assert_equal 'Provide an array with length 2 or more', two_sum([], 9)
end
🎨 RSpec equivalent (spec style):
describe "two_sum" do
  context "when array is empty" do
    it "returns an error message" do
      expect(two_sum([], 9)).to eq('Provide an array with length 2 or more')
    end
  end
end
Both test the same functionality, but specs emphasize describing behavior in natural language, making them easier for non-technical stakeholders to understand. 🎉
🔬 Mini-test equivalent:
# frozen_string_literal: true

require 'minitest/spec'
require_relative 'two_sum'

describe "TwoSum" do
  describe "when array is empty" do
    it "returns an error message" do
      _(two_sum([], 9)).must_equal 'Provide an array with length 2 or more'
    end
  end
end
The underscore _() in Minitest spec style is a wrapper method that converts the value into an expectation object.
Here’s why it’s used:
🔍 Why the Underscore _()?
🎯 Purpose:
The _() method wraps your actual value and returns a special expectation object that has assertion methods like must_equal, must_be, etc.
⚙️ How it works:
# This:
_(two_sum([], 9)).must_equal 'Provide an array with length 2 or more'

# Is equivalent to:
# 1. two_sum([], 9) returns some value
# 2. _() wraps that value into an expectation object
# 3. .must_equal() is called on that expectation object
🔄 Alternative Syntaxes
1. 📝 Using expect() (more readable):
expect(two_sum([], 9)).must_equal 'Provide an array with length 2 or more'
2. 🔧 Using value() (explicit):
value(two_sum([], 9)).must_equal 'Provide an array with length 2 or more'
3. 🏷️ Traditional unit test style (no wrapper needed):
assert_equal 'Provide an array with length 2 or more', two_sum([], 9)
💡 Why underscore specifically?
Minimal syntax: _() is short and doesn’t clutter the code
Ruby convention: Underscore often indicates “throwaway” or “utility” variables
Non-conflicting: Unlikely to conflict with your method names
Chainable: Creates a fluent interface for assertions
🎨 Complete comparison:
# Spec style with underscore
_(result).must_equal expected

# Spec style with expect (more readable)
expect(result).must_equal expected

# Unit test style (no wrapper)
assert_equal expected, result
The expect() version is often preferred because it’s more self-documenting!
🎨 Alternative Spec Style with Expectation Syntax:
# frozen_string_literal: true

require 'minitest/spec'
require_relative 'two_sum'

describe "TwoSum" do
  describe "when array is empty" do
    it "returns an error message" do
      expect(two_sum([], 9)).must_equal 'Provide an array with length 2 or more'
    end
  end
end
⚖️ Key Differences in Minitest
🔧 Setup Required:
Unit Test: require 'minitest/test'
Spec: require 'minitest/spec'
✍️ Assertion Style:
Unit Test: assert_equal expected, actual
Spec: _(actual).must_equal expected or expect(actual).must_equal expected
🏗️ Structure:
Unit Test: Classes with test_ methods
Spec: describe blocks with it blocks
🎯 Readability:
Both styles work with Minitest, but the spec style reads more like natural language documentation, making it easier to understand the intended behavior!
Excellent question! Let me clarify the relationship between TDD/BDD (methodologies) and RSpec/Minitest (testing frameworks):
Ensuring code quality and security in a Rails application is critical – especially as your project grows. In this post, we’ll walk through integrating two powerful tools into your Rails 8 app:
SimpleCov: for measuring and enforcing test coverage
Brakeman: for automated static analysis of security vulnerabilities
By the end, you’ll understand why each tool matters, how to configure them, and the advantages they bring to your development workflow.
Why Code Coverage & Security Scanning Matter
Maintainability Tracking test coverage ensures critical paths are exercised by your test suite. Over time, you can guard against regressions and untested code creeping in.
Quality Assurance High coverage correlates with fewer bugs: untested code is potential technical debt. SimpleCov gives visibility into what’s untested.
Security Rails apps can be vulnerable to injection, XSS, mass assignment, and more. Catching these issues early, before deployment, dramatically reduces risk.
Compliance & Best Practices Many organizations require minimum coverage thresholds and regular security scans. Integrating these tools automates compliance.
Part 1: Integrating SimpleCov for Test Coverage
1. Add the Gem
In your Gemfile, under the :test group, add:
group :test do
  gem 'simplecov', require: false
end
Then run:
bundle install
2. Configure SimpleCov
Create (or update) test/test_helper.rb (for Minitest) before any application code is loaded:
require 'simplecov'
SimpleCov.start 'rails' do
  coverage_dir 'public/coverage'           # output directory
  minimum_coverage 90               # fail if coverage < 90%
  add_filter '/test/'               # ignore test files themselves
  add_group 'Models', 'app/models'
  add_group 'Controllers', 'app/controllers'
  add_group 'Jobs', 'app/jobs'
  add_group 'Libraries', 'lib'
end

# Then require the rest of your test setup
ENV['RAILS_ENV'] ||= 'test'
require_relative '../config/environment'
require 'rails/test_help'
# ...
Tip: You can customize groups, filters, and thresholds. If coverage dips below the set minimum, your CI build will fail.
Note: coverage_dir should be modified to public/coverage. Else you cannot access the html publically.
3. Run Your Tests & View the Report
✗ bin/rails test
≈ tailwindcss v4.1.3

Done in 46ms
Running 10 tests in a single process (parallelization threshold is 50)
Run options: --seed 63363

# Running:

..........

Finished in 0.563707s, 17.7397 runs/s, 60.3150 assertions/s.
10 runs, 34 assertions, 0 failures, 0 errors, 0 skips
Coverage report generated for Minitest to /Users/abhilash/rails/design_studio/public/coverage.
Line Coverage: 78.57% (88 / 112)
Line coverage (78.57%) is below the expected minimum coverage (90.00%).
SimpleCov failed with exit 2 due to a coverage related error
A color-coded report shows covered (green) vs. missed (red) lines.
Drill down by file or group to identify untested code.
We get 78.57% only coverage and our target is 90% coverage. Let’s check where we missed the tests. ProductsController 82%. We missed coverage for #delete_image action. Let’s add it and check again.
Let’s add Product Controller json requests test cases for json error response and add the ApplicationControllerTest for testing root path.
Now we get: 88.3%
Now we have to add some Test cases for Product model.
Now we get: 92.86% ✅
4. Enforce in CI
In your CI pipeline (e.g. GitHub Actions), ensure:
- name: Run tests with coverage
  run: |
    bundle exec rails test
    # Optionally upload coverage to Coveralls or Codecov
If coverage < threshold, the job will exit non-zero and fail.
Part 2: Incorporating Brakeman for Security Analysis
1. Add Brakeman to Your Development Stack
You can install Brakeman as a gem (development-only) or run it via Docker/CLI. Here’s the gem approach:
group :development do
  gem 'brakeman', require: false
end
Optionally, you can fail the build if new warnings are introduced by comparing against a baseline report.
Advantages of Using SimpleCov & Brakeman Together
Aspect
SimpleCov
Brakeman
Purpose
Test coverage metrics
Static security analysis
Fail-fast
Fails when coverage drops below threshold
Can be configured to fail on new warnings
Visibility
Colorized HTML coverage report
Detailed HTML/JSON vulnerability report
CI/CD Ready
Integrates seamlessly with most CI systems
CLI-friendly, outputs machine-readable data
Customizable
Groups, filters, thresholds
Checks selection, ignored files, baseline
Together, they cover two critical quality dimensions:
Quality & Maintainability (via testing)
Security & Compliance (via static analysis)
Automating both checks in your pipeline means faster feedback, fewer production issues, and higher confidence when shipping code.
Best Practices & Tips
Threshold for SimpleCov: Start with 80%, then gradually raise to 90–95% over time.
Treat Brakeman Warnings Seriously: Not all findings are exploitable, but don’t ignore them—triage and document why you’re suppressing any warning.
Baseline Approach: Use a baseline report for Brakeman so your build only fails on newly introduced warnings, not historical ones.
Schedule Periodic Full Scans: In addition to per-PR scans, run a weekly scheduled Brakeman job to catch issues from merged code.
Combine with Other Tools: Consider adding gem like bundler-audit for known gem vulnerabilities.
Conclusion
By integrating SimpleCov and Brakeman into your Rails 8 app, you establish a robust safety net that:
Ensures new features are properly tested
Keeps an eye on security vulnerabilities
Automates quality gates in your CI/CD pipeline
These tools are straightforward to configure and provide immediate benefits – improved code confidence, faster code reviews, and fewer surprises in production. Start today, and make code quality and security first-class citizens in your Rails workflow!
Testing is a crucial part of ensuring the reliability and correctness of a Ruby on Rails 8 application. Controller tests verify the behaviour of your application’s controllers, ensuring that actions handle requests properly, return correct responses, and enforce security measures.
This guide explores the best practices in writing Rails 8 controller tests, references well-known Rails projects, and provides 20 test case examples—including 5 complex ones.
Setting Up the Testing Environment using Rspec
To effectively write controller tests, we use RSpec (the most popular testing framework in the Rails community) along with key supporting gems:
Recommended Gems
Add the following gems to your Gemfile under the :test group:
group :test do
  gem 'rspec-rails'  # Main testing framework
  gem 'factory_bot_rails'  # For test data setup
  gem 'database_cleaner-active_record'  # Cleans test database
  gem 'faker'  # Generates fake data
  gem 'shoulda-matchers'  # Provides one-liner matchers for common Rails functions
end
Run:
bundle install
rails generate rspec:install
Then, configure spec_helper.rb and rails_helper.rb to include necessary test configurations.
require 'rails_helper'

describe ArticlesController, type: :controller do
  describe 'GET #index' do
    it 'returns a successful response' do
      get :index
      expect(response).to have_http_status(:ok)
    end
  end
end
2. Testing Show Action with a Valid ID
describe 'GET #show' do
  let(:article) { create(:article) }
  it 'returns the requested article' do
    get :show, params: { id: article.id }
    expect(response).to have_http_status(:ok)
    expect(assigns(:article)).to eq(article)
  end
end
3. Testing Show Action with an Invalid ID
describe 'GET #show' do
  it 'returns a 404 for an invalid ID' do
    get :show, params: { id: 9999 }
    expect(response).to have_http_status(:not_found)
  end
end
4. Testing Create Action with Valid Parameters
describe 'POST #create' do
  it 'creates a new article' do
    expect {
      post :create, params: { article: attributes_for(:article) }
    }.to change(Article, :count).by(1)
  end
end
5. Testing Create Action with Invalid Parameters
describe 'POST #create' do
  it 'does not create an article with invalid parameters' do
    expect {
      post :create, params: { article: { title: '' } }
    }.not_to change(Article, :count)
  end
end
6. Testing Update Action
describe 'PATCH #update' do
  let(:article) { create(:article) }
  it 'updates an article' do
    patch :update, params: { id: article.id, article: { title: 'Updated' } }
    expect(article.reload.title).to eq('Updated')
  end
end
7. Testing Destroy Action
describe 'DELETE #destroy' do
  let!(:article) { create(:article) }
  it 'deletes an article' do
    expect {
      delete :destroy, params: { id: article.id }
    }.to change(Article, :count).by(-1)
  end
end
Here are the missing test cases (7 to 15) that should be included in your blog post:
8. Testing Redirection After Create
describe 'POST #create' do
  it 'redirects to the article show page' do
    post :create, params: { article: attributes_for(:article) }
    expect(response).to redirect_to(assigns(:article))
  end
end
9. Testing JSON Response for Index Action
describe 'GET #index' do
  it 'returns a JSON response' do
    get :index, format: :json
    expect(response.content_type).to eq('application/json')
  end
end
10. Testing JSON Response for Show Action
describe 'GET #show' do
  let(:article) { create(:article) }
  it 'returns the article in JSON format' do
    get :show, params: { id: article.id }, format: :json
    expect(response.content_type).to eq('application/json')
    expect(response.body).to include(article.title)
  end
end
11. Testing Unauthorized Access to Update
describe 'PATCH #update' do
  let(:article) { create(:article) }
  it 'returns a 401 if user is not authorized' do
    patch :update, params: { id: article.id, article: { title: 'Updated' } }
    expect(response).to have_http_status(:unauthorized)
  end
end
12. Testing Strong Parameters Enforcement
describe 'POST #create' do
  it 'does not allow mass assignment of protected attributes' do
    expect {
      post :create, params: { article: { title: 'Valid', admin_only_field: true } }
    }.to raise_error(ActiveModel::ForbiddenAttributesError)
  end
end
13. Testing Destroy Action with Invalid ID
describe 'DELETE #destroy' do
  it 'returns a 404 when the article does not exist' do
    delete :destroy, params: { id: 9999 }
    expect(response).to have_http_status(:not_found)
  end
end
14. Testing Session Persistence
describe 'GET #dashboard' do
  before { session[:user_id] = create(:user).id }
  it 'allows access to the dashboard' do
    get :dashboard
    expect(response).to have_http_status(:ok)
  end
end
15. Testing Rate Limiting on API Requests
describe 'GET #index' do
  before do
    10.times { get :index }
  end
  it 'returns a 429 Too Many Requests when rate limit is exceeded' do
    get :index
    expect(response).to have_http_status(:too_many_requests)
  end
end
Complex Controller 🎮Tests
16. Testing Admin Access Control
describe 'GET #admin_dashboard' do
  context 'when user is admin' do
    let(:admin) { create(:user, role: :admin) }
    before { sign_in admin }
    it 'allows access' do
      get :admin_dashboard
      expect(response).to have_http_status(:ok)
    end
  end
  context 'when user is not admin' do
    let(:user) { create(:user, role: :user) }
    before { sign_in user }
    it 'redirects to home' do
      get :admin_dashboard
      expect(response).to redirect_to(root_path)
    end
  end
end
17. Testing Turbo Stream Responses
describe 'PATCH #update' do
  let(:article) { create(:article) }
  it 'updates an article and responds with Turbo Stream' do
    patch :update, params: { id: article.id, article: { title: 'Updated' } }, format: :turbo_stream
    expect(response.media_type).to eq Mime[:turbo_stream]
  end
end
Here are three additional complex test cases (18, 19, and 20) to include in your blog post:
18. Testing WebSockets with ActionCable
describe 'WebSocket Connection' do
  let(:user) { create(:user) }

  before do
    sign_in user
  end

  it 'successfully subscribes to a channel' do
    subscribe room_id: 1
    expect(subscription).to be_confirmed
    expect(subscription).to have_stream_from("chat_1")
  end
end
Why? This test ensures that ActionCable properly subscribes users to real-time chat channels.
19. Testing Nested Resource Actions
describe 'POST #create in nested resource' do
  let(:user) { create(:user) }
  let(:post) { create(:post, user: user) }

  it 'creates a comment under the correct post' do
    expect {
      post :create, params: { post_id: post.id, comment: { body: 'Nice post!' } }
    }.to change(post.comments, :count).by(1)
  end
end
Why? This test ensures correct behavior when working with nested resources like comments under posts.
20. Testing Multi-Step Form Submission
describe 'PATCH #update (multi-step form)' do
  let(:user) { create(:user, step: 'personal_info') }

  it 'advances the user to the next step in a multi-step form' do
    patch :update, params: { id: user.id, user: { step: 'address_info' } }
    expect(user.reload.step).to eq('address_info')
  end
end
Why? This test ensures users can progress through a multi-step form properly.
📝 Conclusion
This guide provides an extensive overview of controller testing in Rails 8, ensuring robust coverage for all possible scenarios. By following these patterns, your Rails applications will have reliable, well-tested controllers that behave as expected.