Create the User model
Now let’s start building our actual Rails application.
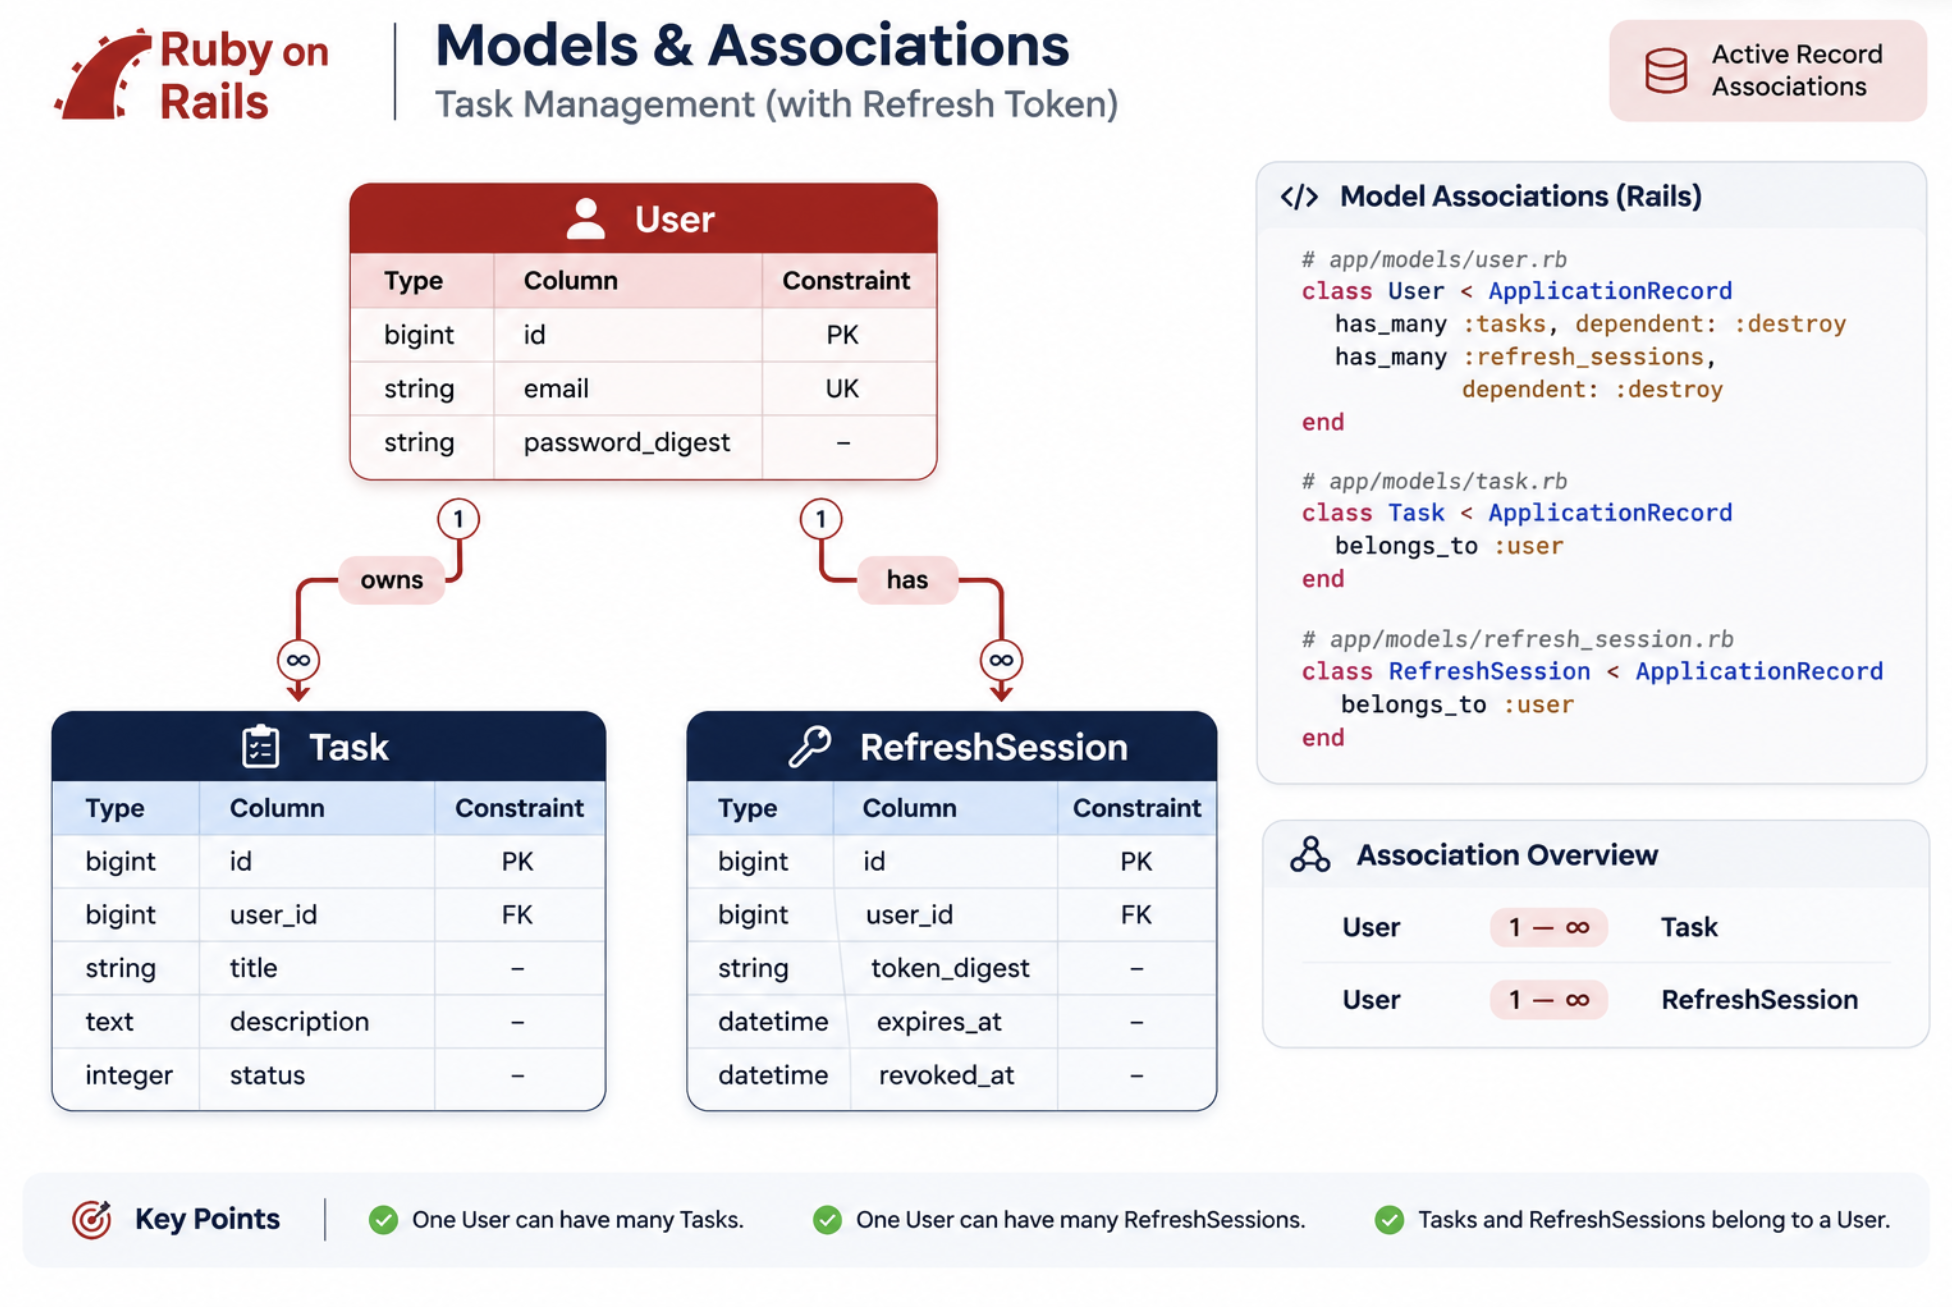
I want to start with the User model rather than Task, because our application will have JWT authentication and every task must belong to an authenticated user. We’ll introduce RefreshSession when we implement JWT refresh tokens.
Install bcrypt
Rails provides has_secure_password, which uses bcrypt for password hashing.
Uncomment this to backend/Gemfile: gem "bcrypt", "~> 3.1.7" and do bundle install
Why bcrypt?
We should never store users’ actual passwords in the database. Instead, bcrypt hashes the password using a salt. Rails provides password authentication functionality through has_secure_password. We’ll explore password hashing, verification and authentication in detail when implementing JWT login.
Generate User model
rails g model User email:string password_digest:string
      invoke  active_record
      create    db/migrate/20261117085319_create_users.rb
      create    app/models/user.rb
      invoke    rspec
      create      spec/models/user_spec.rb
Notice invoking rspec, because we configured rspec generators. Notice that we’re using password_digest, not password. has_secure_password provides a virtual password attribute and stores its hash in password_digest
Review the migration
Make these database-level changes:
emailmust not be NULL.password_digestmust not be NULL.- Add a unique, case-insensitive index for email.
class CreateUsers < ActiveRecord::Migration[8.1]
  def change
    create_table :users do |t|
      t.string :email, null: false
      t.string :password_digest, null: false

      t.timestamps
    end

    add_index :users, "lower(email)", unique: true, name: :idx_users_lower_email
  end
end
Run:
rails db:prepare -t
Inspect db/schema.rb. You should see the users table with the expected columns and index.
Checklist
- Add bcrypt to Gemfile.
- Generate User model.
- Add database constraints.
- Add case-insensitive unique email index.
- Run migrations successfully.
- Inspect
schema.rb. - Commit changes.
We’ll introduce has_secure_password, email normalization, validations, described_class, build_stubbed vs new and proper model specs. We’ll also begin understanding how RSpec interacts with ActiveRecord and PostgreSQL.
Let’s implement our first real Rails model behaviour and write meaningful RSpec tests against it.
User model, validations and password security
in User model add: has_secure_password
What does this provide? When you assign: user.password = "my-secret-password" Rails automatically generates a bcrypt password digest and stores it in: user.password_digest
It also provides: user.authenticate("my-secret-password")
The behaviour is:
| Input | Result |
|---|---|
| Correct password | Returns the user object |
| Incorrect password | Returns false |
Important things to understand:
has_secure_password provides these validations automatically:
- Password must be present when creating a new record.
- Password cannot exceed 72 bytes.
- Password confirmation is checked when you supply
password_confirmation.
It does not enforce a minimum password length or complexity. We’ll discuss our password policy when implementing registration. Also, bcrypt’s 72-byte limit is a byte limit, not necessarily a 72-character limit.
Normalize the email address
onsider these inputs:
"Abhilash@Example.com"" abhilash@example.com ""ABHILASH@EXAMPLE.COM"
We want to store a consistent representation: abhilash@example.com
Rails provides an attribute normalization API. Add this to your model:
normalizes :email, with: ->(email) { email.strip.downcase }
Why use normalizes?
- Normalization happens when an attribute is assigned or validated.
- It keeps email representation consistent.
- You don’t need to remember to call
.strip.downcasein every controller.
Rails has supported
normalizessince Rails 7.1.
Add email validations
Add validations for:
- Email presence.
- Email uniqueness, case-insensitive.
Use Rails validations rather than implementing custom validation methods for these requirements.
Important architectural distinction:
We’re using two protections for uniqueness:
- ActiveRecord uniqueness validation – provides a useful validation error to the application.
- PostgreSQL unique index – protects the database against concurrent duplicate inserts.
Neither replaces the other.
Note: Our earlier lower(email) unique index is important here. The validation and database constraint must enforce the same case-insensitive uniqueness rule.
Understand the complete model behaviour
Your model should now have three responsibilities:
User
 ├── Password security
 │    └── has_secure_password
 │
 ├── Email normalization
 │    └── normalizes
 │
 └── Email validations
      ├── presence
      └── case-insensitive uniqueness
Prepare RSpec model testing
described_class
Instead of writing: User.new(...)
inside every example, we can use: described_class.new(...)
When we write: RSpec.describe User do
described_class refers to User
Why is this useful?
Imagine we later rename the model or move the spec. Using described_class reduces unnecessary references to the class name.
Open:backend/spec/models/user_spec.rb
new vs create!
We’ll use native ActiveRecord methods for now, before introducing FactoryBot.
| Method | Behaviour |
|---|---|
User.new | Creates an unsaved ActiveRecord object |
User.create | Creates and attempts to persist a record |
User.create! | Persists or raises an exception if validations fail |
user = User.new(email: "test@example.com")
user.persisted? # false

# whereas:
user = User.create!(...)
user.persisted? # true
For a model uniqueness test, we need a persisted record to check against. We’ll introduce FactoryBot later and understand build, create and build_stubbed.
RSpec assignment
Implement these tests. We can use subject, let, context and before wherever appropriate. Refer: https://rspec.info/features/3-12/rspec-expectations/built-in-matchers/
Exercise 1 – Valid user
Create a user with a valid email and password. Verify that the user is valid.
Exercise 2 – Email presence
Test what happens when:
- Email is missing.
- Email is an empty string.
Verify the appropriate validation error.
Exercise 3 – Email uniqueness
This is important. Create a user with: abhilash@example.com
Then attempt to create another user using: ABHILASH@EXAMPLE.COM
Verify that the second user is invalid. Why are we testing this?
Because email uniqueness should be case-insensitive.
Exercise 4 – Email normalization
Pass this value: " Abhilash@Example.com " Verify that the resulting email is: abhilash@example.com
Also test that uppercase input is normalized.
Exercise 5 – Password digest
Create a user with a password.
Verify:
password_digestis present.password_digestdoes not equal the original password.- The password digest is stored, not the plain-text password.
Exercise 6 – Password authentication
Test both scenarios:
Correct password:
user.authenticate("correct-password")
Expected: returns the user

Incorrect password:
user.authenticate("wrong-password")
Expected: returns false
Exercise 7 – Password confirmation
Try assigning:
password = "password123"
password_confirmation = "different-password"
Verify that the user is invalid.
Remember: Rails only checks confirmation when password_confirmation is supplied.
User Spec spec/models/user_spec.rb:
require 'rails_helper'

RSpec.describe User, type: :model do
  let(:valid_user) { described_class.create!(email: "email@example.com", password: "password@1") }
  let(:non_persisted_user) { described_class.new(email: "  EMAIL@example.com  ", password: "Pass12#") }

  describe "validations" do
    context "valid user" do
      it "check valid user" do
        expect(non_persisted_user.valid?).to be_truthy
      end

      it "check email, password presence" do
        non_persisted_user.valid?
        expect(non_persisted_user.email).not_to be_empty
        expect(non_persisted_user.password).not_to be_empty
      end
    end

    context "invalid user" do
      it "missing email, password, password digest" do
        invalid_user = described_class.new(email: "", password: "")
        invalid_user.valid?
        expect(invalid_user.errors.full_messages).to include("Email can't be blank")
        expect(invalid_user.errors.full_messages).to include("Password can't be blank")
        expect(invalid_user.errors.full_messages).to include("Password digest can't be blank")
      end

      it "throw error email not unique" do
        valid_user
        invalid_user = described_class.new(email: " EMAIL@EXAMPLE.com", password: "password@1")
        invalid_user.valid?
        expect(invalid_user.errors.full_messages).to include("Email has already been taken")
      end
    end
  end

  describe "email normalization" do
    it "email normalization when validation happens" do
      non_persisted_user.valid?
      expect(non_persisted_user.email).to eq("email@example.com")
    end

    it "email normalization when assignment" do
      new_user = described_class.new
      new_user.email = "  MYEMAIL@GMAIL.COM "
      expect(new_user.email).to eq("myemail@gmail.com")
    end

    it "checks email normalized after saving" do
      non_persisted_user.save!
      expect(non_persisted_user.email).to eq("email@example.com")
    end
  end

  describe "Passwords" do
    context "Passwords authentication" do
      it "checks valid authentication if email and password provided" do
        result = valid_user.authenticate("password@1")
        expect(result).to equal(valid_user)
      end

      it "checks invalid authentication if wrong password given" do
        result = valid_user.authenticate("wrong-pass12")
        expect(result).to be(false)
      end
    end

    context "Password digest" do
      it "checks password digest is present" do
        expect(valid_user.password_digest).not_to be_empty
      end

      it "password digest does not equal the original password" do
        expect(valid_user.password_digest).not_to eq(valid_user.password)
      end

      it "The password digest is stored, not the plain-text password" do
        # expect(valid_user.password_digest).
      end
    end
  end
end
Q): How does let caching work?
This is an important concept.
RSpec memoizes let values per example (it), not across examples.
Consider:
let(:user) do
  puts "Creating user"
  described_class.create!(
    email: "test@example.com",
    password: "password123"
  )
end
Now imagine three examples:
it "example 1" do
  user
  user
end

it "example 2" do
  user
end

it "example 3" do
  user
end
The execution looks like this:
Example 1
   |
   v
Access user
   |
   v
Execute let block (1st time)
   |
   v
Cache the result
   |
   v
Access user again
   |
   v
Return cached object
   |
   v
Example ends - cache discarded

Example 2
   |
   v
Access user
   |
   v
Execute let block again (2nd time)
   |
   v
Cache the result
   |
   v
Example ends - cache discarded

Example 3
   |
   v
Access user
   |
   v
Execute let block again (3rd time)
   |
   v
Cache the result
So the output will be:
Creating user
Creating user
Creating user
Key concept The user object is cached within one example, but a new object is created for every subsequent example that accesses user.
What about let!?
Exactly the same memoization, but with eager evaluation.
let!(:user) do
  puts "Creating user"
  described_class.create!(...)
end
The block executes automatically before every example.
Even if you never reference user inside the example, it is still created.
| Behaviour | let | let! |
|---|---|---|
| Lazy evaluation | Yes | No |
| Automatic evaluation | No | Yes |
| Memoized within example | Yes | Yes |
| Cached across examples | No | No |
| Executes again in next example | When referenced | Always |
Important: RSpec’s memoization is unrelated to Rails caching (Rails.cache) or database caching. It only caches the helper’s return value for the current example.
There is too much test cases for a small user model snippet. So how big the test will be if the user model evolves and becomes big.
Q) Is it worth spending these much time spending test examples or do we write only the major ones in real world?
We deliberately wrote more examples than we’d probably write for such a small model in a real project. The objective was to teach you RSpec matchers, setup, validations, memoization and password testing.
In real-world development, we don’t write tests for every possible combination just to increase the test count.
What do we actually test in production?
My recommendation is:
Test behaviour and business rules, not every line of code.
For our current User model, I’d consider these the important behaviours:
| Behaviour | Should we test? | Reason |
|---|---|---|
| Email presence | Yes | Business requirement |
| Email normalization | Yes | Data consistency |
| Case-insensitive uniqueness | Yes | Business requirement |
| Password authentication | Yes | Security-critical |
| Incorrect password | Yes | Security-critical |
| Password hashing | Yes | Security-critical |
| Password confirmation | If enabled | Registration requirement |
| Every possible email format | Not necessarily | Avoid redundant tests |
| Every possible password string | No | Test meaningful boundaries |
Notice that we don’t necessarily need a separate example for every assertion. For example, password hashing could be tested in one example:
- Create a user.
- Reload the user from the database.
- Verify that the password digest exists.
- Verify that the original password isn’t stored as the password attribute.
- Verify that authentication still works.
That’s one meaningful behaviour test rather than several fragmented tests.
How do we decide whether to write a separate test?
I generally follow these principles.
Rule 1: Different behaviour deserves different examples.
For example:
- Correct password authenticates.
- Incorrect password doesn’t authenticate.
These should be separate examples because they represent different outcomes.
Rule 2: Don’t test every framework feature.
For example, Rails already implements has_secure_password. We don’t need to test every internal operation of bcrypt. We need to test that our application uses it correctly.
Rule 3: Test security boundaries thoroughly.
Authentication, authorization, permissions, data ownership and input validation deserve more attention than simple getters and setters.
Rule 4: Test regressions.
Suppose a developer changes email normalization and accidentally removes .downcase. A good test should catch that regression.
Regression testing is a type of software testing performed to ensure that a recent code change, bug fix, new feature, or system update has not broken existing functionality.
When is it Performed?
- You typically trigger regression testing in situations such as:
- After bug fixes: To confirm that fixing one issue did not inadvertently create another.
- After adding new features: To make sure new code plays nicely with legacy code.
- After code refactoring: When the underlying code is cleaned up or restructured without changing its external behavior.
- Before a major release: As a final baseline check across critical user journeys
What happens when a model becomes bigger?
Imagine our User model eventually supports:
class User < ApplicationRecord
  has_secure_password

  has_many :tasks
  has_many :refresh_sessions

  # Email normalization
  # Password validations
  # Account status
  # Roles
  # Account locking
  # Email verification
end
We shouldn’t put every possible test into one enormous example group.
We organize them by behaviour:
spec/
└── models/
    └── user_spec.rb
Inside:
RSpec.describe User, type: :model do
  describe "validations" do
    # Relevant validation examples
  end

  describe "associations" do
    # Association behaviour
  end

  describe "authentication" do
    # Password authentication
  end

  describe "email normalization" do
    # Normalization behaviour
  end

  describe "account locking" do
    # Account locking behaviour
  end
end
If the model becomes excessively complex, we should also consider extracting responsibilities into service objects or dedicated domain components instead of continuing to grow the model indefinitely.
What about 100% test coverage?
Don’t chase 100% coverage blindly.
Consider:
- 100% line coverage doesn’t guarantee that your application works correctly.
- A test can execute a line without checking its result.
- Critical security behaviour deserves tests even if the overall coverage is already high.
I prefer meaningful test coverage over a high coverage percentage.
My recommendation for our project
We’ll follow a practical testing strategy.
Our testing strategy
Model specs: Validate business rules, model behaviour, associations and important edge cases.
Request specs: Test HTTP requests, authentication, authorization, status codes and JSON responses.
Service specs: Test independent business logic such as JWT generation, verification and refresh-token rotation.
Integration testing: Verify that important application workflows work together.
Introduce FactoryBot
Let’s introduce FactoryBot, one of the most commonly used tools in Rails testing. Our goal is to stop manually constructing User records in every RSpec example and create reusable test data instead.
FactoryBot setup and fundamentals
1. Why do we need FactoryBot?
Consider our existing RSpec code:
let(:valid_user) do
  User.create!(
    email: "email@example.com",
    password: "password@1"
  )
end
Imagine we have 50 test examples involving users. We might repeatedly write: User.create!(email: "...", password: "...")
This creates several problems:
- Repeated test data.
- Duplicate attribute definitions.
- Difficulties maintaining tests when models evolve.
- Unintentional duplicate email addresses.
- Complex setup when models have associations.
FactoryBot solves this by allowing us to define reusable object blueprints called factories.
Install FactoryBot:
Official Gem Repo: https://github.com/thoughtbot/factory_bot_rails
Open backend/Gemfile. Add:
group :development, :test do
  gem "factory_bot_rails"
end
Why both groups?
test: We need FactoryBot to create test data.development: Enables Rails generator integration, so Rails can generate factories when we generate models.
Do: bundle install
Configure FactoryBot with RSpec
We want to use: build(:user)
create(:user)
Instead of writing: FactoryBot.build(:user)
FactoryBot.create(:user)
Both are valid. We’ll enable the shorter syntax in RSpec. Create a support directory:
mkdir -p spec/support touch spec/support/factory_bot.rb
In spec/support/factory_bot.rb, add this configuration:
RSpec.configure do |config|
  config.include FactoryBot::Syntax::Methods
end
Now open: spec/rails_helper.rb
Find this line (it may be commented out):
# Dir[Rails.root.join('spec', 'support', '**', '*.rb')].sort.each { |f| require f }
Uncomment it. See the comment above. This ensures that our support files are loaded when RSpec starts. This is fine for us as we only load the Rspec configuration from the support folder.
Why use spec/support?
As our testing infrastructure grows, we’ll add reusable configuration and helpers here.
For example:
spec/
├── factories/
├── models/
├── requests/
├── services/
├── support/
│   └── factory_bot.rb
├── rails_helper.rb
└── spec_helper.rb
Create your first factory
Create the file: mkdir -p spec/factories touch spec/factories/users.rb
Our first factory will represent a valid User. The structure will look like this:
FactoryBot.define do
  factory :user do
    sequence(:email) { |n| "user#{n}@example.com" }

    password { "password@1" }
  end
end
Let’s understand each part.
FactoryBot.define – Container for our factory definitions.
factory :user – Defines a factory named user.
FactoryBot automatically identifies the corresponding Rails model as User.
sequence(:email) – Generates a unique email each time the factory is evaluated.
For example:
user1@example.com
user2@example.com
user3@example.com
Why do we need sequences?
Remember our unique email constraint in PostgreSQL. Without sequences, creating multiple users with the same email could result in uniqueness validation errors.
password – Provides a default password that satisfies our current User model requirements.
One important practice: a factory should provide the minimum attributes necessary to create a valid object. We’ll introduce optional attributes and traits later.
Understand FactoryBot build strategies
This is probably the most important FactoryBot concept.
FactoryBot supports four commonly used strategies.
1. build(:user)
In memory user = build(:user)
- Creates a User instance.
- Does not save it to PostgreSQL.
- Does not execute database persistence callbacks.
- Returns an unsaved ActiveRecord object.
Equivalent in concept to: User.new(...)
Use when: Testing validations and model behaviour without requiring database persistence.
2. create(:user)
Persisted user = create(:user)
- Builds a User instance.
- Saves it to PostgreSQL.
- Runs validations and persistence callbacks.
- Returns a persisted record.
Equivalent in concept to: User.create!(...)
Use when: Testing uniqueness, database queries, associations and persistence-related behaviour.
3. build_stubbed(:user)
Stubbed object user = build_stubbed(:user)
- Does not save the record to PostgreSQL.
- Assigns simulated persistence attributes such as an ID.
- Stubs database-related behaviour.
Use when: You need an object that behaves like a persisted record but don’t need actual database interaction.
Be careful: it isn’t a substitute for a real persisted record in integration or database-dependent tests.
4. attributes_for(:user)
Hash only attributes = attributes_for(:user)
Returns an attribute hash rather than a User object.
Use when: Building request payloads or testing API input handling.
An important performance consideration: unnecessary database writes make large test suites slower. Choose the lightest strategy that actually tests the behaviour you care about.
FactoryBot traits and list factories
Now let’s learn two features that become particularly useful when application models grow.
1. List factories: build_list and create_list
Suppose we need five users for a test.
Without list factories:
user1 = create(:user)
user2 = create(:user)
user3 = create(:user)
user4 = create(:user)
user5 = create(:user)
FactoryBot provides a better way.
build_list – users = build_list(:user, 5) – Creates five User objects without saving them.
create_list – users = create_list(:user, 5) – Creates five User records and persists them to PostgreSQL.
| Method | Objects | Database |
|---|---|---|
build_list | 5 | No records |
create_list | 5 | 5 records |
Both methods return arrays.
Exercise
Create a new spec: touch spec/learning/factory_bot_lists_spec.rb Write two examples.
Exercise A – build_list – Create three users and verify:
- Array contains three users.
- None of the users is persisted.
- All three emails are unique.
Exercise B – create_list – Create three users and verify:
- Array contains three users.
- All three are persisted.
- All three have unique IDs
describe "Factory Bot: Build list" do
    context "create three users and verify" do
      it "contains 3 users" do
        users = build_list(:user, 3)
        expect(users.size).to eq(3)
      end
      it "3 users are not persisted and emails are unique" do
        users = build_list(:user, 3)
        emails = []
        users.each do |user|
          emails << user.email
          expect(user.persisted?).to eq(false)
        end
        expect(emails.uniq.size).to eq(3)
      end
    end
  end

  describe "Factory Bot: Create list" do
    context "create three users and verify" do
      it "contains 3 users" do
        users = create_list(:user, 3)
        expect(users.size).to eq(3)
      end
      it "all users are persisted and have unique ids" do
        users = create_list(:user, 3)
        user_ids = []
        users.each do |user|
          user_ids << user.id
          expect(user.persisted?).to eq(true)
        end
        expect(user_ids.uniq.size).to eq(3)
      end
    end
  end
FactoryBot traits
Now imagine our User model supports password confirmation. We may need different user states in different tests:
- User with matching password confirmation.
- User with mismatched password confirmation.
- User without password.
We don’t want to create a separate factory for every scenario. This is where traits are useful. A trait represents a reusable variation of an existing factory. For example:
build(:user, :with_password_confirmation) Or: build(:user, :with_invalid_password_confirmation)
Both reuse the same :user factory but apply different attributes.
Assignment
Open: spec/factories/users.rb Add two traits:
| Trait | Behaviour |
|---|---|
:with_password_confirmation | Sets password confirmation equal to password |
:with_invalid_password_confirmation | Sets a different password confirmation |
Don’t add any new model validations. Rails’ has_secure_password already supports password confirmation validation when confirmation is supplied.
Test these traits
In your new spec file, create examples that:
- Build a user with matching password confirmation and verify that it is valid.
- Build a user with mismatched password confirmation and verify that it is invalid.
- Verify that the second user has the expected validation error.
Important: Use build, not create for these tests. We are testing validation behaviour, not database persistence.
# spec/models/user_spec.rb

context "With Traits" do
      it "verify with password confirmation" do
        user = build(:user, :with_password_confirmation)
        expect(user.valid?).to eq(true)
      end
      it "verify with invalid password confirmation" do
        user = build(:user, :with_invalid_password_confirmation)
        expect(user.valid?).to eq(false)
        expect(user.errors.full_messages).to include("Password confirmation doesn't match Password")
      end
    end
Understanding when to use traits vs overrides
This distinction is useful in real projects.
| Requirement | Preferred approach |
|---|---|
| Change email for one example | Attribute override |
| Create multiple users | create_list |
| Reuse an admin user state | Trait |
| Reuse an inactive user state | Trait |
| Change password for one example | Attribute override |
| Reuse a specific authentication state | Trait |
Don’t create traits for every possible attribute combination. Traits are most useful for meaningful, reusable object states.
Create the Task model and database relationship
Now we’re moving into the actual Task Management application.
Our first important domain relationship:
- One User can create multiple Tasks.
- Every Task belongs to exactly one User.
Database relationship
User 1 : N Tasks -> user_id (FK) – Each task stores the ID of its owner.
1. Decide our Task attributes
Let’s start with a simple schema.
| Column | Type | Configuration |
|---|---|---|
| id | bigint | Primary key |
| user_id | bigint | Foreign key, NOT NULL |
| title | string | NOT NULL |
| description | text | Nullable |
| status | integer | NOT NULL, default 0 |
| created_at | datetime | Automatically generated |
| updated_at | datetime | Automatically generated |
For the status, we’ll eventually support:
pendingin_progresscompleted
Why integer?
Rails supports enums that map readable status names to integer values in the database. We’ll implement the enum separately and understand its advantages and pitfalls, particularly why explicitly mapping enum values is important.
Generate the Task model
From your backend directory:
bin/rails generate model Task title:string description:text status:integer user:references
Because we’ve configured RSpec generators, you should get (notice invoking Rspec and FactoryBot):

Inspect the actual migration and make the necessary adjustments.
Configure the associations
Open: app/models/user.rb – Add the one-to-many association.
Open: app/models/task.rb – Inspect the generated belongs_to association.
# migration
class CreateTasks < ActiveRecord::Migration[8.1]
  def change
    create_table :tasks do |t|
      t.string :title, null: false
      t.text :description
      t.integer :status, null: false, default: 0
      t.references :user, null: false, foreign_key: true

      t.timestamps
    end
  end
end

# user model
class User
  has_many :tasks, dependant: :destroy
  ....
end

# task model
class Task < ApplicationRecord
  belongs_to :user
end
We’ll discuss the difference between destroy, delete, dependent: :delete_all and database-level cascading deletion later.
Do: rails db:migrate -t, check database table details:

FactoryBot associations: User and Task
This is particularly useful because real applications rarely have isolated models. Most models have relationships, and our tests need to create related records efficiently.
1. Create the Task factory
Open: spec/factories/tasks.rb
Our Task model has:
titledescriptionstatususer_id
We want every generated Task to have an associated User. Your factory should follow this structure:
FactoryBot.define do
  factory :task do
    title { "Improve Product" }
    description { "Improve the product page by minimizing dependancies" }

    association :user
  end
end
Understand association :user
FactoryBot understands that the Task factory needs a User factory to construct its associated User. It automatically resolves the :user factory. You could also write: user. But I prefer association :user for now.
How does FactoryBot handle associated objects?
This is an important concept. FactoryBot uses the parent’s build strategy for associations by default.
Consider: task = build(:task)
Expected behaviour:
build(:task)
     |
     v
Build Task object
     |
     v
Build associated User
     |
     v
Return Task
     |
     v
Neither record persisted
Now consider: task = create(:task)
Expected behaviour:
create(:task)
     |
     v
Create associated User
     |
     v
Create Task with user_id
     |
     v
Both records persisted
This is controlled by FactoryBot’s use_parent_strategy configuration, which defaults to true
An important mistake to avoid:
Don’t write this inside the Task factory: user { create(:user) }
Why? Even when you call build(:task), this explicitly creates and persists the User. You lose the advantage of build. Use association :user instead.
Attribute override for associations
Let’s say we already have a User and want to assign that specific User to a Task.
We can override the association:
user = create(:user)

task = build(:task, user: user)
Now the Task belongs to the User you supplied. This is useful when testing ownership, permissions and authorization later. For example, we’ll eventually have multiple users, each with their own tasks.


