Setup 🛠 Rails 8 App – Part 12: Modify Product Schema – Apply Normalization

Right now we have following fields in Product Table:

create_table "products", force: :cascade do |t|
    t.string "title", null: false
    t.text "description"
    t.string "category"
    t.string "color"
    t.string "size", limit: 10
    t.decimal "mrp", precision: 7, scale: 2
    t.decimal "discount", precision: 7, scale: 2
    t.decimal "rating", precision: 2, scale: 1
    t.datetime "created_at", null: false
    t.datetime "updated_at", null: false
  end

If you examine the above table, there will be repetitive product items if consider for a size of an item there comes so many colours. We need to create different product rows for each size different colours.

So Let’s split the table into two.

1. Product Table

class CreateProducts < ActiveRecord::Migration[8.0]
  def change
    def change
      create_table :products do |t|
        t.string  :name
        t.text    :description
        t.string  :category   # women, men, kids, infants
        t.decimal :rating, precision: 2, scale: 1, default: 0.0

        t.timestamps
      end

      add_index :products, :category
    end
  end
end

2. Product Variant Table

class CreateProductVariants < ActiveRecord::Migration[8.0]
  def change
    create_table :product_variants do |t|
      t.references :product, null: false, foreign_key: true
      t.string  :sku, null: false
      t.decimal :price, precision: 10, scale: 2
      t.string  :size
      t.string  :color
      t.integer :stock_quantity, default: 0
      t.jsonb   :specs, default: {}, null: false

      t.timestamps
    end

    # GIN index for fast JSONB attribute searching
    add_index :product_variants, :specs, using: :gin
    add_index :product_variants, [ :product_id, :size, :color ], unique: true
    add_index :product_variants, :sku, unique: true
  end
end

Data normalization is a core concept in database design that helps organize data efficiently, eliminate redundancy, and ensure data integrity.


🔍 What Is Data Normalization?

Normalization is the process of structuring a relational database in a way that:

  • Reduces data redundancy (no repeated data)
  • Prevents anomalies in insert, update, or delete operations
  • Improves data integrity

It breaks down large, complex tables into smaller, related tables and defines relationships using foreign keys.

🧐 Why Normalize?

Problem Without NormalizationHow Normalization Helps
Duplicate data everywhereMoves repeated data into separate tables
Inconsistent valuesEnforces rules and relationships
Hard to update dataIsolates each concept so it’s updated once
Wasted storageReduces data repetition

📚 Normal Forms (NF)

Each Normal Form (NF) represents a level of database normalization. The most common are:

🔸 1NF – First Normal Form

  • Eliminate repeating groups
  • Ensure each column has atomic (indivisible) values

Bad Example:

CREATE TABLE Orders (
  order_id INT,
  customer_name VARCHAR,
  items TEXT  -- "Shirt, Pants, Hat"
);

Fixed (1NF):

CREATE TABLE OrderItems (
  order_id INT,
  item_name VARCHAR
);

🔸 2NF – Second Normal Form

  • Must be in 1NF
  • Remove partial dependencies (when a non-key column depends only on part of a composite key)

Example: If a table has a composite key (student_id, course_id), and student_name depends only on student_id, it should go into a separate table.

🔸 3NF – Third Normal Form

  • Must be in 2NF
  • Remove transitive dependencies (non-key columns depending on other non-key columns)

Example:

CREATE TABLE Employees (
  emp_id INT PRIMARY KEY,
  emp_name VARCHAR,
  dept_name VARCHAR,
  dept_location VARCHAR
);

Here, dept_location depends on dept_name, not emp_id — so split it:

Normalized:

CREATE TABLE Departments (
  dept_name VARCHAR PRIMARY KEY,
  dept_location VARCHAR
);

💡 Real-World Example

Let’s say you have this table:

Orders(order_id, customer_name, customer_email, product1, product2, product3)

Problems:

  • Repeating columns (product1, product2, …)
  • Redundant customer data in each order

Normalized Version:

  1. Customers(customer_id, name, email)
  2. Orders(order_id, customer_id)
  3. OrderItems(order_id, product_id)
  4. Products(product_id, name, price)

⚖️ Normalization vs. Denormalization

  • Normalization = Good for consistency, long-term maintenance
  • ⚠️ Denormalization = Good for performance in read-heavy systems (like reporting dashboards)

Use normalization as a default practice, then selectively denormalize if performance requires it.


Delete button example (Rails 7+)

<%= link_to "Delete Product",
              @product,
              data: { turbo_method: :delete, turbo_confirm: "Are you sure you want to delete this product?" },
              class: "inline-block px-4 py-2 bg-red-100 text-red-600 border border-red-300 rounded-md hover:bg-red-600 hover:text-white font-semibold transition duration-300 transform hover:scale-105" %>

💡 What’s Improved:

  • data: { turbo_confirm: ... } ensures compatibility with Turbo (Rails 7+).
  • Better button-like appearance (bg, px, py, rounded, etc.).
  • Hover effects and transitions for a smooth UI experience.

Add Brand to products table

Let’s add brand column to the product table:

✗ rails g migration add_brand_to_products brand:string:
index
class AddBrandToProducts < ActiveRecord::Migration[8.0]
  def change
    # Add 'brand' column
    add_column :products, :brand, :string

    # Add index for brand
    add_index :products, :brand
  end
end

❗️Important Note:

PostgreSQL does not support BEFORE or AFTER when adding a column.

Caused by:
PG::SyntaxError: ERROR:  syntax error at or near "BEFORE" (PG::SyntaxError)
LINE 1: ...LTER TABLE products ADD COLUMN brand VARCHAR(255) BEFORE des...
  • PostgreSQL (default in Rails) does not support column order (they’re always returned in the order they were created).
  • If you’re using MySQL, you could use raw SQL for positioning as shown below.

If I USE MySQL, I would like to see the brand name as first column of the table products. You can do that by changing the migration to:

class AddBrandToProducts < ActiveRecord::Migration[8.0]
  def up
    execute "ALTER TABLE products ADD COLUMN brand VARCHAR(255) BEFORE description;"
    add_index :products, :brand
  end

  def down
    remove_index :products, :brand
    remove_column :products, :brand
  end
end

Reverting Previous Migrations

You can use Active Record’s ability to rollback migrations using the revert method:

require_relative "20121212123456_example_migration"

class FixupExampleMigration < ActiveRecord::Migration[8.0]
  def change
    revert ExampleMigration

    create_table(:apples) do |t|
      t.string :variety
    end
  end
end

The revert method also accepts a block of instructions to reverse. This could be useful to revert selected parts of previous migrations.

Reference: https://guides.rubyonrails.org/active_record_migrations.html#reverting-previous-migrations

Product Index Page after applying NF:
Product Show Page after applying NF:
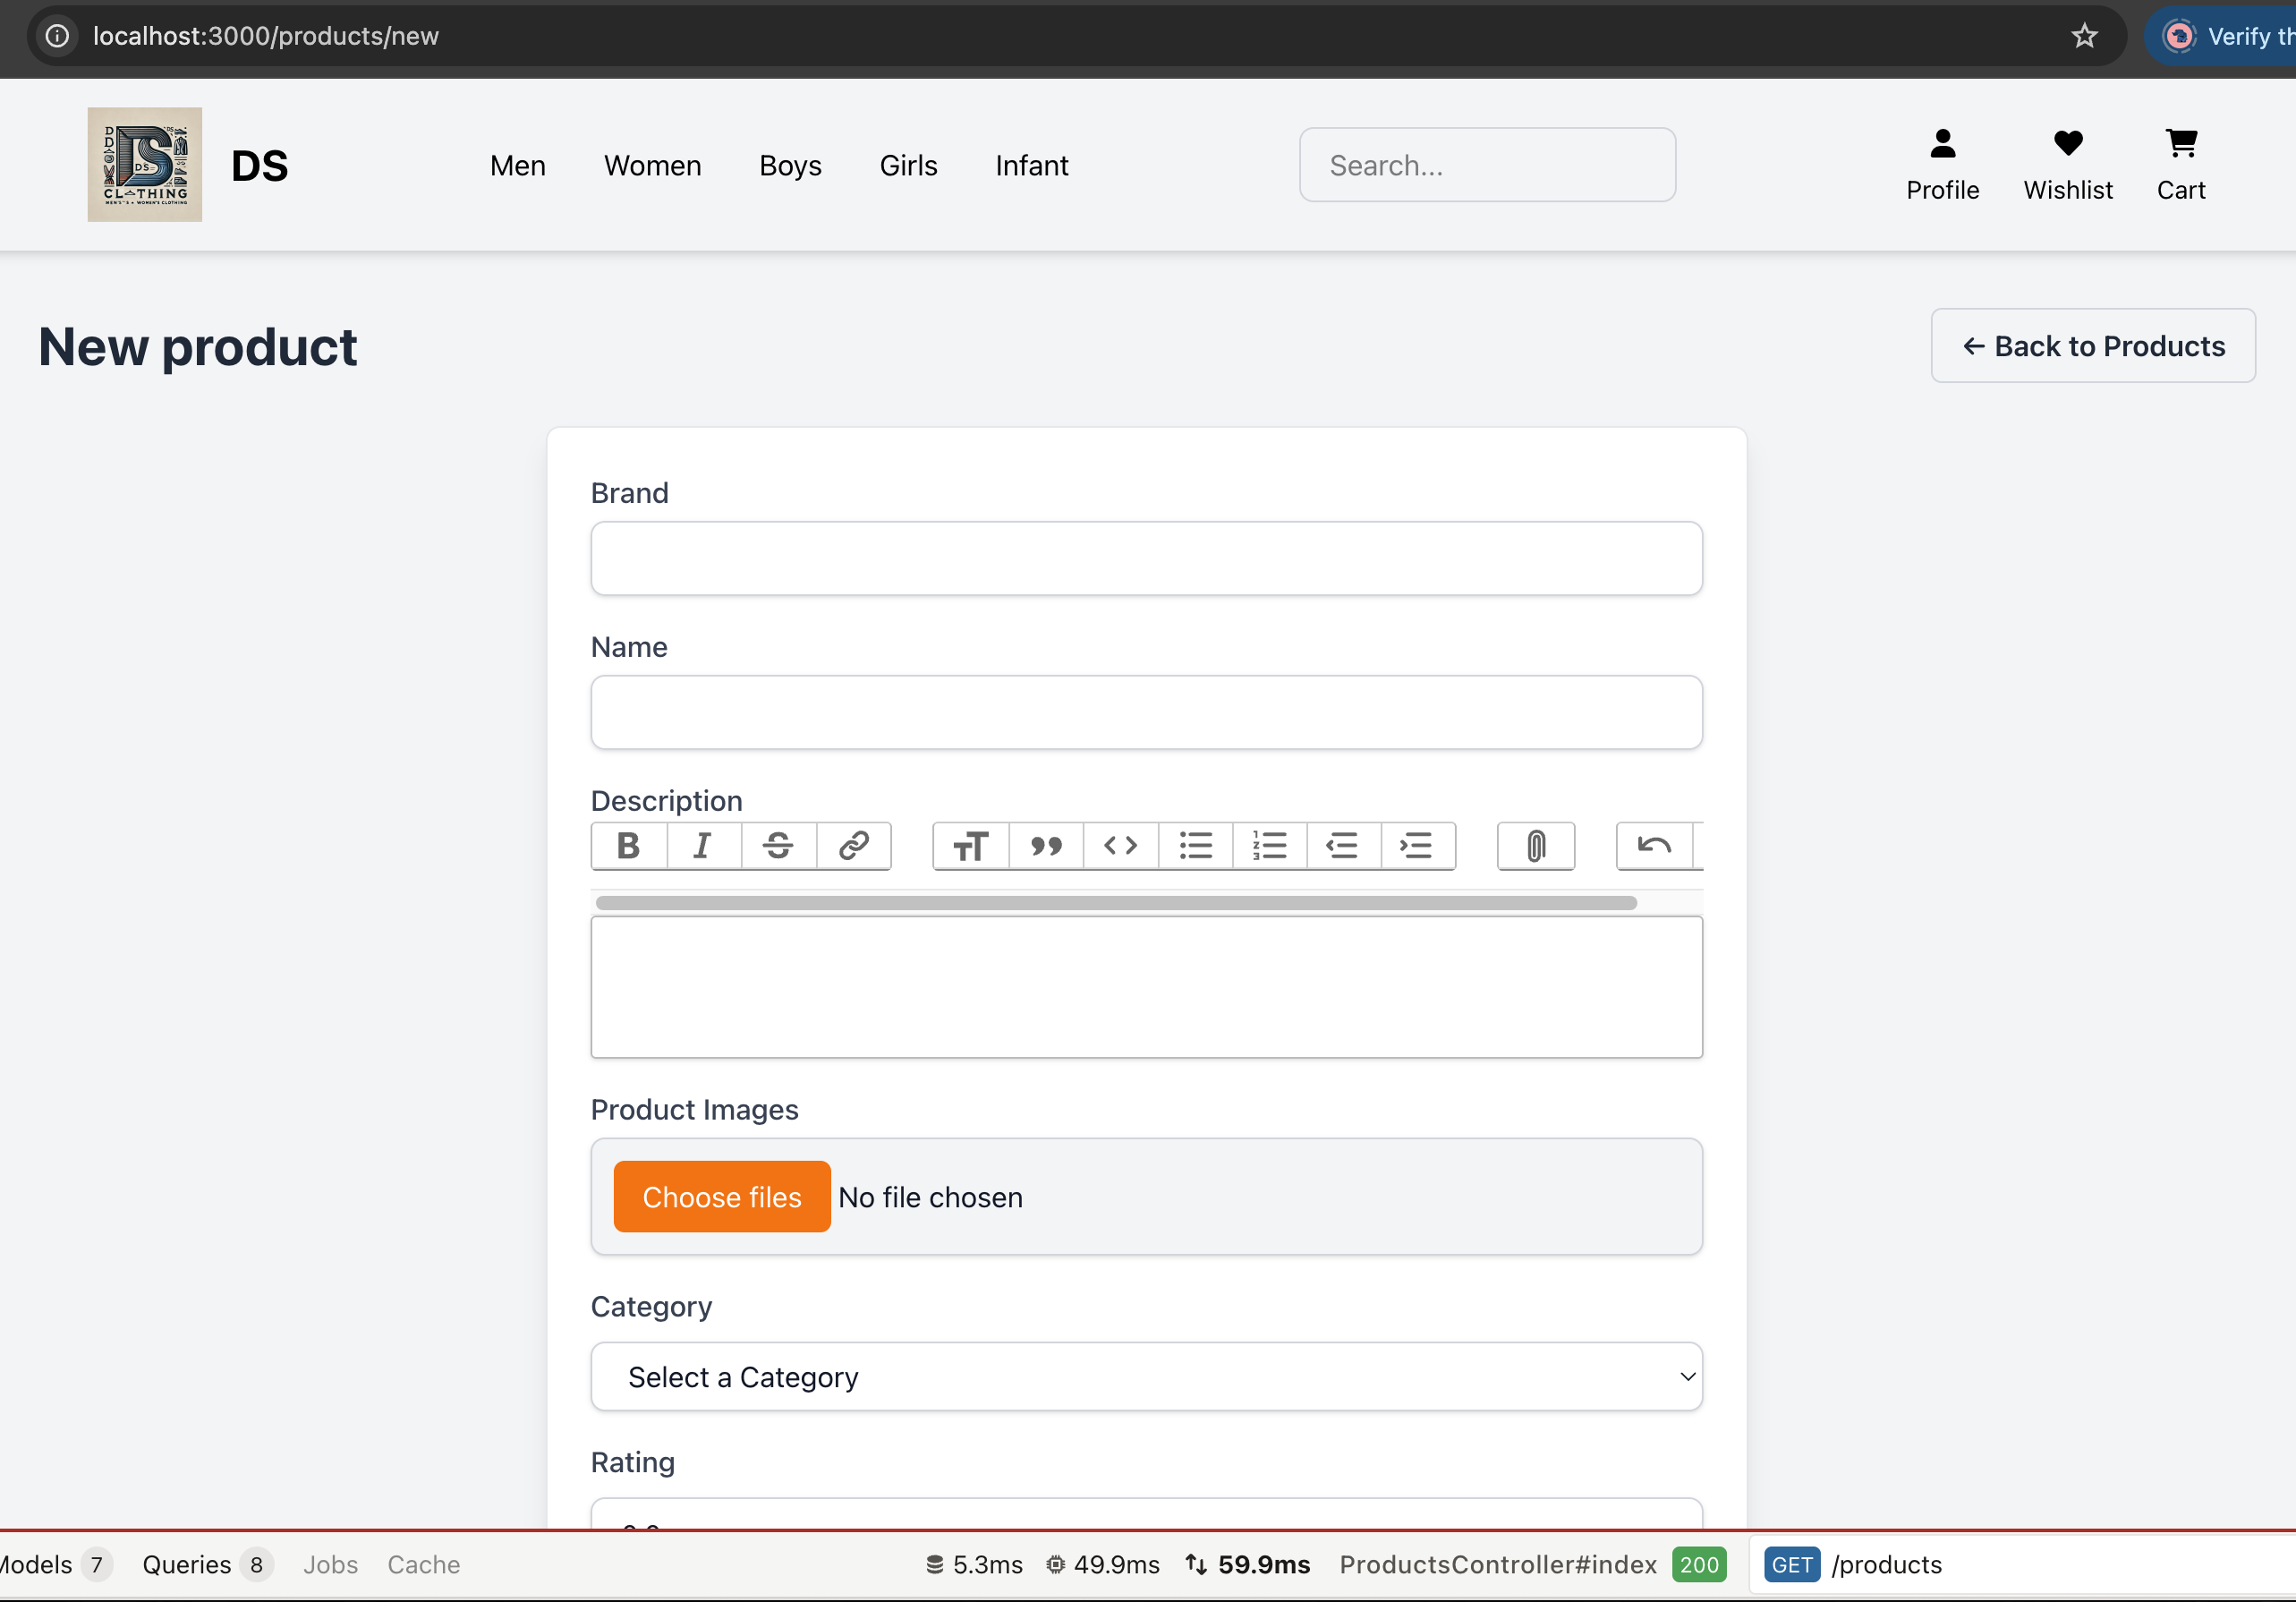
New Product Page after applying NF:

to be continued.. 🚀

Setup 🛠 Rails 8 App – Part 11: Convert 🔄 Rails App from SQLite to PostgreSQL

If you’ve already built a Rails 8 app using the default SQLite setup and now want to switch to PostgreSQL, here’s a clean step-by-step guide to make the transition smooth:

1.🔧 Setup PostgreSQL in macOS

🔷 Step 1: Install PostgreSQL via Homebrew

Run the following:

brew install postgresql

This created a default database cluster for me, check the output. So you can skip the Step 3.

==> Summary
🍺  /opt/homebrew/Cellar/postgresql@14/14.17_1: 3,330 files, 45.9MB

==> Running `brew cleanup postgresql@14`...
==> postgresql@14
This formula has created a default database cluster with:
  initdb --locale=C -E UTF-8 /opt/homebrew/var/postgresql@14

To start postgresql@14 now and restart at login:
  brew services start postgresql@14

Or, if you don't want/need a background service you can just run:
  /opt/homebrew/opt/postgresql@14/bin/postgres -D /opt/homebrew/var/postgresql@14

After installation, check the version:

psql --version
> psql (PostgreSQL) 14.17 (Homebrew)

🔷 Step 2: Start PostgreSQL Service

To start PostgreSQL now and have it start automatically at login:

brew services start postgresql
==> Successfully started `postgresql@14` (label: homebrew.mxcl.postgresql@14)

If you just want to run it in the background without autostart:

# pg_ctl — initialize, start, stop, or control a PostgreSQL server
pg_ctl -D /opt/homebrew/var/postgresql@14 start

https://www.postgresql.org/docs/current/app-pg-ctl.html

You can find the installed version using:

brew list | grep postgres

🔷 Step 3: Initialize the Database (if needed)

Sometimes Homebrew does this automatically. If not:

initdb /opt/homebrew/var/postgresql@<version>

Or a more general version:

initdb /usr/local/var/postgres

Key functions of initdb: Creates a new database cluster, Initializes the database cluster’s default locale and character set encoding, Runs a vacuum command.

In essence, initdb prepares the environment for a PostgreSQL database to be used and provides a foundation for creating and managing databases within that cluster

🔷 Step 4: Create a User and Database

PostgreSQL uses a role-based access control. Create a user with superuser privileges:

# createuser creates a new Postgres user
createuser -s postgres

createuser is a shell script wrapper around the SQL command CREATE USER via the Postgres interactive terminal psql. Thus, there is nothing special about creating users via this or other methods

Then switch to psql:

psql postgres

You can also create a database:

createdb <db_name>

🔷 Step 5: Connect and Use psql

psql -d <db_name>

Inside the psql shell, try:

\l    -- list databases
\dt   -- list tables
\q    -- quit

🔷 Step 6: Use a GUI (Optional)

For a friendly UI, install one of the following:

pgAdmin

Postico

TablePlus

2. Update Gemfile

Replace SQLite gem with PostgreSQL:

# Remove or comment this:
# gem "sqlite3", "~> 1.4"

# Add this:
gem "pg", "~> 1.4"

Then run:

bundle install


3. Update config/database.yml

Replace the entire contents of config/database.yml with the following:

default: &default
  adapter: postgresql
  encoding: unicode
  username: postgres
  password:
  host: localhost
  pool: <%= ENV.fetch("RAILS_MAX_THREADS") { 5 } %>

development:
  <<: *default
  database: your_app_name_development

test:
  <<: *default
  database: your_app_name_test

production:
  primary: &primary_production
    <<: *default
    database: your_app_name_production
    username: your_production_username
    password: <%= ENV['YOUR_APP_DATABASE_PASSWORD'] %>
  cache:
    <<: *primary_production
    database: your_app_name_production_cache
    migrations_paths: db/cache_migrate
  queue:
    <<: *primary_production
    database: your_app_name_production_queue
    migrations_paths: db/queue_migrate
  cable:
    <<: *primary_production
    database: your_app_name_production_cable
    migrations_paths: db/cable_migrate

Replace your_app_name with your actual Rails app name.

4. Drop SQLite Database (Optional)

rm storage/development.sqlite3
rm storage/test.sqlite3

5. Create and Setup PostgreSQL Database

rails db:create
rails db:migrate

If you had seed data:

rails db:seed

6. Test It Works

Boot up your server:

bin/dev

Then go to http://localhost:3000 and confirm everything works.

7. Check psql manually (Optional)

psql -d your_app_name_development

Then run:

\dt     -- view tables
\q      -- quit

8. Update .gitignore

Note: If not already added /storage/*

Make sure SQLite DBs are not accidentally committed:

/storage/*.sqlite3
/storage/*.sqlite3-journal


After moving into PostgreSQL

I was getting an issue with postgres column, where I have the following data in the migration:

# migration
t.decimal :rating, precision: 1, scale: 1

# log
ActiveRecord::RangeError (PG::NumericValueOutOfRange: ERROR:  numeric field overflow
12:44:36 web.1  | DETAIL:  A field with precision 1, scale 1 must round to an absolute value less than 1.
12:44:36 web.1  | )

Value passed is: 4.3. I was not getting this issue in SqLite DB.

What does precision: 1, scale: 1 mean?

  • precision: Total number of digits (both left and right of the decimal).
  • scale: Number of digits after the decimal point

If you want to store ratings like 4.3, 4.5, etc., a good setup is:

t.decimal :rating, precision: 2, scale: 1
# revert and migrate for products table

✗ rails db:migrate:down VERSION=2025031XXXXX -t
✗ rails db:migrate:up VERSION=2025031XXXXXX -t

Then go to http://localhost:3000 and confirm everything works.

to be continued.. 🚀

Setup 🛠 Rails 8 App – Part 10: PostgreSQL Into The Action

For a Ruby on Rails 8 application, the choice of database depends on your specific needs, but here’s a breakdown of the best options and when to use each:

PostgreSQL (Highly Recommended)

Best overall choice for most Rails apps.

Why:

  • First-class support in Rails.
  • Advanced features like full-text search, JSONB support, CTEs, window functions.
  • Strong consistency and reliability.
  • Scales well vertically and horizontally (with tools like Citus).
  • Used by: GitHub, Discourse, Basecamp, Shopify.

Use if:

  • You’re building a standard Rails web app or API.
  • You need advanced query features or are handling complex data types (e.g., JSON).

SQLite (For development/testing only)

  • Lightweight, file-based.
  • Fast and easy to set up.
  • But not recommended for production.

Use if:

  • You’re building a quick prototype or local dev/testing app.
  • NOT for multi-user production environments.

MySQL / MariaDB

  • Also supported by Rails.
  • Can work fine for simpler applications.
  • Lacks some advanced features (like robust JSON support or full Postgres-style indexing).
  • Not the default in many modern Rails setups.

Use if:

  • Your team already has MySQL infrastructure or legacy systems.
  • You need horizontal scaling with Galera Cluster or similar setups.

Others (NoSQL like MongoDB, Redis, etc.)

  • Use Redis for caching and background job data (not as primary DB).
  • Use MongoDB or other NoSQL only if your data model really demands it (e.g., unstructured documents, event sourcing).

Recommendation Summary:

Use CaseRecommended DB
Production web/API appPostgreSQL
Dev/prototyping/local testingSQLite
Legacy systems/MySQL infrastructureMySQL/MariaDB
Background jobs/cachingRedis
Special needs (e.g., documents)MongoDB (with caution)

If you’re starting fresh or building something scalable and modern with Rails 8, go with PostgreSQL.

Let’s break that down:

💬 What does “robust JSON support” mean?

PostgreSQL supports a special column type: json and jsonb, which lets you store structured JSON data directly in your database — like hashes or objects.

Why it matters:

  • You can store dynamic data without needing to change your schema.
  • You can query inside the JSON using SQL (->, ->>, @>, etc.).
  • You can index parts of the JSON — for speed.

🔧 Example:

You have a products table with a specs column that holds tech specs in JSON:

specs = {
  "color": "black",
  "brand": "Libas",
  "dimensions": {"chest": "34", "waist": "30", "shoulder": "13.5"}
}

You can query like:

SELECT * FROM products WHERE specs->>'color' = 'black';

Or check if the JSON contains a value:

SELECT * FROM products WHERE specs @> '{"brand": "Libas"}';

You can even index specs->>'color' to make these queries fast.


💬 What does “full Postgres-style indexing” mean?

PostgreSQL supports a wide variety of powerful indexing options, which improve query performance and flexibility.

⚙️ Types of Indexes PostgreSQL supports:

Index TypeUse Case
B-TreeDefault; used for most equality and range searches
GIN (Generalized Inverted Index)Fast indexing for JSON, arrays, full-text search
Partial IndexesIndex only part of the data (e.g., WHERE active = true)
Expression IndexesIndex a function or expression (e.g., LOWER(email))
Covering Indexes (INCLUDE)Fetch data directly from the index, avoiding table reads
  • B-Tree Indexes: B-tree indexes are more suitable for single-value columns.
  • When to Use GIN Indexes: When you frequently search for specific elements within arrays, JSON documents, or other composite data types.
  • Example for GIN Indexes: Imagine you have a table with a JSONB column containing document metadata. A GIN index on this column would allow you to quickly find all documents that have a specific author or belong to a particular category. 

Why does this matter for our shopping app?

  • We can store and filter products with dynamic specs (e.g., kurtas, shorts, pants) without new columns.
  • Full-text search on product names/descriptions.
  • Fast filters: color = 'red' AND brand = 'Libas' even if those are stored in JSON.
  • Index custom expressions like LOWER(email) for case-insensitive login.

💬 What are Common Table Expressions (CTEs)?

CTEs are temporary result sets you can reference within a SQL query — like defining a mini subquery that makes complex SQL easier to read and write.

WITH recent_orders AS (
  SELECT * FROM orders WHERE created_at > NOW() - INTERVAL '7 days'
)
SELECT * FROM recent_orders WHERE total > 100;

  • Breaking complex queries into readable parts.
  • Re-using result sets without repeating subqueries.
In Rails (via with from gems like scenic or with_cte):
Order
  .with(recent_orders: Order.where('created_at > ?', 7.days.ago))
  .from('recent_orders')
  .where('total > ?', 100)

💬 What are Window Functions?

Window functions perform calculations across rows related to the current row — unlike aggregate functions, they don’t group results into one row.

🔧 Example: Rank users by their score within each team:
SELECT
  user_id,
  team_id,
  score,
  RANK() OVER (PARTITION BY team_id ORDER BY score DESC) AS rank
FROM users;
Use cases:
  • Ranking rows (like leaderboards).
  • Running totals or moving averages.
  • Calculating differences between rows (e.g. “How much did this order increase from the last?”).
🛤 In Rails:

Window functions are available through raw SQL or Arel. Here’s a basic example:

User
  .select("user_id, team_id, score, RANK() OVER (PARTITION BY team_id ORDER BY score DESC) AS rank")

CTEs and Window functions are fully supported in PostgreSQL, making it the go-to DB for any Rails 8 app that needs advanced querying.

JSONB Support

JSONB stands for “JSON Binary” and is a binary representation of JSON data that allows for efficient storage and retrieval of complex data structures.

This can be useful when you have data that doesn’t fit neatly into traditional relational database tables, such as nested or variable-length data structures.

Absolutely — storing JSON in a relational database (like PostgreSQL) can be super powerful when used wisely. It gives you schema flexibility without abandoning the structure and power of SQL. Here are real-world use cases for using JSON columns in relational databases:

Here are real-world use cases for using JSON columns in relational databases:

🔧 1. Flexible Metadata / Extra Attributes

Let users store arbitrary attributes that don’t require schema changes every time.

Use case: Product variants, custom fields

t.jsonb :metadata

{
  "color": "red",
  "size": "XL",
  "material": "cotton"
}

=> Good when:

  • You can’t predict all the attributes users will need.
  • You don’t want to create dozens of nullable columns.

🎛️ 2. Storing Settings or Preferences

User or app settings that vary a lot.

Use case: Notification preferences, UI layout, feature toggles

{
  "email": true,
  "sms": false,
  "theme": "dark"
}

=> Easy to store and retrieve as a blob without complex joins.

🌐 3. API Response Caching

Store external API responses for caching or auditing.

Use case: Storing Stripe, GitHub, or weather API responses.

t.jsonb :api_response

=> Avoids having to map every response field into a column.

📦 4. Storing Logs or Events

Use case: Audit trails, system logs, user events

{
  "action": "login",
  "timestamp": "2025-04-18T10:15:00Z",
  "ip": "123.45.67.89"
}

=> Great for capturing varied data over time without a rigid schema.

📊 6. Embedded Mini-Structures

Use case: A form builder app storing user-created forms and fields.

{
  "fields": [
    { "type": "text", "label": "Name", "required": true },
    { "type": "email", "label": "Email", "required": false }
  ]
}

=> When each row can have nested, structured data — almost like a mini-document.

🕹️ 7. Device or Browser Info (User Agents)

Use case: Analytics, device fingerprinting

{
  "browser": "Safari",
  "os": "macOS",
  "version": "17.3"
}

=> You don’t need to normalize or query this often — perfect for JSON.


JSON vs JSONB in PostgreSQL

Use jsonb over json unless you need to preserve order or whitespace.

  • jsonb is binary format → faster and indexable
  • You can do fancy stuff like:
SELECT * FROM users WHERE preferences ->> 'theme' = 'dark';

Or in Rails:

User.where("preferences ->> 'theme' = ?", 'dark')

store and store_accessor

They let you treat JSON or text-based hash columns like structured data, so you can access fields as if they were real database columns.

🔹 store

  • Used to declare a serialized store (usually a jsonb, json, or text column) on your model.
  • Works best with key/value stores.

👉 Example:

Let’s say your users table has a settings column of type jsonb:

# migration
add_column :users, :settings, :jsonb, default: {}

Now in your model:

class User < ApplicationRecord
  store :settings, accessors: [:theme, :notifications], coder: JSON
end

You can now do this:

user.theme = "dark"
user.notifications = true
user.save

user.settings
# => { "theme" => "dark", "notifications" => true }

🔹 store_accessor

A lightweight version that only declares attribute accessors for keys inside a JSON column. Doesn’t include serialization logic — so you usually use it with a json/jsonb/text column that already works as a Hash.

👉 Example:

class User < ApplicationRecord
  store_accessor :settings, :theme, :notifications
end

This gives you:

  • user.theme, user.theme=
  • user.notifications, user.notifications=
🤔 When to Use Each?
FeatureWhen to Use
storeWhen you need both serialization and accessors
store_accessorWhen your column is already serialized (jsonb, etc.)

If you’re using PostgreSQL with jsonb columns — it’s more common to just use store_accessor.

Querying JSON Fields
User.where("settings ->> 'theme' = ?", "dark")

Or if you’re using store_accessor:

User.where(theme: "dark")

💡 But remember: you’ll only be able to query these fields efficiently if you’re using jsonb + proper indexes.


🔥 Conclusion:

  • PostgreSQL can store, search, and index inside JSON fields natively.
  • This lets you keep your schema flexible and your queries fast.
  • Combined with its advanced indexing, it’s ideal for a modern e-commerce app with dynamic product attributes, filtering, and searching.

To install and set up PostgreSQL on macOS, you have a few options. The most common and cleanest method is using Homebrew. Here’s a step-by-step guide:

Writing Perfect Active Record 🗒️ Queries in Ruby on Rails 8

Active Record (AR) is the heart of Ruby on Rails when it comes to database interactions. Writing efficient and readable queries is crucial for application performance and maintainability. This guide will help you master Active Record queries with real-world examples and best practices.


Setting Up a Sample Database

To demonstrate complex Active Record queries, let’s create a Rails app with a sample database structure containing multiple tables.

Generate Models & Migrations

rails new MyApp --database=postgresql
cd MyApp
rails g model User name:string email:string
rails g model Post title:string body:text user:references
rails g model Comment body:text user:references post:references
rails g model Category name:string
rails g model PostCategory post:references category:references
rails g model Like user:references comment:references
rails db:migrate

Database Schema Overview

  • users: Stores user information.
  • posts: Stores blog posts written by users.
  • comments: Stores comments on posts, linked to users and posts.
  • categories: Stores post categories.
  • post_categories: Join table for posts and categories.
  • likes: Stores likes on comments by users.

Basic Active Record Queries

1. Fetching All Records

User.all  # Returns all users (Avoid using it directly on large datasets as it loads everything into memory)

⚠️ User.all can lead to performance issues if the table contains a large number of records. Instead, prefer pagination (User.limit(100).offset(0)) or batch processing (User.find_each).

2. Finding a Specific Record

User.find(1)  # Finds a user by ID
User.find_by(email: 'john@example.com')  # Finds by attribute

3. Filtering with where vs having

Post.where(user_id: 2)  # Fetch all posts by user with ID 2

Difference between where and having:

  • where is used for filtering records before grouping.
  • having is used for filtering after group operations.

Example:

Post.group(:user_id).having('COUNT(id) > ?', 5)  # Users with more than 5 posts

4. Ordering Results

User.order(:name)  # Order users alphabetically
Post.order(created_at: :desc)  # Order posts by newest first

5. Limiting Results

Post.limit(5)  # Get the first 5 posts

6. Selecting Specific Columns

User.select(:id, :name)  # Only fetch ID and name

7. Fetching Users with a Specific Email Domain

User.where("email LIKE ?", "%@gmail.com")

8. Fetching the Most Recent Posts

Post.order(created_at: :desc).limit(5)

9. Using pluck for Efficient Data Retrieval

User.pluck(:email)  # Fetch only emails as an array

10. Checking if a Record Exists Efficiently

User.exists?(email: 'john@example.com')

11. Including Associations (eager loading to avoid N+1 queries)

Post.includes(:comments).where(comments: { body: 'Great post!' })


Advanced Queries with Joins

1. Joining Tables (INNER JOIN)

Post.joins(:user).where(users: { name: 'John' })

2. Self Join Example

A self-join is useful when dealing with hierarchical relationships, such as an employee-manager structure.

Model Setup

class Employee < ApplicationRecord
  belongs_to :manager, class_name: 'Employee', optional: true
  has_many :subordinates, class_name: 'Employee', foreign_key: 'manager_id'
end

Sample Data

idnamemanager_id
1AliceNULL
2Bob1
3Carol1
4Dave2

Query: Find Employees Who Report to Alice

Employee.joins(:manager).where(managers_employees: { name: 'Alice' })

Result:

idnamemanager_id
2Bob1
3Carol1

This query fetches employees who report to Alice (i.e., those where manager_id = 1).

3. Fetching Users with No Posts (LEFT JOIN with NULL check)

User.left_outer_joins(:posts).where(posts: { id: nil })

4. Counting Posts Per User

User.joins(:posts).group('users.id').count

Complex Queries in Active Record

1. Fetching Posts with the Most Comments

Post.joins(:comments)
    .group('posts.id')
    .order('COUNT(comments.id) DESC')
    .limit(1)

2. Fetching Posts with More than 5 Comments

Post.joins(:comments)
    .group(:id)
    .having('COUNT(comments.id) > ?', 5)

3. Finding Users Who Liked the Most Comments

User.joins(comments: :likes)
    .group('users.id')
    .select('users.id, users.name, COUNT(likes.id) AS likes_count')
    .order('likes_count DESC')
    .limit(1)

4. Fetching Posts Belonging to Multiple Categories

Post.joins(:categories).group('posts.id').having('COUNT(categories.id) > ?', 1)

5. Fetching the Last Comment of Each Post

Comment.select('DISTINCT ON (post_id) *').order('post_id, created_at DESC')

6. Fetching Users Who Haven’t Commented on a Specific Post

User.where.not(id: Comment.where(post_id: 10).select(:user_id))

7. Fetching Users Who Have Commented on Every Post

User.joins(:comments).group(:id).having('COUNT(DISTINCT comments.post_id) = ?', Post.count)

8. Finding Posts With No Comments

Post.left_outer_joins(:comments).where(comments: { id: nil })

9. Fetching the User Who Created the Most Posts

User.joins(:posts)
    .group('users.id')
    .select('users.id, users.name, COUNT(posts.id) AS post_count')
    .order('post_count DESC')
    .limit(1)

10. Fetching the Most Liked Comment

Comment.joins(:likes)
    .group('comments.id')
    .order('COUNT(likes.id) DESC')
    .limit(1)

11. Fetching Comments with More than 3 Likes and Their Associated Posts

Comment.joins(:likes, :post)
    .group('comments.id', 'posts.id')
    .having('COUNT(likes.id) > ?', 3)

12. Finding Users Who Haven’t Liked Any Comments

User.left_outer_joins(:likes).where(likes: { id: nil })

13. Fetching Users, Their Posts, and the Count of Comments on Each Post

User.joins(posts: :comments)
    .group('users.id', 'posts.id')
    .select('users.id, users.name, posts.id AS post_id, COUNT(comments.id) AS comment_count')
    .order('comment_count DESC')

Importance of inverse_of in Model Associations

What is inverse_of?

The inverse_of option in Active Record associations helps Rails correctly link objects in memory, avoiding unnecessary database queries and ensuring bidirectional association consistency.

Example Usage

class User < ApplicationRecord
  has_many :posts, inverse_of: :user
end

class Post < ApplicationRecord
  belongs_to :user, inverse_of: :posts
end

Why Use inverse_of?

  • Performance Optimization: Prevents extra queries by using already loaded objects.
  • Ensures Data Consistency: Updates associations without additional database fetches.
  • Enables Nested Attributes: Helps when using accepts_nested_attributes_for.

Example:

user = User.new(name: 'Alice')
post = user.posts.build(title: 'First Post')
post.user == user  # True without needing an additional query

Best Practices to use in Rails Projects

1. Using Scopes for Readability

class Post < ApplicationRecord
  scope :recent, -> { order(created_at: :desc) }
end

Post.recent.limit(10)  # Fetch recent posts

2. Using find_each for Large Datasets

User.find_each(batch_size: 100) do |user|
  puts user.email
end

3. Avoiding SELECT * for Performance

User.select(:id, :name).load

4. Avoiding N+1 Queries with includes

Post.includes(:comments).each do |post|
  puts post.comments.count
end


Conclusion

Mastering Active Record queries is essential for writing performant and maintainable Rails applications. By using joins, scopes, batch processing, and eager loading, you can write clean and efficient queries that scale well.

Do you have any favorite Active Record query tricks? Share them in the comments!

🧬 Extracting and Joining on Ancestry Values in PostgreSQL: A Complete Guide

I am working on a project where we face issues in an ancestral path data in PostgreSql DB. Working with hierarchical data in PostgreSQL often involves dealing with ancestry paths stored as delimited strings. This comprehensive guide explores how to extract specific values from ancestry columns and utilize them effectively in join operations, complete with practical examples, troubleshooting tips and how I fixed the issues.

📋 Table of Contents

🎯 Introduction

PostgreSQL’s robust string manipulation capabilities make it ideal for handling complex hierarchical data structures. When working with ancestry values stored in text columns, you often need to extract specific parts of the hierarchy for data analysis, reporting, or joining operations.

This article demonstrates how to:

  • ✨ Extract values from ancestry strings using regular expressions
  • 🔗 Perform efficient joins on extracted ancestry data
  • 🛡️ Handle edge cases and avoid common pitfalls
  • ⚡ Optimize queries for better performance

❓ Problem Statement

📊 Scenario

Consider a projects table with an ancestry column containing hierarchical paths like:

-- Sample ancestry values
"6/4/5/3"     -- Parent chain: 6 → 4 → 5 → 3
"1/2"         -- Parent chain: 1 → 2
"9"           -- Single parent: 9
NULL          -- Root level project

🎯 Goal

We need to:

  1. Extract the last integer value from the ancestry path
  2. Use this value in a JOIN operation to fetch parent project data
  3. Handle edge cases like NULL values and malformed strings

🏗️ Understanding the Data Structure

📁 Table Structure

CREATE TABLE projects (
    id BIGINT PRIMARY KEY,
    name VARCHAR(255) NOT NULL,
    ancestry TEXT,  -- Stores parent hierarchy as "id1/id2/id3"
    created_at TIMESTAMP DEFAULT NOW()
);

-- Sample data
INSERT INTO projects (id, name, ancestry) VALUES
    (1, 'Root Project', NULL),
    (2, 'Department A', '1'),
    (3, 'Team Alpha', '1/2'),
    (4, 'Task 1', '1/2/3'),
    (5, 'Subtask 1A', '1/2/3/4');

🧭 Ancestry Path Breakdown

Project IDNameAncestryImmediate Parent
1Root ProjectNULLNone (root)
2Department A11
3Team Alpha1/22
4Task 11/2/33
5Subtask 1A1/2/3/44

🔧 Solution Overview

🎯 Core Approach

  1. 🔍 Pattern Matching: Use regex to identify the last number in the ancestry string
  2. ✂️ Value Extraction: Extract the matched value using regexp_replace()
  3. 🔄 Type Conversion: Cast the extracted string to the appropriate numeric type
  4. 🔗 Join Operation: Use the converted value in JOIN conditions

📝 Basic Query Structure

SELECT projects.*
FROM projects
LEFT OUTER JOIN projects AS parent_project 
    ON CAST(
        regexp_replace(projects.ancestry, '.*\/(\d+)$', '\1')
        AS BIGINT
    ) = parent_project.id
WHERE projects.ancestry IS NOT NULL;

📝 Regular Expression Deep Dive

🎯 Pattern Breakdown: .*\/(\d+)$

Let’s dissect this regex pattern:

.*      -- Match any characters (greedy)
\/      -- Match literal forward slash
(\d+)   -- Capture group: one or more digits
$       -- End of string anchor

📊 Pattern Matching Examples

Ancestry StringRegex MatchCaptured GroupResult
"6/4/5/3"5/33✅ 3
"1/2"1/22✅ 2
"9"No match❌ Original string
"abc/def"No match❌ Original string

🔧 Alternative Regex Patterns

-- For single-level ancestry (no slashes)
regexp_replace(ancestry, '^(\d+)$', '\1')

-- For extracting first parent instead of last
regexp_replace(ancestry, '^(\d+)\/.*', '\1')

-- For handling mixed delimiters (/ or -)
regexp_replace(ancestry, '.*[\/\-](\d+)$', '\1')

💻 Implementation Examples

🔧 Example 1: Basic Parent Lookup

-- Find each project with its immediate parent information
SELECT 
    p.id,
    p.name AS project_name,
    p.ancestry,
    parent.id AS parent_id,
    parent.name AS parent_name
FROM projects p
LEFT OUTER JOIN projects parent 
    ON CAST(
        regexp_replace(p.ancestry, '.*\/(\d+)$', '\1')
        AS BIGINT
    ) = parent.id
WHERE p.ancestry IS NOT NULL
ORDER BY p.id;

Expected Output:

 id | project_name | ancestry | parent_id | parent_name
----+--------------+----------+-----------+-------------
  2 | Department A | 1        |         1 | Root Project
  3 | Team Alpha   | 1/2      |         2 | Department A
  4 | Task 1       | 1/2/3    |         3 | Team Alpha
  5 | Subtask 1A   | 1/2/3/4  |         4 | Task 1

🎯 Example 2: Handling Edge Cases

-- Robust query that handles all edge cases
SELECT 
    p.id,
    p.name AS project_name,
    p.ancestry,
    CASE 
        WHEN p.ancestry IS NULL THEN 'Root Level'
        WHEN p.ancestry !~ '.*\/(\d+)$' THEN 'Single Parent'
        ELSE 'Multi-level'
    END AS hierarchy_type,
    parent.name AS parent_name
FROM projects p
LEFT OUTER JOIN projects parent ON 
    CASE 
        -- Handle multi-level ancestry
        WHEN p.ancestry ~ '.*\/(\d+)$' THEN
            CAST(regexp_replace(p.ancestry, '.*\/(\d+)$', '\1') AS BIGINT)
        -- Handle single-level ancestry
        WHEN p.ancestry ~ '^\d+$' THEN
            CAST(p.ancestry AS BIGINT)
        ELSE NULL
    END = parent.id
ORDER BY p.id;

📈 Example 3: Aggregating Child Counts

-- Count children for each project
WITH parent_child_mapping AS (
    SELECT 
        p.id AS child_id,
        CASE 
            WHEN p.ancestry ~ '.*\/(\d+)$' THEN
                CAST(regexp_replace(p.ancestry, '.*\/(\d+)$', '\1') AS BIGINT)
            WHEN p.ancestry ~ '^\d+$' THEN
                CAST(p.ancestry AS BIGINT)
            ELSE NULL
        END AS parent_id
    FROM projects p
    WHERE p.ancestry IS NOT NULL
)
SELECT 
    p.id,
    p.name,
    COUNT(pcm.child_id) AS direct_children_count
FROM projects p
LEFT JOIN parent_child_mapping pcm ON p.id = pcm.parent_id
GROUP BY p.id, p.name
ORDER BY direct_children_count DESC;

🚨 Common Errors and Solutions

Error 1: “invalid input syntax for type bigint”

Problem:

-- ❌ Incorrect: Casting entire ancestry string
CAST(projects.ancestry AS BIGINT) = parent.id

Solution:

-- ✅ Correct: Cast only the extracted value
CAST(
    regexp_replace(projects.ancestry, '.*\/(\d+)$', '\1') 
    AS BIGINT
) = parent.id

Error 2: Unexpected Results with Single-Level Ancestry

Problem: Single values like "9" don’t match the pattern .*\/(\d+)$

Solution:

-- ✅ Handle both multi-level and single-level ancestry
CASE 
    WHEN ancestry ~ '.*\/(\d+)$' THEN
        CAST(regexp_replace(ancestry, '.*\/(\d+)$', '\1') AS BIGINT)
    WHEN ancestry ~ '^\d+$' THEN
        CAST(ancestry AS BIGINT)
    ELSE NULL
END

Error 3: NULL Ancestry Values Causing Issues

Problem: NULL values can cause unexpected behaviour in joins

Solution:

-- ✅ Explicitly handle NULL values
WHERE ancestry IS NOT NULL 
AND ancestry != ''

🛡️ Complete Error-Resistant Query

SELECT 
    p.id,
    p.name AS project_name,
    p.ancestry,
    parent.id AS parent_id,
    parent.name AS parent_name
FROM projects p
LEFT OUTER JOIN projects parent ON 
    CASE 
        WHEN p.ancestry IS NULL OR p.ancestry = '' THEN NULL
        WHEN p.ancestry ~ '.*\/(\d+)$' THEN
            CAST(regexp_replace(p.ancestry, '.*\/(\d+)$', '\1') AS BIGINT)
        WHEN p.ancestry ~ '^\d+$' THEN
            CAST(p.ancestry AS BIGINT)
        ELSE NULL
    END = parent.id
ORDER BY p.id;

⚡ Performance Considerations

📊 Indexing Strategies

-- Create index on ancestry for faster pattern matching
CREATE INDEX idx_projects_ancestry ON projects (ancestry);

-- Create partial index for non-null ancestry values
CREATE INDEX idx_projects_ancestry_not_null 
ON projects (ancestry) 
WHERE ancestry IS NOT NULL;

-- Create functional index for extracted parent IDs
CREATE INDEX idx_projects_parent_id ON projects (
    CASE 
        WHEN ancestry ~ '.*\/(\d+)$' THEN
            CAST(regexp_replace(ancestry, '.*\/(\d+)$', '\1') AS BIGINT)
        WHEN ancestry ~ '^\d+$' THEN
            CAST(ancestry AS BIGINT)
        ELSE NULL
    END
) WHERE ancestry IS NOT NULL;

🔄 Query Optimization Tips

  1. 🎯 Use CTEs for Complex Logic
WITH parent_lookup AS (
    SELECT 
        id,
        CASE 
            WHEN ancestry ~ '.*\/(\d+)$' THEN
                CAST(regexp_replace(ancestry, '.*\/(\d+)$', '\1') AS BIGINT)
            WHEN ancestry ~ '^\d+$' THEN
                CAST(ancestry AS BIGINT)
        END AS parent_id
    FROM projects
    WHERE ancestry IS NOT NULL
)
SELECT p.*, parent.name AS parent_name
FROM parent_lookup p
JOIN projects parent ON p.parent_id = parent.id;
  1. ⚡ Consider Materialized Views for Frequent Queries
CREATE MATERIALIZED VIEW project_hierarchy AS
SELECT 
    p.id,
    p.name,
    p.ancestry,
    CASE 
        WHEN p.ancestry ~ '.*\/(\d+)$' THEN
            CAST(regexp_replace(p.ancestry, '.*\/(\d+)$', '\1') AS BIGINT)
        WHEN p.ancestry ~ '^\d+$' THEN
            CAST(p.ancestry AS BIGINT)
    END AS parent_id
FROM projects p;

-- Refresh when data changes
REFRESH MATERIALIZED VIEW project_hierarchy;

🛠️ Advanced Techniques

🔍 Extracting Multiple Ancestry Levels

-- Extract all ancestry levels as an array
SELECT 
    id,
    name,
    ancestry,
    string_to_array(ancestry, '/') AS ancestry_array,
    -- Get specific levels
    split_part(ancestry, '/', 1) AS level_1,
    split_part(ancestry, '/', 2) AS level_2,
    split_part(ancestry, '/', -1) AS last_level
FROM projects
WHERE ancestry IS NOT NULL;

🧮 Calculating Hierarchy Depth

-- Calculate the depth of each project in the hierarchy
SELECT 
    id,
    name,
    ancestry,
    CASE 
        WHEN ancestry IS NULL THEN 0
        ELSE array_length(string_to_array(ancestry, '/'), 1)
    END AS hierarchy_depth
FROM projects
ORDER BY hierarchy_depth, id;

🌳 Building Complete Hierarchy Paths

-- Recursive CTE to build full hierarchy paths
WITH RECURSIVE hierarchy_path AS (
    -- Base case: root projects
    SELECT 
        id,
        name,
        ancestry,
        name AS full_path,
        0 AS level
    FROM projects 
    WHERE ancestry IS NULL

    UNION ALL

    -- Recursive case: child projects
    SELECT 
        p.id,
        p.name,
        p.ancestry,
        hp.full_path || ' → ' || p.name AS full_path,
        hp.level + 1 AS level
    FROM projects p
    JOIN hierarchy_path hp ON 
        CASE 
            WHEN p.ancestry ~ '.*\/(\d+)$' THEN
                CAST(regexp_replace(p.ancestry, '.*\/(\d+)$', '\1') AS BIGINT)
            WHEN p.ancestry ~ '^\d+$' THEN
                CAST(p.ancestry AS BIGINT)
        END = hp.id
)
SELECT * FROM hierarchy_path
ORDER BY level, id;

✅ Best Practices

🎯 Data Validation

  1. ✅ Validate Ancestry Format on Insert/Update
-- Add constraint to ensure valid ancestry format
ALTER TABLE projects 
ADD CONSTRAINT check_ancestry_format 
CHECK (
    ancestry IS NULL 
    OR ancestry ~ '^(\d+)(\/\d+)*$'
);
  1. 🔍 Regular Data Integrity Checks
-- Find orphaned projects (ancestry points to non-existent parent)
SELECT p.id, p.name, p.ancestry
FROM projects p
WHERE p.ancestry IS NOT NULL
AND NOT EXISTS (
    SELECT 1 FROM projects parent
    WHERE parent.id = CASE 
        WHEN p.ancestry ~ '.*\/(\d+)$' THEN
            CAST(regexp_replace(p.ancestry, '.*\/(\d+)$', '\1') AS BIGINT)
        WHEN p.ancestry ~ '^\d+$' THEN
            CAST(p.ancestry AS BIGINT)
    END
);

🛡️ Error Handling

-- Function to safely extract parent ID
CREATE OR REPLACE FUNCTION extract_parent_id(ancestry_text TEXT)
RETURNS BIGINT AS $$
BEGIN
    IF ancestry_text IS NULL OR ancestry_text = '' THEN
        RETURN NULL;
    END IF;

    IF ancestry_text ~ '.*\/(\d+)$' THEN
        RETURN CAST(regexp_replace(ancestry_text, '.*\/(\d+)$', '\1') AS BIGINT);
    ELSIF ancestry_text ~ '^\d+$' THEN
        RETURN CAST(ancestry_text AS BIGINT);
    ELSE
        RETURN NULL;
    END IF;
EXCEPTION 
    WHEN OTHERS THEN
        RETURN NULL;
END;
$$ LANGUAGE plpgsql IMMUTABLE;

-- Usage
SELECT p.*, parent.name AS parent_name
FROM projects p
LEFT JOIN projects parent ON extract_parent_id(p.ancestry) = parent.id;

📊 Monitoring and Maintenance

-- Query to analyze ancestry data quality
SELECT 
    'Total Projects' AS metric,
    COUNT(*) AS count
FROM projects

UNION ALL

SELECT 
    'Projects with Ancestry' AS metric,
    COUNT(*) AS count
FROM projects 
WHERE ancestry IS NOT NULL

UNION ALL

SELECT 
    'Valid Ancestry Format' AS metric,
    COUNT(*) AS count
FROM projects 
WHERE ancestry ~ '^(\d+)(\/\d+)*$'

UNION ALL

SELECT 
    'Orphaned Projects' AS metric,
    COUNT(*) AS count
FROM projects p
WHERE p.ancestry IS NOT NULL
AND extract_parent_id(p.ancestry) NOT IN (SELECT id FROM projects);

📝 Conclusion

Working with ancestry data in PostgreSQL requires careful handling of string manipulation, type conversion, and edge cases. By following the techniques outlined in this guide, you can:

🎯 Key Takeaways

  1. 🔍 Use robust regex patterns to handle different ancestry formats
  2. 🛡️ Always handle edge cases like NULL values and malformed strings
  3. ⚡ Consider performance implications and use appropriate indexing
  4. ✅ Implement data validation to maintain ancestry integrity
  5. 🔧 Create reusable functions for complex extraction logic

💡 Final Recommendations

  • 🎯 Test thoroughly with various ancestry formats
  • 📊 Monitor query performance and optimize as needed
  • 🔄 Consider alternative approaches like ltree for complex hierarchies
  • 📚 Document your ancestry format for team members
  • 🛠️ Implement proper error handling in production code

The techniques demonstrated here provide a solid foundation for working with hierarchical data in PostgreSQL. Whether you’re building organizational charts, category trees, or project hierarchies, these patterns will help you extract and manipulate ancestry data effectively and reliably! 🚀


📖 Additional Resources

PostgreSQL commands to remember

List of commands to remember using postgres DB managment system.

Login, Create user and password

# login to psql client
psql postgres # OR
psql -U postgres
create database mydb; # create db
create user abhilash with SUPERUSER CREATEDB CREATEROLE encrypted password 'abhilashPass!'; 
grant all privileges on database mydb to myuser; # add privileges

Connect to DB, List tables and users, functions, views, schema

\l # lists all the databases
\c dbname # connect to db
\dt # show tables
\d table_name # Describe a table
\dn # List available schema
\df #  List available functions
\dS [your_table_name] # List triggers
\dv # List available views
\du # lists all user accounts and roles 
\du+ # is the extended version which shows even more information.

Show history, save to file, edit using editor, execution time, help

SELECT version(); # version of psql
\g  # Execute the previous command
\s # Command history
\s filename # save Command history to a file
\i filename # Execute psql commands from a file
\? # help on psql commands
\h ALTER TABLE # To get help on specific PostgreSQL statement
\timing #  Turn on/off query execution time
\e # Edit command in your own editor
\e [function_name] # It is more useful when you edit a function in the editor. Do \df for functions
\o [file_name] # send all next query results to file
    \o out.txt
    \dt 
    \o # switch
    \dt

Change output, Quit psql

# Switch output options
\a command switches from aligned to non-aligned column output.
\H command formats the output to HTML format.
\q # quit psql

Reference: https://www.postgresqltutorial.com/postgresql-administration/psql-commands/

PostgreSQL Cheat Sheet

CREATE DATABASE

CREATE DATABASE dbName;

CREATE TABLE (with auto numbering integer id)

CREATE TABLE tableName (
 id serial PRIMARY KEY,
 name varchar(50) UNIQUE NOT NULL,
 dateCreated timestamp DEFAULT current_timestamp
);

Add a primary key

ALTER TABLE tableName ADD PRIMARY KEY (id);

Create an INDEX

CREATE UNIQUE INDEX indexName ON tableName (columnNames);

Backup a database (command line)

pg_dump dbName > dbName.sql

Backup all databases (command line)

pg_dumpall > pgbackup.sql

Run a SQL script (command line)

psql -f script.sql databaseName

Search using a regular expression

SELECT column FROM table WHERE column ~ 'foo.*';

The first N records

SELECT columns FROM table LIMIT 10;

Pagination

SELECT cols FROM table LIMIT 10 OFFSET 30;

Prepared Statements

PREPARE preparedInsert (int, varchar) AS
  INSERT INTO tableName (intColumn, charColumn) VALUES ($1, $2);
EXECUTE preparedInsert (1,'a');
EXECUTE preparedInsert (2,'b');
DEALLOCATE preparedInsert;

Create a Function

CREATE OR REPLACE FUNCTION month (timestamp) RETURNS integer 
 AS 'SELECT date_part(''month'', $1)::integer;'
LANGUAGE 'sql';

Table Maintenance

VACUUM ANALYZE table;

Reindex a database, table or index

REINDEX DATABASE dbName;

Show query plan

EXPLAIN SELECT * FROM table;

Import from a file

COPY destTable FROM '/tmp/somefile';

Show all runtime parameters

SHOW ALL;

Grant all permissions to a user

GRANT ALL PRIVILEGES ON table TO username;

Perform a transaction

BEGIN TRANSACTION 
 UPDATE accounts SET balance += 50 WHERE id = 1;
COMMIT;

Basic SQL

Get all columns and rows from a table

SELECT * FROM table;

Add a new row

INSERT INTO table (column1,column2)
VALUES (1, 'one');

Update a row

UPDATE table SET foo = 'bar' WHERE id = 1;

Delete a row

DELETE FROM table WHERE id = 1;

From: https://www.petefreitag.com/cheatsheets/postgresql/


Liferay 7.3: Create custom database services (service-builder)

STEP 1:

Open the IDE. Goto File -> New -> Liferay Module Project


Select `service-builder` as Template

Click Next. Provide the package name and click finish

After that you can see two folders are created (*-api and *-service) inside your workspace.

And three folders in the IDE

Open siteService-service and click on service.xml . Click on the Entities and delete the default Foo column

And then add the Entity named Site . It is just an Entity, that connects to the table.

Click on the Site Entity and provide the table name

Add the Table Name

Add the columns as many as you want.

Select the column type from here:

Click on the Source Tab and you can see in the service.xml details of all columns that added.

Double click on the buildService to build the new service and double click on the deploy to deploy the service.

Now click on the down arrow and gradle -> refresh project. You can see the bundles created.

And the .jar bundles inside the osgi modules

Copy this *-api.jar file into the deploy folder of the server.

~/liferay-ce-portal-tomcat-7.3.0-ga1-20200127150653953/liferay-ce-portal-7.3.0-ga1/deploy

and then copy the *-service.jar into the same folder

You can see these are processing and started in the server logs.

INFO  [com.liferay.portal.kernel.deploy.auto.AutoDeployScanner][AutoDeployDir:263] Processing sitesService.api.jar

~/liferay-ce-portal-tomcat-7.3.0-ga1-20200127150653953/liferay-ce-portal-7.3.0-ga1/osgi/modules][BundleStartStopLogger:39] STARTED sitesService.api_1.0.0 [1115]

[com.liferay.portal.kernel.deploy.auto.AutoDeployScanner][AutoDeployDir:263] Processing sitesService.service.jar

~/liferay-ce-portal-tomcat-7.3.0-ga1-20200127150653953/liferay-ce-portal-7.3.0-ga1/osgi/modules][BundleStartStopLogger:39] STARTED sitesService.service_1.0.0 [1116]


Now check the database, if the Site_ table with all columns are created or not

You can see the table and columns are created. In the next topic we discuss about adding services to this service builder.

Backup your system databases using Ruby backup gem

Install RVM (Or Rbenv) to manage your Ruby versions

 $ gpg --keyserver hkp://keys.gnupg.net --recv-keys 409B6B1796C275462A1703113804BB82D39DC0E3 7D2BAF1CF37B13E2069D6956105BD0E739499BDB
 $ curl -sSL https://get.rvm.io | bash 

Restart Terminal and type rvm -v

 $ rvm install 2.5
 $ rvm gemset create backup
 $ rvm gemset use backup
 $ gem install backup
 $ backup generate:model --trigger project_2_backup --archives --storages='s3' --compressor='gzip' --notifiers='mail' 
 Generated configuration file: '/home/ubuntu/Backup/config.rb'.
 Generated model file: '/home/ubuntu/Backup/models/project_2_backup.rb'.
 Usage:
   backup generate:model --trigger=TRIGGER
 Options:
   --trigger=TRIGGER
   [--config-path=CONFIG_PATH]  # Path to your Backup configuration directory
   [--databases=DATABASES]      # (mongodb, mysql, postgresql, redis, riak)
   [--storages=STORAGES]        # (cloudfiles, dropbox, ftp, local, ninefold, rsync, s3, scp, sftp)
   [--syncers=SYNCERS]          # (cloud_files, rsync_local, rsync_pull, rsync_push, s3)
   [--encryptors=ENCRYPTORS]    # (gpg, openssl)
   [--compressors=COMPRESSORS]  # (bzip2, gzip, lzma, pbzip2)
   [--notifiers=NOTIFIERS]      # (campfire, hipchat, mail, presently, prowl, twitter)
   [--archives]
   [--splitter]                 # use `--no-splitter` to disable
                               # Default: true 

Sample Model File

Add the following conf in Backup/models/project_2_backup.rb:

Example for mongodb

 database MongoDB do |db|
     db.name               = "db_name"
     db.username           = "db_username"
     db.password           = "db_pswd"
     db.host               = "localhost"
     db.port               = 27017 
     db.ipv6               = false
     #db.only_collections   = ["only", "these", "collections"]
     db.additional_options = ['--authenticationDatabase=admin']
     db.lock               = false
     db.oplog              = false
   end
   ## 
   # Amazon Simple Storage Service [Storage]
   #
   store_with S3 do |s3|
     # AWS Credentials
     s3.access_key_id     = "YOUR_ACCESS_KEY"
     s3.secret_access_key = "YOUR_SECRET_KEY"
     # Or, to use a IAM Profile:
     # s3.use_iam_profile = true
     s3.region            = "ap-southeast-2" 
     s3.bucket            = "bucket_name"
     s3.path              = "bucket_name_path"
     s3.keep              = 12
     # s3.keep              = Time.now - 2592000 # Remove all backups older than 1 month.
   end 

 # Notification mail infos
 notify_by Mail do |mail|
     mail.on_success           = true
     mail.on_warning           = true
     mail.on_failure           = true
     mail.from                 = "_____@gmail.com"
     mail.to                   = "____@___.com"
     mail.cc                   = "______@_____.com, _____@______.com"
     #mail.bcc                  = "bcc@email.com"
     #mail.reply_to             = "reply_to@email.com" 
     mail.address              = "smtp.gmail.com"
     mail.port                 = 587
     mail.domain               = "domain_name"
     mail.user_name            = "email_username"
     mail.password             = "email_password"
     mail.authentication       = "plain"
     mail.encryption           = :starttls
 end 

Once you’ve setup your configuration, check your work with:

$ backup check

If there are no errors, the check should report:

[2019/03/28 10:02:26][info] Configuration Check Succeeded.

Perform Backup:

$ backup perform --trigger project_2_backup

The Keep Option

keep a specified number of backups in storage. After each backup is performed, it will remove older backup package files based on the keep setting.

keep as a Number

If a number has been specified and once the keep limit has been reached, the oldest backup will be removed.

Note that if keep is set to 5, then the 6th backup will be transferred and stored, before the oldest is removed. So be sure you have space available for keep + 1 backups

keep as Time

When a Time object is set to keep it will keep backups until that time. Everything older than the set time will be removed.

How to reinstall mongodb in ubuntu linux

Before reinstalling mongodb, in your linux system check whats installed in the system

 $ sudo dpkg -l | grep mongo
 ii  mongodb-org                              2.6.3                                       amd64        MongoDB open source document-oriented database system (metapackage)
 ii  mongodb-org-mongos                       2.6.3                                       amd64        MongoDB sharded cluster query router
 ii  mongodb-org-server                       2.6.3                                       amd64        MongoDB database server
 ii  mongodb-org-shell                        2.6.3                                       amd64        MongoDB shell client
 ii  mongodb-org-tools                        2.6.3                                       amd64        MongoDB tools

Remove all
$ sudo apt-get remove mongodb*

Install mongodb again, check mongodb org

$ sudo apt-get install -y mongodb-org

For particular version

$ sudo apt-get install -y mongodb-org=2.6.5 mongodb-org-server=2.6.5 mongodb-org-shell=2.6.5 mongodb-org-mongos=2.6.5 mongodb-org-tools=2.6.5


check whats newly installed

$ sudo dpkg -l | grep mongo
 ii  mongodb-org                              2.6.8                                       amd64        MongoDB open source document-oriented database system (metapackage)
 ii  mongodb-org-mongos                       2.6.8                                       amd64        MongoDB sharded cluster query router
 ii  mongodb-org-server                       2.6.8                                       amd64        MongoDB database server
 ii  mongodb-org-shell                        2.6.8                                       amd64        MongoDB shell client
 ii  mongodb-org-tools                        2.6.8                                       amd64        MongoDB tools

check mongodb server status

$ sudo service mongod status

Start mongodb server

$ sudo service mongod start

Start mongo shell

$ mongo

check mongodb log file here

 $ tail -n 200 /var/log/mongodb/mongod.log