Setting Up Terminal 🖥️ for Development on MacOS (Updated 2025)

If you’re setting up your MacBook for development, having a well-configured terminal is essential. This guide will walk you through installing and configuring a powerful terminal setup using Homebrew, iTerm2, and Oh My Zsh, along with useful plugins.

1. Install Homebrew

Homebrew is a package manager that simplifies installing software on macOS.

Open the Terminal and run:

/bin/bash -c "$(curl -fsSL https://raw.githubusercontent.com/Homebrew/install/HEAD/install.sh)"

After installation, add Homebrew to your PATH by running the following commands:

echo >> ~/.zprofile
echo 'eval "$(/opt/homebrew/bin/brew shellenv)"' >> ~/.zprofile
eval "$(/opt/homebrew/bin/brew shellenv)"

Verify installation:

brew --version

Check here.

2. Install iTerm2

The default macOS Terminal is functional but lacks advanced features. iTerm2 is a powerful alternative.

Install it using Homebrew:

brew install --cask iterm2

Open iTerm2 from your Applications folder after installation.

Check and Install Git

Ensure Git is installed:

git --version

If not installed, install it using Homebrew:

brew install git

3. Install Oh My Zsh

Oh My Zsh enhances the Zsh shell with themes and plugins. Install it with:

sh -c "$(curl -fsSL https://raw.githubusercontent.com/ohmyzsh/ohmyzsh/master/tools/install.sh)"

Check here.

Configure .zshrc

Edit your .zshrc file:

vim ~/.zshrc

Add useful plugins:

plugins=(git rails ruby)

The default theme is robbyrussell. You can explore other themes here.

Customize iTerm2 Color Scheme

Find and import themes from iTerm2 Color Schemes.

4. Add Zsh Plugins

Enhance your terminal experience with useful plugins.

a. Install zsh-autosuggestions

This plugin provides command suggestions as you type.

Install via Oh My Zsh:

git clone https://github.com/zsh-users/zsh-autosuggestions ${ZSH_CUSTOM:-~/.oh-my-zsh/custom}/plugins/zsh-autosuggestions

Or install via Homebrew:

brew install zsh-autosuggestions

Add to ~/.zshrc:

plugins=(git rails ruby zsh-autosuggestions)

If installed via Homebrew, add:

source /opt/homebrew/share/zsh-autosuggestions/zsh-autosuggestions.zsh

to the bottom of ~/.zshrc.

Restart iTerm2:

exec zsh

b. Install zsh-syntax-highlighting

This plugin highlights commands to distinguish valid syntax from errors.

Install via Oh My Zsh:

git clone https://github.com/zsh-users/zsh-syntax-highlighting.git ${ZSH_CUSTOM:-~/.oh-my-zsh/custom}/plugins/zsh-syntax-highlighting

Add to .zshrc:

plugins=(git rails ruby zsh-autosuggestions zsh-syntax-highlighting)

Restart iTerm2:

exec zsh

Wrapping Up

Your terminal is now set up for an optimized development experience! With Homebrew, iTerm2, Oh My Zsh, and useful plugins, your workflow will be faster and more efficient.

to be continued …

Senior-Level Linux Commands Every Backend Engineer Should Know

For a senior backend engineer, Linux commands are more than tools for navigating directories.

They become a production debugging language.

When a Rails application is consuming too much memory, a log contains millions of lines, a deployment introduces unexpected configuration changes, or a background worker suddenly starts failing, knowing how to combine commands such as sed, awk, grep, find, xargs, sort, uniq, cut, tr, jq, and ps can save hours.

The real skill is not memorizing commands. It is understanding how to compose them into pipelines.

command1 | command2 | command3

This article focuses on commands and techniques that become particularly valuable at a senior engineering level.


1. grep – Search With Intent

Most developers know:

grep "ERROR" production.log

But grep becomes much more powerful with regular expressions and recursive searches.

Search recursively

grep -R "ActiveRecord::Deadlocked" log/

Useful when you don’t know which file contains the problem.

Ignore case

grep -Ri "timeout" .

Show line numbers

grep -n "connection refused" production.log

Search multiple patterns

grep -E "ERROR|FATAL|Exception" production.log

Show context around matches

grep -C 5 "NoMethodError" production.log

This is extremely useful for application logs because the surrounding lines often contain request IDs, parameters, stack traces, or timestamps.

When to use

Use grep when your primary operation is:

“Find lines matching this condition.”

2. sed – Stream Editing

sed is one of the most useful Linux commands for manipulating text without opening an editor.

The simplest example:

sed 's/foo/bar/g' file.txt

Replace every foo with bar.

Delete lines

Delete empty lines:

sed '/^$/d' file.txt

Delete lines containing DEBUG:

sed '/DEBUG/d' production.log

Print specific lines

sed -n '100,150p' production.log

This displays lines 100 through 150.

Very useful when investigating a specific portion of a huge log file.

Modify a configuration file

For example:

sed -i 's/RAILS_LOG_LEVEL=info/RAILS_LOG_LEVEL=debug/' .env

-i modifies the file in place.

Be careful with production configuration files. Prefer making a backup when appropriate:

sed -i.bak 's/old_value/new_value/g' config.yml

Advanced use: remove sensitive information

Suppose logs contain email addresses:

User login: john@example.com
User login: alice@example.com

We can mask them:

sed -E 's/[[:alnum:]._%+-]+@[[:alnum:].-]+\.[A-Za-z]{2,}/[REDACTED]/g' app.log

This is useful when sanitizing logs before sharing them.

When to use sed

Think:

“I want to transform or filter text while streaming it.”

3. awk – Lightweight Data Processing

awk is one of the most important commands for senior engineers.

It treats input as structured columns.

Suppose:

101 John 4500
102 Alice 6000
103 Bob 5000

Run:

awk '{print $1, $3}' users.txt

Output:

101 4500
102 6000
103 5000

Filter records

awk '$3 > 5000 {print $1, $2, $3}' users.txt

Now only users earning more than 5000 are printed.

Calculate values

awk '{sum += $3} END {print sum}' users.txt

Calculate the total salary.

Average:

awk '{sum += $3; count++} END {print sum/count}' users.txt

Processing logs

Imagine an Nginx log:

10.0.0.1 GET /users 200
10.0.0.2 GET /users 500
10.0.0.3 GET /products 200
10.0.0.4 GET /users 500

Extract HTTP status:

awk '{print $4}' access.log

Count status codes:

awk '{print $4}' access.log | sort | uniq -c

Result:

2 200
2 500

awk with conditions

awk '$4 >= 500 {print}' access.log

Find server errors.

When to use awk

Think:

“My input has columns/records and I need to filter, transform, aggregate, or calculate something.”

For quick operational data analysis, awk can often replace writing a small script.

4. cut – Extract Columns

For simple column extraction, cut is usually easier than awk.

Example:

cut -d',' -f1 users.csv

Extract the first CSV field.

Multiple fields:

cut -d',' -f1,3 users.csv

Character ranges:

cut -c1-10 file.txt

Use cut when the operation is straightforward.

Use awk when logic becomes conditional or computational.

5. sort + uniq – Finding Patterns

These commands become extremely powerful together.

Suppose you want to find the most common URLs:

awk '{print $7}' access.log |
sort |
uniq -c |
sort -nr

Example:

1500 /api/users
980 /api/orders
450 /health

This is a classic production-analysis pipeline.

Why sort before uniq?

uniq only detects adjacent duplicate lines.

Therefore:

sort file.txt | uniq

is usually required.

6. head and tail – Inspect Large Files Safely

Instead of opening a 10 GB log:

head -n 50 production.log

Last 100 lines:

tail -n 100 production.log

The real power is:

tail -f production.log

Follow new log entries in real time.

For Rails applications this is particularly useful during deployments:

tail -f log/production.log

You can combine it with grep:

tail -f production.log | grep --line-buffered "ERROR"

Now you’re effectively monitoring errors as they occur.

7. find – Locate Files Precisely

Find Ruby files:

find app/ -type f -name "*.rb"

Find files modified recently:

find log/ -type f -mtime -1

Find large files:

find /var/log -type f -size +500M

Find and execute a command:

find tmp/ -type f -name "*.tmp" -delete

Be careful with destructive commands.

A safer approach is:

find tmp/ -type f -name "*.tmp" -print

Inspect the result first.

8. xargs – Turn Output Into Arguments

Suppose:

find tmp/ -type f -name "*.tmp"

returns many files.

You can pass them to another command:

find tmp/ -type f -name "*.tmp" -print0 |
xargs -0 rm

-print0 and -0 are important because filenames can contain spaces or special characters.

Another example:

grep -Rl "TODO" app/ | xargs wc -l

This finds files containing TODO and counts their lines.

9. ps – Understand Running Processes

For a Rails server:

ps aux | grep puma

More useful:

ps aux --sort=-%mem | head

Find processes consuming the most memory.

CPU:

ps aux --sort=-%cpu | head

This can quickly identify runaway workers.

10. top and htop – Live System Diagnosis

top

For an easier interactive interface:

htop

Use these when diagnosing:

  • High CPU
  • Memory pressure
  • Load
  • Runaway processes
  • Number of workers
  • Process states

For application debugging, don’t look only at Rails logs. Always correlate application behavior with OS-level resource usage.

11. df vs du

These commands answer different questions.

Disk filesystem usage

df -h

Answers:

How full is the filesystem?

Directory usage

du -sh log/

Answers:

What is consuming the space?

Find the largest directories:

du -sh * | sort -hr | head

This is extremely useful when a server suddenly reports:

No space left on device

12. lsof – Discover Who Owns a Resource

Find which process is using port 3000:

lsof -i :3000

Find processes using a file:

lsof /var/log/production.log

Find deleted files still consuming disk:

lsof +L1

This last one is particularly valuable.

A process may keep a deleted log file open. du may not show the file anymore, while disk space remains consumed until the process releases it.

13. ss – Network Investigation

Modern Linux systems commonly use ss for socket inspection.

Check listening ports:

ss -lntp

Check established connections:

ss -nt

Find connections to port 5432:

ss -nt | grep ':5432'

This can help investigate:

  • PostgreSQL connection exhaustion
  • Unexpected network connections
  • Services not listening
  • Connection buildup

14. jq – JSON From the Command Line

Modern APIs produce JSON everywhere.

Suppose:

{
"users": [
{"id": 1, "name": "John"},
{"id": 2, "name": "Alice"}
]
}

Extract names:

jq '.users[].name' response.json

Output:

"John"
"Alice"

Transform it:

jq -r '.users[] | "\(.id),\(.name)"' response.json

This becomes especially powerful when debugging APIs:

curl -s https://example.com/api/users |
jq '.users[] | select(.active == true)'

15. curl – API Debugging From the Shell

Instead of immediately reaching for Postman:

curl -i https://example.com/health

POST JSON:

curl -X POST https://example.com/api/users \
-H "Content-Type: application/json" \
-d '{"name":"John"}'

Measure request timing:

curl -o /dev/null -s \
-w 'HTTP: %{http_code}\nTime: %{time_total}s\n' \
https://example.com

This is extremely useful when debugging production APIs.

16. tee – See and Save Output Simultaneously

bundle exec rails db:migrate 2>&1 | tee migration.log

The output is displayed on the terminal while simultaneously being written to a file.

Useful during deployments and troubleshooting.

17. Powerful Pipelines

The real senior-level skill comes from combining commands.

For example, identify the most frequent 500 responses:

grep " 500 " access.log |
awk '{print $7}' |
sort |
uniq -c |
sort -nr |
head -20

Or find the largest log files:

find /var/log -type f -size +100M -print |
xargs -r ls -lh |
sort -k5 -hr

Or monitor Rails errors:

tail -f log/production.log |
grep --line-buffered -E "ERROR|FATAL|Exception"

18. A Practical Senior Engineer Mental Model

Instead of memorizing hundreds of commands, categorize them.

RequirementCommands
Searchgrep, rg
Transform textsed
Process columns/dataawk, cut
Count/group datasort, uniq
Locate filesfind
Connect commandsxargs, pipes
Inspect processesps, top, htop
Inspect disksdf, du
Inspect socketsss, lsof
JSON processingjq
HTTP/API debuggingcurl
Save + display outputtee

The most important progression is:

Basic Linux
Individual commands
Pipelines
Conditional filtering
Aggregation
Production diagnosis

A senior engineer should be comfortable turning an unclear operational question into a shell pipeline.

For example:

“Which API endpoints are causing the most HTTP 500 errors right now?”

Instead of manually opening a log file, you should naturally arrive at something like:

grep " 500 " access.log |
awk '{print $7}' |
sort |
uniq -c |
sort -nr |
head -20

That is the real power of Linux:

small, composable tools solving complex operational problems.

For Rails engineers especially, mastering these commands means you can diagnose the application, process, filesystem, network, and logs from the same shell instead of relying entirely on application-level tooling.

Happy commanding!

Steps to reinstall rvm in ubuntu

Uninstall RVM – do the following

unset GEM_HOME

rvm implode

rm -rf ~/.rvm

sudo rm -rf /usr/share/rvm

sudo rm /etc/profile.d/rvm.sh

sudo rm /etc/rvmrc

sudo rm ~/.rvmrc

vim ~/.zshrc  # or ~/.bash_profile related to machine/software you use and remove rvm related lines

Install RVM:

sudo apt-get install build-essential

unset rvm_path

sudo apt install gnupg2

Goto https://rvm.io/rvm/install and add gpg keys to verify

gpg --keyserver hkp://pool.sks-keyservers.net --recv-keys 409B6B1796C275462A1703113804BB82D39DC0E3 7D2BAF1CF37B13E2069D6956105BD0E739499BDB
 
\curl -sSL https://get.rvm.io | bash -s stable

If the following error occurs while adding keys:

➜ gpg --keyserver hkp://pool.sks-keyservers.net --recv-keys 409B6B1796C275462A1703113804BB82D39DC0E3 7D2BAF1CF37B13E2069D6956105BD0E739499BDB
gpg: connecting dirmngr at '/run/user/1000/gnupg/S.dirmngr' failed: IPC connect call failed
gpg: keyserver receive failed: No dirmngr

then do:

sudo apt-get update

then you will get some errors regarding the keys, add those keys to following command:

gpg --keyserver hkp://pool.sks-keyservers.net --recv-keys 409B6B1796C275462A1703113804BB82D39DC0E3 7D2BAF1CF37B13E2069D6956105BD0E739499BDB

then do:

\curl -sSL https://get.rvm.io | bash -s stable

Make sure that your ~/.bash_profile or ~/.zshrc file contains the following lines to load rvm to the shell:

# RVM manual script for loading rvm to shell
[[ -s "$HOME/.rvm/scripts/rvm" ]] && . "$HOME/.rvm/scripts/rvm" 

After installing check RVM by:

➜ rvm list

# No rvm rubies installed yet. Try 'rvm help install'.

➜ rvm install 2.7.2
Searching for binary rubies, this might take some time.
Found remote file https://rubies.travis-ci.org/ubuntu/18.04/x86_64/ruby-2.7.2.tar.bz2
Checking requirements for ubuntu.
Requirements installation successful.
ruby-2.7.2 - #configure
ruby-2.7.2 - #download
 ..............
No checksum for downloaded archive, recording checksum in user configuration.
ruby-2.7.2 - #validate archive
ruby-2.7.2 - #extract
ruby-2.7.2 - #validate binary
ruby-2.7.2 - #setup
ruby-2.7.2 - #gemset created ~/.rvm/gems/ruby-2.7.2@global
ruby-2.7.2 - #importing gemset ~/.rvm/gemsets/global.gems..................................
ruby-2.7.2 - #generating global wrappers.......
ruby-2.7.2 - #gemset created ~/.rvm/gems/ruby-2.7.2
ruby-2.7.2 - #importing gemsetfile ~/.rvm/gemsets/default.gems evaluated to empty gem list
ruby-2.7.2 - #generating default wrappers.......

➜ rvm list
=* ruby-2.7.2 [ x86_64 ]

# => - current
# =* - current && default
#  * - default

➜ rvm gemset list

gemsets for ruby-2.7.2 (found in ~/.rvm/gems/ruby-2.7.2)
=> (default)
   global

➜ rvm gemset create foobar
ruby-2.7.2 - #gemset created ~/.rvm/gems/ruby-2.7.2@foobar
ruby-2.7.2 - #generating foobar wrappers.......

➜ rvm gemset list              

gemsets for ruby-2.7.2 (found in ~/.rvm/gems/ruby-2.7.2)
=> (default)
   foobar
   global

➜ rvm gemset use foobar
Using ruby-2.7.2 with gemset foobar

➜ rvm gemset list           

gemsets for ruby-2.7.2 (found in ~/.rvm/gems/ruby-2.7.2)
   (default)
=> foobar
   global

➜ rvm list gemsets

rvm gemsets

   ruby-2.7.2 [ x86_64 ]
=> ruby-2.7.2@foobar [ x86_64 ]
   ruby-2.7.2@global [ x86_64 ]

For preserving the gemset for the current directory create .rvmrc file:

vim .rvmrc
# add this: rvm --rvmrc use foobar

If rvm is not loading into the shell after changing the terminal preferences, check the rvm_path env variable.

$rvm_path      
zsh: no such file or directory: /usr/share/rvm

If you don’t have that directory you must change the above path to a correct rvm installed path.

By default rvm installed in this path: ${HOME}/.rvm So you can add this path to rvm_path

Set it like:

export rvm_path="${HOME}/.rvm"

You can add this line into your ~/.zshrc OR ~/.bash_profile file.

You can check rvm env variables and info by:

env | grep rvm  
rvm info

Check ruby version by: ruby -v If ruby is not loading try to add the following line into your bash_profile:

export PATH=~/.rvm/gems/ruby-2.7.2/bin:$PATH # change version: ruby-2.7.2 to your installed version
source ~/.bash_profile OR source ~/.zshrc # whatever you use
ruby -v
 

Liferay 7.3: Create custom database services (service-builder)

STEP 1:

Open the IDE. Goto File -> New -> Liferay Module Project


Select `service-builder` as Template

Click Next. Provide the package name and click finish

After that you can see two folders are created (*-api and *-service) inside your workspace.

And three folders in the IDE

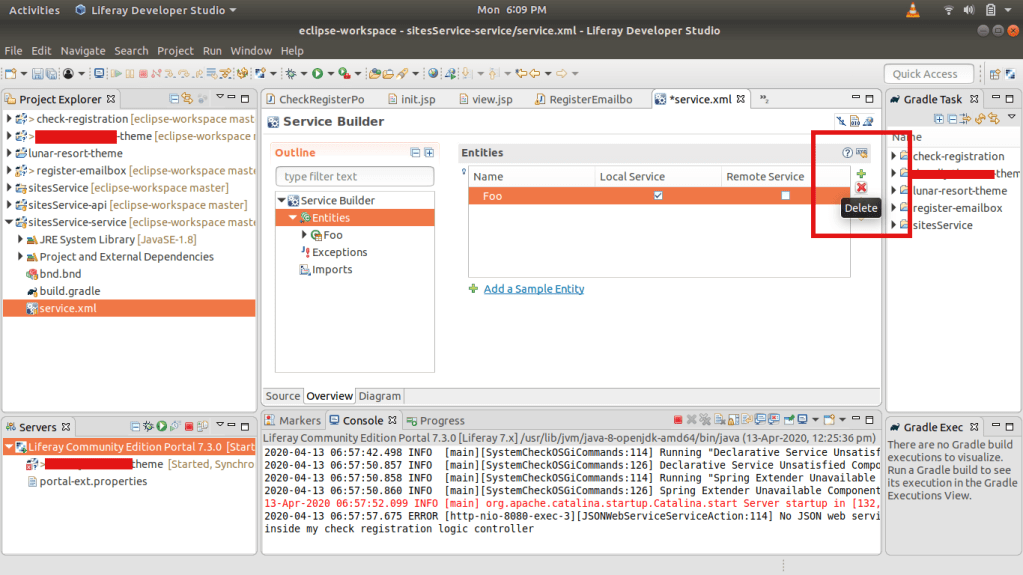
Open siteService-service and click on service.xml . Click on the Entities and delete the default Foo column

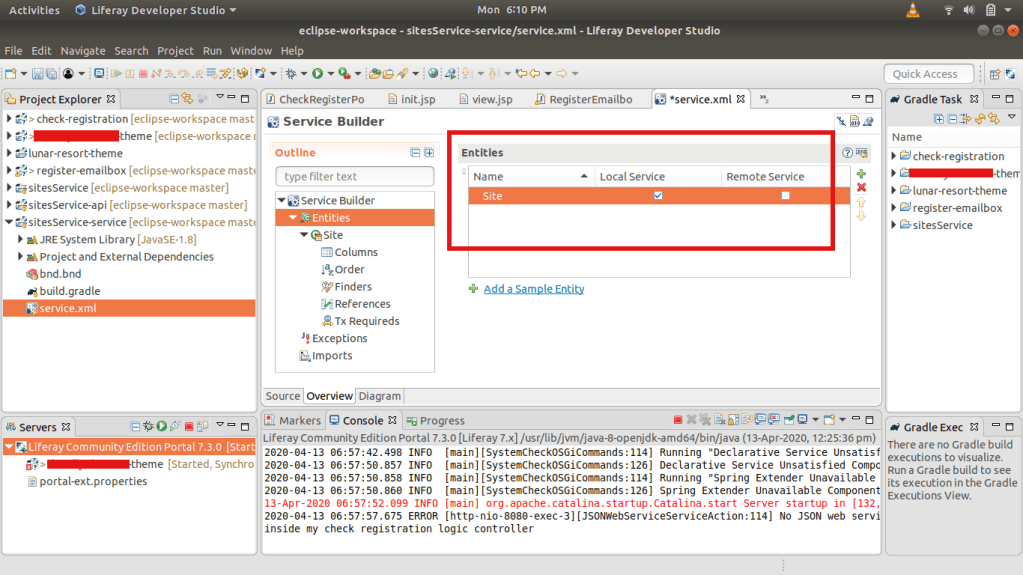
And then add the Entity named Site . It is just an Entity, that connects to the table.

Click on the Site Entity and provide the table name

Add the Table Name

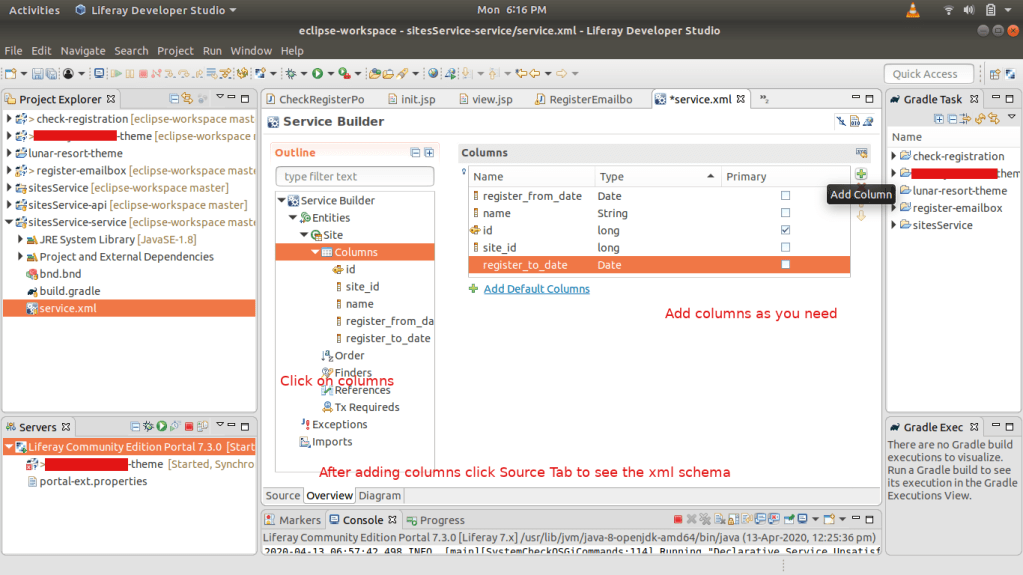
Add the columns as many as you want.

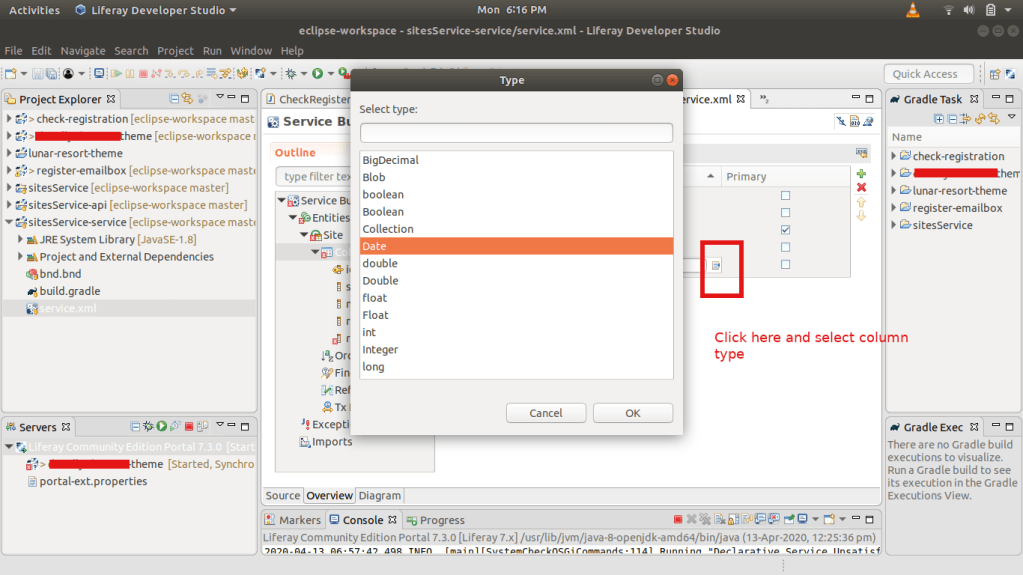
Select the column type from here:

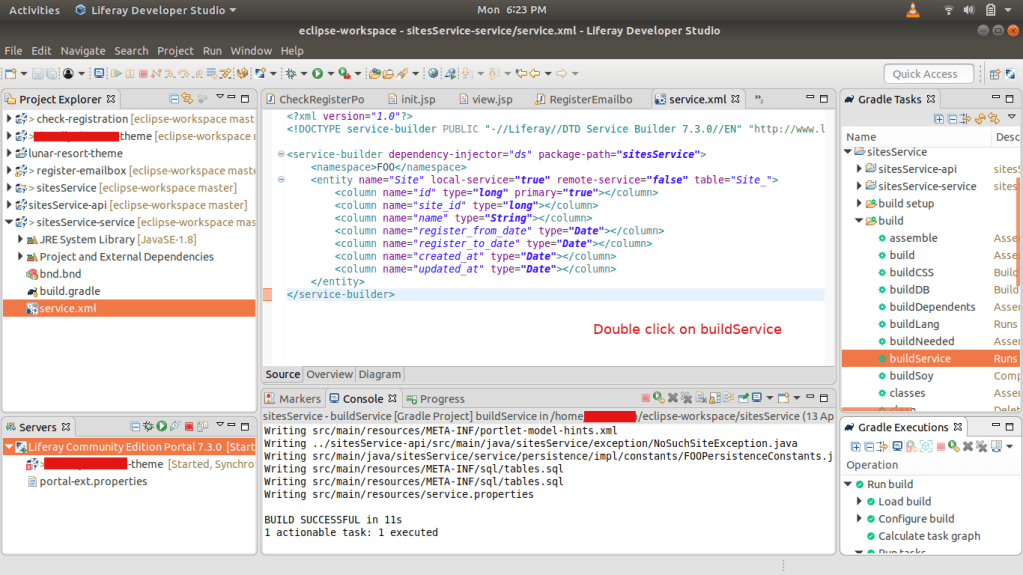
Click on the Source Tab and you can see in the service.xml details of all columns that added.

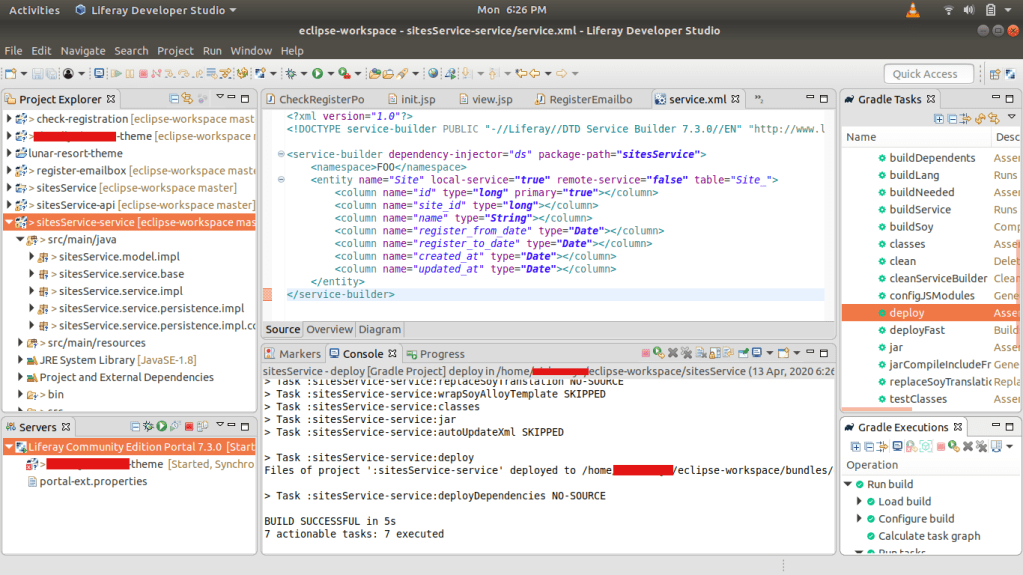
Double click on the buildService to build the new service and double click on the deploy to deploy the service.

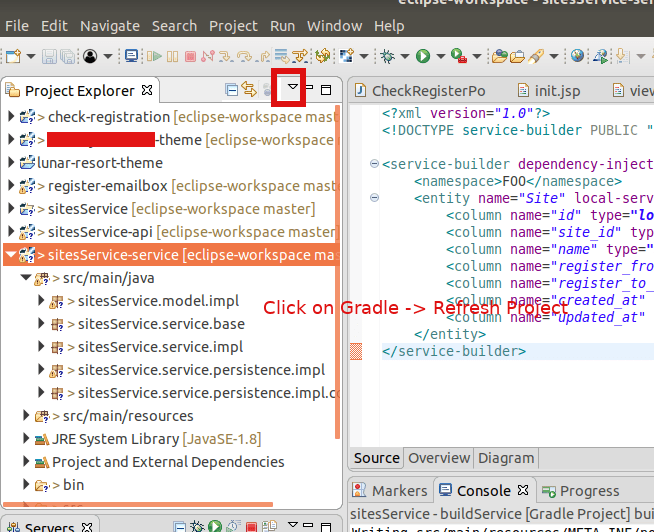
Now click on the down arrow and gradle -> refresh project. You can see the bundles created.

And the .jar bundles inside the osgi modules

Copy this *-api.jar file into the deploy folder of the server.

~/liferay-ce-portal-tomcat-7.3.0-ga1-20200127150653953/liferay-ce-portal-7.3.0-ga1/deploy

and then copy the *-service.jar into the same folder

You can see these are processing and started in the server logs.

INFO  [com.liferay.portal.kernel.deploy.auto.AutoDeployScanner][AutoDeployDir:263] Processing sitesService.api.jar

~/liferay-ce-portal-tomcat-7.3.0-ga1-20200127150653953/liferay-ce-portal-7.3.0-ga1/osgi/modules][BundleStartStopLogger:39] STARTED sitesService.api_1.0.0 [1115]

[com.liferay.portal.kernel.deploy.auto.AutoDeployScanner][AutoDeployDir:263] Processing sitesService.service.jar

~/liferay-ce-portal-tomcat-7.3.0-ga1-20200127150653953/liferay-ce-portal-7.3.0-ga1/osgi/modules][BundleStartStopLogger:39] STARTED sitesService.service_1.0.0 [1116]


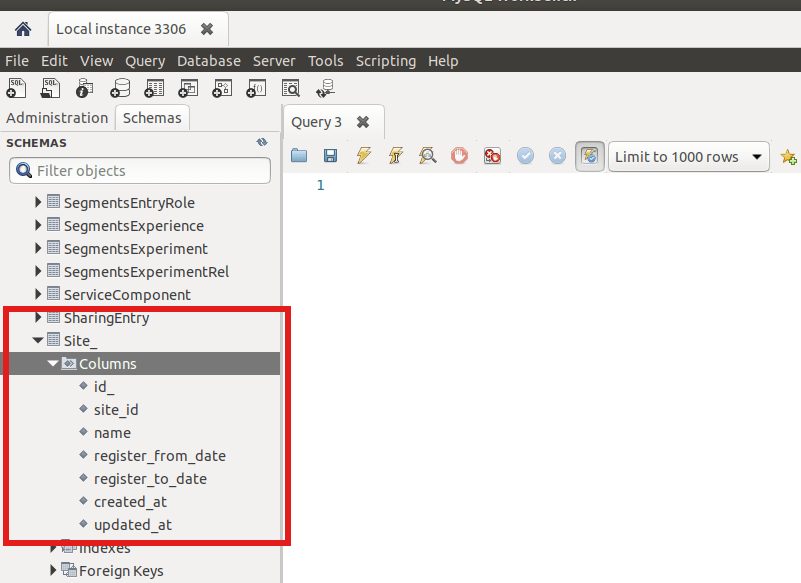
Now check the database, if the Site_ table with all columns are created or not

You can see the table and columns are created. In the next topic we discuss about adding services to this service builder.

Liferay 7.3: Create a custom MVC portlet

What is a portlet?

A portlet is fragment on a webpage as web application and is used with portlets on the same webpage.

When you access a web site, you interact with an application. That application may be simple: it may only show you information, such as an article. The application may be complex, including forms, sending data etc. These applications run on a platform that provides application developers the building blocks they need to make applications.

If there are so many implementations of MVC frameworks in Java, why did Liferay create yet another one?

Liferay MVC provides these benefits:

It’s lightweight, as opposed to many other Java MVC frameworks.
There are no special configuration files that need to be kept in sync with your code.
It’s a simple extension of GenericPortlet.
You avoid writing a bunch of boilerplate code, since Liferay’s MVC framework simply looks for some pre-defined parameters when the init() method is called.
The controller can be broken down into MVC command classes, each of which handles the controller code for a particular portlet phase (render, action, and resource serving phases).
Liferay’s portlets use it. That means there are plenty of robust implementations to reference when you need to design or troubleshoot your Liferay applications.

Each portlet phase executes different operations:

Init: 

The init()  method is called by the portlet container during deployment and reads init parameters defined in portlet.xml file. The Portlet interface exposes the init method as:  void init (PortletConfig config) throws PortletException
The PortletConfig interface is  to retrieve configuration  from the portlet definition in the deployment descriptor. The portlet can only read the configuration data. The configuration information contains the portlet name, the portlet initialization parameters, the portlet resource bundle and the portlet application context.

Render:

Generates the portlet’s contents based on the portlet’s current state. When this phase runs on one portlet, it also runs on all other portlets on the page. The Render phase runs when any portlets on the page complete the Action or Event phases.

In this phase portlet generates content and renders on webpage.

The render phase is called in below cases:
1. The page that contains portlet is rendered on web page
2. After completing Action Phase
3. After completing Event Processing phase

below is example:

<portlet:renderURL var=“loadEmployees”> <portlet:param name=”mvcPath”
value=”/WEB-INF/view/empList.jsp” /> </portlet:renderURL>
<a href=”<%=loadEmployees%>”>Click here</a>


Action:

In response to a user action, performs some operation that changes the portlet’s state. The Action phase can also trigger events that are processed by the Event phase. Following the Action phase and optional Event phase, the Render phase then regenerates the portlet’s contents.

 its result of user actions such as add,edit, delete

  1. only one portlet can be entered into action phase for a request in a portlet container
  2. Any events triggered during the Action phase are handled during the Event phaseof the portlet lifecycle. Events can be used when portlets want to communicatewith each other. The Render phase will be called when all events have been handled.


Event:

Processes events triggered in the Action phase. Events are used for IPC. Once the portlet processes all events, the portal calls the Render phase on all portlets on the page.
Resource-serving: Serves a resource independent from the rest of the lifecycle. This lets a portlet serve dynamic content without running the Render phase on all portlets on a page. The Resource-serving phase handles AJAX requests.

Reference:

You can see more details and clarify your doubts by checking the following docs:

https://help.liferay.com/hc/en-us/articles/360018159451-Liferay-MVC-Portlet-

https://help.liferay.com/hc/en-us/articles/360018159431-Introduction-to-Portlets-

https://help.liferay.com/hc/en-us/articles/360017880432-Creating-an-MVC-Portlet-

http://www.javasavvy.com/liferay-portlet-basics-and-lifecycle/

Now we get into the action.

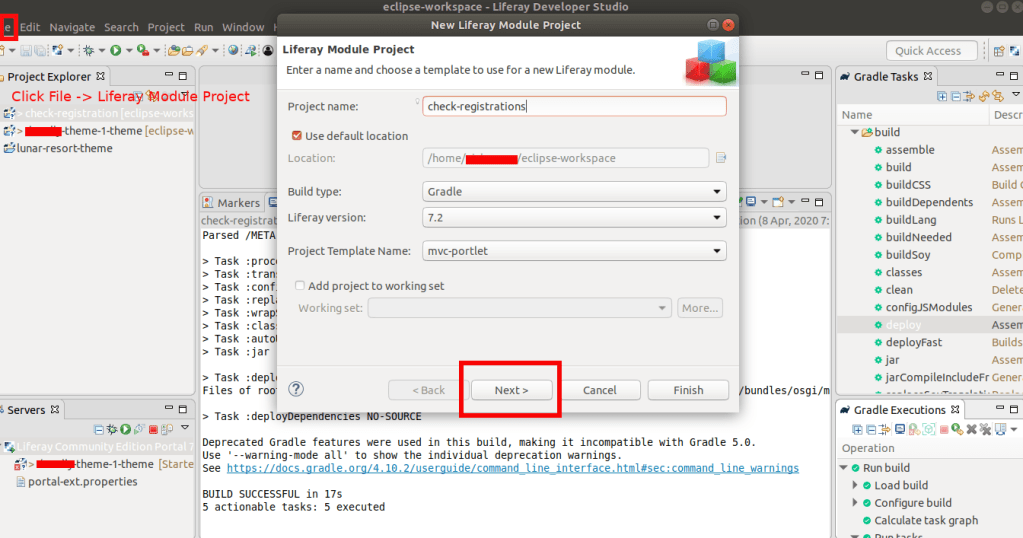
Step 1: Open Developer Studio and goto File -> New -> Liferay Module Project

Add Project Name, select mvc-portlet

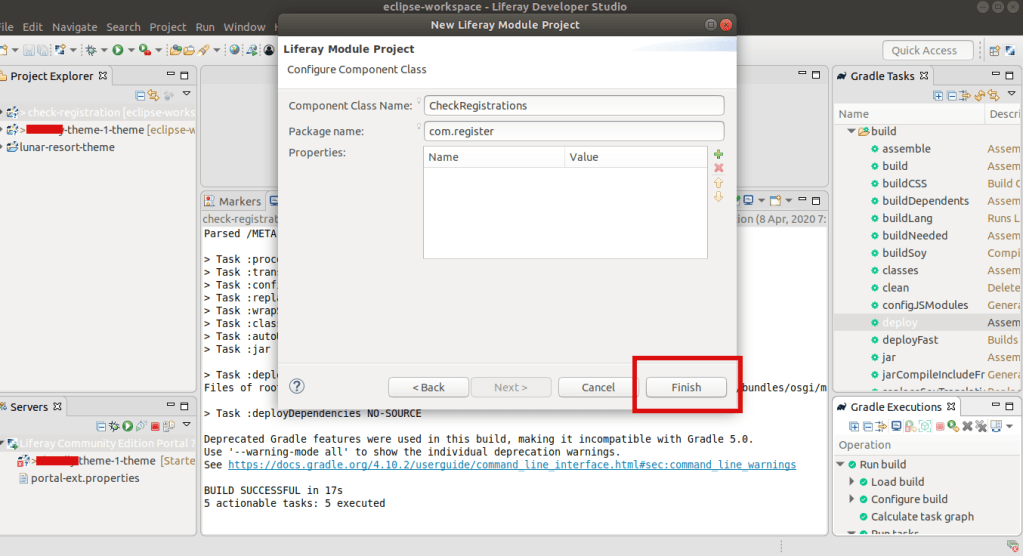
Add class Name and package name and click finish

Step 2: Take Gradle task from right side section and double click on the deploy of created portlet

You can check the created portlet in the Studio’s workspace folder as above

The controller class of the portlet

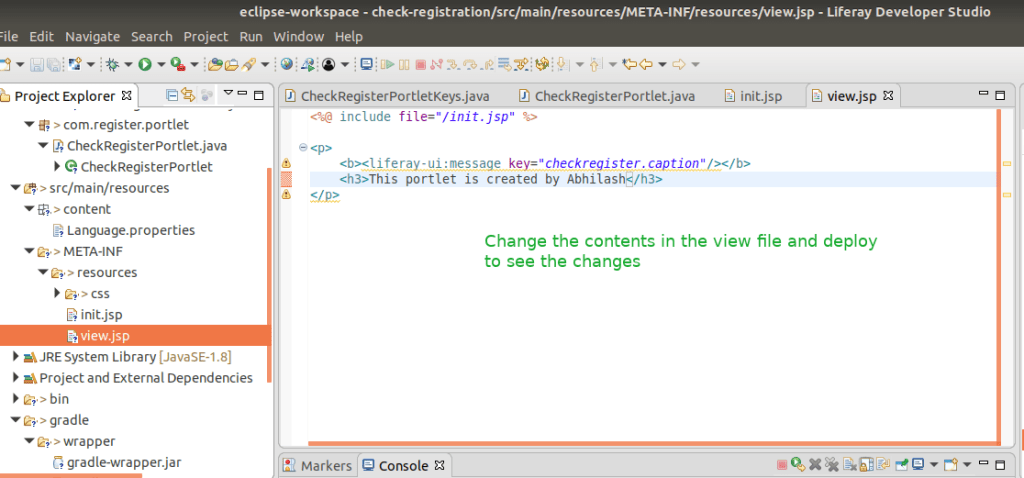
Step 3: We will be changing the Class file and view file and deploy the changes and check

Add some code snnippet inside the above java Class, so that class look like this:

package com.register.portlet;

import com.register.constants.CheckRegisterPortletKeys;

import java.io.IOException;

import com.liferay.portal.kernel.portlet.bridges.mvc.MVCPortlet;

import javax.portlet.Portlet;
import javax.portlet.PortletException;
import javax.portlet.RenderRequest;
import javax.portlet.RenderResponse;

import org.osgi.service.component.annotations.Component;

/**
 * @author abhilash
 */
@Component(
	immediate = true,
	property = {
		"com.liferay.portlet.display-category=Register",
		"com.liferay.portlet.header-portlet-css=/css/main.css",
		"com.liferay.portlet.instanceable=true",
		"javax.portlet.display-name=CheckRegister",
		"javax.portlet.init-param.template-path=/",
		"javax.portlet.init-param.view-template=/view.jsp",
		"javax.portlet.name=" + CheckRegisterPortletKeys.CHECKREGISTER,
		"javax.portlet.resource-bundle=content.Language",
		"javax.portlet.security-role-ref=power-user,user"
	},
	service = Portlet.class
)
public class CheckRegisterPortlet extends MVCPortlet {
	public void doView(RenderRequest renderRequest, RenderResponse renderResponse) 
		   throws IOException, PortletException {
		System.out.println("inside my check registration logic controller");
		super.doView(renderRequest, renderResponse);
	}
}

Change the view.jsp as above

Step 4: Deploy again so that you can see the jar file is created as below:

The jar file created

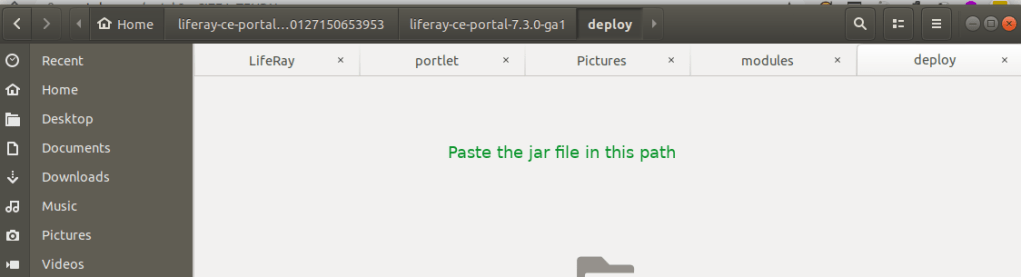
Copy the jar file into this tomcat server folder, so that it can pick the package

Step 5: You can see the package status in the Gogo shell Liferay provides, goto the http://localhost:8080 and check inside the Configuration section Gogo Shell. Type command: lb

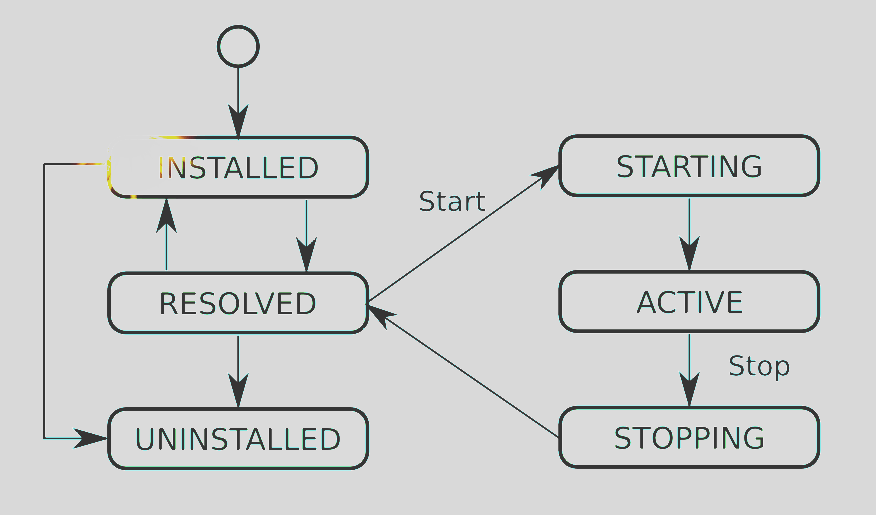
See the status – Installed. It should be ACTIVE after we deploy it.

Here are the list of osgi lifecycle status:

Step 6: Handle the Errors if any

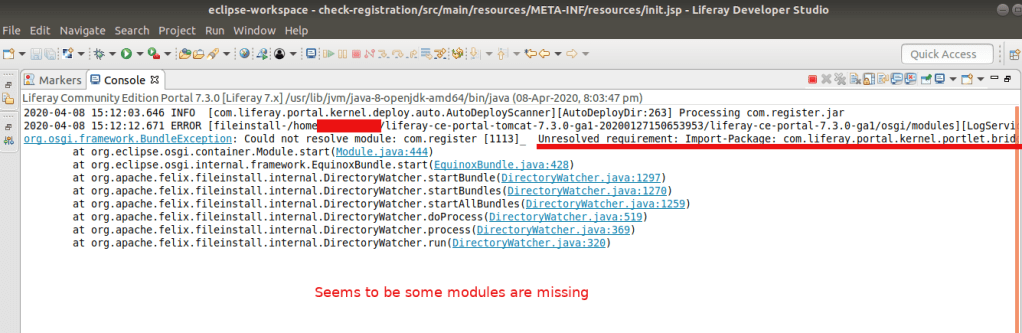
I am getting some issues with this creation, lets see what is the problem.

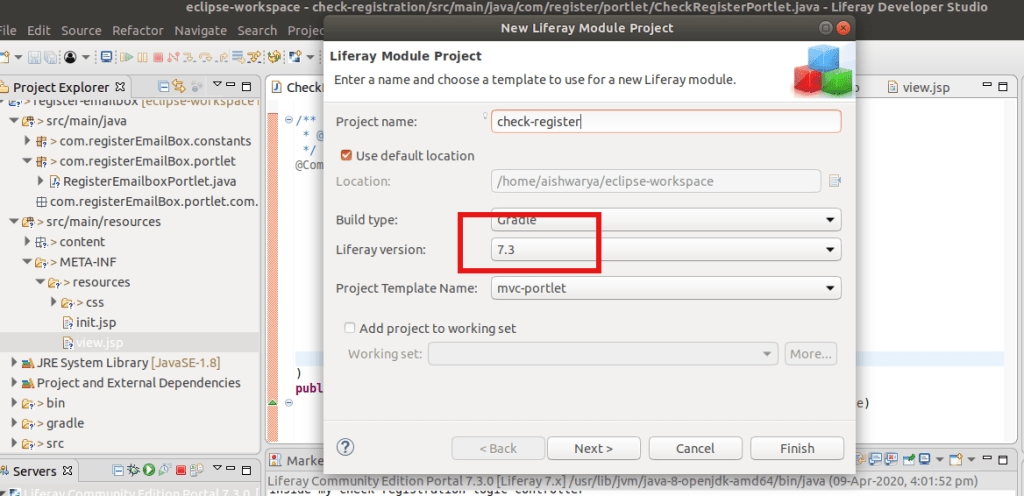
I don’t have any idea why I am getting this. After some research I tried to add the module that is missing here, but no luck. Then I realised we are on Liferay 7.3 and See the pic of the IDE there we selected 7.2 version because thats the latest version available there. Hmm…So…yeahh that may be the issue here. You got that!

So Update your IDE and create the package again.

Now it Works!

And check our newly created portlet in the right side section (inside Widget) of Liferay Site.

You can see this messge that we wrote inside the Class inside my check registration logic controller in your server console in IDE. And this message This portlet is created by Abhilash inside the Portlet.

Congrats .. You have created your first custom portlet in Liferay.

Liferay 7.3: Developing custom themes

You can see the details for setting up themes from here:

https://help.liferay.com/hc/en-us/articles/360034979312-Setting-up-the-Theme

Goto your workspace folder (our developer studio workspace ~/eclipse-workspace):

$ cd ~/eclipse-workspace
$ nvm use 10.5
$ npm install -g generator-liferay-theme
$ npm install -g yo gulp
$ yo liferay-theme


Provide theme name, id, liferay version and font information

? What would you like to call your theme? Theme Moon
? What id would you like to give to your theme? theme-moon
? Which version of Liferay is this theme for? 7.3
? Would you like to add Font Awesome to your theme? No
.........
The project has been created successfully.

 Now we will invoke gulp init for you, to configure your deployment
strategy. 

Remember, that you can change your answers whenever you want by 
running gulp init again.

? Select your deployment strategy (Use arrow keys)
❯ Local App Server   // select this
  Docker Container 
  Other 

? Select your deployment strategy Local App Server
? Enter the path to your app server directory: /home/abhilash/liferay-ce-portal-tomcat-7.3.0-ga1-20200127150653953/liferay-ce-portal-7.3.0-ga1/tomcat-9.0.17
? Enter the url to your production or development site: http://localhost:8080


Run the command below from the theme’s root folder to build the files:

$ cd theme-moon
$ gulp build   # this creates the build folder

Now do the following changes to edit the created theme.

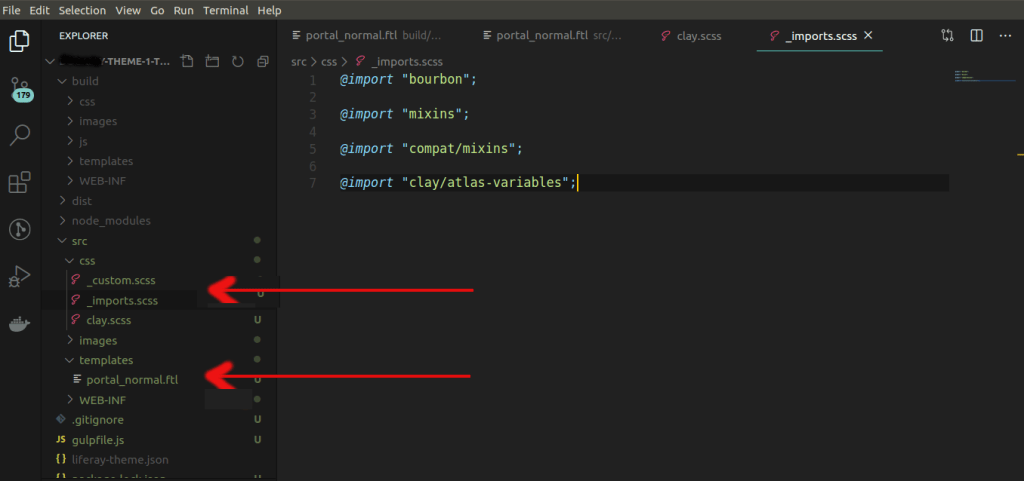
** Create a new /src/templates/ folder and copy portal_normal.ftl from the build/templates/ folder into it.

Configure the theme to extend the Atlas theme. Add a clay.scss file to the theme’s /src/css/ folder and add the import shown below:

@import "clay/atlas";

Create an _imports.scss file in the /src/css/ folder and add the imports shown below to it. This includes the default imports and replaces the clay/base-variables with the Atlas base variables:

@import "bourbon";

@import "mixins";

@import "compat/mixins";

@import "clay/atlas-variables";

You’ve generated the theme, prepared it for development, and configured it to extend the Atlas theme

Customizing the Header and Logo of your theme

Open portal_normal.ftl and replace the <header>...</header> element and contents with the updated code snippet below. This updates the structure slightly, making the banner expand the full width of the Header, and adds a new header_css_class variable to the class attribute. This variable is defined in a later step.

<header class="${header_css_class}">
	<div class="container-fluid" id="banner" role="banner">
		<a class="${logo_css_class}" href="${site_default_url}" title="<@liferay.language_format arguments="${site_name}" key="go-to-x" />">
			<img alt="${logo_description}" height="${site_logo_height}" src="${site_logo}" width="${site_logo_width}" />
			<#if show_site_name>
				${site_name}
			</#if>
		</a>

		<#if has_navigation>
			<#include "${full_templates_path}/navigation.ftl" />
		</#if>
	</div>
</header>

Replace the <div class="container-fluid" id="wrapper"> element with the updated code below to remove some margins and padding:

<div class="container-fluid mt-0 pt-0 px-0" id="wrapper">

And move the wrapper down, and place it directly above the <section id="content"> element:

<div class="container-fluid mt-0 pt-0 px-0" id="wrapper">
  <section id="content">
  ...
  </section>
  <footer...>
  ...
  </footer>
</div>

The logo’s height is retrieved with the ${site_logo_height} variable. The height of the logo is a bit too large for the this theme, so you must adjust it. Remove the width attribute from the logo’s image so it defaults to auto:

<img alt="${logo_description}" height="${site_logo_height}" src="${site_logo}" />

Create init_custom.ftl in your theme’s /src/templates/ folder and assign the logo’s site_logo_height variable to the value below:

<#assign site_logo_height = 56 />

Assign the new header_css_class variable you added in step one to the value below:

<
#assign header_css_class = 
"navbar navbar-expand-md navbar-dark flex-column flex-md-row bd-navbar" 
/>

This applies Bootstrap and Clay utility classes to provide the overall look and feel of the Header. Assigning the classes to a variable keeps portal_normal clean and makes the code easy to maintain. If you want to update the classes, you just have to modify the variable (e.g. header_css_class = header_css_class + " my-new-class").

Add the code snippet below to update the logo_css_class variable to use Bootstrap’s navbar-brand class:

NEW THUMBNAIL FOR THE THEME

Before you upload the theme to see what it looks like so far, you must create a theme thumbnail so you can identify it. Create a  thumbnail.png and replace the default from the /src/images/ folder. Note that its dimensions are 480px by 270px. These dimensions are required to display the theme thumbnail properly.

DEVELOPER MODE (If not enabled you may face CSS / JS loading issues )

The theme isn’t complete yet, but you’ll deploy what you have so you can replace the default logo with the your logo. Enable Developer Mode before deploying your theme, so the theme’s files are not cached for future deployments.

Once I faced CSS loading issue in my AWS Liferay site for one theme. After a lot of research I found that, the server doesn’t have portal-ext.properties file and not enabled the so called Developer Mode

Custom CSS Loading in Liferay

My custom _import.scss almost look like this:

/* These inject tags are used for dynamically creating imports for themelet styles, you can place them where ever you like in this file. */

/* inject:imports */

/* endinject */

/* This file allows you to override default styles in one central location for easier upgrade and maintenance. */

@import "bourbon";

@import "mixins";

@import "compat/mixins";

@import "clay/atlas-variables";

@import "./style.scss";

@import "./innerstyle.scss";

@import "./mixedslider.scss";

------

Liferay loads this css file in HTML like as follows:

<link class="lfr-css-file" data-senna-track="temporary" href="http://localhost:8080/o/myTheme-theme/css/main.css?browserId=other&themeId=myTheme_WAR_myThemetheme&languageId=en_US&b=7301&t=1588754322000" id="liferayThemeCSS" rel="stylesheet" type="text/css" />

When clicking on this file, I get different css as follows instead of the _import.scss file listed above.

/*1559583096000*/
.loadingmask-message{background:transparent;border-width:0;display:block;height:1em;margin-left:auto;margin-right:auto;position:relative;text-align:left;width:1em}.loadingmask-message .loadingmask-message-content{-webkit-animation:loading-animation 1.2s infinite ease-out;animation:loading-animation 1.2s 
........

This is because of I was not enabled the ‘Developer Mode’ in portal.ext file.

After enabling it as below, my _import.scss styles shows up in Liferay’s main.css file.

Create a portal-ext.properties file in your server’s root folder if it doesn’t exist.

Add the line below to it:

include-and-override=portal-developer.properties

Start the server, if it’s not already started, and deploy the theme with the command below:

$ gulp deploy
.....
[20:34:49] Finished 'plugin:deploy' after 32 ms
[20:34:49] Finished 'deploy:war' after 32 ms
[20:34:49] Finished 'deploy' after 4.78 s

CHANGE LOGO

Open the Control Menu and navigate to Site Builder → Pages. Click the Gear icon next to Public Pages to open the configuration menu. Under the Look and Feel tab, scroll down and click the Change Current Theme button and select the Lunar Resort Theme. Scroll to the Logo heading, click the Change button, upload the new-logo.png logo, and click the Save button to apply the theme and logo.

Reference: https://help.liferay.com/hc/en-us/articles/360034979332-Customizing-the-Lunar-Resort-s-Header-and-Logo

IMPORT THIS THEME IN IDE

And at last how to import this theme so that your tomcat server runs it?

Goto your Developer studio
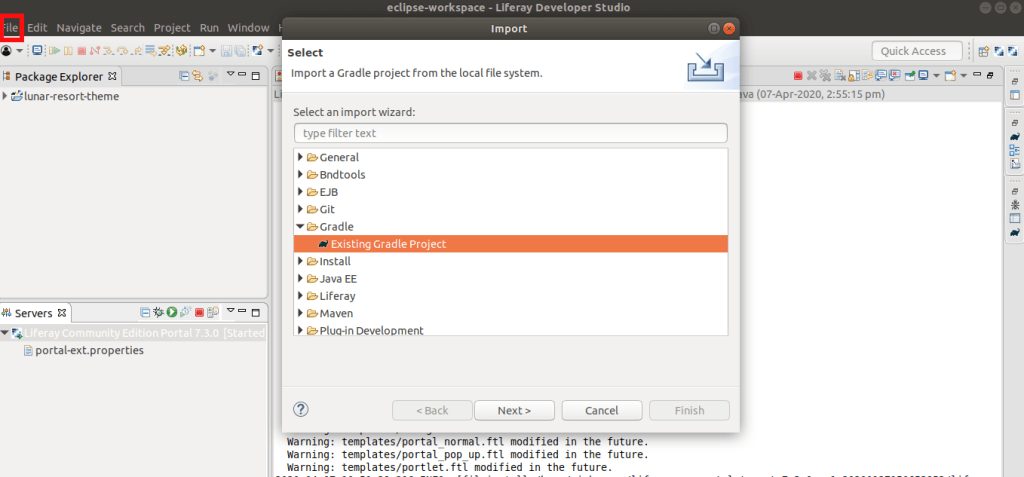
Goto File -> Import -> Import gradle project -> select the path of this theme root directory -> Done!

Click on the File -> Import

Select the created theme path

Right click on the server and restart it. OR right click on the theme after draging it to the server and click on restart

Then goto http://localhost:8080/

click on Settings icon on top -> Under theme select

Define a specific look and feel for this page.

New theme added

Click on the new theme and click SAVE button. You can see your new theme activated. Congrats!

Backup your system databases using Ruby backup gem

Install RVM (Or Rbenv) to manage your Ruby versions

 $ gpg --keyserver hkp://keys.gnupg.net --recv-keys 409B6B1796C275462A1703113804BB82D39DC0E3 7D2BAF1CF37B13E2069D6956105BD0E739499BDB
 $ curl -sSL https://get.rvm.io | bash 

Restart Terminal and type rvm -v

 $ rvm install 2.5
 $ rvm gemset create backup
 $ rvm gemset use backup
 $ gem install backup
 $ backup generate:model --trigger project_2_backup --archives --storages='s3' --compressor='gzip' --notifiers='mail' 
 Generated configuration file: '/home/ubuntu/Backup/config.rb'.
 Generated model file: '/home/ubuntu/Backup/models/project_2_backup.rb'.
 Usage:
   backup generate:model --trigger=TRIGGER
 Options:
   --trigger=TRIGGER
   [--config-path=CONFIG_PATH]  # Path to your Backup configuration directory
   [--databases=DATABASES]      # (mongodb, mysql, postgresql, redis, riak)
   [--storages=STORAGES]        # (cloudfiles, dropbox, ftp, local, ninefold, rsync, s3, scp, sftp)
   [--syncers=SYNCERS]          # (cloud_files, rsync_local, rsync_pull, rsync_push, s3)
   [--encryptors=ENCRYPTORS]    # (gpg, openssl)
   [--compressors=COMPRESSORS]  # (bzip2, gzip, lzma, pbzip2)
   [--notifiers=NOTIFIERS]      # (campfire, hipchat, mail, presently, prowl, twitter)
   [--archives]
   [--splitter]                 # use `--no-splitter` to disable
                               # Default: true 

Sample Model File

Add the following conf in Backup/models/project_2_backup.rb:

Example for mongodb

 database MongoDB do |db|
     db.name               = "db_name"
     db.username           = "db_username"
     db.password           = "db_pswd"
     db.host               = "localhost"
     db.port               = 27017 
     db.ipv6               = false
     #db.only_collections   = ["only", "these", "collections"]
     db.additional_options = ['--authenticationDatabase=admin']
     db.lock               = false
     db.oplog              = false
   end
   ## 
   # Amazon Simple Storage Service [Storage]
   #
   store_with S3 do |s3|
     # AWS Credentials
     s3.access_key_id     = "YOUR_ACCESS_KEY"
     s3.secret_access_key = "YOUR_SECRET_KEY"
     # Or, to use a IAM Profile:
     # s3.use_iam_profile = true
     s3.region            = "ap-southeast-2" 
     s3.bucket            = "bucket_name"
     s3.path              = "bucket_name_path"
     s3.keep              = 12
     # s3.keep              = Time.now - 2592000 # Remove all backups older than 1 month.
   end 

 # Notification mail infos
 notify_by Mail do |mail|
     mail.on_success           = true
     mail.on_warning           = true
     mail.on_failure           = true
     mail.from                 = "_____@gmail.com"
     mail.to                   = "____@___.com"
     mail.cc                   = "______@_____.com, _____@______.com"
     #mail.bcc                  = "bcc@email.com"
     #mail.reply_to             = "reply_to@email.com" 
     mail.address              = "smtp.gmail.com"
     mail.port                 = 587
     mail.domain               = "domain_name"
     mail.user_name            = "email_username"
     mail.password             = "email_password"
     mail.authentication       = "plain"
     mail.encryption           = :starttls
 end 

Once you’ve setup your configuration, check your work with:

$ backup check

If there are no errors, the check should report:

[2019/03/28 10:02:26][info] Configuration Check Succeeded.

Perform Backup:

$ backup perform --trigger project_2_backup

The Keep Option

keep a specified number of backups in storage. After each backup is performed, it will remove older backup package files based on the keep setting.

keep as a Number

If a number has been specified and once the keep limit has been reached, the oldest backup will be removed.

Note that if keep is set to 5, then the 6th backup will be transferred and stored, before the oldest is removed. So be sure you have space available for keep + 1 backups

keep as Time

When a Time object is set to keep it will keep backups until that time. Everything older than the set time will be removed.

Create bootable usb drive of OSX from Mac OS

You can use mac’s createinstallmedia command. The format to create a bootable USB is given below.

$ sudo /Applications/Install\ macOS\ Sierra.app/Contents/Resources/createinstallmedia --volume |YOUR-USB-DRIVE-PATH-HERE| --applicationpath |DOT-APP-FILE-MACOS|

In My system the command will be as follows:

$ sudo /Applications/Install\ macOS\ Sierra.app/Contents/Resources/createinstallmedia --volume /Volumes/ABHI\'S/ --applicationpath /Applications/Install\ macOS\ Sierra.app/

You can easily find the corresponding software path in your system, if you have a different OS that mentioned above.

For more details, visit:
https://support.apple.com/en-us/HT201372

#Rails 4.2 #Ruby2.2 How to find association class and other info from an object and its association name

When I was working on a Rails project, I encountered a situation where I needed to find the association class of an association object. I have the object and its association name as inputs. How can I find the association class?

Suppose we have Student class that belongs to a school

class School
  has_many students
end

class Student
  belongs_to :school
end

and suppose so many other relations like this in our project.

So we have

s = Student.last
:school symbol 

I can use

s.school.class and s.school.class.name

But what if the school is blank? The result is ‘NilClass’ From the above code.

Basically for has_many associations now we get the class name as

"ActiveRecord::Associations::CollectionProxy"

because recently in new rails version a change of the Array of objects as associations to its own ‘CollectionProxy’ collections.

So we can use ‘ActiveRecord::Reflection::ClassMethods’ for finding all the association info.

Note that this Rails module is so useful to find all the association related information.

In the above situation we can use ‘reflect_on_association’ method for finding association reflection info. And it returns ‘ActiveRecord::Reflection’ Object.

In the most recent version of Rails, there has been a change where Array of objects as associations have been replaced with their own ‘CollectionProxy’ collections. As a result, we can now use ‘ActiveRecord::Reflection::ClassMethods’ to find all the association information we need. This module is extremely useful in finding all association-related information.

To find association reflection information in the situation described above, we can use the ‘reflect_on_association’ method. This method will return an ‘ActiveRecord::Reflection’ object.

http://api.rubyonrails.org/classes/ActiveRecord/Reflection/ClassMethods.html#method-i-reflect_on_association

Check the following code:

> s.class.reflect_on_association(:school)
=> ##}, @scope_lock=#
, @class_name="Topic", @foreign_key="school_id">

PostgreSQL 9.3 : Installation on ubuntu 14.04

Hi guys, I just started installing postgres on my ubuntu VM. I referred some docs, and followed this one: https://www.digitalocean.com/community/tutorials/how-to-install-and-use-postgresql-on-ubuntu-14-04

Its pretty much explained in this page. But just explaining here the important things.

You can install postgres by ubuntu’s own apt packaging system. Update local apt repository.

$ sudo apt-get update
$ sudo apt-get install postgresql postgresql-contrib

Postgres uses role based access for the unix users. After the installation a default role called ‘postgres’ will be created. You can login to postgres account and start using or creating new roles with Postgres.

Sign in as postgres user

$ sudo -i -u postgres

Access the postgres console by

$ psql

But i cannot enter into the console and I got the following error:

postgres@8930a29k5d05:/home/rails/my_project$ psql
psql: could not connect to server: No such file or directory
        Is the server running locally and accepting
        connections on Unix domain socket "/var/run/postgresql/.s.PGSQL.5432"?

What could be the reason for this error?

So just gone through Postgres doc (http://www.postgresql.org/docs/9.3/static/server-start.html). You can see the same error under the section 17.3.2. Client Connection Problems. But the solution is not mentioned.

Original Reason: PostgreSQL Server was not running after the installation.

I tried rebooting the system and via init script the server should run automatically. But the server is not running again. I understood that something prevents postgres from running the server. What is it?

Just check your postgres server is running or not

$ sudo -aux | grep post
postgres@8930a29k5d05:/home/rails/my_project$ ps -aux | grep postgres
root       136  0.0  0.2  47124  3056 ?        S    06:10   0:00 sudo -u postgres -s
postgres   137  0.0  0.3  18164  3220 ?        S    06:10   0:00 /bin/bash
postgres   140  0.0  0.2  15572  2192 ?        R+   06:10   0:00 ps -aux
postgres   141  0.0  0.0   4892   336 ?        R+   06:10   0:00 grep post

The server is not running.

Run the server manually by

root@8930a29k5d05:/home/rails/my_project#  /etc/init.d/postgresql start
 * Starting PostgreSQL 9.3 database server
                                                                                                                                                         [ OK ] 
root@8930a29k5d05:/home/rails/my_project# ps aux | grep postgres
postgres   158  0.1  2.0 244928 20752 ?        S    06:28   0:00 /usr/lib/postgresql/9.3/bin/postgres -D /var/lib/postgresql/9.3/main -c config_file=/etc/postgresql/9.3/main/postgresql.conf
postgres   160  0.0  0.3 244928  3272 ?        Ss   06:28   0:00 postgres: checkpointer process

postgres   161  0.0  0.4 244928  4176 ?        Ss   06:28   0:00 postgres: writer process

postgres   162  0.0  0.3 244928  3272 ?        Ss   06:28   0:00 postgres: wal writer process

postgres   163  0.0  0.5 245652  6000 ?        Ss   06:28   0:00 postgres: autovacuum launcher process

postgres   164  0.0  0.3 100604  3336 ?        Ss   06:28   0:00 postgres: stats collector process

root       178  0.0  0.0   8868   884 ?        S+   06:28   0:00 grep --color=auto post
root@8930a29k5d05:/home/rails/my_project#

Now the server starts running. If still not works, then try to reconfigure your locales as mentioned here

$ dpkg-reconfigure locales

It is strange that, after installing such a popular database software, it doesn’t provide any information regarding the failure of its own server. It should give the developers some clue so that they can save their precious time.

The reason of this failure, what I concluded is
1. After installation we have to run the server manually
OR
2. I tried resetting the locales (So if no locales set in the machine may prevented the postgres from starting automatically?)