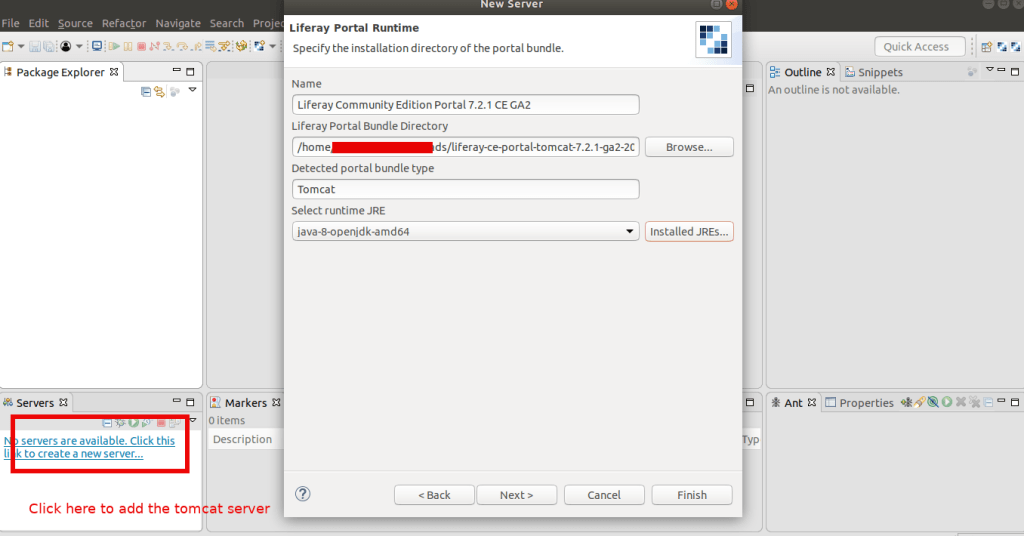
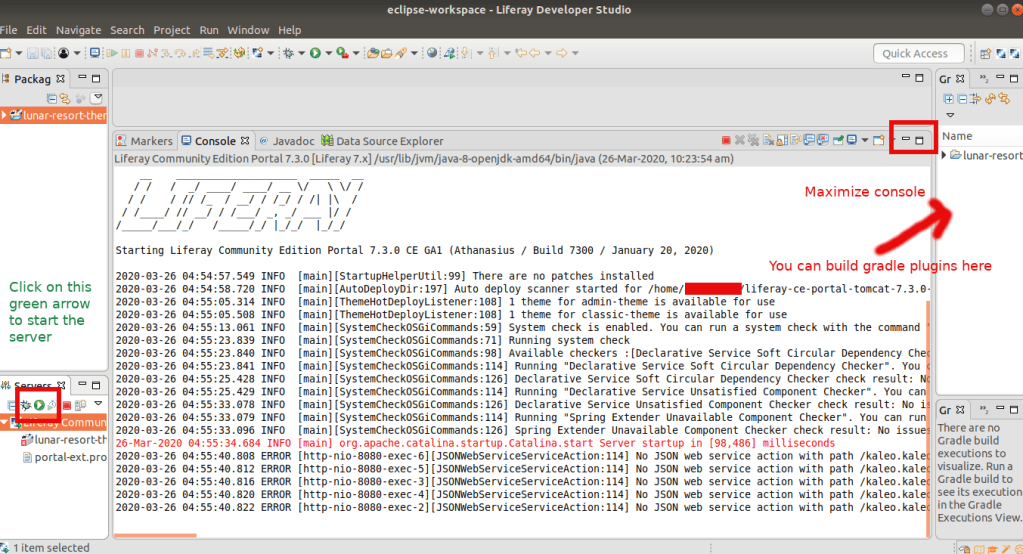
Go inside the downloaded liferay portal folder. And start the tomcat server
cd ~/liferay-ce-portal-tomcat-7.3.0-ga1-20200127150653953/liferay-ce-portal-7.3.0-ga1/tomcat-9.0.17/bin
sh startup.sh
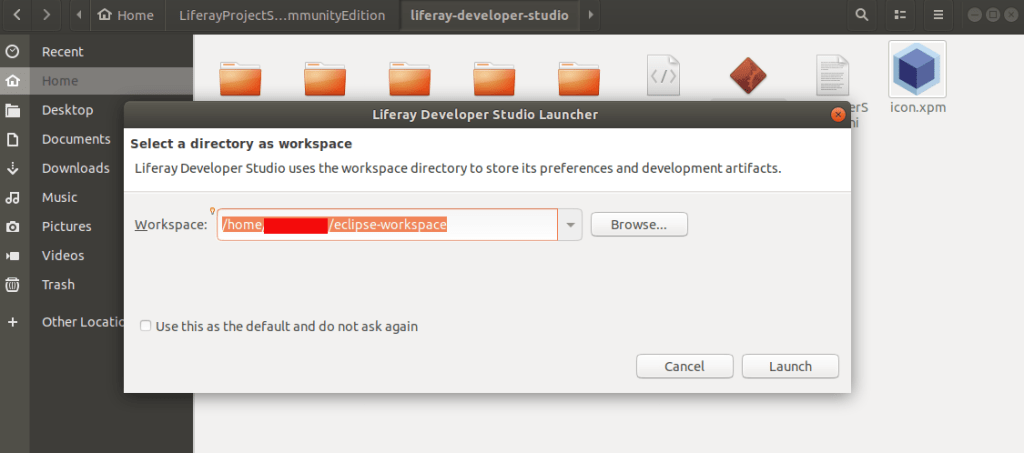
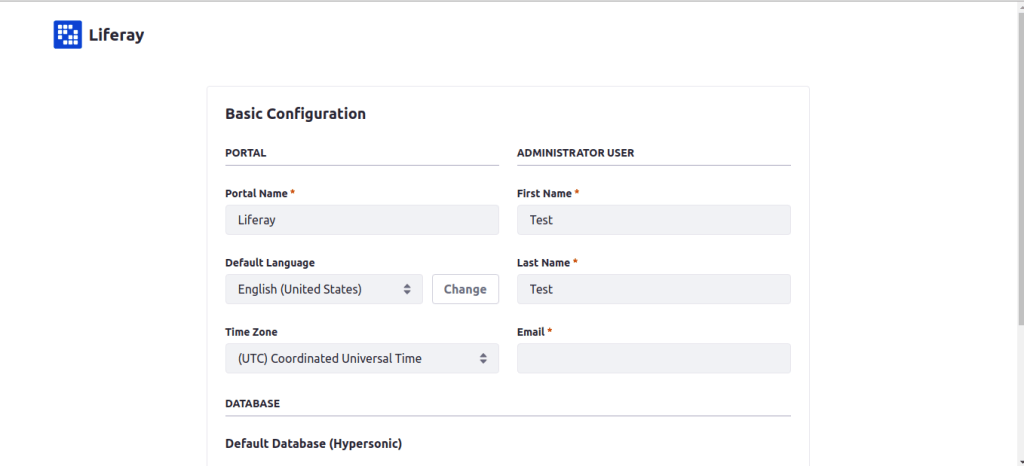
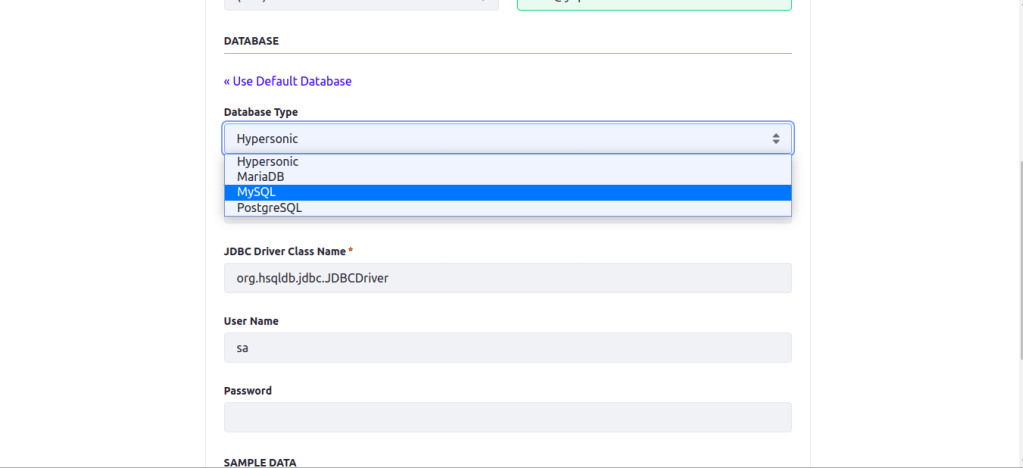
Goto http://localhost:8080/ and start setting up liferay configurations as follows:


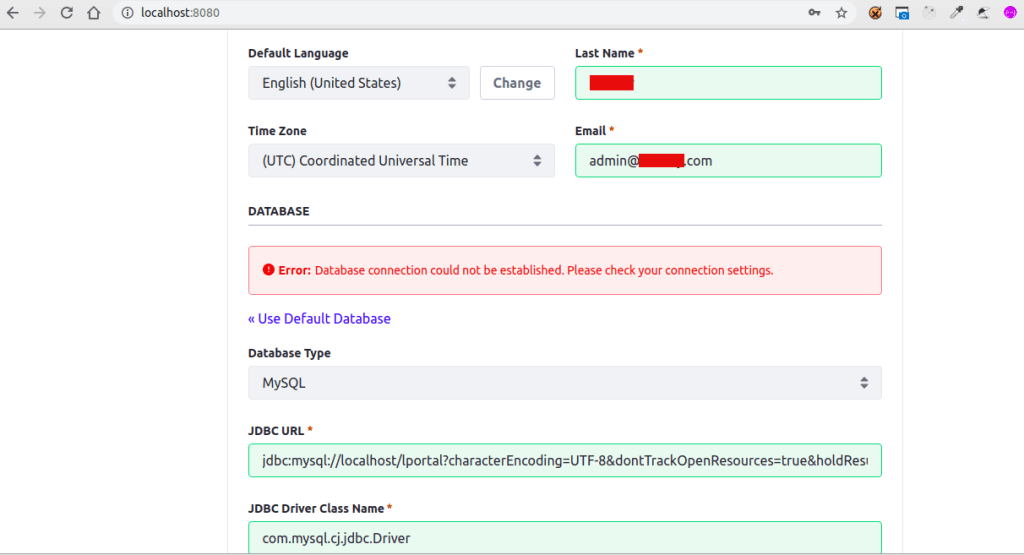
jdbc:mysql://localhost/lportal?characterEncoding=UTF-8&dontTrackOpenResources=true&holdResultsOpenOverStatementClose=true&serverTimezone
=GMT&useFastDateParsing=false&useUnicode=true
JDBC Driver Class Name: com.mysql.cj.jdbc.Driver
If you get the error like this, some of your provided mysql configuration went wrong. Check your mysql username and password.
If the given mysql configuration is correct, then you have to check the Liferay DB exists in your Mysql database. Else create the DB `lportal` as follows:

Now click on the Configure button, you will be ready to go
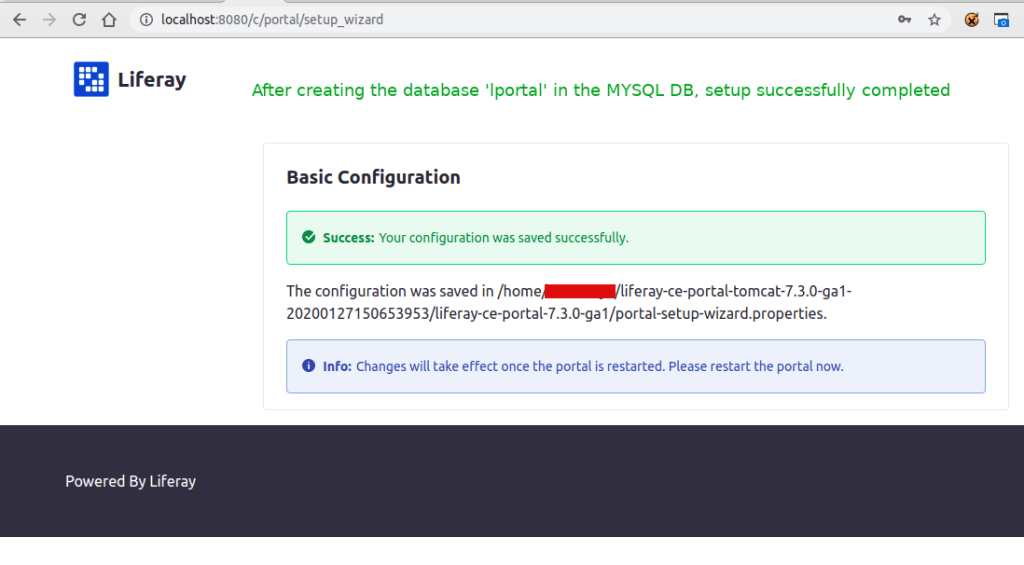

Open ‘~/liferay-ce-portal-tomcat-7.3.0-ga1-20200127150653953/liferay-ce-portal-7.3.0-ga1/portal-setup-wizard.properties’ file and you can see the above configurations added by liferay.

You can see the following tables populated in the database lportal
mysql> show tables;
+--------------------------------+
| Tables_in_lportal              |
+--------------------------------+
| AMImageEntry                   |
| AccountEntry                   |
| AccountEntryOrganizationRel    |
| AccountEntryUserRel            |
| AccountRole                    |
| Account_                       |
| Address                        |
| AnnouncementsDelivery          |
| AnnouncementsEntry             |
| AnnouncementsFlag              |
| AppBuilderApp                  |
| AppBuilderAppDeployment        |
| AssetAutoTaggerEntry           |
| AssetCategory                  |
| AssetCategoryProperty          |
| AssetDisplayPageEntry          |
| AssetEntries_AssetCategories   |
| AssetEntries_AssetTags         |
| AssetEntry                     |
| AssetEntryAssetCategoryRel     |
| AssetEntryUsage                |
| AssetLink                      |
| AssetListEntry                 |
| AssetListEntryAssetEntryRel    |
| AssetListEntrySegmentsEntryRel |
| AssetListEntryUsage            |
| AssetTag                       |
| AssetVocabulary                |
| Audit_AuditEvent               |
| BackgroundTask                 |
| BatchEngineExportTask          |
| BatchEngineImportTask          |
| BlogsEntry                     |
| BlogsStatsUser                 |
| BrowserTracker                 |
| CTCollection                   |
| CTEntry                        |
| CTMessage                      |
| CTPreferences                  |
| CTProcess                      |
| CTSContent                     |
| Calendar                       |
| CalendarBooking                |
| CalendarNotificationTemplate   |
| CalendarResource               |
| ChangesetCollection            |
| ChangesetEntry                 |
| ClassName_                     |
| Company                        |
| CompanyInfo                    |
| Configuration_                 |
| Contact_                       |
| Contacts_Entry                 |
| Counter                        |
| Country                        |
| DDLRecord                      |
| DDLRecordSet                   |
| DDLRecordSetVersion            |
| DDLRecordVersion               |
| DDMContent                     |
| DDMDataProviderInstance        |
| DDMDataProviderInstanceLink    |
| DDMFormInstance                |
| DDMFormInstanceRecord          |
| DDMFormInstanceRecordVersion   |
| DDMFormInstanceVersion         |
| DDMStorageLink                 |
| DDMStructure                   |
| DDMStructureLayout             |
| DDMStructureLink               |
| DDMStructureVersion            |
| DDMTemplate                    |
| DDMTemplateLink                |
| DDMTemplateVersion             |
| DEDataDefinitionFieldLink      |
| DEDataListView                 |
| DLContent                      |
| DLFileEntry                    |
| DLFileEntryMetadata            |
| DLFileEntryType                |
| DLFileEntryTypes_DLFolders     |
| DLFileRank                     |
| DLFileShortcut                 |
| DLFileVersion                  |
| DLFileVersionPreview           |
| DLFolder                       |
| DLOpenerFileEntryReference     |
| DLSyncEvent                    |
| EmailAddress                   |
| ExpandoColumn                  |
| ExpandoRow                     |
| ExpandoTable                   |
| ExpandoValue                   |
| ExportImportConfiguration      |
| FragmentCollection             |
| FragmentEntry                  |
| FragmentEntryLink              |
| FriendlyURLEntry               |
| FriendlyURLEntryLocalization   |
| FriendlyURLEntryMapping        |
| Group_                         |
| Groups_Orgs                    |
| Groups_Roles                   |
| Groups_UserGroups              |
| HtmlPreviewEntry               |
| IM_MemberRequest               |
| Image                          |
| JournalArticle                 |
| JournalArticleLocalization     |
| JournalArticleResource         |
| JournalContentSearch           |
| JournalFeed                    |
| JournalFolder                  |
| KBArticle                      |
| KBComment                      |
| KBFolder                       |
| KBTemplate                     |
| KaleoAction                    |
| KaleoCondition                 |
| KaleoDefinition                |
| KaleoDefinitionVersion         |
| KaleoInstance                  |
| KaleoInstanceToken             |
| KaleoLog                       |
| KaleoNode                      |
| KaleoNotification              |
| KaleoNotificationRecipient     |
| KaleoTask                      |
| KaleoTaskAssignment            |
| KaleoTaskAssignmentInstance    |
| KaleoTaskForm                  |
| KaleoTaskFormInstance          |
| KaleoTaskInstanceToken         |
| KaleoTimer                     |
| KaleoTimerInstanceToken        |
| KaleoTransition                |
| Layout                         |
| LayoutBranch                   |
| LayoutClassedModelUsage        |
| LayoutFriendlyURL              |
| LayoutPageTemplateCollection   |
| LayoutPageTemplateEntry        |
| LayoutPageTemplateStructure    |
| LayoutPageTemplateStructureRel |
| LayoutPrototype                |
| LayoutRevision                 |
| LayoutSEOEntry                 |
| LayoutSEOSite                  |
| LayoutSet                      |
| LayoutSetBranch                |
| LayoutSetPrototype             |
| ListType                       |
| Lock_                          |
| MBBan                          |
| MBCategory                     |
| MBDiscussion                   |
| MBMailingList                  |
| MBMessage                      |
| MBStatsUser                    |
| MBThread                       |
| MBThreadFlag                   |
| MDRAction                      |
| MDRRule                        |
| MDRRuleGroup                   |
| MDRRuleGroupInstance           |
| Marketplace_App                |
| Marketplace_Module             |
| MembershipRequest              |
| OA2Auths_OA2ScopeGrants        |
| OAuth2Application              |
| OAuth2ApplicationScopeAliases  |
| OAuth2Authorization            |
| OAuth2ScopeGrant               |
| OrgGroupRole                   |
| OrgLabor                       |
| Organization_                  |
| PasswordPolicy                 |
| PasswordPolicyRel              |
| PasswordTracker                |
| Phone                          |
| PluginSetting                  |
| PollsChoice                    |
| PollsQuestion                  |
| PollsVote                      |
| PortalPreferences              |
| Portlet                        |
| PortletItem                    |
| PortletPreferences             |
| QUARTZ_BLOB_TRIGGERS           |
| QUARTZ_CALENDARS               |
| QUARTZ_CRON_TRIGGERS           |
| QUARTZ_FIRED_TRIGGERS          |
| QUARTZ_JOB_DETAILS             |
| QUARTZ_LOCKS                   |
| QUARTZ_PAUSED_TRIGGER_GRPS     |
| QUARTZ_SCHEDULER_STATE         |
| QUARTZ_SIMPLE_TRIGGERS         |
| QUARTZ_SIMPROP_TRIGGERS        |
| QUARTZ_TRIGGERS                |
| RatingsEntry                   |
| RatingsStats                   |
| ReadingTimeEntry               |
| RecentLayoutBranch             |
| RecentLayoutRevision           |
| RecentLayoutSetBranch          |
| Region                         |
| Release_                       |
| Repository                     |
| RepositoryEntry                |
| ResourceAction                 |
| ResourcePermission             |
| Role_                          |
| SAPEntry                       |
| SegmentsEntry                  |
| SegmentsEntryRel               |
| SegmentsEntryRole              |
| SegmentsExperience             |
| SegmentsExperiment             |
| SegmentsExperimentRel          |
| ServiceComponent               |
| SharingEntry                   |
| SiteFriendlyURL                |
| SiteNavigationMenu             |
| SiteNavigationMenuItem         |
| SocialActivity                 |
| SocialActivityAchievement      |
| SocialActivityCounter          |
| SocialActivityLimit            |
| SocialActivitySet              |
| SocialActivitySetting          |
| SocialRelation                 |
| SocialRequest                  |
| Subscription                   |
| SystemEvent                    |
| Team                           |
| Ticket                         |
| TrashEntry                     |
| TrashVersion                   |
| UserGroup                      |
| UserGroupGroupRole             |
| UserGroupRole                  |
| UserGroups_Teams               |
| UserIdMapper                   |
| UserNotificationDelivery       |
| UserNotificationEvent          |
| UserTracker                    |
| UserTrackerPath                |
| User_                          |
| Users_Groups                   |
| Users_Orgs                     |
| Users_Roles                    |
| Users_Teams                    |
| Users_UserGroups               |
| ViewCountEntry                 |
| VirtualHost                    |
| WebDAVProps                    |
| Website                        |
| WikiNode                       |
| WikiPage                       |
| WikiPageResource               |
| WorkflowDefinitionLink         |
| WorkflowInstanceLink           |
+--------------------------------+
262 rows in set (0.00 sec)

mysql>
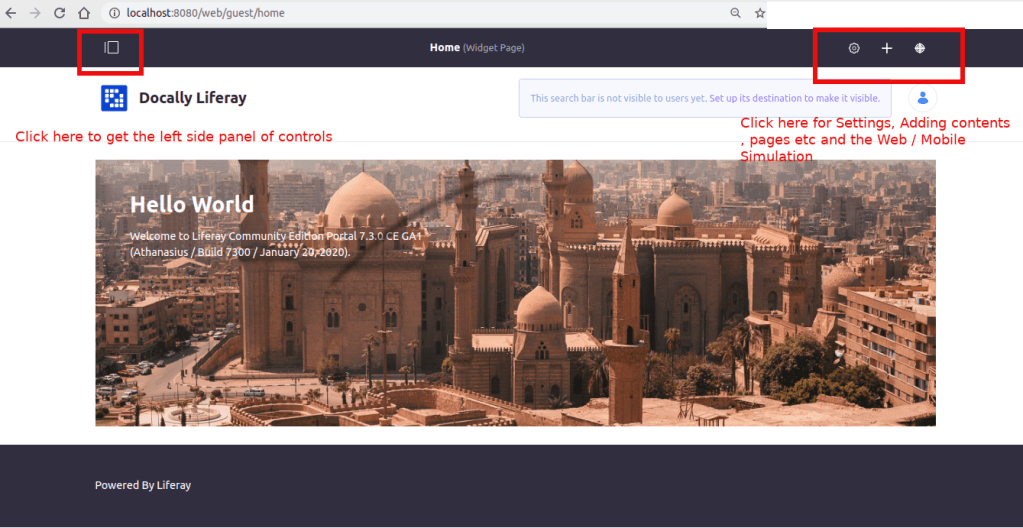
Login with
Email: provide the email given at the time of register
Password: test (default password for version 7.3)
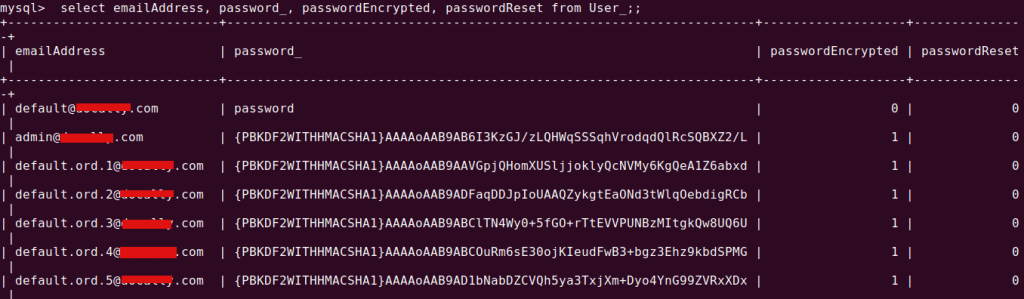
If you are using Liferay 7.2 version, then this default password may not work. In this version liferay generates a random password, that you can check in the log file as below:
cd ~/Downloads/liferay-ce-portal-tomcat-7.2.1-ga2-20191111141448326/liferay-ce-portal-7.2.1-ga2/tomcat-9.0.17/logs/ && tail -f catalina.out
Search word password. You can get it.


changing to new db from old db
Add the new db name ‘liferay721’ to portal-setup-wizard.properties
.........
jdbc.default.url=jdbc:mysql://localhost/liferay721?characterEncoding=UTF-8&dontTrackOpenResources=true&holdResultsOpenOverStatementClose=true&serverTimezone=GMT&useFastDateParsing=false&useUnicode=true
.........
Restart the server. Server Log:
Starting Liferay Community Edition Portal 7.2.1 CE GA2 (Mueller / Build 7201 / November 12, 2019)

2020-05-08 14:45:53.921 INFO  [main][StartupHelper:75] There are no patches installed
2020-05-08 14:45:54.000 WARN  [main][ReleaseLocalServiceImpl:238] Table 'liferay721.Release_' doesn't exist
2020-05-08 14:45:54.003 INFO  [main][ReleaseLocalServiceImpl:129] Create tables and populate with default data
...................
...................
Issues you may face during the setup
Once I created a DB names liferay_7_3_1 and the setup wizard finishes successfully and message shown to restart the server for get into the portal.
When I restart it I received the following issue:
An unexpected system error occurred.

java.lang.NullPointerException

and the following tables were created in the database named liferay_7_3_1
Only 155 rows
+--------------------------------+
| Tables_in_liferay_7_3_1        |
+--------------------------------+
| AccountEntry                   |
| AccountEntryOrganizationRel    |
| AccountEntryUserRel            |
.........
|
| Website                        |
| WikiNode                       |
| WikiPage                       |
| WikiPageResource               |
| WorkflowDefinitionLink         |
| WorkflowInstanceLink           |
+--------------------------------+
155 rows in set (0.00 sec)
Then I renamed the DB to liferay731. Then it works! So beware of underscore characters in your DB name.
Another error is shown when the server is not able to connect to your database, or database is not created that is specified as in your portal.ext.properties or portal-setup-wizard.properties