Ever wondered how a single Redis server can handle thousands of simultaneous connections without breaking a sweat? Or how Node.js can serve millions of requests with just one thread? The magic lies in the event loop – a deceptively simple concept that powers everything from your web browser to Netflix’s streaming infrastructure.
🎯 What is an Event Loop?
An event loop is like a super-efficient restaurant manager who never stops moving:
👨💼 Event Loop Manager:
"Order ready at table 3!" → Handle it
"New customer at door!" → Seat them
"Payment needed at table 7!" → Process it
"Kitchen needs supplies!" → Order them
Traditional approach (blocking):
# One waiter per table (one thread per request)
waiter1.take_order_from_table_1  # Waiter1 waits here...
waiter2.take_order_from_table_2  # Waiter2 waits here...
waiter3.take_order_from_table_3  # Waiter3 waits here...
Event loop approach (non-blocking):
# One super-waiter handling everything
loop do
  event = get_next_event()
  case event.type
  when :order_ready then serve_food(event.table)
  when :new_customer then seat_customer(event.customer)
  when :payment then process_payment(event.table)
  end
end
🏗️ The Anatomy of an Event Loop
🔄 The Core Loop
// Simplified event loop (Node.js style)
while (true) {
  // 1. Check for completed I/O operations
  let events = pollForEvents();

  // 2. Execute callbacks for completed operations
  events.forEach(event => {
    event.callback();
  });

  // 3. Execute any scheduled timers
  runTimers();

  // 4. If no more work, sleep until next event
  if (noMoreWork()) {
    sleep();
  }
}
📋 Event Queue System
┌─ Timer Queue ──────┐    ┌─ I/O Queue ────────┐    ┌─ Check Queue ──┐
│ setTimeout()       │    │ File operations    │    │ setImmediate() │
│ setInterval()      │    │ Network requests   │    │ process.tick() │
└────────────────────┘    │ Database queries   │    └────────────────┘
                          └────────────────────┘
                                     ↓
                          ┌─────────────────────┐
                          │   Event Loop Core   │
                          │  "What's next?"     │
                          └─────────────────────┘
⚡ Why Event Loops Are Lightning Fast
🚫 No Thread Context Switching
# Traditional multi-threading overhead
Thread 1: [████████] Context Switch [████████] Context Switch
Thread 2:           [████████] Context Switch [████████]
Thread 3:                     [████████] Context Switch [████████]
# CPU wastes time switching between threads!

# Event loop efficiency
Single Thread: [████████████████████████████████████████████████]
# No context switching = pure work!
🎯 Perfect for I/O-Heavy Applications
# What most web applications do:
def handle_request
  user = database.find_user(id)     # Wait 10ms
  posts = api.fetch_posts(user)     # Wait 50ms
  cache.store(posts)                # Wait 5ms
  render_response(posts)            # Work 1ms
end
# Total: 66ms (65ms waiting, 1ms working!)
Event loop transforms this:
# Non-blocking version
def handle_request
  database.find_user(id) do |user|           # Queue callback
    api.fetch_posts(user) do |posts|         # Queue callback
      cache.store(posts) do                  # Queue callback
        render_response(posts)               # Finally execute
      end
    end
  end
  # Returns immediately! Event loop handles the rest
end
☁️ Nextflix: Cloud Architecture
High-Level Design of Netflix System Design:

Microservices Architecture of Netflix:

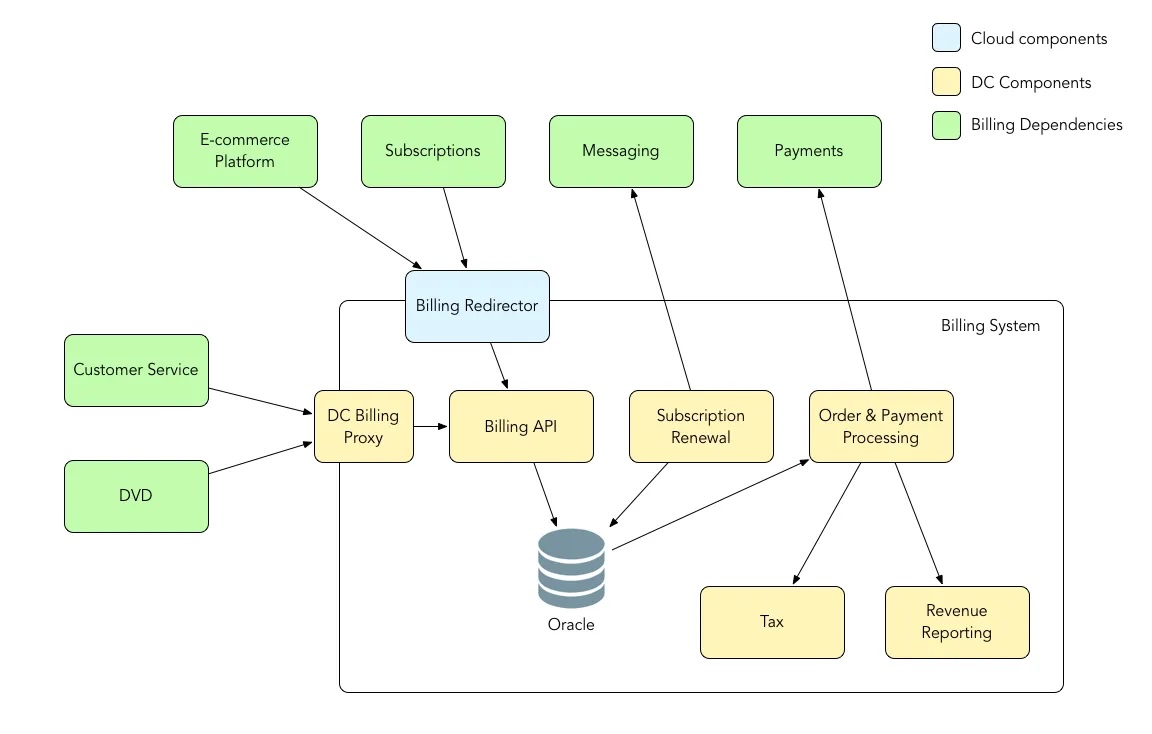
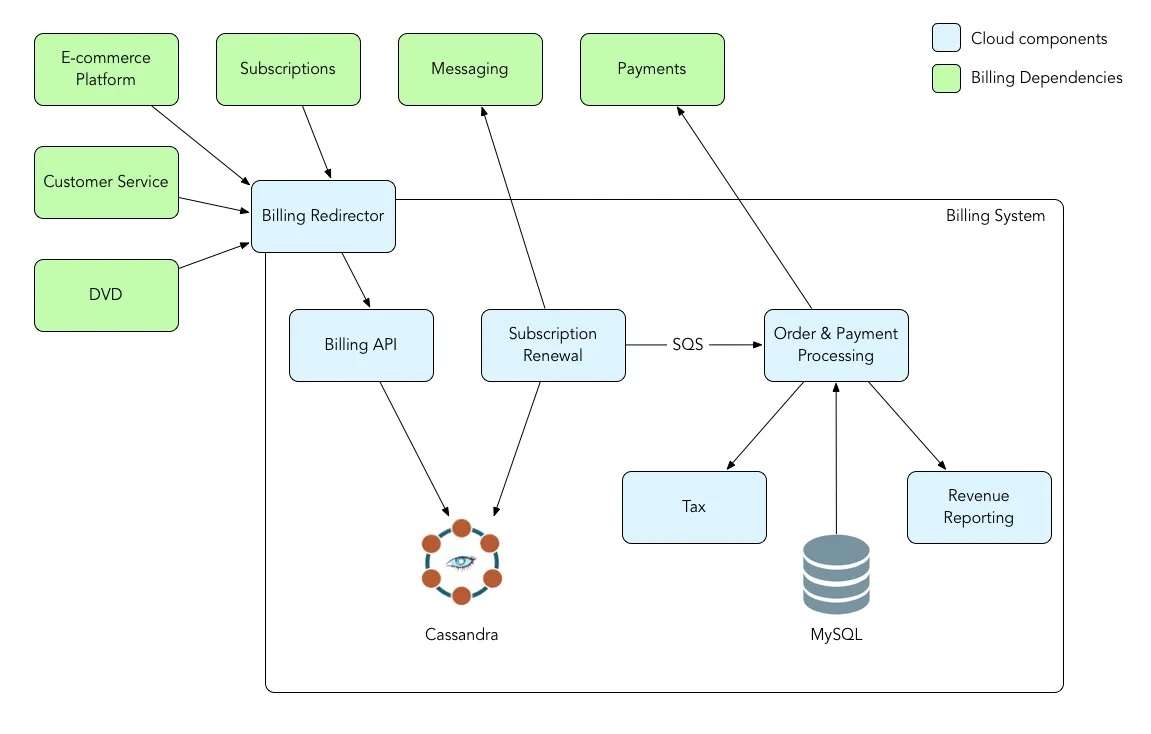
Netflix Billing Migration To Aws
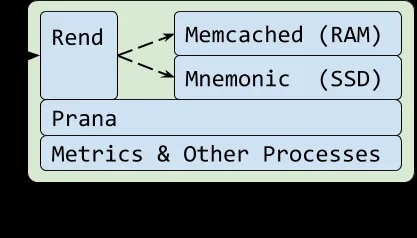
Application-data-caching-using-ssds


Read System Design Netflix | A Complete Architecture: System-design-netflix-a-complete-Architecture
Reference: NetFlix Blog, GeeksForGeeks Blog
🔧 Event Loop in Action: Redis Case Study
📡 How Redis Handles 10,000 Connections
// Simplified Redis event loop (C code)
void aeMain(aeEventLoop *eventLoop) {
    while (!eventLoop->stop) {
        // 1. Wait for file descriptor events (epoll/kqueue)
        int numEvents = aeApiPoll(eventLoop, tvp);

        // 2. Process each ready event
        for (int i = 0; i < numEvents; i++) {
            aeFileEvent *fe = &eventLoop->events[fired[i].fd];

            if (fired[i].mask & AE_READABLE) {
                fe->rfileProc(eventLoop, fired[i].fd, fe->clientData, fired[i].mask);
            }
            if (fired[i].mask & AE_WRITABLE) {
                fe->wfileProc(eventLoop, fired[i].fd, fe->clientData, fired[i].mask);
            }
        }
    }
}
🎭 The BRPOP Magic Revealed
# When you call redis.brpop()
redis.brpop("queue:default", timeout: 30)

# Redis internally does:
# 1. Check if list has items → Return immediately if yes
# 2. If empty → Register client as "blocked"
# 3. Event loop continues serving other clients
# 4. When item added → Wake up blocked client
# 5. Return the item

# Your Ruby thread blocks, but Redis keeps serving others!
🌍 Event Loops in the Wild
🟢 Node.js: JavaScript Everywhere
// Single thread handling thousands of requests
const server = http.createServer((req, res) => {
  // This doesn't block other requests!
  database.query('SELECT * FROM users', (err, result) => {
    res.json(result);
  });
});
🐍 Python: AsyncIO
import asyncio

async def handle_request():
    # Non-blocking database call
    user = await database.fetch_user(user_id)
    # Event loop serves other requests while waiting
    posts = await api.fetch_posts(user.id)
    return render_template('profile.html', user=user, posts=posts)

# Run multiple requests concurrently
asyncio.run(handle_many_requests())
💎 Ruby: EventMachine & Async
# EventMachine (older)
EventMachine.run do
  EventMachine::HttpRequest.new('http://api.example.com').get.callback do |response|
    puts "Got response: #{response.response}"
  end
end

# Modern Ruby (Async gem)
require 'async'

Async do |task|
  response = task.async { Net::HTTP.get('example.com', '/api/data') }
  puts response.wait
end
Read More (Premium content): RailsDrop: Rubys-async-revolution
Message from the post: “💪 Ruby is not holding back with the JS spread of the WORLD! 💪 Rails is NOT DYING in 2025!! ITS EVOLVING!! 💪 We Ruby/Rails Community Fire with BIG in Future! 🕺”
⚙️ The Dark Side: Event Loop Limitations
🐌 CPU-Intensive Tasks Kill Performance
// This blocks EVERYTHING!
function badCpuTask() {
  let result = 0;
  for (let i = 0; i < 10000000000; i++) {  // 10 billion iterations
    result += i;
  }
  return result;
}

// While this runs, NO other requests get served!
🩹 The Solution: Worker Threads
// Offload heavy work to separate thread
const { Worker } = require('worker_threads');

function goodCpuTask() {
  return new Promise((resolve) => {
    const worker = new Worker('./cpu-intensive-task.js');
    worker.postMessage({ data: 'process this' });
    worker.on('message', resolve);
  });
}
🎯 When to Use Event Loops
✅ Perfect For:
- Web servers (lots of I/O, little CPU)
- API gateways (routing requests)
- Real-time applications (chat, games)
- Database proxies (Redis, MongoDB)
- File processing (reading/writing files)
❌ Avoid For:
- Heavy calculations (image processing)
- Machine learning (training models)
- Cryptographic operations (Bitcoin mining)
- Scientific computing (physics simulations)
🚀 Performance Comparison
Handling 10,000 Concurrent Connections:

Traditional Threading:
├── Memory: ~2GB (200KB per thread)
├── Context switches: ~100,000/second
├── CPU overhead: ~30%
└── Max connections: ~5,000

Event Loop:
├── Memory: ~50MB (single thread + buffers)
├── Context switches: 0
├── CPU overhead: ~5%
└── Max connections: ~100,000+
🔮 The Future: Event Loops Everywhere
Modern frameworks are embracing event-driven architecture:
- Rails 7+: Hotwire + ActionCable
- Django: ASGI + async views
- Go: Goroutines (event-loop-like)
- Rust: Tokio async runtime
- Java: Project Loom virtual threads
💡 Key Takeaways
- Event loops excel at I/O-heavy workloads – perfect for web applications
- They use a single thread – no context switching overhead
- Non-blocking operations – one slow request doesn’t block others
- CPU-intensive tasks are kryptonite – offload to worker threads
- Modern web development is moving toward async patterns – learn them now!
The next time you see redis.brpop() blocking your Ruby thread while Redis happily serves thousands of other clients, you’ll know exactly what’s happening under the hood! 🎉