Setup ๐Ÿ›  Rails 8 App โ€“ Part 17: Fix Github actions, Mini-test ๐Ÿ—œ๏ธ Test Cases With Cursor AI โž˜

Hello friends, in this post lets look into the issues we faced after integrating:

  1. Sessions for users (sign in functionality)
  2. Order, Order items models and the related code base

Check our Github actions failure cases here: https://github.com/MIRA-Designs/design_studio/actions/runs/14953772366/job/42006659413?pr=31

What is working?

  • Rubocop linting checks
  • Test cases – Fails
  • Brakeman security scan – Pending

Why the issue?

I made a mistake of integrating the sessions with Order and Order items model (I used the help of Co-piolet for improvement). I have only written the test cases for sessions. Why I made this mistake? Because for last some days the development was not happening in our design_studio project. So I was curious to do so many things at a time and I cannot control myself ๐Ÿ™‚

Now what’s next?

Let’s solve the test cases issues. First I cannot get ‘why this test cases for Rate limit issue is happening’. I have to research on this. I want to try Cursor – how it works with these kind of scenarios. Cursor provide me details about exact issue in our test cases and updated for me. I was happy that I saved some time.

Let’s see What is the findings of cursor:

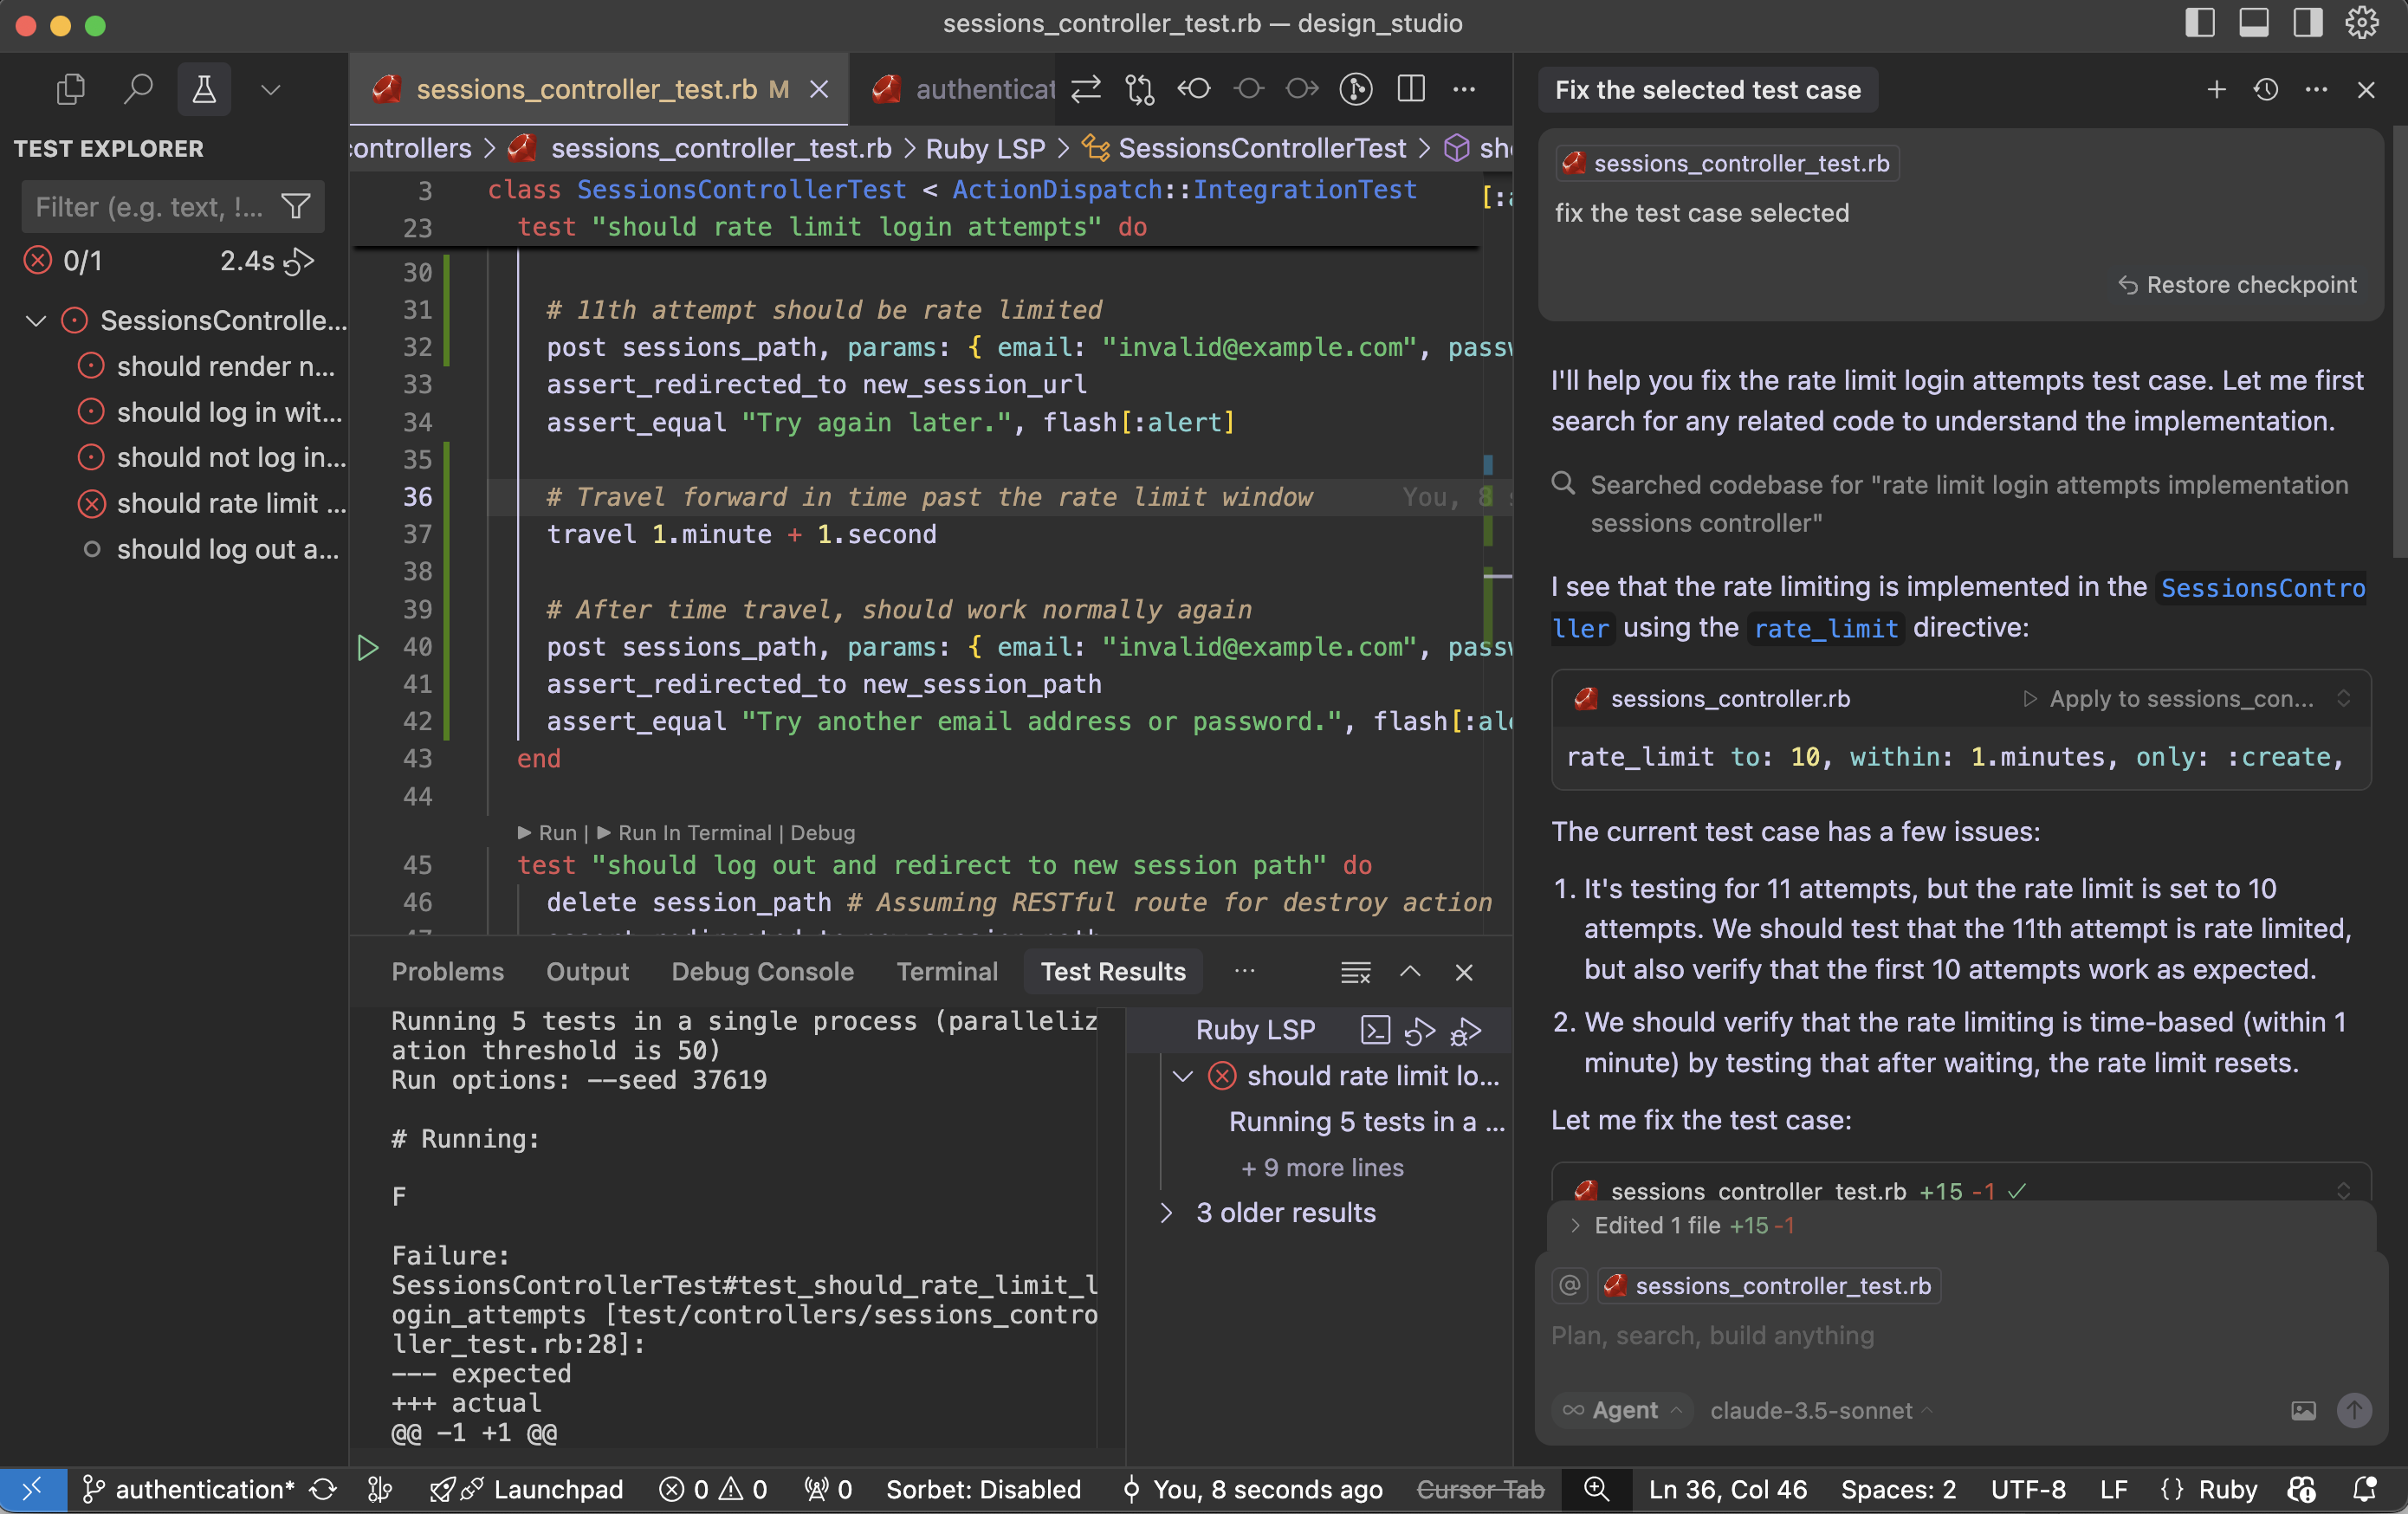
The current test case has few issues:

  1. It’s testing for 11 attempts, but the rate limit is set to 10 attempts. We should test that the 11th attempt is rate limited, but also verify that the first 10 attempts work as expected.
  2. We should verify that the rate limiting is time-based (within 1 minute) by testing that after waiting, the rate limit resets.

Fix the test case:

Cursor updated the test case to properly test the rate limiting functionality. Here’s what the improved test does:

  1. First, it makes 10 attempts and verifies that each attempt gets the normal “invalid credentials” response
  2. Then it makes the 11th attempt and verifies that it gets rate limited with the “Try again later” message
  3. Finally, it uses Rails’ travel helper to move forward in time past the rate limit window (1 minute + 1 second) and verifies that the rate limit has been reset by making another attempt

This test now properly verifies:

  • The rate limit threshold (10 attempts)
  • The rate limit behavior (redirect with “Try again later” message)
  • The rate limit duration (1 minute)
  • The rate limit reset after the time window expires

The test is now more thorough and matches the actual implementation in the SessionsController.

Run the test case with the fix:

Failure:
SessionsControllerTest#test_should_rate_limit_login_attempts [test/controllers/sessions_controller_test.rb:34]:
--- expected
+++ actual
@@ -1 +1 @@
-"Try again later."
+"Try another email address or password."

the problem is that the rate limiting is happening at the controller level using rate_limit, but our test isn’t properly simulating real-world timing. Let me modify the test to ensure we’re making the requests within the 1-minute window and properly testing the rate limiting.

We fixed it and still the issues are not solved:

# Running:
F
Failure:
SessionsControllerTest#test_should_rate_limit_login_attempts [test/controllers/sessions_controller_test.rb:36]:
--- expected
+++ actual
@@ -1 +1 @@
-"Try again later."
+"Try another email address or password."

bin/rails test test/controllers/sessions_controller_test.rb:23

The issue may be with our SessionsController rate_limit directive. That is not working in test environment. I had this doubt. Let’s see what cursor tell us regarding this:

Looking at the SessionsController, the rate limiting is implemented using Rails’ rate_limit macro, but it seems the rate limiting might not be working as expected in the test environment. Let’s try to debug this by checking if we need to enable rate limiting in the test environment or if there’s a different approach needed.

Cursor suggested Rails cache setup and wipe out cache:

require "test_helper"

class SessionsControllerTest < ActionDispatch::IntegrationTest
  setup do
    # Use memory store for rate limiting in tests
    Rails.cache = ActiveSupport::Cache::MemoryStore.new
  end

  teardown do
    Rails.cache.clear
  end

  ......

The test environment is configured to use :null_store for caching, which means rate limiting won’t work. Let’s modify the test environment configuration:

environments/test.rb:

- config.cache_store = :null_store
+ config.cache_store = :memory_store

Cursor made two important changes:

  1. Changed the test environment’s cache store from :null_store to :memory_store to ensure rate limiting works properly
  2. Added a consistent IP address in the test requests using 
    headers: { REMOTE_ADDR: “192.168.1.1” } 
    since rate limiting is typically done based on the client’s IP address

The test should now work correctly because:

  1. We have proper caching enabled in the test environment
  2. We’re using a consistent IP address for all requests, which is what rate limiting typically uses to track requests
  3. We’re still maintaining the time window with travel_to and travel
  4. The cache is cleared between tests to ensure a clean state

Try running the test again – it should now properly detect when the rate limit is exceeded on the 11th request.

Running 5 tests in a single process (parallelization threshold is 50)
Run options: --seed 55394

# Running:
.

Finished in 1.222473s, 0.8180 runs/s, 28.6305 assertions/s.
1 runs, 35 assertions, 0 failures, 0 errors, 0 skips
Coverage report generated for Unit Tests to /Users/abhilash/rails/design_studio/public/coverage.
Line Coverage: 21.37% (81 / 379)

Works!! Cursor – you beauty.

Let us see why the fix worked:

  1. The main issue was that the test environment was using :null_store for caching, which effectively disabled all caching. Since Rails’ rate limiting feature relies on caching to track request counts, it wasn’t working properly.
  2. By changing to :memory_store, we enabled proper caching in the test environment, allowing the rate limiting to track requests.
  3. Adding the consistent IP address (REMOTE_ADDR: “192.168.1.1”) in the test requests was also important because Rails’ rate limiting typically uses the client’s IP address as part of the cache key to track requests per client.
  4. The test structure ensures clean state by:
  • Using setup to initialize a fresh cache store for each test
  • Using teardown to clear the cache after each test
  • Using travel_to to ensure consistent timing for rate limit windows
  • Using consistent IP addresses for request tracking

This is a good example of how testing rate limiting requires careful consideration of the entire environment, including caching, timing, and request attributes. The test now properly verifies that:

  • Users can make up to 10 attempts within a minute
  • The 11th attempt gets rate limited
  • After waiting for a minute, they can try again

I may need some more time to get the fact that: “Rails’ rate limiting feature relies on caching to track request counts”. Here is the importance of AI tool like cursor. It saved a lot of my debugging time.

Setup ๐Ÿ›  Rails 8 App – Part 1: Setup All Necessary Configurations | Ruby | Rails setup | Kamal | Rails Generations

Ruby on Rails 8 introduces several improvements that make development easier, more secure, and more maintainable. In this guide, we’ll walk through setting up a new Rails 8 application while noting the significant configurations and features that come out of the box.

1. Check Your Ruby and Rails Versions

If not installed Ruby 3.4 and Rails 8.0 please check: https://railsdrop.com/2025/02/11/installing-and-setup-ruby-3-rails-8-vscode-ide-on-macos-in-2025/

Before starting, ensure that you have the correct versions of Ruby and Rails installed:

$ ruby -v
ruby 3.4.1

$ rails -v
Rails 8.0.1

If you donโ€™t have these versions installed, update them using your package manager or version manager (like rbenv or RVM).

2. Create a New Rails 8 Application

Run the following command to create a new Rails app:

$ rails new design_studio

Noteworthy Files and Directories Created

Here are some interesting files and directories that are generated with a new Rails 8 app:

 create  .ruby-version
 create  bin/brakeman
 create  bin/rubocop
 create  bin/docker-entrypoint
 create  .rubocop.yml
 create  .github/workflows
 create  .github/workflows/ci.yml
 create  config/cable.yml
 create  config/storage.yml
 create  config/initializers/content_security_policy.rb
 create  config/initializers/filter_parameter_logging.rb
 create  config/initializers/new_framework_defaults_8_0.rb

Key Takeaways:

  • Security & Code Quality Tools: Brakeman (security scanner) and RuboCop (code style linter) are included by default.
  • Docker Support: The presence of bin/docker-entrypoint suggests better built-in support for containerized deployment.
  • GitHub Actions Workflow: The .github/workflows/ci.yml file provides default CI configurations.
  • Enhanced Security: The content_security_policy.rb initializer helps enforce a strict security policy.
  • New Rails Defaults: The new_framework_defaults_8_0.rb initializer helps manage breaking changes in Rails 8.

Rails automatically creates the following during the creation of the rails new app.

a. Configuring Import Maps and Installing Turbo & Stimulus

Rails 8 still defaults to Import Maps for JavaScript package management, avoiding the need for Node.js and Webpack:

$ rails turbo:install stimulus:install

This creates the following files:

create    config/importmap.rb
create    app/javascript/controllers
create    app/javascript/controllers/index.js
create    app/javascript/controllers/hello_controller.js
append    config/importmap.rb

Key Takeaways:

  • Import Maps: Defined in config/importmap.rb, allowing dependency management without npm.
  • Hotwired Support: Turbo and Stimulus are automatically configured for modern front-end development.
  • Generated Controllers: Stimulus controllers are pre-configured inside app/javascript/controllers/.

b. Deploying with Kamal

Kamal simplifies deployment with Docker and Kubernetes. Rails 8 includes built-in support:

$ bundle binstubs kamal
$ bundle exec kamal init

This results in:

Created .kamal/secrets file
Created sample hooks in .kamal/hooks

Key Takeaways:

  • Automated Deployment Setup: Kamal provides easy-to-use deployment scripts.
  • Secret Management: The .kamal/secrets file ensures secure handling of credentials.
  • Deployment Hooks: Custom hooks allow pre- and post-deployment scripts for automation.

c. Setting Up Caching and Queues with Solid Cache, Queue, and Cable

NOTE: Rails automatically creates this for you while creating the rails app.

Rails 8 includes Solid Cache, Solid Queue, and Solid Cable for enhanced performance and scalability:

$ rails solid_cache:install solid_queue:install solid_cable:install

This creates:

create  config/cache.yml
create  db/cache_schema.rb
create  config/queue.yml

Key Takeaways:

  • Caching Support: config/cache.yml manages application-wide caching.
  • Database-Powered Queue System: Solid Queue simplifies background job management without requiring external dependencies like Sidekiq.
  • Real-Time WebSockets: Solid Cable offers Action Cable improvements for real-time features.

3. Rails 8 Migration Enhancements

Rails 8 provides new shortcuts and syntax improvements for database migrations:

NOT NULL Constraints with ! Shortcut

You can impose NOT NULL constraints directly from the command line using !:

# Example for not null constraints: 
โžœ rails generate model User name:string!

Type Modifiers in Migrations

Rails 8 allows passing commonly used type modifiers directly via the command line. These modifiers are enclosed in curly braces {} after the field type.

# Example for model generation: 
โžœ rails generate model Product name:string description:text
# Example for passing modifiers: 
โžœ rails generate migration AddDetailsToProducts 'price:decimal{5,2}' supplier:references{polymorphic}

Generating a Scaffold for the Product Model

Let’s generate a complete scaffold for our Product model:

โœ— rails generate scaffold product title:string! description:text category:string color:string 'size:string{10}' 'mrp:decimal{7,2}' 'discount:decimal{7,2}' 'rating:decimal{1,1}'
โžœ  design_studio git:(main) โœ— rails -v
Rails 8.0.1
โžœ  design_studio git:(main) โœ— ruby -v
ruby 3.4.1 (2024-12-25 revision 48d4efcb85) +PRISM [arm64-darwin24]
โžœ  design_studio git:(main) โœ— rails generate scaffold product title:string! description:text category:string color:string 'size:string{10}' 'mrp:decimal{7,2}' 'discount:decimal{7,2}' 'rating:decimal{1,1}'

Using the Rails Resource Generator

The rails g resource command is a powerful way to generate models, controllers, migrations, and routes all in one go. This is particularly useful when setting up RESTful resources in a Rails application.

Basic Syntax

โžœ rails g resource product

This command creates the necessary files for a new resource, including:

  • A model (app/models/product.rb)
  • A migration file (db/migrate/)
  • A controller (app/controllers/product_controller.rb)
  • Routes in config/routes.rb
  • A test file (test/controllers/product_controller_test.rb or spec/)

Example Usage

To generate a Post resource with attributes:

โžœ rails g resource Product title:string! description:text brand:references

This will:

  1. Create a Product model with title and description attributes.
  2. Add a brand_id foreign key as a reference.
  3. Apply a NOT NULL constraint on title (! shortcut).
  4. Generate a corresponding migration file.
  5. Set up routes automatically (resources :products).

Running the Migration

After generating a resource, apply the migration to update the database:

โžœ rails db:migrate


Difference Between resource and scaffold

Rails provides both rails g resource and rails g scaffold, but they serve different purposes:

Featurerails g resourcerails g scaffold
Generates a Modelโœ…โœ…
Generates a Migrationโœ…โœ…
Generates a Controllerโœ… (empty actions)โœ… (full CRUD actions)
Generates Views (HTML/ERB)โŒโœ… (index, show, new, edit, etc.)
Generates Routesโœ…โœ…
Generates Helper FilesโŒโœ…
Generates Testsโœ…โœ…
  • rails g resource is minimalโ€”it generates only essential files without view templates. It’s useful when you want more control over how your views and controller actions are built.
  • rails g scaffold is more opinionated and generates full CRUD functionality with prebuilt forms and views, making it ideal for rapid prototyping.

If you need full CRUD functionality quickly, use scaffold. If you prefer a leaner setup with manual control over implementation, use resource.

Conclusion

Rails 8 significantly enhances the development experience with built-in security tools, CI/CD workflows, streamlined deployment via Kamal, and modern front-end support with Turbo & Stimulus. It also improves caching, background jobs, and real-time features with Solid tools.

These improvements make Rails 8 a robust framework for modern web applications, reducing the need for additional dependencies while keeping development efficient and secure.

Enjoy Rails! ๐Ÿš€