Finds all occurrences of a pattern in a string and returns them as an array.
The scan method in Ruby is a powerful string method that allows you to find all occurrences of a pattern in a string. It returns an array of matches, making it extremely useful for text processing and data extraction tasks.
text = "hello world hello ruby"
matches = text.scan(/hello/)
puts matches.inspect
# Output: ["hello", "hello"]
Matching Multiple Patterns
text = "The quick brown fox jumps over the lazy dog"
matches = text.scan(/\b\w{3}\b/)  # Find all 3-letter words
puts matches.inspect
# Output: ["The", "fox", "the", "dog"]
"a1 b2 c3".scan(/(\w)(\d)/) { |letter, num| puts "#{letter} -> #{num}" }
# Output:
# a -> 1
# b -> 2
# c -> 3
text = "Prices: $10, $20, $30"
total = 0
text.scan(/\$(\d+)/) { |match| total += match[0].to_i }
puts total
# Output: 60
5. Case-Insensitive Search
"Ruby is COOL!".scan(/cool/i) # => ["COOL"]
6. Extract Email Addresses
"Email me at test@mail.com".scan(/\S+@\S+/) # => ["test@mail.com"]
text = "Contact us at support@example.com or sales@company.org"
emails = text.scan(/\b[A-Za-z0-9._%+-]+@[A-Za-z0-9.-]+\.[A-Za-z]{2,}\b/)
puts emails.inspect
# Output: ["support@example.com", "sales@company.org"]
Performance Characteristics: Ruby’s #scan Method
The #scan method is generally efficient for most common string processing tasks, but its performance depends on several factors:
String length – Larger strings take longer to process
Pattern complexity – Simple patterns are faster than complex regex
Number of matches – More matches mean more memory allocation
Performance Considerations
1. Time Complexity 🧮
Best case: O(n) where n is string length
Worst case: O(n*m) for complex regex patterns (with backtracking)
2. Memory Usage 🧠
Creates an array with all matches
Each match is a new string object (memory intensive for large results)
Benchmark 📈 Examples
require 'benchmark'

large_text = "Lorem ipsum " * 10_000

# Simple word matching
Benchmark.bm do |x|
  x.report("simple scan:") { large_text.scan(/\w+/) }
  x.report("complex scan:") { large_text.scan(/(?:^|\s)(\w+)(?=\s|$)/) }
end
Typical results:
              user     system      total        real
simple scan:  0.020000   0.000000   0.020000 (  0.018123)
complex scan: 0.050000   0.010000   0.060000 (  0.054678)
   # Slower (creates match groups)
   text.scan(/(\w+)/)

   # Faster
   text.scan(/\w+/)
Use blocks to avoid large arrays:
   # Stores all matches in memory
   matches = text.scan(pattern)

   # Processes matches without storing
   text.scan(pattern) { |m| process(m) }
Consider alternatives for very large strings:
   # For simple splits, String#split might be faster
   words = text.split

   # For streaming processing, use StringIO
When to Be Cautious ⚠️
Processing multi-megabyte strings
Using highly complex regular expressions
When you only need the first few matches (consider #match instead)
The #scan method is optimized for most common cases, but for performance-critical applications with large inputs, consider benchmarking alternatives.
#inject Method (aka #reduce)
Enumerable#inject takes two arguments: a base case and a block.
Each item of the Enumerable is passed to the block, and the result of the block is fed into the block again and iterate next item.
In a way the inject function injects the function between the elements of the enumerable. inject is aliased as reduce. You use it when you want to reduce a collection to a single value.
For example:
    product = [ 2, 3, 4 ].inject(1) do |result, next_value|
      result * next_value
    end
    product #=> 24
Purpose
Accumulates values by applying an operation to each element in a collection
Can produce a single aggregated result or a compound value
require 'benchmark'

large_array = (1..1_000_000).to_a

Benchmark.bm do |x|
  x.report("inject:") { large_array.inject(0, :+) }
  x.report("each + var:") do
    sum = 0
    large_array.each { |n| sum += n }
    sum
  end
end
Typical results show inject is slightly slower than explicit iteration but more concise:
              user     system      total        real
inject:      0.040000   0.000000   0.040000 (  0.042317)
each + var:  0.030000   0.000000   0.030000 (  0.037894)
Optimization Tips 💡
Use symbol shorthand when possible (faster than blocks):
   # Faster
   array.inject(:+)

   # Slower
   array.inject { |sum, n| sum + n }
Preallocate mutable objects when building structures:
   # Good for hashes
   items.inject({}) { |h, (k,v)| h[k] = v; h }

   # Better for arrays
   items.inject([]) { |a, e| a << e.transform; a }
Avoid unnecessary object creation in blocks:
   # Bad - creates new string each time
   strings.inject("") { |s, x| s + x.upcase }

   # Good - mutates original string
   strings.inject("") { |s, x| s << x.upcase }
Consider alternatives for simple cases:
   # For simple sums
   array.sum # (Ruby 2.4+) is faster than inject(:+)

   # For concatenation
   array.join is faster than inject(:+)
When to Be Cautious ⚠️
With extremely large collections where memory matters
When the block operations are very simple (explicit loop may be faster)
When building complex nested structures (consider each_with_object)
The inject method provides excellent readability with generally good performance for most use cases.
Minitest provides a complete suite of testing facilities supporting TDD, BDD, mocking, and benchmarking.
minitest/test is a small and incredibly fast unit testing framework. It provides a rich set of assertions to make your tests clean and readable.
minitest/spec is a functionally complete spec engine. It hooks onto minitest/test and seamlessly bridges test assertions over to spec expectations.
minitest/benchmark is an awesome way to assert the performance of your algorithms in a repeatable manner. Now you can assert that your newb co-worker doesn’t replace your linear algorithm with an exponential one!
minitest/mock by Steven Baker, is a beautifully tiny mock (and stub) object framework.
minitest/pride shows pride in testing and adds coloring to your test output
minitest/test_task – a full-featured and clean rake task generator. – Minitest Github
♦️ Incredibly small and fast runner, but no bells and whistles.
Let’s take the given example in the doc, we’d like to test the following class:
class Meme
  def i_can_has_cheezburger?
    "OHAI!"
  end

  def will_it_blend?
    "YES!"
  end
end
🧪 Unit tests
Define your tests as methods beginning with test_.
require "minitest/autorun"

class TestMeme < Minitest::Test
  def setup
    @meme = Meme.new
  end

  def test_that_kitty_can_eat
    assert_equal "OHAI!", @meme.i_can_has_cheezburger?
  end

  def test_that_it_will_not_blend
    refute_match /^no/i, @meme.will_it_blend?
  end

  def test_that_will_be_skipped
    skip "test this later"
  end
end
# File lib/minitest/test.rb, line 153
def setup; end
♦️ Runs before every test. Use this to set up before each test run.
The terms “unit test” and “spec” are often used in software testing, and while they can overlap, they have some key differences:
🧪 Unit Test vs 📋 Spec: Key Differences
🔬Unit Test
Purpose: Tests a single unit of code (typically a method, function, or class) in isolation
Scope: Very focused and narrow – tests one specific piece of functionality
Style: Usually follows a more traditional testing approach with setup, execution, and assertion
Framework examples: Minitest (like in your Ruby file), JUnit, pytest
Structure: Often uses test_ prefix or Test classes with assertion methods
📝 Spec (Specification)
Purpose: Describes the behavior and requirements of the system in a more readable, documentation-like format
Scope: Can cover unit-level, integration, or acceptance testing
Style: Uses natural language descriptions that read like specifications
Framework examples: RSpec, Jasmine, Mocha, Jest
Structure: Uses descriptive blocks like describe, it, should
⚖️ Key Differences
1. ✍️ Writing Style:
Unit Test: def test_array_is_empty with assertions
Spec: describe "when array is empty" do it "should return error message"
2. 👁️ Readability:
Unit Test: More code-focused, technical
Spec: More human-readable, business-focused
3. 🎯 Philosophy:
Unit Test: Test the implementation
Spec: Specify the behavior (BDD – Behavior Driven Development)
📊 Example Comparison
🏷️ Our current Minitest code:
def array_is_an_empty_array
  assert_equal 'Provide an array with length 2 or more', two_sum([], 9)
end
🎨 RSpec equivalent (spec style):
describe "two_sum" do
  context "when array is empty" do
    it "returns an error message" do
      expect(two_sum([], 9)).to eq('Provide an array with length 2 or more')
    end
  end
end
Both test the same functionality, but specs emphasize describing behavior in natural language, making them easier for non-technical stakeholders to understand. 🎉
🔬 Mini-test equivalent:
# frozen_string_literal: true

require 'minitest/spec'
require_relative 'two_sum'

describe "TwoSum" do
  describe "when array is empty" do
    it "returns an error message" do
      _(two_sum([], 9)).must_equal 'Provide an array with length 2 or more'
    end
  end
end
The underscore _() in Minitest spec style is a wrapper method that converts the value into an expectation object.
Here’s why it’s used:
🔍 Why the Underscore _()?
🎯 Purpose:
The _() method wraps your actual value and returns a special expectation object that has assertion methods like must_equal, must_be, etc.
⚙️ How it works:
# This:
_(two_sum([], 9)).must_equal 'Provide an array with length 2 or more'

# Is equivalent to:
# 1. two_sum([], 9) returns some value
# 2. _() wraps that value into an expectation object
# 3. .must_equal() is called on that expectation object
🔄 Alternative Syntaxes
1. 📝 Using expect() (more readable):
expect(two_sum([], 9)).must_equal 'Provide an array with length 2 or more'
2. 🔧 Using value() (explicit):
value(two_sum([], 9)).must_equal 'Provide an array with length 2 or more'
3. 🏷️ Traditional unit test style (no wrapper needed):
assert_equal 'Provide an array with length 2 or more', two_sum([], 9)
💡 Why underscore specifically?
Minimal syntax: _() is short and doesn’t clutter the code
Ruby convention: Underscore often indicates “throwaway” or “utility” variables
Non-conflicting: Unlikely to conflict with your method names
Chainable: Creates a fluent interface for assertions
🎨 Complete comparison:
# Spec style with underscore
_(result).must_equal expected

# Spec style with expect (more readable)
expect(result).must_equal expected

# Unit test style (no wrapper)
assert_equal expected, result
The expect() version is often preferred because it’s more self-documenting!
🎨 Alternative Spec Style with Expectation Syntax:
# frozen_string_literal: true

require 'minitest/spec'
require_relative 'two_sum'

describe "TwoSum" do
  describe "when array is empty" do
    it "returns an error message" do
      expect(two_sum([], 9)).must_equal 'Provide an array with length 2 or more'
    end
  end
end
⚖️ Key Differences in Minitest
🔧 Setup Required:
Unit Test: require 'minitest/test'
Spec: require 'minitest/spec'
✍️ Assertion Style:
Unit Test: assert_equal expected, actual
Spec: _(actual).must_equal expected or expect(actual).must_equal expected
🏗️ Structure:
Unit Test: Classes with test_ methods
Spec: describe blocks with it blocks
🎯 Readability:
Both styles work with Minitest, but the spec style reads more like natural language documentation, making it easier to understand the intended behavior!
Excellent question! Let me clarify the relationship between TDD/BDD (methodologies) and RSpec/Minitest (testing frameworks):
Ruby on Rails is known for its developer-friendly conventions, but it’s also built with security in mind. While the framework provides many features to guard against common threats, it’s up to developers to understand and apply them correctly.
In this post, we’ll walk through essential Rails security measures, tackle real-world threats, and share best practices – with examples for both API-only and full-stack Rails applications.
🚨 Common Web Threats Rails Helps Mitigate
SQL Injection
Cross-Site Scripting (XSS)
Cross-Site Request Forgery (CSRF)
Mass Assignment
Session Hijacking
Insecure Deserialization
Insecure File Uploads
Authentication & Authorization flaws
Let’s explore how Rails addresses these and what you can do to reinforce your app.
1. 🧱 SQL Injection
🛡️ Rails Protection:
Threat: Attackers inject malicious SQL through user inputs to read, modify, or delete database records
Rails uses Active Record with prepared statements to prevent SQL injection by default.
Arel: Build complex queries without string interpolation.
3. Victim visitsattacker.com while still logged into the bank.
4. Browser auto-sends the bank session cookie with the forged POST—and the transfer goes through, because the bank sees a “legitimate” logged-in request.
🛡️ Rails’ CSRF Protection
Rails ships with built-in defenses against CSRF by embedding an unguessable token in forms and verifying it on each non-GET request.
1.protect_from_forgery
In ApplicationController, Rails by default includes:
class ApplicationController < ActionController::Base
  protect_from_forgery with: :exception
end
This causes Rails to raise an exception if the token is missing or invalid.
Cross-Site Request Forgery (CSRF) is an attack that tricks a user’s browser into submitting a request (e.g. form submission, link click) to your application without the user’s intention, leveraging the fact that the browser automatically includes credentials (cookies, basic auth headers, etc.) with each request.
🔧 Disabling or Customizing CSRF
♦️ Disable for APIs (stateless JSON endpoints):
class Api::BaseController < ActionController::API skip_before_action :verify_authenticity_token end
♦️ Use Null Session (allowing some API use without exception):
protect_from_forgery with: :null_session
✅ Key Takeaways
CSRF exploits the browser’s automatic credential sending.
Rails guards by inserting and validating an unguessable token.
Always keep protect_from_forgery with: :exception in your base controller for full-stack Rails apps.
Fuzz & Pen Testing: Use tools like ZAP Proxy, OWASP ZAP.
Use RSpec tests for role restrictions, parameter whitelisting, and CSRF.
describe "Admin access" do
  it "forbids non-admins from deleting users" do
    delete admin_user_path(user)
    expect(response).to redirect_to(root_path)
  end
end
Continuous Integration – Integrate scans in CI pipeline (GitHub Actions example):
# config/initializers/rack_attack.rb

Rack::Attack.throttle('req/ip', limit: 60, period: 1.minute) do |req|
  req.ip
end
in Rails 8 we can use rate_limit for Controller actions like:
rate_limit to: 10, within: 1.minutes, only: :create, with: -> { redirect_to new_session_url, alert: "Try again later." }
Pagination & Filtering: Prevent large payloads to avoid DoS.
📝 Summary: Best Practices Checklist
✅ Use Strong Parameters ✅ Escape output (no raw unless absolutely trusted) ✅ Sanitize user content ✅ Use Devise or Sorcery for auth ✅ Authorize every resource with Pundit or CanCanCan ✅ Store files safely and validate uploads ✅ Enforce HTTPS in production ✅ Regularly run Brakeman and bundler-audit ✅ Rate-limit APIs with Rack::Attack ✅ Keep dependencies up to date
🔐 Final Thought
Rails does a lot to keep you safe — but security is your responsibility. Follow these practices and treat every external input as potentially dangerous. Security is not a one-time setup — it’s an ongoing process.
Declarative UI: build complex interfaces by composing small, reusable components.
Virtual DOM: efficient updates, smoother user experience.
Rich ecosystem: hooks, context, testing tools, and libraries like Redux.
Easy to learn once you grasp JSX and component lifecycle.
Why use React in Rails?
Leverage Rails’ backend power (ActiveRecord, routing, authentication) with React’s frontend flexibility.
Build single-page-app-like interactions within a Rails monolith or progressively enhance ERB views.
2. Prerequisites
Ruby 3.4.x installed (recommend using rbenv or RVM or Mise).
Rails 8.x (we’ll install below).
Node.js (>= 16) and npm or Yarn.
Code editor (VS Code, RubyMine, etc.).
Why Node.js is Required for React
React’s ecosystem relies on a JavaScript runtime and package manager:
Build tools (ESBuild, Webpack, Babel) run as Node.js scripts to transpile JSX/ES6 and bundle assets.
npm/Yarn fetch and manage React and its dependencies from the npm registry.
Script execution: Rails generators and custom npm scripts (e.g. rails javascript:install:react, npm run build) need Node.js to execute.
Without Node.js, you cannot install packages or run the build pipeline necessary to compile and serve React components.
What is Node.js?
Node.js is an open-source, cross-platform JavaScript runtime built on Chrome’s V8 engine. It enables JavaScript to be executed on the server (outside the browser) and provides:
Server-side scripting: build web servers, APIs, and backend services entirely in JavaScript.
Command-line tools: run scripts for tasks like building, testing, or deploying applications.
npm ecosystem: access to hundreds of thousands of packages for virtually any functionality, from utility libraries to full frameworks.
Event-driven, non-blocking I/O: efficient handling of concurrent operations, making it suitable for real-time applications.
Node.js is the backbone that powers React’s tooling, package management, and build processes.
3. Installing Ruby 3.4 and Rails 8
1. Install Ruby 3.4.0 (example using rbenv):
# install rbenv and ruby-build if not yet installed
brew install rbenv ruby-build
rbenv install 3.4.0
rbenv global 3.4.0
ruby -v   # => ruby 3.4.0p0
We’ll scaffold a fresh project using ESBuild for JavaScript bundling, which integrates seamlessly with React.
rails new design_studio_react \
  --database=postgresql \
  -j esbuild
cd design_studio_react
--database=postgresql: sets PostgreSQL as the database adapter.
-j esbuild: configures ESBuild for JS bundling (preferred for React in Rails 8).
4.1 About ESBuild
ESBuild is a next-generation JavaScript bundler and minifier written in Go. Rails 8 adopted ESBuild by default for JavaScript bundling due to its remarkable speed and modern feature set:
Blazing-fast builds: ESBuild performs parallel compilation and leverages Go’s concurrency, often completing bundling in milliseconds even for large codebases.
Built‑in transpilation: it supports JSX and TypeScript out of the box, so you don’t need separate tools like Babel unless you have highly custom transforms.
Tree shaking: ESBuild analyzes import/export usage to eliminate dead code, producing smaller bundles.
Plugin system: you can extend ESBuild with plugins for asset handling, CSS bundling, or custom file types.
Simplicity: configuration is minimal—Rails’ -j esbuild flag generates sensible defaults, and you can tweak options in package.json or a separate esbuild.config.js.
How Rails Integrates ESBuild
When you run:
rails new design_studio_react --database=postgresql -j esbuild
Rails will:
1. Install the esbuild npm package alongside react dependencies.
Developer experience: near-instant rebuilds let you see JSX changes live without delay.
Production readiness: built‑in minification and tree shaking keep your asset sizes small.
Future-proof: the plugin ecosystem grows, and Rails can adopt newer bundlers (like SWC or Vite) with a similar pattern.
With ESBuild, your React components compile quickly, your development loop tightens, and your production assets stay optimized—making it the perfect companion for a modern Rails 8 + React stack.
5. What is Virtual DOM
The Virtual DOM is one of React’s most important concepts. Let me explain it clearly with examples.
🎯 What is the Virtual DOM?
The Virtual DOM is a JavaScript representation (copy) of the actual DOM that React keeps in memory. It’s a lightweight JavaScript object that describes what the UI should look like.
📚 Real DOM vs Virtual DOM
Real DOM (What the browser uses):
<!-- This is the actual DOM in the browser -->
<div id="todo-app">
  <h1>My Todo List</h1>
  <ul>
    <li>React List</li>
    <li>Build a todo app</li>
  </ul>
</div>
// React compares old vs new Virtual DOM
const differences = [
  {
    type: 'ADD',
    location: 'ul.children',
    element: { type: 'li', props: { children: 'Build Todo App' } }
  }
];
Step 5: Reconciliation (Updating Real DOM)
// React updates ONLY what changed in the real DOM
const ul = document.querySelector('ul');
const newLi = document.createElement('li');
newLi.textContent = 'Build Todo App';
ul.appendChild(newLi); // Only this line runs!
🚀 Why Virtual DOM is Fast
Without Virtual DOM (Traditional approach):
// Traditional DOM manipulation
function updateTodoList(todos) {
  const ul = document.querySelector('ul');
  ul.innerHTML = ''; // Clear everything!

  todos.forEach(todo => {
    const li = document.createElement('li');
    li.textContent = todo;
    ul.appendChild(li); // Recreate everything!
  });
}
With Virtual DOM (React approach):
// React's approach
function updateTodoList(oldTodos, newTodos) {
  const differences = findDifferences(oldTodos, newTodos);

  differences.forEach(diff => {
    if (diff.type === 'ADD') {
      // Only add the new item
      const li = document.createElement('li');
      li.textContent = diff.todo;
      ul.appendChild(li);
    }
  });
}
🎭 Real Example with Our Todo App
Let’s trace through what happens when you add a todo:
// React compares and finds:
const changes = [
  {
    type: 'INSERT',
    location: 'ul',
    element: { type: 'li', key: 3, props: { children: 'Master React Hooks ⏳' } }
  }
];

// React updates ONLY what changed:
const ul = document.querySelector('ul');
const newLi = document.createElement('li');
newLi.textContent = 'Master React Hooks ⏳';
ul.appendChild(newLi); // Only this operation!
🎯 Key Benefits of Virtual DOM
1. Performance:
// Without Virtual DOM: Updates entire list
document.querySelector('ul').innerHTML = generateEntireList(todos);

// With Virtual DOM: Updates only what changed
document.querySelector('ul').appendChild(newTodoElement);
2. Predictability:
// You write declarative code
const TodoList = ({ todos }) => (
  <ul>
    {todos.map(todo => <li key={todo.id}>{todo.text}</li>)}
  </ul>
);

// React handles the imperative updates
// You don't need to manually add/remove DOM elements
3. Batching:
// Multiple state updates in one event
const handleButtonClick = () => {
  setTodos([...todos, newTodo]);     // Change 1
  setInputValue('');                 // Change 2
  setCount(count + 1);              // Change 3
};

// React batches these into one DOM update!
// For simple apps, Virtual DOM has overhead
// Direct DOM manipulation can be faster for simple operations
document.getElementById('counter').textContent = count;
❌ “Virtual DOM prevents all DOM operations”
// React still manipulates the real DOM
// Virtual DOM just makes it smarter about WHEN and HOW
✅ “Virtual DOM optimizes complex updates”
// When you have many components and complex state changes
// Virtual DOM's diffing algorithm is much more efficient
🧠 Does React show Virtual DOM to the user?
No. The user only ever sees the real DOM. The Virtual DOM (VDOM) is never shown directly. It’s just an internal tool used by React to optimize how and when the real DOM gets updated.
🧩 What is Virtual DOM exactly?
A JavaScript-based, lightweight copy of the real DOM.
Stored in memory.
React uses it to figure out what changed after state/props updates.
👀 What the user sees:
The real, visible HTML rendered to the browser — built from React components.
This is called the Real DOM.
🔁 So why use Virtual DOM at all?
✅ Because manipulating the real DOM is slow.
React uses VDOM to:
Build a new virtual DOM after every change.
Compare (diff) it with the previous one.
Figure out the minimum real DOM updates required.
Apply only those changes to the real DOM.
This process is called reconciliation.
🖼️ Visual Analogy
Imagine the Virtual DOM as a sketchpad. React draws the new state on it, compares it with the old sketch, and only updates what actually changed in the real-world display (real DOM).
✅ TL;DR
Question
Answer
Does React show the virtual DOM to user?
❌ No. Only the real DOM is ever visible to the user.
What is virtual DOM used for?
🧠 It’s used internally to calculate DOM changes efficiently.
Is real DOM updated directly?
✅ Yes, but only the minimal parts React determines from the VDOM diff.
🧪 Example Scenario
👤 The user is viewing a React app with a list of items and a button:
Compares previous VDOM (10 <li> items) vs new VDOM (20 <li> items).
Finds that 10 new <li> nodes were added.
This is called the reconciliation process.
⚙️ 4. React Updates the Real DOM
React tells the browser: “Please insert 10 new <li> elements inside the <ul>.”
✅ Only these 10 DOM operations happen. ❌ React does not recreate the entire <ul> or all 20 items.
🖼️ What the User Sees
On the screen (the real DOM):
<ul>
  <li>Item 1</li>
  ...
  <li>Item 20</li>
</ul>
The user never sees the Virtual DOM — they only see the real DOM updates that React decides are necessary.
🧠 Summary: Virtual DOM vs Real DOM
Step
Virtual DOM
Real DOM
Before click
10 <li> nodes in memory
10 items visible on screen
On click
New VDOM generated with 20 <li> nodes
React calculates changes
Diff
Compares new vs old VDOM
Determines: “Add 10 items”
Commit
No UI shown from VDOM
Only those 10 new items added to browser DOM
✅ Key Point
🧠 The Virtual DOM is a tool for React, not something the user sees. 👁️ The user only sees the final, optimized changes in the real DOM.
🎯 Summary
Virtual DOM is React’s:
JavaScript representation of the real DOM
Diffing algorithm that compares old vs new Virtual DOM
Reconciliation process that updates only what changed
Performance optimization for complex applications
Abstraction layer that lets you write declarative code
Think of it as React’s smart assistant that:
Remembers what your UI looked like before
Compares it with what it should look like now
Makes only the necessary changes to the real DOM
This is why you can write simple, declarative code like {todos.map(todo => <li>{todo}</li>)} and React handles all the complex DOM updates efficiently!
🔄 After the Virtual DOM Diff, How React Updates the Real DOM
🧠 Step-by-Step:
React creates a diff between the new and previous virtual DOM trees.
React then creates a list of “instructions” called the update queue.
Examples:
“Insert <li>Item 11</li> at position 10″
“Remove <div> at index 3″
“Change text of button to ‘Read Less'”
These changes are passed to React’s reconciliation engine.
React uses the browser’s DOM APIs (document.createElement, appendChild, removeChild, etc.) to apply only the minimal changes.
✅ So instead of doing:
document.body.innerHTML = newHTML; // inefficient, replaces all
React does:
const newEl = document.createElement("li");
newEl.textContent = "Item 11";
ul.appendChild(newEl); // just this
❓ Why Didn’t Browsers Do This Earlier?
Excellent historical question. The short answer is: Browsers give us the tools, but React gave us the strategy.
⚠️ Why browsers didn’t do it automatically:
Reason
Explanation
🧱 Low-level APIs
The browser exposes DOM APIs (appendChild, setAttribute), but they’re imperative — devs must write the logic.
🤯 Complexity
Managing DOM efficiently across many updates (nested, reordered, conditional elements) is hard and bug-prone manually.
🔁 Manual state syncing
Before React, developers had to manually keep UI in sync with state. That logic got complex and messy fast.
📦 No built-in abstraction
Browsers don’t offer a built-in “virtual diff engine” or abstraction like React’s VDOM.
🤖 What React Added That Browsers Don’t
Feature
Browser DOM
React (with VDOM)
Efficient diffing
❌ No
✅ Yes (reconciliation)
Declarative UI
❌ No
✅ Yes (return <UI />)
Component abstraction
❌ No
✅ Yes (function/class components)
State-driven rendering
❌ Manual
✅ Built-in
Minimal updates
❌ Up to you
✅ Automatic via VDOM
✅ TL;DR
React calculates exactly what changed via the virtual DOM diffing.
It then uses native DOM APIs to update only what’s necessary in the real DOM.
Browsers give you low-level control, but not an optimized strategy for updating UI based on state — React filled that gap beautifully.
Now Let’s break down how a React app starts after you run:
npx create-react-app my-app
cd my-app
npm start
What actually happens behind the scenes? Let’s unpack it step-by-step 👇
⚙️ Step 1: npx create-react-app — What It Does
This command:
Downloads and runs the latest version of the create-react-app tool (CRA).
Sets up a project with:
A preconfigured Webpack + Babel build system
Development server
Scripts and dependencies
Installs React, ReactDOM, and a bunch of tools inside node_modules.
Key folders/files created:
my-app/
├── node_modules/
├── public/
├── src/
│   └── index.js       👈 main entry point
├── package.json
Step 2: npm start — How the App Runs
When you run:
npm start
It’s actually running this line from package.json:
"scripts": {
  "start": "react-scripts start"
}
So it calls:
react-scripts start
🧠 What is react-scripts?
react-scripts is a package from Facebook that:
Runs a development server using Webpack Dev Server
Compiles JS/JSX using Babel
Watches your files for changes (HMR)
Starts a browser window at http://localhost:3000
It configures:
Webpack
Babel
ESLint
PostCSS
Source maps … all behind the scenes, so you don’t have to set up any configs manually.
📦 Libraries Involved
Tool / Library
Purpose
React
Core UI library (react)
ReactDOM
Renders React into actual DOM (react-dom)
Webpack
Bundles your JS, CSS, images, etc.
Babel
Converts modern JS/JSX to browser-friendly JS
Webpack Dev Server
Starts dev server with live reloading
react-scripts
Runs all the above with pre-made configs
🏗️ Step 3: Entry Point — src/index.js
The app starts here:
// src/index.js
import React from 'react';
import ReactDOM from 'react-dom/client';
import App from './App';

const root = ReactDOM.createRoot(document.getElementById('root'));
root.render(<App />);
ReactDOM.createRoot(...) finds the <div id="root"> in public/index.html.
Then renders the <App /> component into it.
The DOM inside the browser updates — and the user sees the UI.
✅ TL;DR
Step
What Happens
npx create-react-app
Sets up a full React project with build tools
npm start
Calls react-scripts start, which runs Webpack dev server
react-scripts
Handles build, hot reload, and environment setup
index.js
Loads React and renders your <App /> to the browser DOM
Browser Output
You see your live React app at localhost:3000
6. Installing and Configuring React
Rails 8 provides a generator to bootstrap React + ESBuild.
Run the React installer: rails javascript:install:react This will:
Install react and react-dom via npm.
Create an example app/javascript/components/HelloReact.jsx component.
Configure ESBuild to transpile JSX.
Verify your application layout: In app/views/layouts/application.html.erb, ensure you have: <%= javascript_include_tag "application", type: "module", defer: true %>
Mount the React component: Replace (or add) a div placeholder in an ERB view, e.g. app/views/home/index.html.erb:<div id="hello-react" data-props="{}"></div>
Initialize mount point In app/javascript/application.js:
import "./components"
In app/javascript/components/index.js:
import React from "react"
import { createRoot } from "react-dom/client"
import HelloReact from "./HelloReact"

document.addEventListener("DOMContentLoaded", () => {
  const container = document.getElementById("hello-react")
  if (container) {
    const root = createRoot(container)
    const props = JSON.parse(container.dataset.props || "{}")
    root.render(<HelloReact {...props} />)
  }
})
Your React component will now render within the Rails view!
Let’s now move onto create Authentication for our application.
Modern e‑commerce applications need robust user authentication, clear role‑based access, and an intuitive ordering system. In this post, we’ll walk through how to:
Add Rails’ built‑in authentication via has_secure_password.
Create a users table with roles for customers and admins.
Build an orders table to capture overall transactions.
Create order_items to track each product variant in an order.
Throughout, we’ll leverage PostgreSQL’s JSONB for flexible metadata, and we’ll use Rails 8 conventions for migrations and models.
Automatic Authentication For Rails 8 Apps
bin/rails generate authentication
This creates all the necessary files for users and sessions.
Create Authentication Manually
1. Create users table and user model
✗ rails g migration create_users

# users migration
class CreateUsers < ActiveRecord::Migration[8.0]
  def change
    create_table :users do |t|
      t.string   :email,           null: false, index: { unique: true }
      t.string   :password_digest, null: false
      t.string   :role,            null: false, default: "customer"
      t.string   :first_name
      t.string   :last_name
      t.jsonb    :metadata,        null: false, default: {}
      t.timestamps
    end

    # You can later set up an enum in the User model:
    # enum role: { customer: "customer", admin: "admin" }
  end
end

✗ rails g model user

# User model
class User < ApplicationRecord
  has_secure_password
  enum :role, {
    customer:  "customer",
    admin:     "admin"
  }
  has_many :orders
end
2. Authenticating with has_secure_password
Rails ships with bcrypt support out of the box. To enable it:
Uncomment the following line in your Gemfile. # gem "bcrypt", "~> 3.1.7"
Run bundle install.
In your migration, create a password_digest column:
create_table :users do |t|
  t.string :email,           null: false, index: { unique: true }
  t.string :password_digest, null: false
  # ... other fields ...
end
In app/models/user.rb, enable:
class User < ApplicationRecord
  has_secure_password
  # ...
end
This gives you user.authenticate(plain_text_password) and built‑in validation that a password is present on create.
3. Setting Up Users with Roles
We often need both customers and admins. Let’s create a role column with a default of "customer":
create_table :users do |t|
  t.string :role, null: false, default: "customer"
  # ...
end
In the User model you can then define an enum:
class User < ApplicationRecord
  ......
  enum :role, {
    customer:  "customer",
    admin:     "admin"
  }
end
This lets you call current_user.admin? or User.customers for scopes.
user.customer!   # sets role to "customer"
user.admin?      # => false
Rails built-in enum gives you a quick way to map a column to a fixed set of values, and it:
Defines predicate and bang methods
Adds query scopes
Provides convenient helpers for serialization, validations, etc.
4. Building the Orders Table
Every purchase is represented by an Order. Key fields:
user_id (foreign key)
total_price (decimal with scale 2)
status (string; e.g. pending, paid, shipped)
shipping_address (JSONB): allows storing a full address object with flexible fields (street, city, postcode, country, and even geolocation) without altering your schema. You can index JSONB columns (GIN) to efficiently query nested fields, and you avoid creating a separate addresses table unless you need relationships or reuse.
placed_at (datetime, optional): records the exact moment the order was completed, independent of when the record was created. Making this optional lets you distinguish between draft/in-progress orders (no placed_at yet) and finalized purchases.
Timestamps
placed_at (datetime, optional): records the exact moment the order was completed, independent of when the record was created. Making this optional lets you distinguish between draft/in-progress orders (no placed_at yet) and finalized purchases.
Timestamps and an optional placed_at datetime
✗ rails g migration create_orders

# orders migration
class CreateOrders < ActiveRecord::Migration[8.0]
  def change
    create_table :orders do |t|
      t.references :user, null: false, foreign_key: true, index: true
      t.decimal    :total_price, precision: 12, scale: 2, null: false, default: 0.0
      t.string     :status,      null: false, default: "pending", index: true
      t.jsonb      :shipping_address, null: false, default: {}
      t.datetime   :placed_at
      t.timestamps
    end

    # Example statuses: pending, paid, shipped, cancelled
  end
end
In app/models/order.rb:
✗ rails g model order

class Order < ApplicationRecord
  belongs_to :user
  has_many   :order_items, dependent: :destroy
  has_many   :product_variants, through: :order_items

  STATUSES = %w[pending paid shipped cancelled]
  validates :status, inclusion: { in: STATUSES }
end
5. Capturing Each Item: order_items
To connect products to orders, we use an order_items join table. Each row stores:
order_id and product_variant_id as FKs
quantity, unit_price, and any discount_percent
Optional JSONB metadata for special instructions
✗ rails g migration create_order_items

# order_items migration
class CreateOrderItems < ActiveRecord::Migration[8.0]
  def change
    create_table :order_items do |t|
      t.references :order,           null: false, foreign_key: true, index: true
      t.references :product_variant, null: false, foreign_key: true, index: true
      t.integer    :quantity,        null: false, default: 1
      t.decimal    :unit_price,      precision: 10, scale: 2, null: false
      t.decimal    :discount_percent, precision: 5, scale: 2, default: 0.0
      t.jsonb      :metadata,        null: false, default: {}
      t.timestamps
    end

    # Composite unique index to prevent duplicate variant per order
    add_index :order_items, [:order_id, :product_variant_id], unique: true, name: "idx_order_items_on_order_and_variant"
  end
Model associations:
✗ rails g model order_item

class OrderItem < ApplicationRecord
  belongs_to :order
  belongs_to :product_variant

  validates :quantity, numericality: { greater_than: 0 }
end
6. Next Steps: Controllers & Authorization
Controllers: Scaffold UsersController, SessionsController (login/logout), OrdersController, and nested OrderItemsController under orders or use a service object to build carts.
Authorization: Once role is set, integrate Pundit or CanCanCan to restrict admin actions (creating products, managing variants) and customer actions (viewing own orders).
Views/Frontend: Tie it all together with forms for signup/login, a product catalog with “Add to Cart”, a checkout flow, and an admin dashboard for product management.
In config/routes.rb, nest order_items under orders and add session routes:
Rails.application.routes.draw do
  resources :users
n
  resources :sessions, only: %i[new create destroy]
  get    '/login',  to: 'sessions#new'
  post   '/login',  to: 'sessions#create'
  delete '/logout', to: 'sessions#destroy'

  resources :orders do
    resources :order_items, only: %i[create update destroy]
  end

  root 'products#index'
end
By the end, you’ll have a fully functional e‑commerce back end: secure auth, order tracking, and clear user roles.
How to setup your First User🙍🏻♂️ in the system
The very first user you should set up is:
✅ An admin user — to create/manage products, variants, and handle backend tasks.
Here’s the best approach:
⭐ Best Practice: Seed an Admin User
Instead of manually creating it through the UI (when no one can log in yet), the best and safest approach is to use db/seeds.rb to create an initial admin user.
Why?
You can reliably recreate it on any environment (local, staging, production).
You can script strong defaults (like setting a secure admin email/password).
🔒 Tip: Use ENV Variables
For production, never hardcode admin passwords directly in seeds.rb. Instead, do:
admin_password = ENV.fetch("ADMIN_PASSWORD")
and pass it as:
ADMIN_PASSWORD=SomeStrongPassword rails db:seed
This keeps credentials out of your Git history.
🛠 Option 1: Add Seed Datadb/seeds.rb
Add a block in db/seeds.rb that checks for (or creates) an admin user:
Keeps seed file lean—admin-creation logic lives in a focused task.
Enforces presence of ENV vars (you won’t accidentally use a default password in prod).
Cons:
Slightly more setup than plain seeds, though it’s still easy to run.
I choose for Option 2, because it is namespaced and clear what is the purpose. But in seed there will be lot of seed data together make it difficult to identify a particular task.
🛡 Why is This Better?
✅ No need to expose a sign-up page to create the very first admin. ✅ You avoid manual DB entry or Rails console commands. ✅ You can control/rotate the admin credentials easily. ✅ You can add additional seed users later if needed (for demo or testing).
📝 Summary
✅ Seed an initial admin user ✅ Add a role check (admin? method) ✅ Lock down sensitive parts of the app to admin ✅ Use ENV vars in production for passwords
JavaScript tooling: using rails default tubo-stream, NO nodeJS or extra js
We would love to see:
RuboCop linting Checks
SimpleCov test coverage report
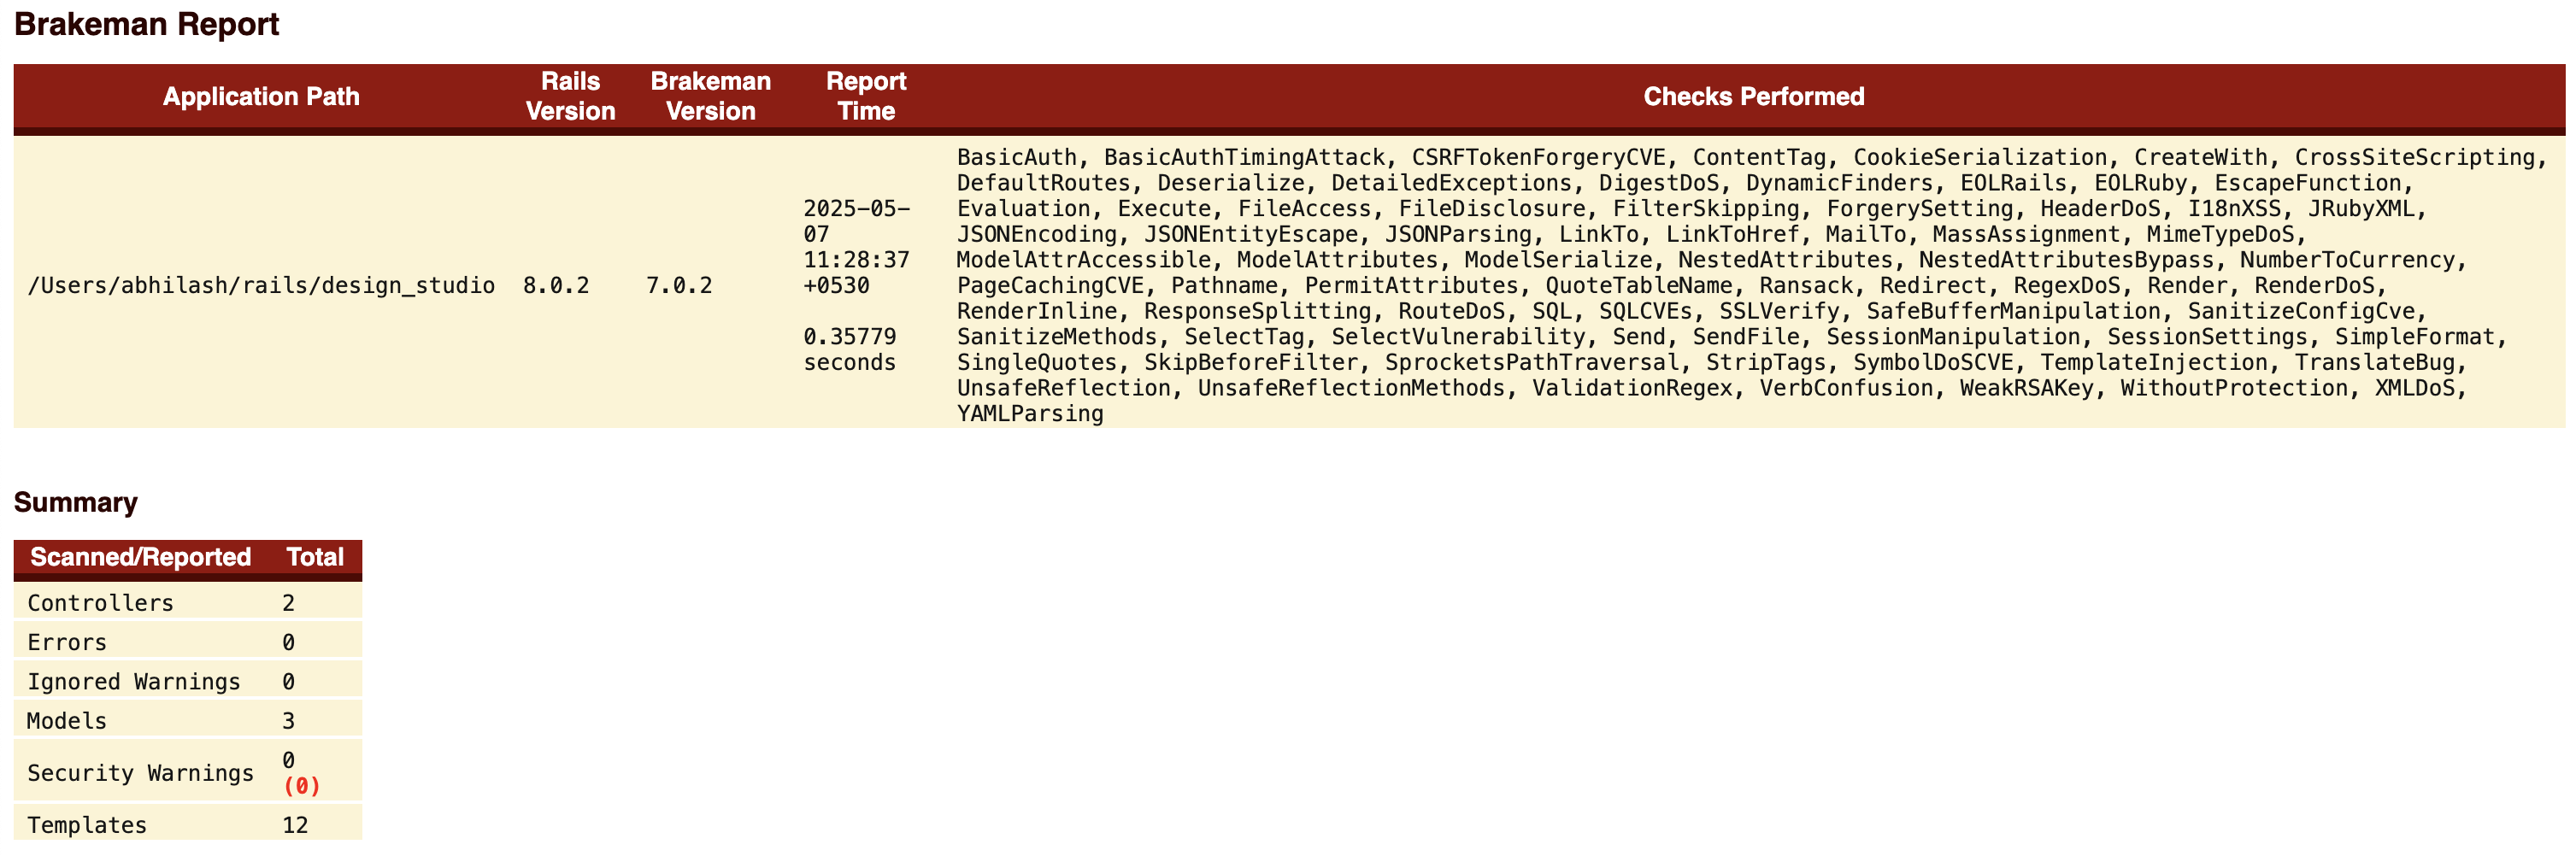
Brakeman security scan
Here’s how to set up CI that runs on every push, including pull requests:
1. Create GitHub Actions Workflow
Create this file: .github/workflows/ci.yml
name: Rails CI

# Trigger on pushes to main or any feature branch, and on PRs targeting main
on:
  push:
    branches:
      - main
      - 'feature/**'
  pull_request:
    branches:
      - main

jobs:
  # 1) Lint job with RuboCop
  lint:
    name: RuboCop Lint
    runs-on: ubuntu-latest

    steps:
      - name: Checkout code
        uses: actions/checkout@v3

      - name: Set up Ruby
        uses: ruby/setup-ruby@v1
        with:
          ruby-version: 3.4.1
          bundler-cache: true

      - name: Install dependencies
        run: |
          sudo apt-get update -y
          sudo apt-get install -y libpq-dev
          bundle install --jobs 4 --retry 3

      - name: Run RuboCop
        run: bundle exec rubocop --fail-level E

  # 2) Test job with Minitest
  test:
    name: Minitest Suite
    runs-on: ubuntu-latest
    needs: lint

    services:
      postgres:
        image: postgres:15
        ports:
          - 5432:5432
        env:
          POSTGRES_PASSWORD: password
        options: >-
          --health-cmd pg_isready
          --health-interval 10s
          --health-timeout 5s
          --health-retries 5

    env:
      RAILS_ENV: test
      DATABASE_URL: postgres://postgres:password@localhost:5432/test_db

    steps:
      - name: Checkout code
        uses: actions/checkout@v3

      - name: Set up Ruby
        uses: ruby/setup-ruby@v1
        with:
          ruby-version: 3.4.1
          bundler-cache: true

      - name: Install dependencies
        run: |
          sudo apt-get update -y
          sudo apt-get install -y libpq-dev
          bundle install --jobs 4 --retry 3

      - name: Set up database
        run: |
          bin/rails db:create
          bin/rails db:schema:load

      - name: Run Minitest
        run: bin/rails test
  # 3) Security job with Brakeman
  security:
    name: Brakeman Scan
    runs-on: ubuntu-latest
    needs: [lint, test]

    steps:
      - uses: actions/checkout@v3
      - name: Set up Ruby
        uses: ruby/setup-ruby@v1
        with:
          ruby-version: 3.4.1
          bundler-cache: true

      - name: Install Brakeman
        run: bundle install --jobs 4 --retry 3

      - name: Run Brakeman
        run: bundle exec brakeman --exit-on-warnings
How this works:
on.push & on.pull_request:
Runs on any push to main or feature/**, and on PRs targeting main.
lint job:
Checks out code, sets up Ruby 3.4.1, installs gems (with bundler-cache), then runs bundle exec rubocop --fail-level E to fail on any error-level offenses.
test job:
Depends on the lint job (needs: lint), so lint must pass first.
Spins up a PostgreSQL 15 service, sets DATABASE_URL for Rails, creates & loads the test database, then runs your Minitest suite with bin/rails test.
🛠 What Does .github/dependabot.yml Do?
This YAML file tells Dependabot: ♦️ Which dependencies to monitor ♦️ Where (which directories) to look for manifest files ♦️ How often to check for updates ♦️ What package ecosystems (e.g., RubyGems, npm, Docker) are used ♦️ Optional rules like versioning, reviewer assignment, and update limits
Dependabot then opens automated pull requests (PRs) in your repository when:
There are new versions of dependencies
A security advisory affects one of your dependencies
This helps you keep your app up to date and secure without manual tracking.
♦️ Place the .github/dependabot.yml file in the .github directory of your repo root. ♦️ Tailor the schedule and limits to your team’s capacity. ♦️ Use the ignore block carefully if you deliberately skip certain updates (e.g., major version jumps). ♦️ Combine it with branch protection rules so Dependabot PRs must pass tests before merging.
🚀 Steps to Push and Test Your CI
✅ You can push both files (ci.yml and dependabot.yml) together in one commit
Here’s a step-by-step guide for testing that your CI works right after the push.
1️⃣ Stage and commit your files
git add .github/workflows/ci.yml .github/dependabot.yml
git commit -m 'feat: Add github actions CI workflow Close #23'
2️⃣ Push to a feature branch (for example, if you’re working on feature/github-ci):
git push origin feature/github-ci
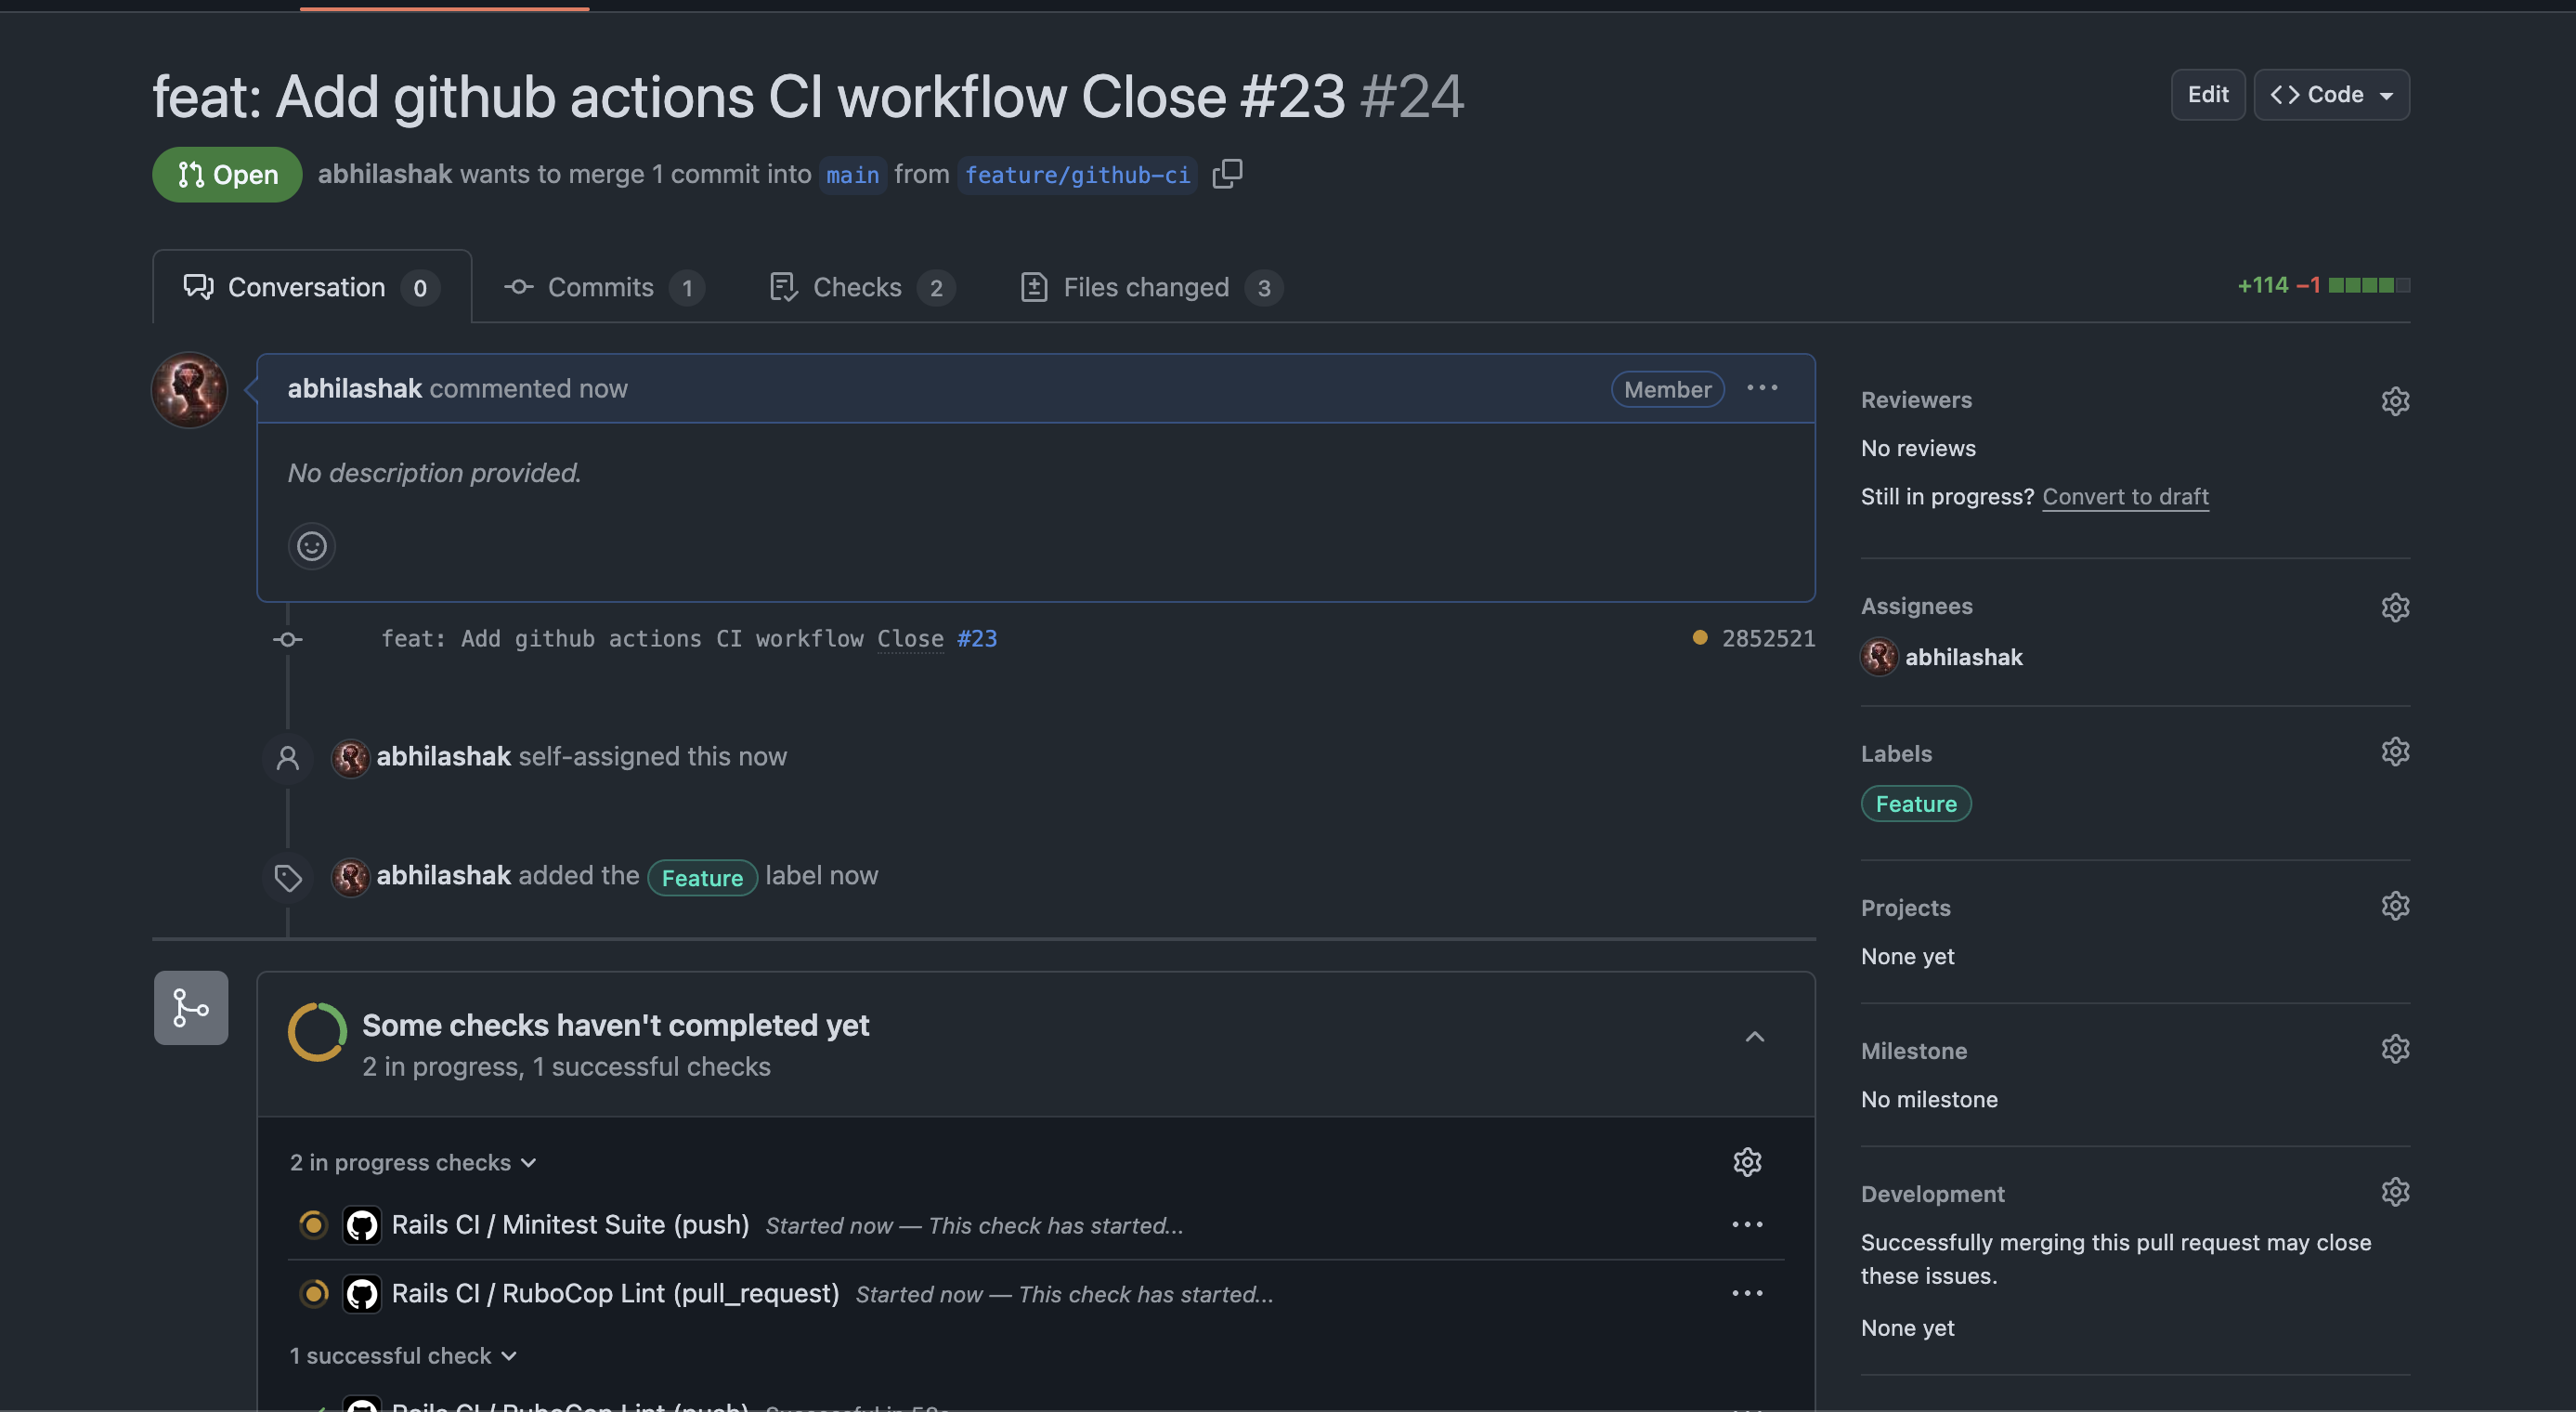
3️⃣ Open a Pull Request
Go to GitHub → your repository → create a pull request from feature/github-ci to main.
4️⃣ Watch GitHub Actions run
Go to the Pull Request page.
You should see a yellow dot / pending check under “Checks”.
Click the “Details” link next to the check (or go to the Actions tab) to see live logs.
✅ How to Know It’s Working
✔️ If all your jobs (e.g., RuboCop Lint, Minitest Suite) finish with green checkmarks, your CI setup is working!
❌ If something fails, you’ll get a red X and the logs will show exactly what failed.
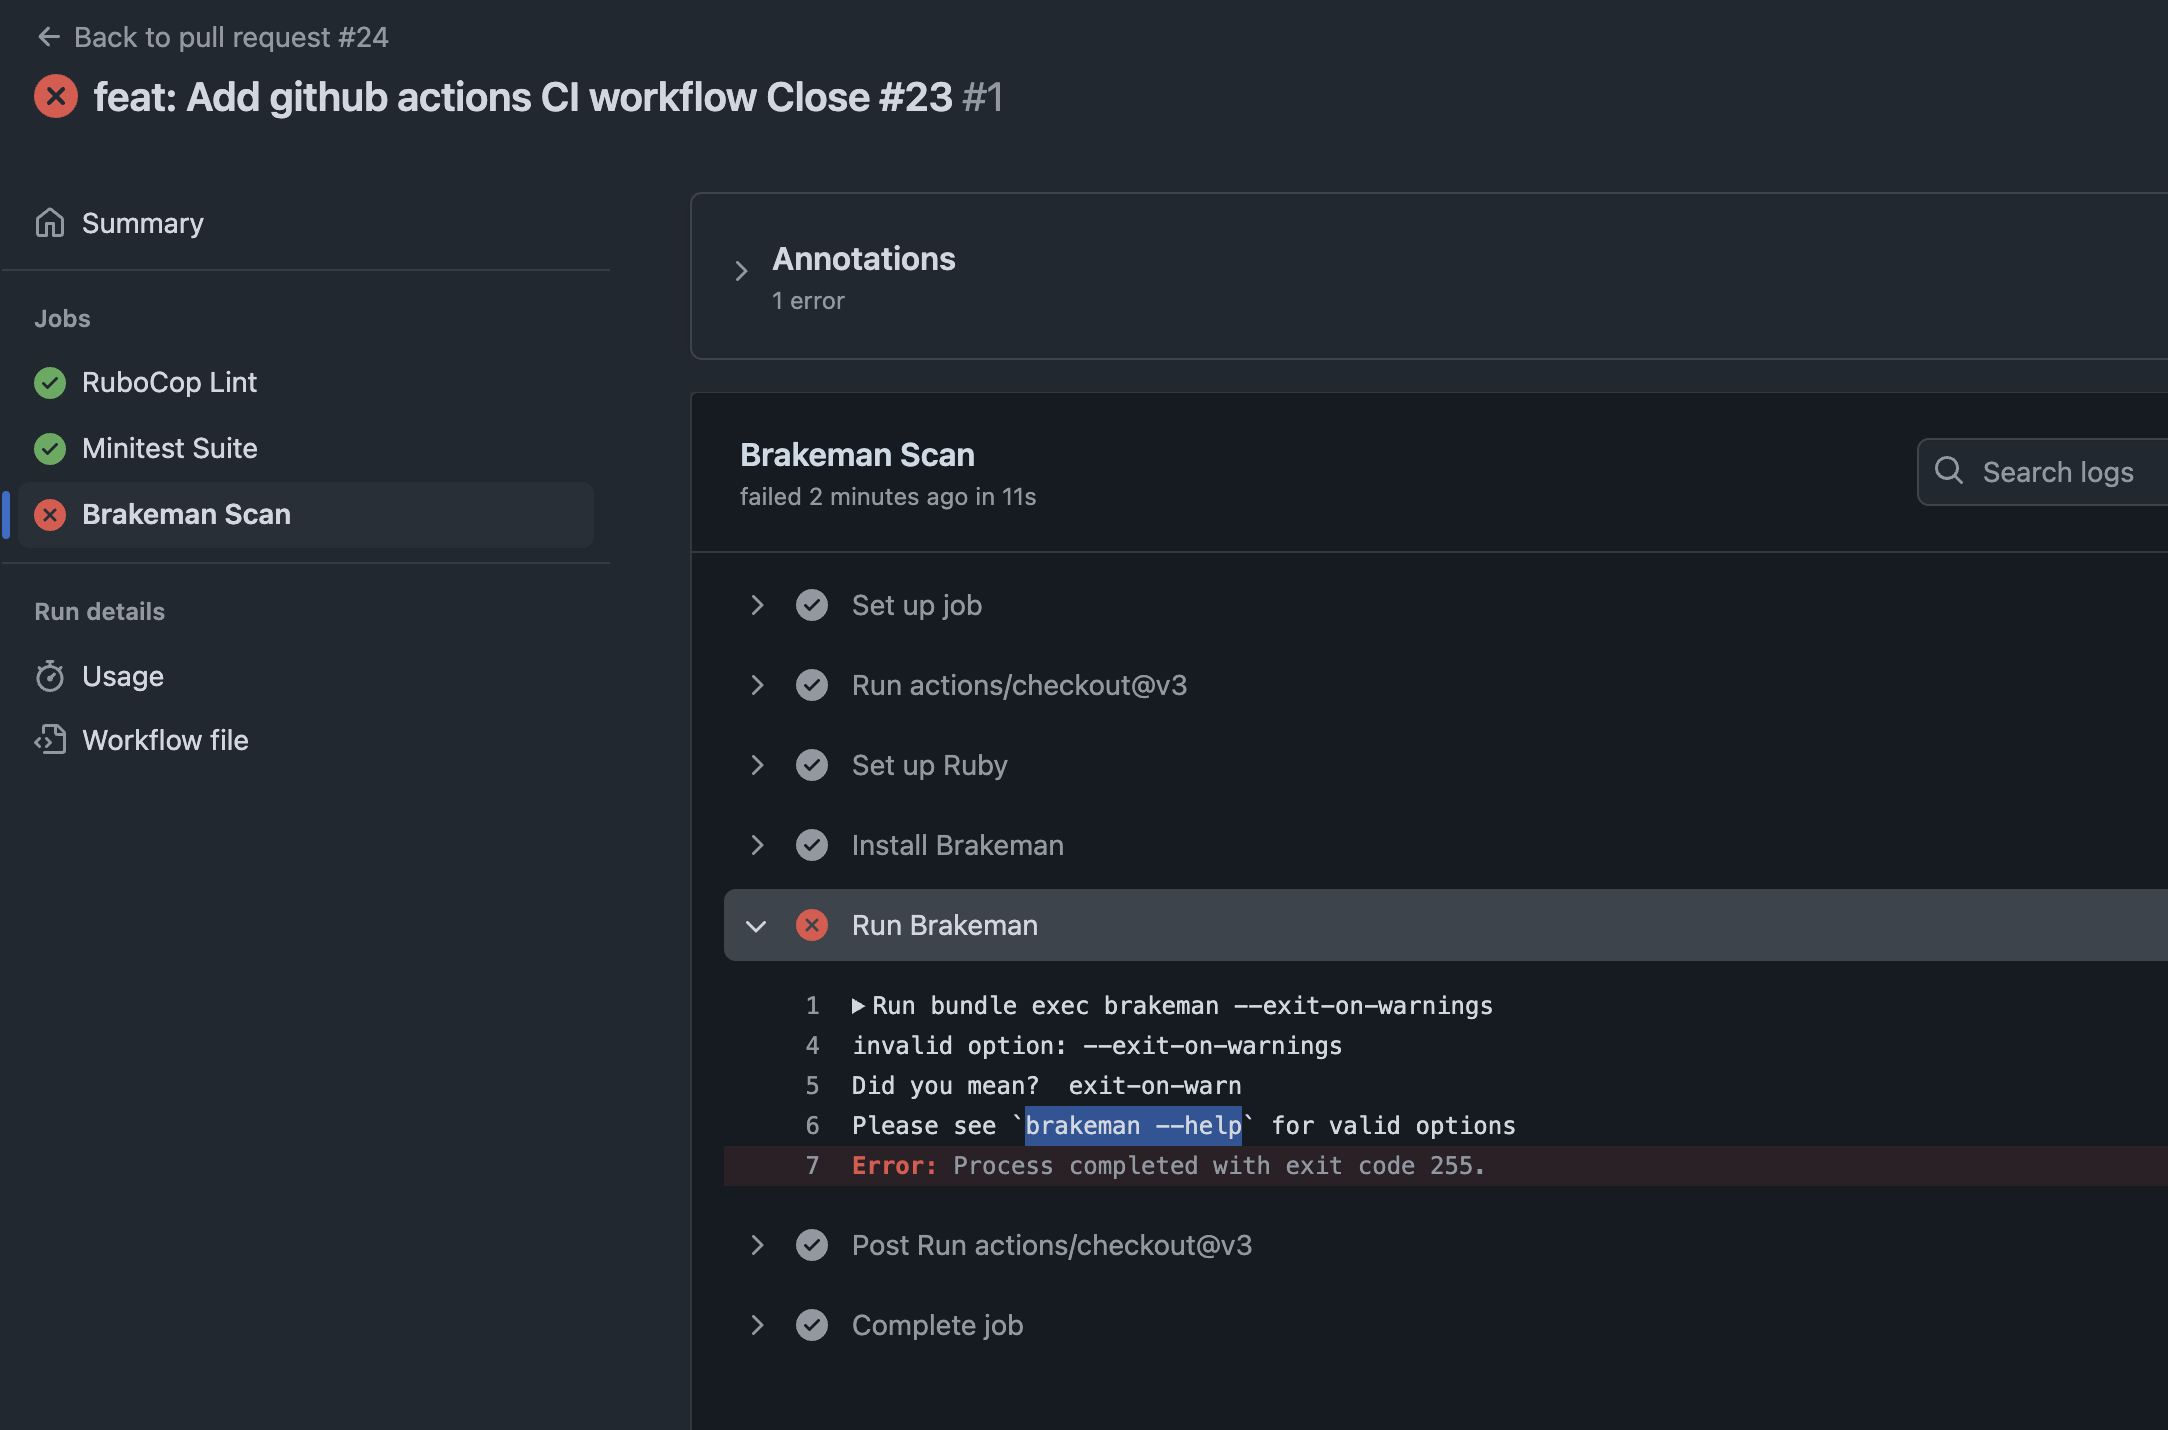
So what’s the problem. Check details.
Check brakeman help for further information about the option.
➜  design_studio git:(feature/github-ci) brakeman --help | grep warn
    -z, --[no-]exit-on-warn          Exit code is non-zero if warnings found (Default)
        --ensure-ignore-notes        Fail when an ignored warnings does not include a note
Modify the option and run again:
run: bundle exec brakeman --exit-on-warn
Push the code and check all checks are passing. ✅
🛠 How to Test Further
If you want to trigger CI without a PR, you can push directly to main:
git checkout main
git merge feature/setup-ci
git push origin main
Note: Make sure your .github/workflows/ci.yml includes:
on:
  push:
    branches: [main, 'feature/**']
  pull_request:
    branches: [main]
This ensures CI runs on both pushes and pull requests.
🧪 Pro Tip: Break It Intentionally
If you want to see CI fail, you can:
Add a fake RuboCop error (like an unaligned indent).
Add a failing test (assert false).
Push and watch the red X appear.
This is a good way to verify your CI is catching problems!
Ensuring code quality and security in a Rails application is critical – especially as your project grows. In this post, we’ll walk through integrating two powerful tools into your Rails 8 app:
SimpleCov: for measuring and enforcing test coverage
Brakeman: for automated static analysis of security vulnerabilities
By the end, you’ll understand why each tool matters, how to configure them, and the advantages they bring to your development workflow.
Why Code Coverage & Security Scanning Matter
Maintainability Tracking test coverage ensures critical paths are exercised by your test suite. Over time, you can guard against regressions and untested code creeping in.
Quality Assurance High coverage correlates with fewer bugs: untested code is potential technical debt. SimpleCov gives visibility into what’s untested.
Security Rails apps can be vulnerable to injection, XSS, mass assignment, and more. Catching these issues early, before deployment, dramatically reduces risk.
Compliance & Best Practices Many organizations require minimum coverage thresholds and regular security scans. Integrating these tools automates compliance.
Part 1: Integrating SimpleCov for Test Coverage
1. Add the Gem
In your Gemfile, under the :test group, add:
group :test do
  gem 'simplecov', require: false
end
Then run:
bundle install
2. Configure SimpleCov
Create (or update) test/test_helper.rb (for Minitest) before any application code is loaded:
require 'simplecov'
SimpleCov.start 'rails' do
  coverage_dir 'public/coverage'           # output directory
  minimum_coverage 90               # fail if coverage < 90%
  add_filter '/test/'               # ignore test files themselves
  add_group 'Models', 'app/models'
  add_group 'Controllers', 'app/controllers'
  add_group 'Jobs', 'app/jobs'
  add_group 'Libraries', 'lib'
end

# Then require the rest of your test setup
ENV['RAILS_ENV'] ||= 'test'
require_relative '../config/environment'
require 'rails/test_help'
# ...
Tip: You can customize groups, filters, and thresholds. If coverage dips below the set minimum, your CI build will fail.
Note: coverage_dir should be modified to public/coverage. Else you cannot access the html publically.
3. Run Your Tests & View the Report
✗ bin/rails test
≈ tailwindcss v4.1.3
Done in 46ms
Running 10 tests in a single process (parallelization threshold is 50)
Run options: --seed 63363
# Running:
..........
Finished in 0.563707s, 17.7397 runs/s, 60.3150 assertions/s.
10 runs, 34 assertions, 0 failures, 0 errors, 0 skips
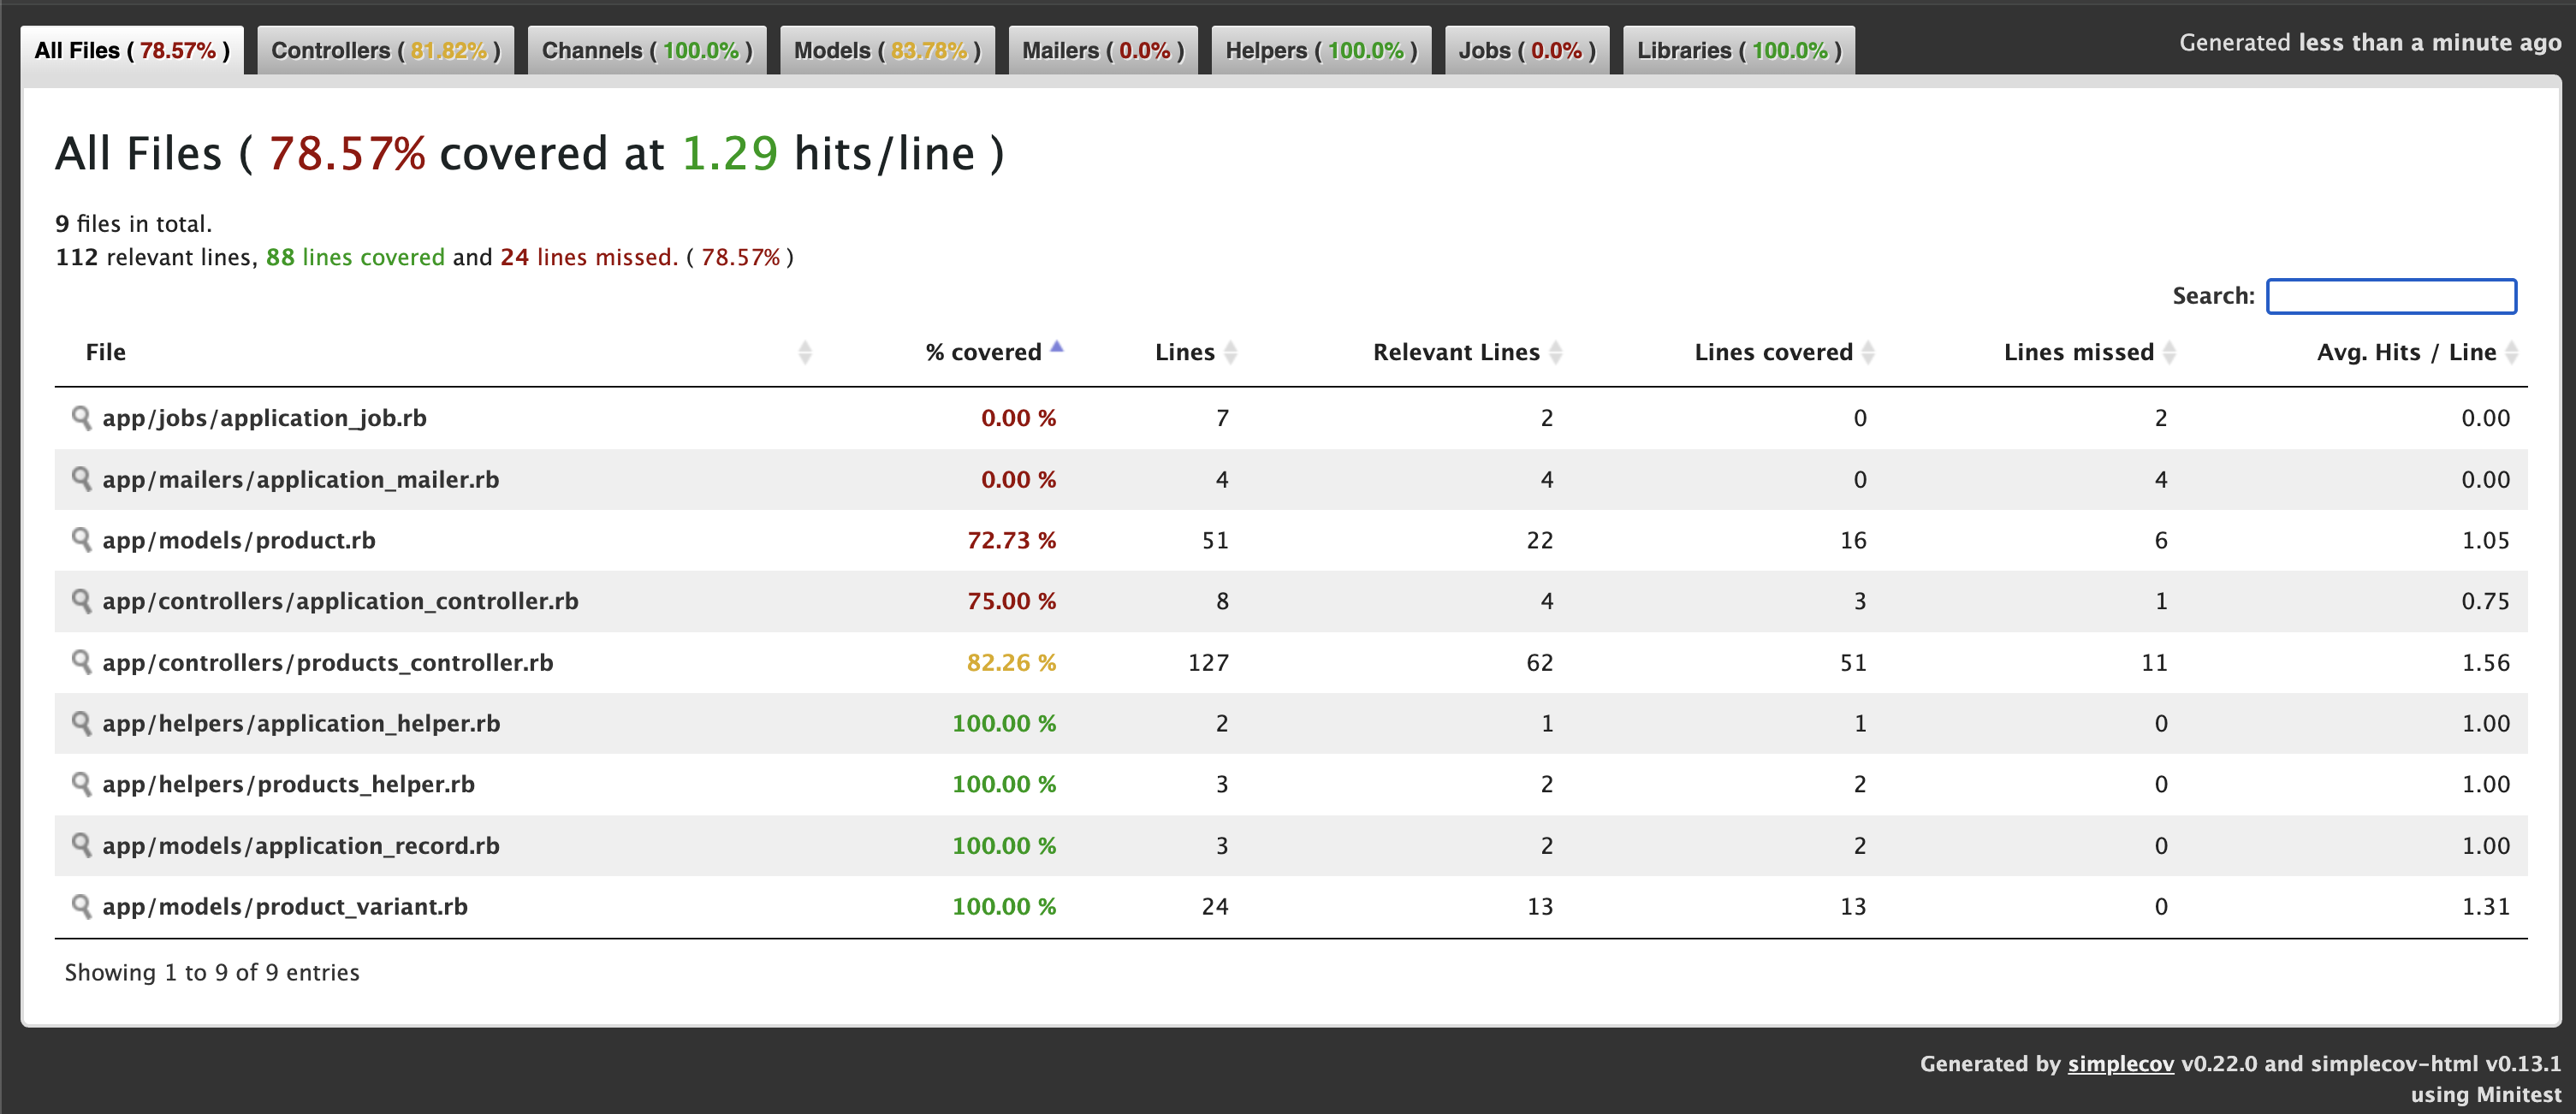
Coverage report generated for Minitest to /Users/abhilash/rails/design_studio/public/coverage.
Line Coverage: 78.57% (88 / 112)
Line coverage (78.57%) is below the expected minimum coverage (90.00%).
SimpleCov failed with exit 2 due to a coverage related error
A color-coded report shows covered (green) vs. missed (red) lines.
Drill down by file or group to identify untested code.
We get 78.57% only coverage and our target is 90% coverage. Let’s check where we missed the tests. ProductsController 82%. We missed coverage for #delete_image action. Let’s add it and check again.
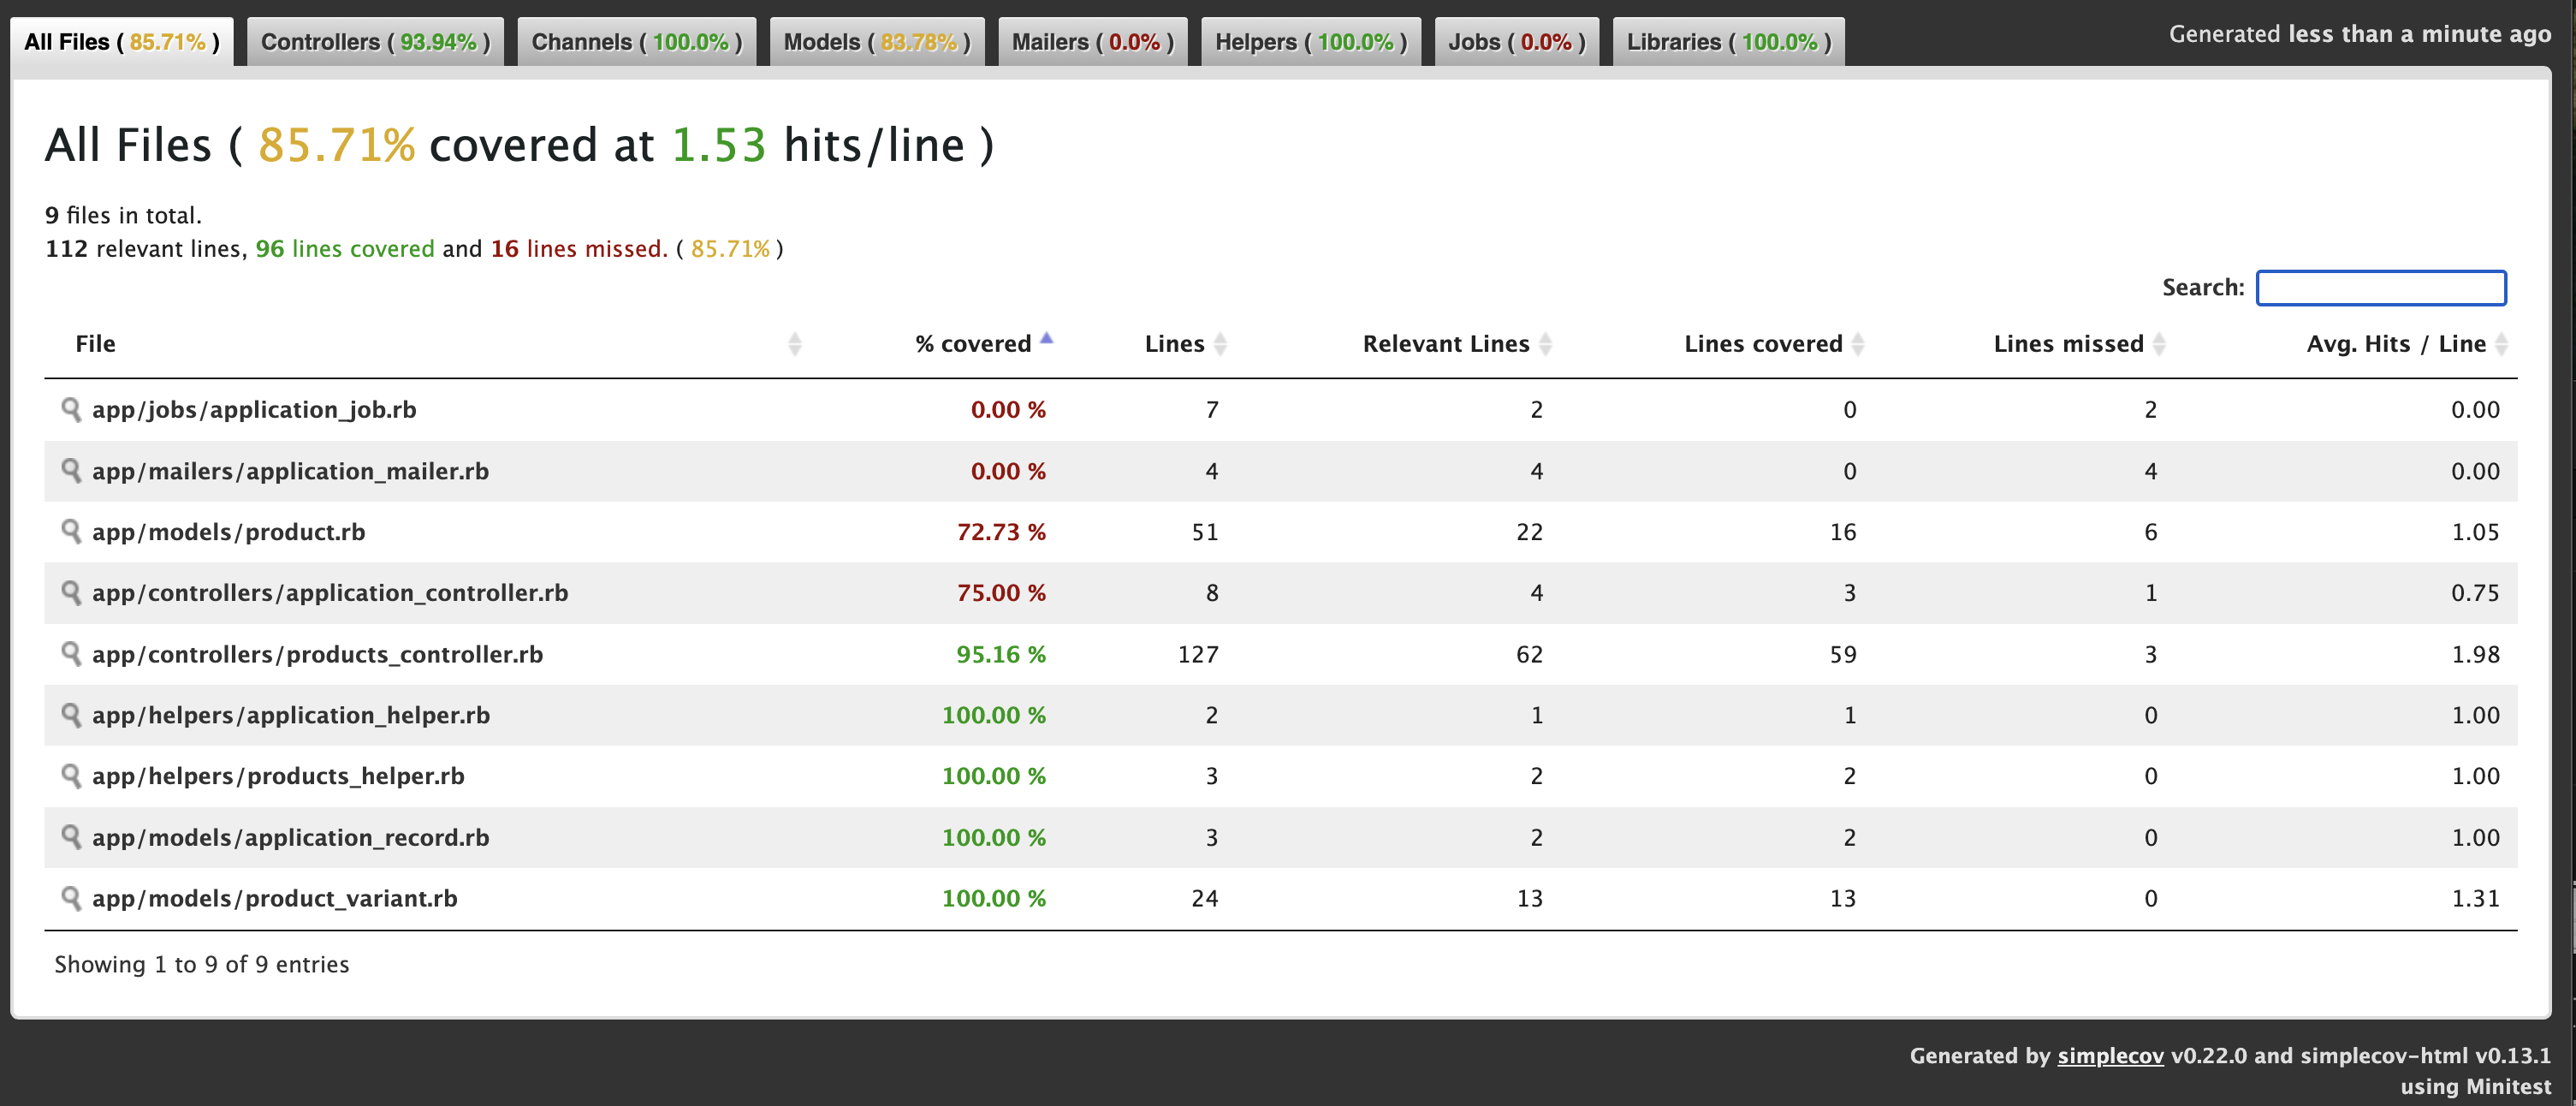
Let’s add Product Controller json requests test cases for json error response and add the ApplicationControllerTest for testing root path.
Now we get: 88.3%
Now we have to add some Test cases for Product model.
Now we get: 92.86% ✅
4. Enforce in CI
In your CI pipeline (e.g. GitHub Actions), ensure:
- name: Run tests with coverage
  run: |
    bundle exec rails test
    # Optionally upload coverage to Coveralls or Codecov
If coverage < threshold, the job will exit non-zero and fail.
Part 2: Incorporating Brakeman for Security Analysis
1. Add Brakeman to Your Development Stack
You can install Brakeman as a gem (development-only) or run it via Docker/CLI. Here’s the gem approach:
group :development do
  gem 'brakeman', require: false
end
Optionally, you can fail the build if new warnings are introduced by comparing against a baseline report.
Advantages of Using SimpleCov & Brakeman Together
Aspect
SimpleCov
Brakeman
Purpose
Test coverage metrics
Static security analysis
Fail-fast
Fails when coverage drops below threshold
Can be configured to fail on new warnings
Visibility
Colorized HTML coverage report
Detailed HTML/JSON vulnerability report
CI/CD Ready
Integrates seamlessly with most CI systems
CLI-friendly, outputs machine-readable data
Customizable
Groups, filters, thresholds
Checks selection, ignored files, baseline
Together, they cover two critical quality dimensions:
Quality & Maintainability (via testing)
Security & Compliance (via static analysis)
Automating both checks in your pipeline means faster feedback, fewer production issues, and higher confidence when shipping code.
Best Practices & Tips
Threshold for SimpleCov: Start with 80%, then gradually raise to 90–95% over time.
Treat Brakeman Warnings Seriously: Not all findings are exploitable, but don’t ignore them—triage and document why you’re suppressing any warning.
Baseline Approach: Use a baseline report for Brakeman so your build only fails on newly introduced warnings, not historical ones.
Schedule Periodic Full Scans: In addition to per-PR scans, run a weekly scheduled Brakeman job to catch issues from merged code.
Combine with Other Tools: Consider adding gem like bundler-audit for known gem vulnerabilities.
Conclusion
By integrating SimpleCov and Brakeman into your Rails 8 app, you establish a robust safety net that:
Ensures new features are properly tested
Keeps an eye on security vulnerabilities
Automates quality gates in your CI/CD pipeline
These tools are straightforward to configure and provide immediate benefits – improved code confidence, faster code reviews, and fewer surprises in production. Start today, and make code quality and security first-class citizens in your Rails workflow!
Testing is a crucial part of ensuring the reliability and correctness of a Ruby on Rails 8 application. Controller tests verify the behaviour of your application’s controllers, ensuring that actions handle requests properly, return correct responses, and enforce security measures.
This guide explores the best practices in writing Rails 8 controller tests, references well-known Rails projects, and provides 20 test case examples—including 5 complex ones.
Setting Up the Testing Environment using Rspec
To effectively write controller tests, we use RSpec (the most popular testing framework in the Rails community) along with key supporting gems:
Recommended Gems
Add the following gems to your Gemfile under the :test group:
group :test do
  gem 'rspec-rails'  # Main testing framework
  gem 'factory_bot_rails'  # For test data setup
  gem 'database_cleaner-active_record'  # Cleans test database
  gem 'faker'  # Generates fake data
  gem 'shoulda-matchers'  # Provides one-liner matchers for common Rails functions
end
Run:
bundle install
rails generate rspec:install
Then, configure spec_helper.rb and rails_helper.rb to include necessary test configurations.
require 'rails_helper'

describe ArticlesController, type: :controller do
  describe 'GET #index' do
    it 'returns a successful response' do
      get :index
      expect(response).to have_http_status(:ok)
    end
  end
end
2. Testing Show Action with a Valid ID
describe 'GET #show' do
  let(:article) { create(:article) }
  it 'returns the requested article' do
    get :show, params: { id: article.id }
    expect(response).to have_http_status(:ok)
    expect(assigns(:article)).to eq(article)
  end
end
3. Testing Show Action with an Invalid ID
describe 'GET #show' do
  it 'returns a 404 for an invalid ID' do
    get :show, params: { id: 9999 }
    expect(response).to have_http_status(:not_found)
  end
end
4. Testing Create Action with Valid Parameters
describe 'POST #create' do
  it 'creates a new article' do
    expect {
      post :create, params: { article: attributes_for(:article) }
    }.to change(Article, :count).by(1)
  end
end
5. Testing Create Action with Invalid Parameters
describe 'POST #create' do
  it 'does not create an article with invalid parameters' do
    expect {
      post :create, params: { article: { title: '' } }
    }.not_to change(Article, :count)
  end
end
6. Testing Update Action
describe 'PATCH #update' do
  let(:article) { create(:article) }
  it 'updates an article' do
    patch :update, params: { id: article.id, article: { title: 'Updated' } }
    expect(article.reload.title).to eq('Updated')
  end
end
7. Testing Destroy Action
describe 'DELETE #destroy' do
  let!(:article) { create(:article) }
  it 'deletes an article' do
    expect {
      delete :destroy, params: { id: article.id }
    }.to change(Article, :count).by(-1)
  end
end
Here are the missing test cases (7 to 15) that should be included in your blog post:
8. Testing Redirection After Create
describe 'POST #create' do
  it 'redirects to the article show page' do
    post :create, params: { article: attributes_for(:article) }
    expect(response).to redirect_to(assigns(:article))
  end
end
9. Testing JSON Response for Index Action
describe 'GET #index' do
  it 'returns a JSON response' do
    get :index, format: :json
    expect(response.content_type).to eq('application/json')
  end
end
10. Testing JSON Response for Show Action
describe 'GET #show' do
  let(:article) { create(:article) }
  it 'returns the article in JSON format' do
    get :show, params: { id: article.id }, format: :json
    expect(response.content_type).to eq('application/json')
    expect(response.body).to include(article.title)
  end
end
11. Testing Unauthorized Access to Update
describe 'PATCH #update' do
  let(:article) { create(:article) }
  it 'returns a 401 if user is not authorized' do
    patch :update, params: { id: article.id, article: { title: 'Updated' } }
    expect(response).to have_http_status(:unauthorized)
  end
end
12. Testing Strong Parameters Enforcement
describe 'POST #create' do
  it 'does not allow mass assignment of protected attributes' do
    expect {
      post :create, params: { article: { title: 'Valid', admin_only_field: true } }
    }.to raise_error(ActiveModel::ForbiddenAttributesError)
  end
end
13. Testing Destroy Action with Invalid ID
describe 'DELETE #destroy' do
  it 'returns a 404 when the article does not exist' do
    delete :destroy, params: { id: 9999 }
    expect(response).to have_http_status(:not_found)
  end
end
14. Testing Session Persistence
describe 'GET #dashboard' do
  before { session[:user_id] = create(:user).id }
  it 'allows access to the dashboard' do
    get :dashboard
    expect(response).to have_http_status(:ok)
  end
end
15. Testing Rate Limiting on API Requests
describe 'GET #index' do
  before do
    10.times { get :index }
  end
  it 'returns a 429 Too Many Requests when rate limit is exceeded' do
    get :index
    expect(response).to have_http_status(:too_many_requests)
  end
end
Complex Controller 🎮Tests
16. Testing Admin Access Control
describe 'GET #admin_dashboard' do
  context 'when user is admin' do
    let(:admin) { create(:user, role: :admin) }
    before { sign_in admin }
    it 'allows access' do
      get :admin_dashboard
      expect(response).to have_http_status(:ok)
    end
  end
  context 'when user is not admin' do
    let(:user) { create(:user, role: :user) }
    before { sign_in user }
    it 'redirects to home' do
      get :admin_dashboard
      expect(response).to redirect_to(root_path)
    end
  end
end
17. Testing Turbo Stream Responses
describe 'PATCH #update' do
  let(:article) { create(:article) }
  it 'updates an article and responds with Turbo Stream' do
    patch :update, params: { id: article.id, article: { title: 'Updated' } }, format: :turbo_stream
    expect(response.media_type).to eq Mime[:turbo_stream]
  end
end
Here are three additional complex test cases (18, 19, and 20) to include in your blog post:
18. Testing WebSockets with ActionCable
describe 'WebSocket Connection' do
  let(:user) { create(:user) }

  before do
    sign_in user
  end

  it 'successfully subscribes to a channel' do
    subscribe room_id: 1
    expect(subscription).to be_confirmed
    expect(subscription).to have_stream_from("chat_1")
  end
end
Why? This test ensures that ActionCable properly subscribes users to real-time chat channels.
19. Testing Nested Resource Actions
describe 'POST #create in nested resource' do
  let(:user) { create(:user) }
  let(:post) { create(:post, user: user) }

  it 'creates a comment under the correct post' do
    expect {
      post :create, params: { post_id: post.id, comment: { body: 'Nice post!' } }
    }.to change(post.comments, :count).by(1)
  end
end
Why? This test ensures correct behavior when working with nested resources like comments under posts.
20. Testing Multi-Step Form Submission
describe 'PATCH #update (multi-step form)' do
  let(:user) { create(:user, step: 'personal_info') }

  it 'advances the user to the next step in a multi-step form' do
    patch :update, params: { id: user.id, user: { step: 'address_info' } }
    expect(user.reload.step).to eq('address_info')
  end
end
Why? This test ensures users can progress through a multi-step form properly.
📝 Conclusion
This guide provides an extensive overview of controller testing in Rails 8, ensuring robust coverage for all possible scenarios. By following these patterns, your Rails applications will have reliable, well-tested controllers that behave as expected.
In an e-commerce application built with Ruby on Rails, controller tests ensure that your APIs and web interfaces behave as expected. In this post, we’ll explore our ProductsControllerTest suite that validates product creation, editing, deletion, and error handling—including associated product variants and image uploads.
Overview
Our controller is responsible for managing Product records and their associated ProductVariant. A Product may have multiple variants, but for simplicity, we’re focusing on creating a product with a primary variant. The test suite uses ActionDispatch::IntegrationTest for full-stack request testing and some pre-seeded fixtures (products(:one) and product_variants(:one)).
Integration tests (Rails 5+)
Inherit from ActionDispatch::IntegrationTest.
Spin up the full Rails stack (routing, middleware, controllers, views).
You drive them with full URLs/paths (e.g. get products_url) and can even cross multiple controllers in one test.
🧪 Fixture Setup
Before diving into the tests, here’s how we set up our test data using fixtures.
We also include a sample image for upload testing:
📁 test/fixtures/files/sample.jpg
🧩 Breakdown of ProductsControllerTest
Here’s what we’re testing and why each case is important:
setup do … end
Runs before each test in the class. Use it to prepare any common test data or state.
class ProductsControllerTest < ActionDispatch::IntegrationTest
  setup do
    @product = products(:one)
    @variant = product_variants(:one)
  end

  # every test below can use @product and @variant
end
test "description" do … end
Defines an individual test case. The string describes what behaviour you’re verifying.
test "should get index" do
  get products_url
  assert_response :success
end
1. GET /products (index)
test "should get index" do
    get products_url
    assert_response :success
    # check products header exists
    assert_select "h1", /Products/i
    # check new product button exists
    assert_select "main div a.btn-new[href=?]", new_product_path,
                  text: "➕ New Product", count: 1
  end
✔️ Verifies the product listing page is accessible and renders a header. New product button also rendered.
assert_response
Verifies the HTTP status code returned by your request. Common symbols:
:success (200)
:redirect (3xx)
:unprocessable_entity (422)
:not_found (404)
get new_product_url
assert_response :success

post products_url, params: invalid_params
assert_response :unprocessable_entity
assert_select
Inspects the server‐rendered HTML using CSS selectors. Great for making sure particular elements and text appear.
get products_url
assert_select "h1", "Products"      # exact match
assert_select "h1", /Products/i     # regex match
assert_select "form[action=?]", products_path
2. GET /products/new
test "should get new" do
    get new_product_url
    assert_response :success
    assert_select "form"
    assert_select "main div a.btn-back[href=?]", products_path,
                  text: /Back to Products/, count: 1
  end
✔️ Ensures the new product form is available. Back button is rendered (for button text we use Reg Exp).
3. POST /products with valid product and variant
test "should create product with variant" do
  assert_difference([ "Product.count", "ProductVariant.count" ]) do
    post products_url, params: {
      product: {
        name: "New Product",
        ...
        images: [fixture_file_upload("test/fixtures/files/sample.jpg", "image/jpeg")],
        product_variant: { ... }
      }
    }
  end
   assert_redirected_to product_url(product)
   assert_equal 1, product.variants.count
   ....
end
✔️ Tests nested attributes, image file uploads, and variant creation in one go.
assert_difference
Ensures a given expression changes by an expected amount. Often used to test side‐effects like record creation/deletion.
assert_difference "Product.count", +1 do
  post products_url, params: valid_product_params
end

assert_difference ["Product.count", "ProductVariant.count"], +1 do
  post products_url, params: nested_variant_params
end

assert_no_difference "Product.count" do
  post products_url, params: invalid_params
end
assert_redirected_to
Confirms that the controller redirected to the correct path or URL.
post products_url, params: valid_params
assert_redirected_to product_url(Product.last)

delete product_url(@product)
assert_redirected_to products_url
4. POST /products fails when variant is invalid
test "should not create product if variant invalid (missing required mrp)" do
  assert_no_difference([ "Product.count", "ProductVariant.count" ]) do
    post products_url, params: { ...
        product: { ...
           product_variant: {
             ...
             mrp: nil, # Invalid
             ...
           }
        }
    }
  end
  assert_response :unprocessable_entity
end
✔️ Ensures validations prevent invalid data from being saved.
5. GET /products/:id
test "should show product" do
  get product_url(@product)
  assert_response :success
  assert_select "h2", @product.brand
  assert_select "h4", @product.name
end
✔️ Validates the product detail page renders correct content.
6. GET /products/:id/edit
test "should get edit" do
  get edit_product_url(@product)
  assert_response :success
  assert_select "form"
end
✔️ Confirms the edit form is accessible.
7. PATCH /products/:id with valid update
test "should update product and variant" do
  patch product_url(@product), params: {
    product: {
      name: "Updated Product",
      rating: 4.2,
      product_variant: {
        size: "XL",
        color: "Blue"
      }
    }
  }
  ...
  assert_equal "Updated Product", @product.name
  assert_equal 4.2, @product.rating
end
✔️ Tests simultaneous updates to product and its variant.
assert_equal
Checks that two values are exactly equal. Use it to verify model attributes, JSON responses, or any Ruby object.
test "should not update with invalid variant data" do
  patch product_url(@product), params: {
    product: {
      product_variant: { mrp: nil }
    }
  }
  assert_response :unprocessable_entity
end
✔️ Verifies that invalid updates are rejected and return 422.
9. DELETE /products/:id
test "should destroy product" do
  assert_difference("Product.count", -1) do
    delete product_url(@product)
  end
end
✔️ Ensures products can be deleted successfully.
10. Enforce unique SKU
test "should enforce unique SKU" do
  post products_url, params: {
    product: {
      ...,
      product_variant: {
        sku: @variant.sku, # duplicate
        ...
      }
    }
  }
  assert_response :unprocessable_entity
end
✔️ Tests uniqueness validation for variant SKUs to maintain data integrity.
Putting It All Together
Each of these building blocks helps compose clear, maintainable tests:
setup prepares the ground.
test names and isolates scenarios.
assert_response and assert_redirected_to check HTTP behavior.
With these tools, you can cover every happy path and edge case in your Rails controllers – ensuring confidence in your application’s behaviour!
📌 Best Practices Covered
🔁 Fixture-driven tests for consistency and speed
🔍 Use of assert_select to test views
🧩 Testing nested models and image uploads
🚫 Validation enforcement with assert_no_difference
🧪 Full CRUD test coverage with edge cases
📝 Summary
A well-tested controller gives you peace of mind when iterating or refactoring. With a test suite like this, you’re not only testing basic functionality but also ensuring that validations, associations, and user-facing forms behave as expected. You can also use Rspec for Test Cases. Check the post for Rspec examples: https://railsdrop.com/2025/05/04/rails-8-write-controller-tests-20-rspec-test-cases-examples/
Here’s a list of commonly used SQL comparison operators with brief explanations and examples:
📋 Basic Comparison Operators:
Operator
Meaning
Example
Result
=
Equal to
WHERE age = 25
Matches rows where age is 25
<>
Not equal to (standard)
WHERE status <> 'active'
Matches rows where status is not 'active'
!=
Not equal to (alternative)
WHERE id != 10
Same as <>, matches if id is not 10
>
Greater than
WHERE salary > 50000
Matches rows with salary above 50k
<
Less than
WHERE created_at < '2024-01-01'
Matches dates before Jan 1, 2024
>=
Greater than or equal
WHERE age >= 18
Matches age 18 and above
<=
Less than or equal
WHERE age <= 65
Matches age 65 and below
📋 Other Common Operators:
Operator
Meaning
Example
BETWEEN
Within a range
WHERE price BETWEEN 100 AND 200
IN
Match any value in a list
WHERE country IN ('US', 'CA', 'UK')
NOT IN
Not in a list
WHERE role NOT IN ('admin', 'staff')
IS NULL
Value is null
WHERE deleted_at IS NULL
IS NOT NULL
Value is not null
WHERE updated_at IS NOT NULL
LIKE
Pattern match (case-insensitive in some DBs)
WHERE name LIKE 'J%'
ILIKE
Case-insensitive LIKE (PostgreSQL only)
WHERE email ILIKE '%@gmail.com'
Now we’ve our products and product_variants schema, let’s re-explore all major SQL JOINs using these two related tables.
####### Products

   Column    |              Type              | Collation | Nullable |               Default
-------------+--------------------------------+-----------+----------+--------------------------------------
 id          | bigint                         |           | not null | nextval('products_id_seq'::regclass)
 description | text                           |           |          |
 category    | character varying              |           |          |
 created_at  | timestamp(6) without time zone |           | not null |
 updated_at  | timestamp(6) without time zone |           | not null |
 name        | character varying              |           | not null |
 rating      | numeric(2,1)                   |           |          | 0.0
 brand       | character varying              |           |          |

######## Product variants

      Column      |              Type              | Collation | Nullable |                   Default
------------------+--------------------------------+-----------+----------+----------------------------------------------
 id               | bigint                         |           | not null | nextval('product_variants_id_seq'::regclass)
 product_id       | bigint                         |           | not null |
 sku              | character varying              |           | not null |
 mrp              | numeric(10,2)                  |           | not null |
 price            | numeric(10,2)                  |           | not null |
 discount_percent | numeric(5,2)                   |           |          |
 size             | character varying              |           |          |
 color            | character varying              |           |          |
 stock_quantity   | integer                        |           |          | 0
 specs            | jsonb                          |           | not null | '{}'::jsonb
 created_at       | timestamp(6) without time zone |           | not null |
 updated_at       | timestamp(6) without time zone |           | not null |
💎 SQL JOINS with products and product_variants
These tables are related through:
product_variants.product_id → products.id
So we can use that for all join examples.
🔸 1. INNER JOIN – Show only products with variants
SELECT
  p.name,
  pv.sku,
  pv.price
FROM products p
INNER JOIN product_variants pv ON p.id = pv.product_id;
♦️ Only returns products that have at least one variant.
🔸 2. LEFT JOIN – Show all products, with variants if available
SELECT
  p.name,
  pv.sku,
  pv.price
FROM products p
LEFT JOIN product_variants pv ON p.id = pv.product_id;
♦️ Returns all products, even those with no variants (NULLs in variant columns).
🔸 3. RIGHT JOIN – Show all variants, with product info if available
(Less common, but useful if variants might exist without a product record)
SELECT
  pv.sku,
  pv.price,
  p.name
FROM products p
RIGHT JOIN product_variants pv ON p.id = pv.product_id;
🔸 4. FULL OUTER JOIN – All records from both tables
SELECT
  p.name AS product_name,
  pv.sku AS variant_sku
FROM products p
FULL OUTER JOIN product_variants pv ON p.id = pv.product_id;
♦️ Shows all products and all variants, even when there’s no match.
🔸 5. SELF JOIN Example (for product_variants comparing similar sizes or prices)
Let’s compare variants of the same product that are different sizes.
SELECT
  pv1.product_id,
  pv1.size AS size_1,
  pv2.size AS size_2,
  pv1.sku AS sku_1,
  pv2.sku AS sku_2
FROM product_variants pv1
JOIN product_variants pv2
  ON pv1.product_id = pv2.product_id
  AND pv1.size <> pv2.size
WHERE pv1.product_id = 101;  -- example product
♦️ Useful to analyze size comparisons or price differences within a product.
🧬 Complex Combined JOIN Example
Show each product with its variants, and include only discounted ones (price < MRP):
SELECT
  p.name AS product_name,
  pv.sku,
  pv.price,
  pv.mrp,
  (pv.mrp - pv.price) AS discount_value
FROM products p
INNER JOIN product_variants pv ON p.id = pv.product_id
WHERE pv.price < pv.mrp
ORDER BY discount_value DESC;
📑 JOIN Summary with These Tables
JOIN Type
Use Case
INNER JOIN
Only products with variants
LEFT JOIN
All products, even if they don’t have variants
RIGHT JOIN
All variants, even if product is missing
FULL OUTER JOIN
Everything — useful in data audits
SELF JOIN
Compare or relate rows within the same table
Let’s now look at JOIN queries with more realistic conditions using products and product_variants.
🦾 Advanced JOIN Queries with Conditions to practice
🔹 1. All products with variants in stock AND discounted
SELECT
  p.name AS product_name,
  pv.sku,
  pv.size,
  pv.color,
  pv.stock_quantity,
  pv.mrp,
  pv.price,
  (pv.mrp - pv.price) AS discount_amount
FROM products p
JOIN product_variants pv ON p.id = pv.product_id
WHERE pv.stock_quantity > 0
  AND pv.price < pv.mrp
ORDER BY discount_amount DESC;
♦️ Shows available discounted variants, ordered by discount.
🔹 2. Products with high rating (4.5+) and at least one low-stock variant (< 10 items)
SELECT
  p.name AS product_name,
  p.rating,
  pv.sku,
  pv.stock_quantity
FROM products p
JOIN product_variants pv ON p.id = pv.product_id
WHERE p.rating >= 4.5
  AND pv.stock_quantity < 10;
🔹 3. LEFT JOIN to find products with no variants or all variants out of stock
SELECT
  p.name AS product_name,
  pv.id AS variant_id,
  pv.stock_quantity
FROM products p
LEFT JOIN product_variants pv
  ON p.id = pv.product_id AND pv.stock_quantity > 0
WHERE pv.id IS NULL;
✅ This tells you:
Either the product has no variants
Or all variants are out of stock
🔹 4. Group and Count Variants per Product
SELECT
  p.name AS product_name,
  COUNT(pv.id) AS variant_count
FROM products p
LEFT JOIN product_variants pv ON p.id = pv.product_id
GROUP BY p.name
ORDER BY variant_count DESC;
🔹 5. Variants with price-percentage discount more than 30%
SELECT
  p.name AS product_name,
  pv.sku,
  pv.mrp,
  pv.price,
  ROUND(100.0 * (pv.mrp - pv.price) / pv.mrp, 2) AS discount_percent
FROM products p
JOIN product_variants pv ON p.id = pv.product_id
WHERE pv.price < pv.mrp
  AND (100.0 * (pv.mrp - pv.price) / pv.mrp) > 30;
🔹 6. Color-wise stock summary for a product category
SELECT
  p.category,
  pv.color,
  SUM(pv.stock_quantity) AS total_stock
FROM products p
JOIN product_variants pv ON p.id = pv.product_id
WHERE p.category = 'Shoes'
GROUP BY p.category, pv.color
ORDER BY total_stock DESC;
These queries simulate real-world dashboard views: inventory tracking, product health, stock alerts, etc.