I made a mistake of integrating the sessions with Order and Order items model (I used the help of Co-piolet for improvement). I have only written the test cases for sessions. Why I made this mistake? Because for last some days the development was not happening in our design_studio project. So I was curious to do so many things at a time and I cannot control myself 🙂
Now what’s next?
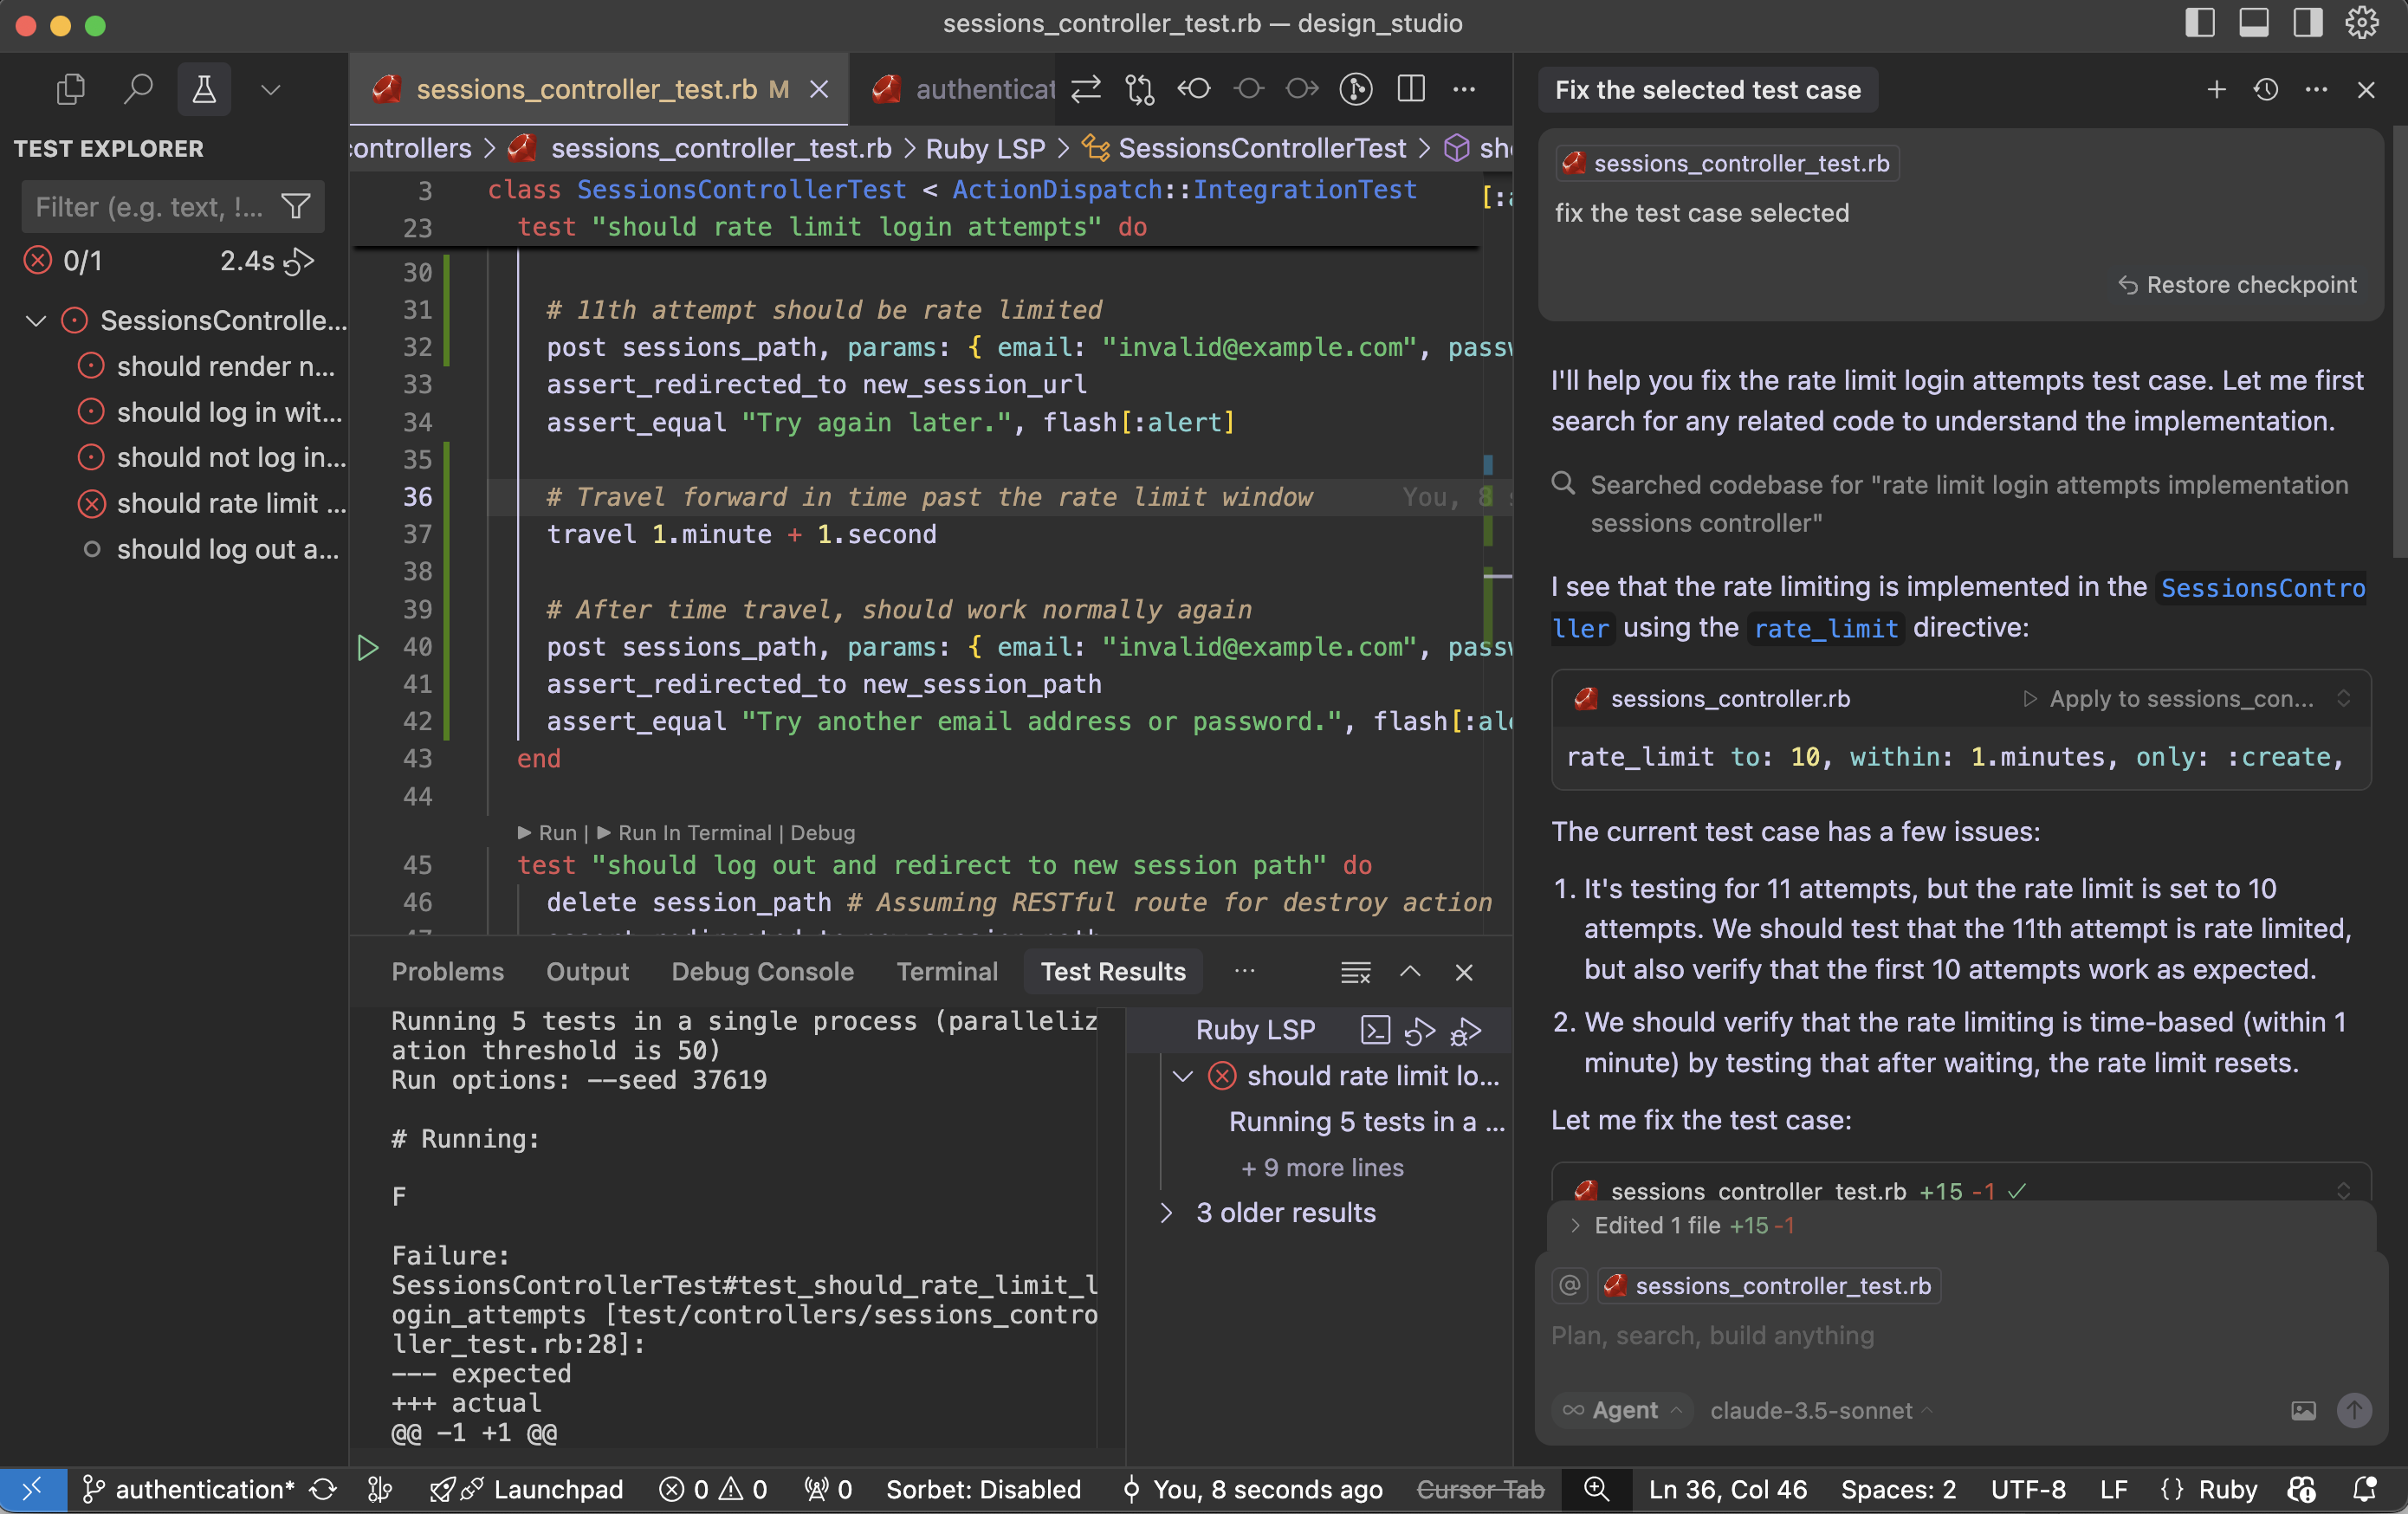
Let’s solve the test cases issues. First I cannot get ‘why this test cases for Rate limit issue is happening’. I have to research on this. I want to try Cursor – how it works with these kind of scenarios. Cursor provide me details about exact issue in our test cases and updated for me. I was happy that I saved some time.
Let’s see What is the findings of cursor:
The current test case has few issues:
It’s testing for 11 attempts, but the rate limit is set to 10 attempts. We should test that the 11th attempt is rate limited, but also verify that the first 10 attempts work as expected.
We should verify that the rate limiting is time-based (within 1 minute) by testing that after waiting, the rate limit resets.
Fix the test case:
Cursor updated the test case to properly test the rate limiting functionality. Here’s what the improved test does:
First, it makes 10 attempts and verifies that each attempt gets the normal “invalid credentials” response
Then it makes the 11th attempt and verifies that it gets rate limited with the “Try again later” message
Finally, it uses Rails’ travel helper to move forward in time past the rate limit window (1 minute + 1 second) and verifies that the rate limit has been reset by making another attempt
This test now properly verifies:
The rate limit threshold (10 attempts)
The rate limit behavior (redirect with “Try again later” message)
The rate limit duration (1 minute)
The rate limit reset after the time window expires
The test is now more thorough and matches the actual implementation in the SessionsController.
Run the test case with the fix:
Failure:
SessionsControllerTest#test_should_rate_limit_login_attempts [test/controllers/sessions_controller_test.rb:34]:
--- expected
+++ actual
@@ -1 +1 @@
-"Try again later."
+"Try another email address or password."
the problem is that the rate limiting is happening at the controller level using rate_limit, but our test isn’t properly simulating real-world timing. Let me modify the test to ensure we’re making the requests within the 1-minute window and properly testing the rate limiting.
We fixed it and still the issues are not solved:
# Running:
F
Failure:
SessionsControllerTest#test_should_rate_limit_login_attempts [test/controllers/sessions_controller_test.rb:36]:
--- expected
+++ actual
@@ -1 +1 @@
-"Try again later."
+"Try another email address or password."

bin/rails test test/controllers/sessions_controller_test.rb:23
The issue may be with our SessionsControllerrate_limit directive. That is not working in test environment. I had this doubt. Let’s see what cursor tell us regarding this:
Looking at the SessionsController, the rate limiting is implemented using Rails’ rate_limit macro, but it seems the rate limiting might not be working as expected in the test environment. Let’s try to debug this by checking if we need to enable rate limiting in the test environment or if there’s a different approach needed.
Cursor suggested Rails cache setup and wipe out cache:
require "test_helper"

class SessionsControllerTest < ActionDispatch::IntegrationTest
  setup do
    # Use memory store for rate limiting in tests
    Rails.cache = ActiveSupport::Cache::MemoryStore.new
  end

  teardown do
    Rails.cache.clear
  end

  ......
The test environment is configured to use :null_store for caching, which means rate limiting won’t work. Let’s modify the test environment configuration:
Changed the test environment’s cache store from :null_store to :memory_store to ensure rate limiting works properly
Added a consistent IP address in the test requests using headers: { REMOTE_ADDR: “192.168.1.1” } since rate limiting is typically done based on the client’s IP address
The test should now work correctly because:
We have proper caching enabled in the test environment
We’re using a consistent IP address for all requests, which is what rate limiting typically uses to track requests
We’re still maintaining the time window with travel_to and travel
The cache is cleared between tests to ensure a clean state
Try running the test again – it should now properly detect when the rate limit is exceeded on the 11th request.
Running 5 tests in a single process (parallelization threshold is 50)
Run options: --seed 55394

# Running:
.

Finished in 1.222473s, 0.8180 runs/s, 28.6305 assertions/s.
1 runs, 35 assertions, 0 failures, 0 errors, 0 skips
Coverage report generated for Unit Tests to /Users/abhilash/rails/design_studio/public/coverage.
Line Coverage: 21.37% (81 / 379)
Works!! Cursor – you beauty.
Let us see why the fix worked:
The main issue was that the test environment was using :null_store for caching, which effectively disabled all caching. Since Rails’ rate limiting feature relies on caching to track request counts, it wasn’t working properly.
By changing to :memory_store, we enabled proper caching in the test environment, allowing the rate limiting to track requests.
Adding the consistent IP address (REMOTE_ADDR: “192.168.1.1”) in the test requests was also important because Rails’ rate limiting typically uses the client’s IP address as part of the cache key to track requests per client.
The test structure ensures clean state by:
Using setup to initialize a fresh cache store for each test
Using teardown to clear the cache after each test
Using travel_to to ensure consistent timing for rate limit windows
Using consistent IP addresses for request tracking
This is a good example of how testing rate limiting requires careful consideration of the entire environment, including caching, timing, and request attributes. The test now properly verifies that:
Users can make up to 10 attempts within a minute
The 11th attempt gets rate limited
After waiting for a minute, they can try again
I may need some more time to get the fact that: “Rails’ rate limiting feature relies on caching to track request counts”. Here is the importance of AI tool like cursor. It saved a lot of my debugging time.
When building a Rails API app, you typically need token-based authentication instead of cookie-based sessions (which are more common in full-stack Rails apps). Here are the most common authentication mechanisms you can use in a Rails API-only application:
How it works: After login, the server issues a JWT token which the client must include in the Authorization header (Bearer <token>) in subsequent requests.
Pros:
Stateless, scalable.
Widely supported across mobile and frontend frameworks.
Cons:
Tokens can’t be invalidated easily without extra measures (e.g., a blacklist).
b. Token-based Auth with Devise + TokenAuthenticatable
POST /login
Content-Type: application/json

{
  "email": "test@example.com",
  "password": "password123"
}
Response:
{ "token": "eyJhbGciOi..." }
Step 3: Use Token in Authenticated Request
GET /profile
Authorization: Bearer eyJhbGciOi...
🔒 Extras You Might Add Later
Token expiration errors
Refresh tokens
Token revocation (e.g., a blacklist table)
Roles/permissions inside the token (e.g., admin claims)
Let’s now write RSpec tests for the JWT-based authentication flow we just set up in your Rails API app.
Assumptions
You already have:
A User model with email and password_digest
An AuthController with login
A UsersController with a protected profile action
JWT auth logic in JsonWebToken
🔧 Step 1: Add RSpec & Factory Bot
In your Gemfile (if not already added):
group :development, :test do
  gem 'rspec-rails'
  gem 'factory_bot_rails'
end

group :test do
  gem 'faker'
end
Then install:
bundle install
rails generate rspec:install
🏭 Step 2: Setup Factory for User
spec/factories/users.rb:
FactoryBot.define do
  factory :user do
    email { Faker::Internet.email }
    password { 'password123' }
    password_confirmation { 'password123' }
  end
end
🧪 Step 3: Auth Request Specs
spec/requests/auth_spec.rb:
require 'rails_helper'

RSpec.describe 'Authentication', type: :request do
  let!(:user) { create(:user, password: 'password123') }

  describe 'POST /login' do
    context 'with valid credentials' do
      it 'returns a JWT token' do
        post '/login', params: { email: user.email, password: 'password123' }

        expect(response).to have_http_status(:ok)
        expect(JSON.parse(response.body)).to include('token')
      end
    end

    context 'with invalid credentials' do
      it 'returns unauthorized' do
        post '/login', params: { email: user.email, password: 'wrong' }

        expect(response).to have_http_status(:unauthorized)
        expect(JSON.parse(response.body)).to include('error')
      end
    end
  end
end
🔒 Step 4: Profile (Protected) Request Specs
spec/requests/users_spec.rb:
require 'rails_helper'

RSpec.describe 'Users', type: :request do
  let!(:user) { create(:user) }
  let(:token) { JsonWebToken.encode(user_id: user.id) }

  describe 'GET /profile' do
    context 'with valid token' do
      it 'returns user profile' do
        get '/profile', headers: { 'Authorization' => "Bearer #{token}" }

        expect(response).to have_http_status(:ok)
        json = JSON.parse(response.body)
        expect(json['email']).to eq(user.email)
      end
    end

    context 'without token' do
      it 'returns unauthorized' do
        get '/profile'
        expect(response).to have_http_status(:unauthorized)
      end
    end

    context 'with invalid token' do
      it 'returns unauthorized' do
        get '/profile', headers: { 'Authorization' => 'Bearer invalid.token' }
        expect(response).to have_http_status(:unauthorized)
      end
    end
  end
end
📦 Final Tips
Run tests with: bundle exec rspec
You can stub JsonWebToken.decode in unit tests if needed to isolate auth logic.
Containerization has reshaped the way we build, ship, and run applications. From simplifying dependency management to enabling micro-services architectures at scale, containers and orchestration platforms like Kubernetes have become cornerstones of modern DevOps. In this post, we’ll explore:
What are containers, and what is containerization?
A brief history and evolution of Kubernetes.
Docker: what it is, how it works, and why it matters.
When Docker emerged and the context before and after.
The impact on the development lifecycle.
Docker’s relevance in 2025 and beyond.
Use cases: when to use—or avoid—Docker.
Feature evolution in Docker.
The future of Docker and containerization in web development.
Where Do Developers Get Containers? How Do They Find the Right Ones?
What Is Docker Hub? How Do You Use It?
Can You Use Docker Without Docker Hub?
1. What Are Containers ⛴️ and What Is Containerization?
Containers are lightweight, standalone units that package an application’s code along with its dependencies (libraries, system tools, runtime) into a single image.
Containerization is the process of creating, deploying, and running applications within these containers.
Unlike virtual machines, containers share the host OS kernel and isolate applications at the process level, resulting in minimal overhead, rapid startup times, and consistent behavior across environments.
Key benefits of containerization
Portability: “Build once, run anywhere” consistency across dev, test, and prod.
Efficiency: Higher density—hundreds of containers can run on a single host.
Isolation: Separate dependencies and runtime environments per app.
Scalability: Containers can be replicated and orchestrated quickly.
2. ☸️ Kubernetes: A Brief History and Evolution
Origins (2014–2015): Google donated its internal Borg system concepts to the Cloud Native Computing Foundation (CNCF), and Kubernetes 1.0 was released in July 2015.
Declarative model: Desired state is continuously reconciled.
Extensibility: CRDs and Operators let you automate almost any workflow.
3. What Is Docker 🐳 and How It Works?
Docker is an open-source platform introduced in 2013 that automates container creation, distribution, and execution.
Core components:
Dockerfile: Text file defining how to build your image (base image, dependencies, commands).
Docker Engine: Runtime that builds, runs, and manages containers.
Docker Hub (and other registries): Repositories for sharing images.
How Docker works
Build:docker build reads a Dockerfile, producing a layered image.
Ship:docker push uploads the image to a registry.
Run:docker run instantiates a container from the image, leveraging Linux kernel features (namespaces, cgroups) for isolation.
4. When Did Docker Emerge, and Why?
Launch: March 13, 2013, with the first open-source release of Docker 0.1 by dotCloud (now Docker, Inc.).
Why Docker?
Prior container tooling (LXC) was fragmented and complex.
Developers needed a standardized, user-friendly workflow for packaging apps.
Docker introduced a simple CLI, robust image layering, and a vibrant community ecosystem almost overnight.
5. Scenario Before and After Docker: Shifting the Development Lifecycle ♻️
Aspect
Before Docker
After Docker
Environment parity
“It works on my machine” frustrations.
Identical containers in dev, test, prod.
Dependency hell
Manual installs; conflicts between apps.
Encapsulated in image layers; side-by-side.
CI/CD pipelines
Custom scripts per environment.
Standard docker build → docker run steps.
Scaling
VM spin-ups with heavy resource use.
Rapid container spin-up, minimal overhead.
Isolation
Lesser isolation; port conflicts.
Namespace and cgroup isolation per container.
Docker transformed workflows by making builds deterministic, tests repeatable, and deployments faster—key enablers of continuous delivery and microservices.
6. Should We Use Docker in 2025?
Absolutely—Docker (and its underlying container technologies) remains foundational in 2025:
Cloud-native architectures place containers at their core.
Serverless platforms often run functions inside containers (AWS Lambda, Azure Functions).
Edge deployments leverage containers for lightweight, consistent runtimes.
Developer expectations: Instant local environments via docker-compose.
However, the ecosystem has matured, and alternatives like Podman (daemonless) and lightweight sandboxing (Firecracker VMs) also coexist.
7. When to Use or Not Use Docker
Use Case
Docker Fits Well?
Notes
Microservices / APIs
✔ Yes
Individual services packaged and scaled independently.
Monolithic apps
✔ Generally beneficial
Simplifies env setup, but added container overhead may be minimal.
High-load, high-latency apps
✔ Yes, with orchestration (K8s).
Autoscaling, rolling updates, resource quotas critical.
Simple frontend only apps
✔ Yes
Serve static assets via lightweight Nginx container.
Legacy desktop-style apps
⚠️ Maybe
Might add unnecessary complexity if no cloud target.
Key considerations
Use Docker for consistent environments, CI/CD integration, and horizontal scaling.
Avoid Docker when low latency on bare metal is paramount, or where container overhead cannot be tolerated (e.g., certain HPC workloads).
8. Is Docker Evolving? Key Feature 🧩Highlights
Docker continues to innovate:
Rootless mode (runs without root privileges) for enhanced security.
BuildKit improvements for faster, cache-efficient image builds.
Docker Extensions for community-driven tooling inside the Docker Desktop UI.
Improved Windows support with Windows containers and WSL2 integrations.
OCI compliance: Better compatibility with other runtimes (runc, crun) and registries.
9. Is Docker Needed for Future Web Development? What’s Next?
Containerization as standard: Even if Docker itself evolves or gives way to new runtimes, the model of packaging apps in isolated, immutable units is here to stay.
Serverless + containers: The blending of function-as-a-service and container workloads will deepen.
Edge computing: Tiny, specialized containers will power IoT and edge gateways.
Security focus: Sandboxing (gVisor, Firecracker) and supply-chain scanning will become default.
While tooling names may shift, the core paradigm—lightweight, reproducible application environments—remains indispensable.
10. Where Do Developers Get Containers? How Do They Find the Right Ones?
Developers get containers in the form of Docker images, which are blueprints for running containers.
These images can come from:
Docker Hub (most popular)
Private registries like GitHub Container Registry, AWS ECR, Google Container Registry, etc.
Custom-built images using Dockerfile
When looking for the right image, developers usually:
Search Docker Hub or other registries (e.g., redis, nginx, node, postgres)
Use official images, which are verified and maintained by Docker or vendors
Use community images, but carefully—check for:
Dockerfile transparency
Recent updates
Number of pulls and stars
Trust status (verified publisher)
Example search: If you want Redis:
docker search redis
11. What Is Docker Hub? How Do You Use It?
Docker Hub is Docker’s official cloud-based registry service where:
Developers publish, store, share, and distribute container images.
It hosts both public (free and open) and private (restricted access) repositories.
Enterprise teams: often use private registries for security and control.
CI/CD pipelines: use cloud provider registries like ECR or GCR for tighter cloud integration.
Offline deployments: air-gapped environments use custom registries or local tarball image transfers.
✅ Summary
Question
Answer
Where do devs get containers?
From Docker Hub, private registries, or by building their own images.
What is Docker Hub?
A public registry for discovering, pulling, and sharing Docker images.
Can Docker work without Docker Hub?
Yes—via self-hosted registries or cloud provider registries.
Conclusion
From Docker’s debut in 2013 to Kubernetes’ rise in 2015 and beyond, containerization has fundamentally altered software delivery. In 2025, containers are ubiquitous: in microservices, CI/CD, serverless platforms, and edge computing. Understanding when—and why—to use Docker (or its successors) is critical for modern developers. As the ecosystem evolves, containerization principles will underpin the next generation of web and cloud-native applications.
In a world increasingly defined by intelligent automation, Cursor AI has emerged as a next-generation AI-powered code editor redefining how developers – from beginners to seasoned experts – build software. Imagine an editor like VS Code but powered by the intelligence of ChatGPT, designed to help you think, debug, and code faster. Cursor AI is that vision realized.
In this post, we’ll explore:
What Cursor AI is
How it evolved
How to install Cursor AI on your MacBook
Why it matters today
How development feels with vs without Cursor AI
Pros and cons
How it affects experienced vs new developers
Best practices for experienced developers using it
Cursor AI is a developer-first AI code editor, built on top of Visual Studio Code, with AI deeply integrated into the editing experience. It’s designed to work contextually – meaning it doesn’t just generate generic code snippets, it understands your codebase, folder structure, and logic.
Key features:
Context-aware AI coding assistant
Instant code refactoring
Inline documentation generation
Bug fixing suggestions
Built-in ChatGPT-style panel
AI code generation for entire files, functions, or blocks
In essence, it turns your editor into a pair programmer that understands your exact project.
🧬 The Evolution of Cursor AI
The journey of Cursor AI started with the rise of GitHub Copilot and ChatGPT in 2022–2023. As these tools showed the value of AI-assisted development, developers demanded more context-aware, editor-native, and codebase-integrated AI tooling.
As of 29 April 2025, ~40% of code committed by professional engineers using Cursor is generated by Cursor!
Timeline of Evolution:
2023: VS Code extensions like Copilot led the charge in AI-assisted code completion.
Late 2023: ChatGPT APIs brought conversational code help into tools.
2024: Cursor AI launched with the vision of full-context development, integrating the editor with ChatGPT and file-tree understanding.
2025: Cursor AI adds real-time debugging help, AI test generation, and full-project understanding with minimal configuration.
Cursor AI wasn’t just a plugin—it was a full-blown editor that replaces VS Code and integrates AI from the ground up.
Check below for the words of Google CEO Sundar Pichai:
✨ Check google’s Veo 3 – An art video generated-model
Once the .dmg file is downloaded, open it and drag the Cursor app to Applications.
Open the app. You may need to give permissions via System Settings > Privacy & Security.
Log in using your GitHub or Google account.
Optionally connect your OpenAI API key (for custom models or paid usage).
Cursor AI will sync your settings like any modern IDE, and you’re ready to go!
🌐 Why Cursor AI Matters in the Modern Coding Era
Software development is no longer just about writing code—it’s about writing good, secure, and maintainable code faster. Cursor AI helps with:
🚀 Speed: Complete entire components in seconds
🧠 Knowledge: Understands your codebase like a team member
🐞 Debugging: Pinpoints issues and suggests fixes
🧪 Testing: Helps write unit tests and specs instantly
✍️ Docs: Auto-generates internal documentation
In the AI-assisted future of work, tools like Cursor AI aren’t optional—they’re multipliers.
🆚 Development With vs. Without Cursor AI
Feature
With Cursor AI
Without Cursor AI
Code generation
Instantly generated with context
Manual and slower
Bug fixing
One-click suggestions
Manual debugging, Stack Overflow
Learning curve
Smooth with AI help
Steeper, especially for beginners
Documentation
Auto-generated inline docs
Time-consuming, often skipped
Refactoring
Assisted refactors in seconds
Manual, error-prone
AI integration
Native and seamless
Plugin-based or absent
The difference is stark: with Cursor AI, coding feels like a team sport—even if you’re solo.
Advantages and Disadvantages of Cursor AI
✅ Advantages:
Full codebase context for suggestions
Conversational AI built into the IDE
Quick refactors and fixes
Makes pair programming obsolete
Beginner-friendly with pro-level capabilities
❌ Disadvantages:
Limited to Cursor editor (not VS Code extension)
May over-rely on AI for thinking/debugging
Occasional hallucinations or wrong suggestions
Internet connection required
Premium features may require subscription or OpenAI key
👶 Freshers vs 🧠 Experienced Developers: How Cursor AI Affects Them
For Freshers:
Pros:
Less intimidating learning experience
AI explains code and errors
Boosts confidence and learning speed
Cons:
May hinder learning fundamentals if overused
Risk of blindly accepting AI suggestions
For Experienced Developers:
Pros:
Supercharges productivity
Speeds up prototyping and testing
Handles boilerplate and repetitive tasks
Cons:
Still requires strong judgment to verify AI output
Context overload may cause distraction if unmanaged
🧩 How Experienced Developers Can Fully Utilize Cursor AI
Here’s a practical strategy:
✅ Do:
Use AI for context-aware code completions—especially for large files.
Refactor in seconds by selecting blocks and using the AI menu.
Write test specs from user stories with the help of the chat assistant.
Ask AI to explain or find bugs across files or functions.
Generate documentation, migration files, or even setup scripts.
❌ Don’t:
Rely solely on AI for business logic or architecture decisions
Accept code blindly—always review suggestions
Skip writing your own tests
Forget to version control your AI-generated changes
Pro Tip 💡:
Use AI for what it’s best at—pattern recognition and code generation—but keep the human creativity and design decisions in your hands.
✨ Final Thoughts
Cursor AI is not just a trend – it’s a transformation. It represents a shift toward context-aware, AI-first development environments that do more than autocomplete – they collaborate.
Whether you’re a Rails engineer, a React hacker, or a full-stack product builder, Cursor AI is like adding a genius teammate to your IDE.
🧱 Up Next: Building a Rails + React App Using Cursor AI
In the next blog post, we’ll build a full Rails + React app from scratch using Cursor AI—watch how it writes your models, React components, routes, and tests like magic.
When choosing between RSpec and Minitest for writing tests in a Ruby on Rails application, both are solid options, but the best choice depends on your project goals, team preferences, and ecosystem alignment.
♦️ Use RSpec if:
You want a rich DSL for expressive, readable tests (describe, context, it, etc.).
You’re working on a large project or with a team familiar with RSpec.
You want access to a larger ecosystem of gems/plugins (e.g., FactoryBot, Shoulda Matchers).
You like writing spec-style tests and separating tests by type (spec/models, spec/controllers, etc.).
Example RSpec syntax:
describe User do
  it "is valid with a name and email" do
    user = User.new(name: "Alice", email: "alice@example.com")
    expect(user).to be_valid
  end
end
♦️ Use Minitest if:
You prefer simplicity and speed — it’s built into Rails and requires no setup.
You value convention over configuration and a more Ruby-like test style.
You’re working on a small-to-medium project or want to avoid extra dependencies.
You like tests integrated with rails test without RSpec’s additional structure.
Example Minitest syntax:
class UserTest < ActiveSupport::TestCase
  test "is valid with a name and email" do
    user = User.new(name: "Alice", email: "alice@example.com")
    assert user.valid?
  end
end
🚦Recommendation:
Go with RSpec if you want a full-featured testing suite, lots of documentation, and are okay with learning a custom DSL.
Stick with Minitest if you want fast boot time, minimal dependencies, and simpler syntax.
Below is a side-by-side comparison of RSpec and Minitest in a Rails 8 context. For each aspect—setup, syntax, assertions, fixtures/factories, controller tests, etc.—you’ll see how you’d do the same thing in RSpec (left) versus Minitest (right). Wherever possible, the examples mirror each other so you can quickly spot the differences.
1. Setup & Configuration
Aspect
RSpec
Minitest
Gem inclusion
Add to your Gemfile: ruby<br>group :development, :test do<br> gem 'rspec-rails', '~> 6.0' # compatible with Rails 8<br>end<br>Then run:bash<br>bundle install<br>rails generate rspec:install<br>This creates spec/ directory with spec/spec_helper.rb and spec/rails_helper.rb.
Built into Rails. No extra gems required. When you generate your app, Rails already configures Minitest.By default you have test/ directory with test/test_helper.rb.
spec/support/... (you can require them via rails_helper.rb)
test/helpers/... (auto-loaded via test_helper.rb)
3. Basic Model Validation Example
RSpec (spec/models/user_spec.rb)
# spec/models/user_spec.rb
require 'rails_helper'

RSpec.describe User, type: :model do
  context "validations" do
    it "is valid with a name and email" do
      user = User.new(name: "Alice", email: "alice@example.com")
      expect(user).to be_valid
    end

    it "is invalid without an email" do
      user = User.new(name: "Alice", email: nil)
      expect(user).not_to be_valid
      expect(user.errors[:email]).to include("can't be blank")
    end
  end
end
Minitest (test/models/user_test.rb)
# test/models/user_test.rb
require "test_helper"

class UserTest < ActiveSupport::TestCase
  test "valid with a name and email" do
    user = User.new(name: "Alice", email: "alice@example.com")
    assert user.valid?
  end

  test "invalid without an email" do
    user = User.new(name: "Alice", email: nil)
    refute user.valid?
    assert_includes user.errors[:email], "can't be blank"
  end
end
4. Using Fixtures vs. Factories
RSpec (with FactoryBot)
Gemfile: group :development, :test do gem 'rspec-rails', '~> 6.0' gem 'factory_bot_rails' end
Factory definition (spec/factories/users.rb): # spec/factories/users.rb FactoryBot.define do factory :user do name { "Bob" } email { "bob@example.com" } end end
Spec using factory: # spec/models/user_spec.rb require 'rails_helper' RSpec.describe User, type: :model do it "creates a valid user via factory" do user = FactoryBot.build(:user) expect(user).to be_valid end end
Minitest (with Fixtures or Minitest Factories)
Default fixture (test/fixtures/users.yml): alice: name: Alice email: alice@example.com bob: name: Bob email: bob@example.com
Test using fixture: # test/models/user_test.rb require "test_helper" class UserTest < ActiveSupport::TestCase test "fixture user is valid" do user = users(:alice) assert user.valid? end end
(Optional) Using minitest-factory_bot: If you prefer factory style, you can add gem 'minitest-factory_bot', define factories similarly under test/factories, and then: # test/models/user_test.rb require "test_helper" class UserTest < ActiveSupport::TestCase include FactoryBot::Syntax::Methods test "factory user is valid" do user = build(:user) assert user.valid? end end
5. Assertions vs. Expectations
Category
RSpec (expectations)
Minitest (assertions)
Check truthiness
expect(some_value).to be_truthy
assert some_value
Check false/nil
expect(value).to be_falsey
refute value
Equality
expect(actual).to eq(expected)
assert_equal expected, actual
Inclusion
expect(array).to include(item)
assert_includes array, item
Change/Count difference
expect { action }.to change(Model, :count).by(1)
assert_difference 'Model.count', 1 do <br> action<br>end
# spec/models/post_spec.rb
require 'rails_helper'

RSpec.describe Post, type: :model do
  it "increments Post.count by 1 when created" do
    expect { Post.create!(title: "Hello", content: "World") }
      .to change(Post, :count).by(1)
  end
end
Minitest:
# test/models/post_test.rb
require "test_helper"

class PostTest < ActiveSupport::TestCase
  test "creation increases Post.count by 1" do
    assert_difference 'Post.count', 1 do
      Post.create!(title: "Hello", content: "World")
    end
  end
end
6. Controller (Request/Integration) Tests
6.1 Controller‐Level Test
RSpec (spec/controllers/users_controller_spec.rb)
# spec/controllers/users_controller_spec.rb
require 'rails_helper'

RSpec.describe UsersController, type: :controller do
  let!(:user) { FactoryBot.create(:user) }

  describe "GET #show" do
    it "returns http success" do
      get :show, params: { id: user.id }
      expect(response).to have_http_status(:success)
    end

    it "assigns @user" do
      get :show, params: { id: user.id }
      expect(assigns(:user)).to eq(user)
    end
  end

  describe "POST #create" do
    context "with valid params" do
      let(:valid_params) { { user: { name: "Charlie", email: "charlie@example.com" } } }

      it "creates a new user" do
        expect {
          post :create, params: valid_params
        }.to change(User, :count).by(1)
      end

      it "redirects to user path" do
        post :create, params: valid_params
        expect(response).to redirect_to(user_path(User.last))
      end
    end

    context "with invalid params" do
      let(:invalid_params) { { user: { name: "", email: "" } } }

      it "renders new template" do
        post :create, params: invalid_params
        expect(response).to render_template(:new)
      end
    end
  end
end
# test/controllers/users_controller_test.rb
require "test_helper"

class UsersControllerTest < ActionDispatch::IntegrationTest
  setup do
    @user = users(:alice)  # from fixtures
  end

  test "should get show" do
    get user_url(@user)
    assert_response :success
    assert_not_nil assigns(:user)   # note: assigns may need enabling in Rails 8
  end

  test "should create user with valid params" do
    assert_difference 'User.count', 1 do
      post users_url, params: { user: { name: "Charlie", email: "charlie@example.com" } }
    end
    assert_redirected_to user_url(User.last)
  end

  test "should render new for invalid params" do
    post users_url, params: { user: { name: "", email: "" } }
    assert_response :success        # renders :new with 200 status by default
    assert_template :new
  end
end
Note:
In Rails 8, controller tests are typically integration tests (ActionDispatch::IntegrationTest) rather than old‐style unit tests. RSpec’s type: :controller still works, but you can also use type: :request (see next section).
assigns(...) is disabled by default in modern Rails controller tests. In Minitest, you might enable it or test via response body or JSON instead.
6.2 Request/Integration Test
RSpec Request Spec (spec/requests/users_spec.rb)
# spec/requests/users_spec.rb
require 'rails_helper'

RSpec.describe "Users API", type: :request do
  let!(:user) { FactoryBot.create(:user) }

  describe "GET /api/v1/users/:id" do
    it "returns the user in JSON" do
      get api_v1_user_path(user), as: :json
      expect(response).to have_http_status(:ok)
      json = JSON.parse(response.body)
      expect(json["id"]).to eq(user.id)
      expect(json["email"]).to eq(user.email)
    end
  end

  describe "POST /api/v1/users" do
    let(:valid_params) { { user: { name: "Dana", email: "dana@example.com" } } }

    it "creates a user" do
      expect {
        post api_v1_users_path, params: valid_params, as: :json
      }.to change(User, :count).by(1)
      expect(response).to have_http_status(:created)
    end
  end
end
Minitest Integration Test (test/integration/users_api_test.rb)
# test/integration/users_api_test.rb
require "test_helper"

class UsersApiTest < ActionDispatch::IntegrationTest
  setup do
    @user = users(:alice)
  end

  test "GET /api/v1/users/:id returns JSON" do
    get api_v1_user_path(@user), as: :json
    assert_response :success
    json = JSON.parse(response.body)
    assert_equal @user.id, json["id"]
    assert_equal @user.email, json["email"]
  end

  test "POST /api/v1/users creates a user" do
    assert_difference 'User.count', 1 do
      post api_v1_users_path, params: { user: { name: "Dana", email: "dana@example.com" } }, as: :json
    end
    assert_response :created
  end
end
Slower boot time because it loads extra files (rails_helper.rb, support files, matchers).
Rich DSL can make tests slightly slower, but you get clearer, more descriptive output.
Minitest
Faster boot time since it’s built into Rails and has fewer abstractions.
Ideal for a smaller codebase or when you want minimal overhead.
Benchmarks: While exact numbers vary, many Rails 8 teams report ~20–30% faster test suite runtime on Minitest vs. RSpec for comparable test counts. If speed is critical and test suite size is moderate, Minitest edges out.
10. Community, Ecosystem & Plugins
Feature
RSpec
Minitest
Popularity
By far the most popular Rails testing framework⸺heavily used, many tutorials.
Standard in Rails. Fewer third-party plugins than RSpec, but has essential ones (e.g., minitest-rails, minitest-factory_bot).
Common plugins/gems
• FactoryBot• Shoulda Matchers (for concise model validations)• Database Cleaner (though Rails 8 encourages use_transactional_tests)• Capybara built-in support
Abundant (RSPEC official guides, many blog posts, StackOverflow).
Good coverage in Rails guides; fewer dedicated tutorials but easy to pick up if you know Ruby.
CI Integration
Excellent support in CircleCI, GitHub Actions, etc. Many community scripts to parallelize RSpec.
Equally easy to integrate; often faster out of the box due to fewer dependencies.
11. Example: Complex Query Test (Integration of AR + Custom Validation)
RSpec
# spec/models/order_spec.rb
require 'rails_helper'

RSpec.describe Order, type: :model do
  describe "scopes and validations" do
    before do
      @user       = FactoryBot.create(:user)
      @valid_attrs = { user: @user, total_cents: 1000, status: "pending" }
    end

    it "finds only completed orders" do
      FactoryBot.create(:order, user: @user, status: "completed")
      FactoryBot.create(:order, user: @user, status: "pending")
      expect(Order.completed.count).to eq(1)
    end

    it "validates total_cents is positive" do
      order = Order.new(@valid_attrs.merge(total_cents: -5))
      expect(order).not_to be_valid
      expect(order.errors[:total_cents]).to include("must be greater than or equal to 0")
    end
  end
end
Minitest
# test/models/order_test.rb
require "test_helper"

class OrderTest < ActiveSupport::TestCase
  setup do
    @user = users(:alice)
    @valid_attrs = { user: @user, total_cents: 1000, status: "pending" }
  end

  test "scope .completed returns only completed orders" do
    Order.create!(@valid_attrs.merge(status: "completed"))
    Order.create!(@valid_attrs.merge(status: "pending"))
    assert_equal 1, Order.completed.count
  end

  test "validates total_cents is positive" do
    order = Order.new(@valid_attrs.merge(total_cents: -5))
    refute order.valid?
    assert_includes order.errors[:total_cents], "must be greater than or equal to 0"
  end
end
12. When to Choose Which?
Choose RSpec if …
You want expressive, English-like test descriptions (describe, context, it).
Your team is already comfortable with RSpec.
You need a large ecosystem of matchers/plugins (e.g., shoulda-matchers, faker, etc.).
You prefer separating specs into spec/ with custom configurations in rails_helper.rb and spec_helper.rb.
Choose Minitest if …
You want zero additional dependencies—everything is built into Rails.
You value minimal configuration and convention over configuration.
You need faster test suite startup and execution.
Your tests are simple enough that a minimal DSL is sufficient.
13. 📋 Summary Table
Feature
RSpec
Minitest
Built-in with Rails
No (extra gem)
Yes
DSL Readability
“describe/context/it” blocks → very readable
Plain Ruby test classes & methods → idiomatic but less English-like
Ecosystem & Plugins
Very rich (FactoryBot, Shoulda, etc.)
Leaner, but you can add factories & reporters if needed
Setup/Boot Time
Slower (loads extra config & DSL)
Faster (built-in)
Fixtures vs. Factory preference
FactoryBot (by convention)
Default YAML fixtures or optionally minitest-factory_bot
Integration Test Support
Built-in type: :request
Built-in ActionDispatch::IntegrationTest
Community Adoption
More widely adopted for large Rails teams
Standard for many smaller Rails projects
✍️ Final Note
If you’re just starting out and want something up and running immediately—Minitest is the simplest path since it requires no extra gems. You can always add more complexity later (e.g., add minitest-factory_bot or minitest-reporters).
If you plan to write a lot of tests—model validations, request specs, feature specs, etc.—with very expressive descriptions (and you don’t mind a slightly longer boot time), RSpec tends to be the de facto choice in many Rails codebases.
Feel free to pick whichever aligns best with your team’s style. Both ecosystems are mature and well-documented.
In a Rails Gemfile, the require: false option tells Bundler not to automatically load the gem when your Rails application starts. Here’s what it means and when to use it:
What It Does
gem 'some_gem', require: false
Without require: false: The gem is automatically required (loaded) when your Rails app boots
With require: false: The gem is installed but won’t be loaded until you explicitly require it
When to Use It
Performance Optimization: For gems you don’t need in all environments (like development-only tools)
Conditional Loading: When you only need a gem in specific circumstances
Reduced Memory Usage: Avoids loading unnecessary gems into memory
Avoid Naming Conflicts: If a gem might conflict with others when loaded
Example Usage
# Only load in development
group :development do
  gem 'brakeman', require: false
end

# Load manually when needed
gem 'nokogiri', require: false

# Then in your code:
def parse_xml
  require 'nokogiri'
  # use Nokogiri...
end
Common Gems That Use This
Testing tools (RSpec, Cucumber)
Performance monitoring tools
Debugging tools (byebug, pry)
Gems used only in rake tasks
Remember that without require: false, Bundler will automatically require the gem, which is the default behavior for most gems in your application.
Ruby and Ruby on Rails are rich, expressive, and powerful technologies that make web development both elegant and productive. In this post, we’ll explore some critical concepts that developers often encounter, along with detailed explanations, advantages, disadvantages, and real-world Rails examples.
1. Garbage Collection (GC) in Ruby
Ruby’s VM uses a mark‑and‑sweep collector with generational enhancements to reduce pause times.
How it works
Generational Division: Objects are split into young (eden/survivor) and old generations. Young objects are collected more frequently.
Mark Phase: It traverses from root nodes (globals, stack, constants) marking reachable objects.
Sweep Phase: Clears unmarked (garbage) objects.
Compaction (in newer versions): Optionally compacts memory to reduce fragmentation.
# Trigger a minor GC (young generation)
GC.start(full_mark: false)
# Trigger a major GC (both generations)
GC.start(full_mark: true)
Benefits
Automatic memory management: Developers focus on logic, not free/delete calls.
ActiveRecord provides tools to fetch associations efficiently and avoid the N+1 query problem.
Method
SQL Generated
Behavior
Pros
Cons
joins
INNER JOIN
Filters by associated table
Efficient filtering; single query
Doesn’t load associated objects fully
preload
2 separate queries
Loads parent then child separately
Avoids N+1; simple to use
Two queries; might fetch unnecessary data
includes
JOIN or 2 queries
Auto‑decides between JOIN or preload
Flexible; avoids N+1 automatically
Harder to predict SQL; can generate large JOINs
eager_load
LEFT OUTER JOIN
Forces single JOIN query
Always one query with data
Large result sets; potential data duplication
Examples
# joins: Filter variants with women category products
> ProductVariant.joins(:product).where(product: {category: 'women'})
  ProductVariant Load (3.4ms)  SELECT "product_variants".* FROM "product_variants" INNER JOIN "products" "product" ON "product"."id" = "product_variants"."product_id" WHERE "product"."category" = 'women'

# preload: Load variants separately
> products = Product.preload(:variants).limit(10)
  Product Load (1.4ms)  SELECT "products".* FROM "products" /* loading for pp */ LIMIT 10
  ProductVariant Load (0.5ms)  SELECT "product_variants".* FROM "product_variants" WHERE "product_variants"."product_id" IN (14, 15, 32)
> products.each { |product| product.variants.size}

# includes: Smart loading
products = > Product.includes(:variants).where("category = ?", 'women')
  Product Load (1.7ms)  SELECT "products".* FROM "products" WHERE (category = 'women') /* loading for pp */ LIMIT 11
  ProductVariant Load (0.8ms)  SELECT "product_variants".* FROM "product_variants" WHERE "product_variants"."product_id" IN (14, 15)

# eager_load: Always join
Product.eager_load(:variants).where(variants: { stock_quantity: 5 })
> Product.eager_load(:variants).where(variants: { stock_quantity: 5 })
  SQL (3.1ms)  SELECT DISTINCT "products"."id" FROM "products" LEFT OUTER JOIN "product_variants" "variants" ON "variants"."product_id" = "products"."id" WHERE "variants"."stock_quantity" = 5 LIMIT 11

  SQL (1.6ms)  SELECT "products"."id" AS t0_r0, "products"."description" AS t0_r1, "products"."category" AS t0_r2, "products"."created_at" AS t0_r3, "products"."updated_at" AS t0_r4, "products"."name" AS t0_r5, "products"."rating" AS t0_r6, "products"."brand" AS t0_r7, "variants"."id" AS t1_r0, "variants"."product_id" AS t1_r1, "variants"."sku" AS t1_r2, "variants"."mrp" AS t1_r3, "variants"."price" AS t1_r4, "variants"."discount_percent" AS t1_r5, "variants"."size" AS t1_r6, "variants"."color" AS t1_r7, "variants"."stock_quantity" AS t1_r8, "variants"."specs" AS t1_r9, "variants"."created_at" AS t1_r10, "variants"."updated_at" AS t1_r11 FROM "products" LEFT OUTER JOIN "product_variants" "variants" ON "variants"."product_id" = "products"."id" WHERE "variants"."stock_quantity" = 5 AND "products"."id" = 15
When to Use
joins: Filtering, counting, or conditions across tables.
preload: You only need associated objects later, with less risk of huge joins.
includes: Default choice; let AR decide.
eager_load: Complex filtering on associations in one query.
3. Achieving Multiple Inheritance via Mixins
Ruby uses modules as mixins to simulate multiple inheritance.
Pattern
module Auditable
  def audit(message)
    puts "Audit: #{message}"
  end
end

module Taggable
  def tag(*names)
    @tags = names
  end
end

class Article
  include Auditable, Taggable
end

article = Article.new
tag "ruby", "rails"
audit "Created article"
Benefits
Code reuse: Share behavior across unrelated classes.
Separation of concerns: Each module encapsulates specific functionality.
Drawbacks
Method conflicts: Last included module wins; resolve with Module#prepend or alias_method.
Rails Example: Concerns
# app/models/concerns/trackable.rb
module Trackable
  extend ActiveSupport::Concern

  included do
    after_create :track_create
  end

  def track_create
    AnalyticsService.log(self)
  end
end

class User < ApplicationRecord
  include Trackable
end
4. Thread vs Fiber
Ruby offers preemptive threads and cooperative fibers for concurrency.
Aspect
Thread
Fiber
Scheduling
OS-level, preemptive
Ruby-level, manual (Fiber.yield/ resume)
Overhead
Higher (context switch cost)
Lower (lightweight)
Use Cases
Parallel I/O, CPU-bound (with GVL caveat)
Managing event loops, non-blocking flows
GVL Impact
All threads share GIL (Global VM Lock)
Fibers don’t bypass GVL
Thread Example
threads = 5.times.map do
  Thread.new { sleep 1; puts "Done in thread #{Thread.current.object_id}" }
end
threads.each(&:join)
Fiber Example
fiber1 = Fiber.new do
  puts "Fiber1 start"
  Fiber.yield
  puts "Fiber1 resume"
end

fiber2 = Fiber.new do
  puts "Fiber2 start"
  fiber1.resume
  puts "Fiber2 resume"
end

fiber2.resume  # orchestrates both fibers
Rails Example: Action Cable
Action Cable uses EventMachine or async fibers to handle multiple WebSocket connections efficiently.
5. Proc vs Lambda
Both are callable objects, but differ in return behavior and argument checks.
# Using a lambda for a conditional callback
class User < ApplicationRecord
  after_save -> { Analytics.track(self) }, if: -> { saved_change_to_email? }
end
6. Exception Handling in Ruby
Ruby’s exception model is dynamic and flexible.
Syntax
begin
  risky_operation
rescue SpecificError => e
  handle_error(e)
rescue AnotherError
  fallback
else
  puts "No errors"
ensure
  cleanup_resources
end
Benefits
Granular control: Multiple rescue clauses per exception class.
Flow control: rescue can be used inline (foo rescue nil).
Drawbacks
Performance: Raising/catching exceptions is costly.
Overuse: Rescuing StandardError broadly can hide bugs.
Rails Example: Custom Exceptions
class PaymentError < StandardError; end

def process_payment
  raise PaymentError, "Insufficient funds" unless valid_funds?
rescue PaymentError => e
  errors.add(:base, e.message)
end
7. Key Ruby on Rails Modules
Rails is modular, each gem serves a purpose:
Module
Purpose
Benefits
ActiveRecord
ORM: models to DB tables
DRY queries, validations, callbacks
ActionController
Controllers: request/response cycle
Filters, strong parameters
ActionView
View templates (ERB, Haml)
Helpers, partials
ActiveModel
Model conventions for non-DB classes
Validations, callbacks without DB
ActiveJob
Job framework (sidekiq, resque adapters)
Unified API for background jobs
ActionMailer
Email composition & delivery
Interceptors, mailer previews
ActionCable
WebSocket support
Streams, channels
ActiveStorage
File uploads & CDN integration
Direct uploads, variants
ActiveSupport
Utility extensions (core extensions, inflections)
Time calculations, i18n, concerns support
8. Method Visibility: public, protected, private
Visibility controls encapsulation and API design.
Modifier
Access From
Use Case
public
Everywhere
Public API methods
private
Same instance only
Helper methods not meant for external use
protected
Instances of same class or subclasses
Comparison or interaction between related objects
class Account
  def transfer(to, amount)
    validate_balance(amount)
    to.deposit(amount)
  end

  private

  def validate_balance(amount)
    raise "Insufficient" if balance < amount
  end

  protected

  def balance
    @balance
  end
end
Advantages
Encapsulation: Hides implementation details.
Inheritance control: Fine‑grained access for subclasses.
Disadvantages
Rigidity: Can complicate testing private methods.
Confusion: Protected rarely used, often misunderstood.
Above Summary
By diving deeper into these core concepts, you’ll gain a solid understanding of Ruby’s internals, ActiveRecord optimizations, module mixins, concurrency strategies, callable objects, exception patterns, Rails modules, and visibility controls. Practice these patterns in your own projects to fully internalize their benefits and trade‑offs.
Other Ruby on Rails Concepts 💡
Now, we’ll explore several foundational topics in Ruby on Rails, complete with detailed explanations, code examples, and a balanced look at advantages and drawbacks.
What is Rack? Rack is the Ruby interface between web servers (e.g., Puma, Unicorn) and Ruby web frameworks (Rails, Sinatra). It standardizes how HTTP requests and responses are handled, enabling middleware stacking and pluggable request processing.
Middleware Rack middleware are modular components that sit in the request/response pipeline. Each piece can inspect, modify, or short-circuit requests before they reach your Rails app, and likewise inspect or modify responses before they go back to the client.
# lib/simple_logger.rb
class SimpleLogger
  def initialize(app)
    @app = app
  end

  def call(env)
    Rails.logger.info("[Request] #{env['REQUEST_METHOD']} #{env['PATH_INFO']}")
    status, headers, response = @app.call(env)
    Rails.logger.info("[Response] status=#{status}")
    [status, headers, response]
  end
end

# config/application.rb
config.middleware.use SimpleLogger
Benefits:
Cross-cutting concerns (logging, security, caching) can be isolated.
Easily inserted, removed, or reordered.
Drawbacks:
Overuse can complicate request flow.
Harder to trace when many middlewares are chained.
2. The N+1 Query Problem
What is N+1? Occurs when Rails executes one query to load a collection, then an additional query for each record when accessing an association.
Prevention: use eager loading (includes, preload, eager_load).
@users = User.includes(:posts)
@users.each { |u| u.posts.count } # still 2 queries only
Benefits of Eager Loading:
Dramatically reduces SQL round-trips.
Improves response times for collections.
Drawbacks:
May load unnecessary data if associations aren’t used.
Can lead to large, complex SQL (especially with eager_load).
3. Using Concerns
What are Concerns? Modules under app/models/concerns (or app/controllers/concerns) to extract and share reusable logic.
# app/models/concerns/archivable.rb
module Archivable
  extend ActiveSupport::Concern

  included do
    scope :archived, -> { where(archived: true) }
  end

  def archive!
    update!(archived: true)
  end
end

# app/models/post.rb
class Post < ApplicationRecord
  include Archivable
end
When to Extract:
Shared behavior across multiple models/controllers.
To keep classes focused and under ~200 lines.
Benefits:
Promotes DRY code.
Encourages separation of concerns.
Drawbacks:
Can mask complexity if overused.
Debugging call stacks may be less straightforward.
4. HABTM vs. Has Many Through
HABTM (has_and_belongs_to_many):
Simple many-to-many with a join table without a Rails model.
class Post < ApplicationRecord
  has_and_belongs_to_many :tags
end
Has Many Through:
Use when the join table has additional attributes or validations.
class Tagging < ApplicationRecord
  belongs_to :post
  belongs_to :tag
  validates :tagged_by, presence: true
end

class Post < ApplicationRecord
  has_many :taggings
  has_many :tags, through: :taggings
end
Benefits & Drawbacks:
Pattern
Benefits
Drawbacks
HABTM
Minimal setup; fewer files
Cannot store metadata on relationship
Has Many Through
Full join model control; validations
More boilerplate; extra join model to maintain
5. Controller Hooks (Callbacks)
Rails controllers provide before_action, after_action, and around_action callbacks.
class ArticlesController < ApplicationController
  before_action :authenticate_user!
  before_action :set_article, only: %i[show edit update destroy]

  def show; end

  private

  def set_article
    @article = Article.find(params[:id])
  end
end
Use Cases:
Authentication/authorization
Parameter normalization
Auditing/logging
Benefits:
Centralize pre- and post-processing logic.
Keep actions concise.
Drawbacks:
Overuse can obscure the action’s core logic.
Callback order matters and can introduce subtle bugs.
6. STI vs. Polymorphic Associations vs. Ruby Inheritance
Feature
STI
Polymorphic
Plain Ruby Inheritance
DB Structure
Single table + type column
Separate tables + *_type + *_id
No DB persistence
Flexibility
Subclasses share schema
Can link many models to one
Full OOP, no DB ties
When to Use
Subtypes with similar attributes
Comments, attachments across models
Pure Ruby services, utilities
STI Example:
class Vehicle < ApplicationRecord; end
class Car < Vehicle; end
class Truck < Vehicle; end
All in vehicles table, differentiated by type.
Polymorphic Example:
class Comment < ApplicationRecord
  belongs_to :commentable, polymorphic: true
end

class Post < ApplicationRecord
  has_many :comments, as: :commentable
end
Benefits & Drawbacks:
STI: simple table; limited when subclasses diverge on columns.
Polymorphic: very flexible; harder to enforce foreign-key constraints.
Ruby Inheritance: best for non-persistent logic; no DB coupling.
7. rescue_from in Rails API Controllers
rescue_from declares exception handlers at the controller (or ApplicationController) level:
class Api::BaseController < ActionController::API
  rescue_from ActiveRecord::RecordNotFound, with: :render_not_found
  rescue_from ActiveRecord::RecordInvalid, with: :render_unprocessable_entity

  private

  def render_not_found(e)
    render json: { error: e.message }, status: :not_found
  end

  def render_unprocessable_entity(e)
    render json: { errors: e.record.errors.full_messages }, status: :unprocessable_entity
  end
end
Benefits:
Centralized error handling.
Cleaner action code without repetitive begin…rescue.
Drawbacks:
Must carefully order rescue_from calls (first match wins).
Overly broad handlers can mask unexpected bugs.
Summary
This post has covered advanced Rails concepts with practical examples, advantages, and pitfalls. By understanding these patterns, you can write cleaner, more maintainable Rails applications. Feedback and questions are welcome—let’s keep the conversation going!
Here we will look into the detailed explanation of some Ruby concepts with practical examples, and real-world scenarios:
1. Handling Many Constants in a Ruby Class
Problem: A class with numerous constants becomes cluttered and harder to maintain.
Solutions & Examples:
Nested Module for Grouping:
   class HTTPClient
     module StatusCodes
       OK = 200
       NOT_FOUND = 404
       SERVER_ERROR = 500
     end

     def handle_response(code)
       case code
       when StatusCodes::OK then "Success"
       when StatusCodes::NOT_FOUND then "Page missing"
       end
     end
   end
Why: Encapsulating constants in a module improves readability and avoids namespace collisions.
Dynamic Constants with const_set:
   class DaysOfWeek
     %w[MON TUE WED THU FRI SAT SUN].each_with_index do |day, index|
       const_set(day, index + 1)
     end
   end
   puts DaysOfWeek::MON # => 1
Use Case: Generate constants programmatically (e.g., days, months).
   class App
     CONSTANTS = YAML.load_file('config/constants.yml')
     def self.error_message(code)
       CONSTANTS['error_codes'].key(code)
     end
   end
Why: Centralize configuration for easy updates.
2. Meta-Programming: Dynamic Methods & Classes
Examples:
define_method for Repetitive Methods:
   class User
     ATTRIBUTES = %w[name email age]

     ATTRIBUTES.each do |attr|
       define_method(attr) { instance_variable_get("@#{attr}") }
       define_method("#{attr}=") { |value| instance_variable_set("@#{attr}", value) }
     end
   end

   user = User.new
   user.name = "Alice"
   puts user.name # => "Alice"
Use Case: Auto-generate getters/setters for multiple attributes.
Dynamic Classes with Class.new:
   Animal = Class.new do
     def speak
       puts "Animal noise!"
     end
   end

   dog = Animal.new
   dog.speak # => "Animal noise!"
Use Case: Generate classes at runtime (e.g., for plugins).
class_eval for Modifying Existing Classes:
   String.class_eval do
     def shout
       upcase + "!"
     end
   end

   puts "hello".shout # => "HELLO!"
Why: Add/redefine methods in existing classes dynamically.
3. Why Classes Are Objects in Ruby
Explanation:
Every class is an instance of Class.
String.class # => Class
Classes inherit from Module and ultimately Object, allowing them to have methods and variables:
  class Dog
    @count = 0 # Class instance variable
    def self.increment_count
      @count += 1
    end
  end
Real-World Impact: You can pass classes as arguments, modify them at runtime, and use them like any other object.
4. super Keyword: Detailed Usage
Examples:
Implicit Argument Passing:
   class Vehicle
     def start_engine
       "Engine on"
     end
   end

   class Car < Vehicle
     def start_engine
       super + " (Vroom!)"
     end
   end

   puts Car.new.start_engine # => "Engine on (Vroom!)"
Explicit super() for No Arguments:
   class Parent
     def greet
       "Hello"
     end
   end

   class Child < Parent
     def greet
       super() + " World!" # Explicitly call Parent#greet with no args
     end
   end
Pitfall: Forgetting () when overriding a method with parameters.
5. Blocks in Ruby Methods: Scenarios
A simple ruby method that accepts a block and executing via yield:
Note: We can call yield any number times that we want.
Proc
Procs are similar to blocks, however, they differ in that they may be saved to a variable to be used again and again. In Ruby, a proc can be called directly using the .call method.
To create Proc, we call new on the Proc class and follow it with the block of code
my_proc = Proc.new { |x| x*x*9 }
=> #<Proc:0x000000011f64ed38 (irb):34>

my_proc.call(6)
=> 324

> my_proc.call      # try to call without an argument
(irb):34:in 'block in <top (required)>': undefined method '*' for nil (NoMethodError)
lambda
> my_lambda = lambda { |x| x/3/5 }
=> #<Proc:0x000000011fe6fd28 (irb):44 (lambda)>

> my_lambda.call(233)
=> 15

> my_lambda = lambda.new { |x| x/3/5 } # wrong
in 'Kernel#lambda': tried to create Proc object without a block (ArgumentError)

> my_lambda = lambda                   # wrong
(irb):45:in 'Kernel#lambda': tried to create Proc object without a block (ArgumentError)

> my_lambda.call     # try to call without an argument
(irb):46:in 'block in <top (required)>': wrong number of arguments (given 0, expected 1) (ArgumentError)
Difference 1: lambda gets an ArgumentError if we call without an argument and Proc doesn’t.
Difference 2: lambda returns to its calling method rather than returning itself like Proc from its parent method.
irb* def proc_method
irb*   my_proc = Proc.new { return "Proc returns" }
irb*   my_proc.call
irb*   "Retun by proc_method"  # neaver reaches here
irb> end
=> :proc_method

irb> p proc_method
"Proc returns"
=> "Proc returns"
   def open_file(path)
     file = File.open(path, 'w')
     yield(file) if block_given?
   ensure
     file.close
   end

   open_file('log.txt') { |f| f.write("Data") }
Why: Ensures the file is closed even if an error occurs.
Custom Iterators:
   class MyArray
     def initialize(items)
       @items = items
     end

     def custom_each
       @items.each { |item| yield(item) }
     end
   end

   MyArray.new([1,2,3]).custom_each { |n| puts n * 2 }
proc = Proc.new { puts "I am the proc block" }
lambda = lambda { puts "I am the lambda block"}

proc_test.call # => I am the proc block
lambda_test.call # => I am the lambda block
6. Enums in Ruby
Approaches:
Symbols/Constants:
   class TrafficLight
     STATES = %i[red yellow green].freeze

     def initialize
       @state = STATES.first
     end

     def next_state
       @state = STATES[(STATES.index(@state) + 1) % STATES.size]
     end
   end
Rails ActiveRecord Enum:
   class User < ActiveRecord::Base
     enum role: { admin: 0, user: 1, guest: 2 }
   end

   user = User.new(role: :admin)
   user.admin? # => true
Why: Generates helper methods like admin? and user.admin!.
7. Including Enumerable
Why Needed:
Enumerable methods (map, select, etc.) rely on each being defined.
Example Without Enumerable:
  class MyCollection
    def initialize(items)
      @items = items
    end

    def each(&block)
      @items.each(&block)
    end
  end

  # Without Enumerable:
  collection = MyCollection.new([1,2,3])
  collection.map { |n| n * 2 } # Error: Undefined method `map`
With Enumerable:
  class MyCollection
    include Enumerable
    # ... same as above
  end

  collection.map { |n| n * 2 } # => [2,4,6]
8. Class Variables (@@)
Example & Risks:
class Parent
  @@count = 0

  def self.count
    @@count
  end

  def increment
    @@count += 1
  end
end

class Child < Parent; end

Parent.new.increment
Child.new.increment
puts Parent.count # => 2 (Shared across Parent and Child)
Why Avoid: Subclasses unintentionally modify the same variable. Alternative (Class Instance Variables):
class Parent
  @count = 0

  def self.count
    @count
  end

  def self.increment
    @count += 1
  end
end
9. Global Variables ($)
Example & Issues:
$logger = Logger.new($stdout)

def log_error(message)
  $logger.error(message) # Accessible everywhere
end

# Problem: Tight coupling; changing $logger affects all code.
When to Use: Rarely, for truly global resources like $stdout or $LOAD_PATH. Alternative: Dependency injection or singleton classes.
class AppConfig
  attr_reader :logger

  def initialize(logger:)
    @logger = logger
  end

  def info(msg)
    @logger.info(msg)
  end
end

config = AppConfig.new(Logger.new($stdout))
info = config.info("Safe")
Summary:
Constants: Organize with modules or external files.
Meta-Programming: Use define_method/Class.new for dynamic code.
Ruby is a dynamic, object-oriented programming language designed for simplicity and productivity. Here are some of its most exciting features:
1. Everything is an Object
In Ruby, every value is an object, even primitive types like integers or nil. This allows you to call methods directly on literals. Example:
5.times { puts "Ruby!" }      # 5 is an Integer object with a `times` method
3.14.floor                    # => 3 (Float object method)
true.to_s                     # => "true" (Boolean → String)
nil.nil?                      # => true (Method to check if object is nil)
2. Elegant and Readable Syntax
Ruby’s syntax prioritizes developer happiness. Parentheses and semicolons are often optional. Example:
# A method to greet a user (parentheses optional)
def greet(name = "Guest")
  puts "Hello, #{name.capitalize}!"
end

greet "alice"  # Output: "Hello, Alice!"
3. Blocks and Iterators
Ruby uses blocks (anonymous functions) to create powerful iterators. Use {} for single-line blocks or do...end for multi-line. Example:
# Multiply even numbers by 2
numbers = [1, 2, 3, 4]
result = numbers.select do |n|
  n.even?
end.map { |n| n * 2 }

puts result # => [4, 8]
4. Mixins via Modules
Modules let you share behavior across classes without inheritance. Example:
module Loggable
  def log(message)
    puts "[LOG] #{message}"
  end
end

class User
  include Loggable  # Mix in the module
end

user = User.new
user.log("New user created!") # => [LOG] New user created!
5. Metaprogramming
Ruby can generate code at runtime. For example, dynamically define methods. Example:
class Person
  # Define methods like name= and name dynamically
  attr_accessor :name, :age
end

person = Person.new
person.name = "Alice"
puts person.name # => "Alice"
6. Duck Typing
Focus on behavior, not type. If it “quacks like a duck,” treat it as a duck. Example:
def print_length(obj)
  obj.length  # Works for strings, arrays, or any object with a `length` method
end

puts print_length("Hello")  # => 5
puts print_length([1, 2, 3]) # => 3
7. Symbols
Symbols (:symbol) are lightweight, immutable strings used as identifiers. Example:
A set is a Ruby class that helps you create a list of unique items. A set is a class that stores items like an array. But with some special attributes that make it 10x faster in specific situations! All the items in a set are guaranteed to be unique.
What’s the difference between a set & an array? A set has no direct access to elements:
> seen[3]
(irb):19:in '<main>': undefined method '[]' for #<Set:0x000000012fc34058> (NoMethodError)
But a set can be converted into an array any time you need:
> seen.to_a
=> [4, 8, 9, 90]
> seen.to_a[3]
=> 90
Set: Fast lookup times (with include?)
If you need these then a set will give you a good performance boost, and you won’t have to be calling uniq on your array every time you want unique elements. Reference: https://www.rubyguides.com/2018/08/ruby-set-class/
Superset & Subset
A superset is a set that contains all the elements of another set.
Set.new(10..40) >= Set.new(20..30)
A subset is a set that is made from parts of another set:
Ruby minimizes boilerplate code with conventions. Example:
class Book
  attr_accessor :title, :author  # Auto-generates getters/setters
  def initialize(title, author)
    @title = title
    @author = author
  end
end

book = Book.new("Ruby 101", "Alice")
puts book.title # => "Ruby 101"
# No need to free memory manually
1000.times { String.new("temp") } # GC cleans up unused objects
15. Community and Ecosystem
RubyGems (packages) like:
Rails: Full-stack web framework.
RSpec: Testing framework.
Sinatra: Lightweight web server.
Install a gem:
gem install rails
16. Error Handling
Use begin/rescue for exceptions:
begin
  puts 10 / 0
rescue ZeroDivisionError => e
  puts "Error: #{e.message}" # => "Error: divided by 0"
end
17. Open Classes
Modify existing classes (use carefully!):
class String
  def reverse_and_upcase
    self.reverse.upcase
  end
end

puts "hello".reverse_and_upcase # => "OLLEH"
18. Reflection
Inspect objects at runtime:
class Dog
  def bark
    puts "Woof!"
  end
end

dog = Dog.new
puts dog.respond_to?(:bark) # => true
puts Dog.instance_methods   # List all methods
Ruby’s design philosophy emphasizes developer productivity and joy. These features make it ideal for rapid prototyping, web development (with Rails), scripting, and more.
Ruby, with its elegant syntax and dynamic nature, empowers developers to write expressive and flexible code. But beneath its simplicity lie powerful—and sometimes misunderstood – concepts like modules, mixins, and meta-programming that define the language’s true potential. Whether you’re wrestling with method lookup order, curious about how method_missing enables magic-like behaviour, or want to leverage eigen classes to bend Ruby’s object model to your will, understanding these fundamentals is key to writing clean, efficient, and maintainable code.
In this guide, we’ll unravel Ruby 3.4’s threading model, its Global Interpreter Lock (GIL) nuances, and how Ruby on Rails 8 leverages concurrency for scalable web applications. We’ll unpack foundational concepts like the Comparable module, Hash collections, and functional programming constructs such as lambdas and Procs. Additionally, we’ll demystify Ruby’s interpreted nature, contrast compilers with interpreters, and highlight modern GC advancements that optimize memory management. Through practical examples, we’ll also examine Ruby’s exception handling, the purpose of respond_to?, Ruby’s core mechanics, from modules and classes to the secrets of the ancestor chain, equipping you with the knowledge to transform from a Ruby user to a Ruby architect. Let’s dive in! 🔍
Why Call It “Magic”?
Ruby lets you break conventional rules and invent your own behavior.
It feels like “sorcery” compared to statically-typed languages.
Frameworks like Rails rely heavily on this (e.g., has_many, before_action).
method_missing
Ruby’s way of saying, “If a method doesn’t exist, call this instead!”
Lets you handle undefined methods dynamically (e.g., building DSLs or proxies).
Dynamic Method Creation (define_method, send)
Define methods on the fly based on conditions or data.
Example: Automatically generating getters/setters without attr_accessor.
Ghost Methods & respond_to_missing?
Methods that “don’t exist” syntactically but behave like they do.
Makes objects infinitely adaptable (e.g., Rails’ find_by_* methods).
Singleton Methods (Eigenclass Wizardry)
Attaching methods to individual objects (even classes!) at runtime.
Example: Adding a custom method to just one string:
Use define_method or eval for dynamic method creation:
  class MyClass
    [:a, :b].each { |m| define_method(m) { ... } }
  end
6. Eigenclass (Singleton Class)
Hidden class where singleton methods live. Accessed via singleton_class or class << obj.
  obj = Object.new
  eigenclass = class << obj; self; end
  eigenclass.define_method(:foo) { ... }
Class methods are stored in the class’s eigenclass.
7. Ancestors (Method Lookup)
Order: Eigenclass → prepended modules → class → included modules → superclass.
  class C; include M; prepend P; end
  C.ancestors # => [P, C, M, Object, ...]
8. method_missing
Called when a method is not found. Override for dynamic behavior.
  class Proxy
    def method_missing(method, *args)
      # Handle unknown methods here
    end
  end
9. String Interpolation
Embed code in #{} within double-quoted strings or symbols:
  name = "Alice"
  puts "Hello, #{name.upcase}!" # => "Hello, ALICE!"
Single quotes ('') disable interpolation.
10. Threading in Ruby 3.4 and Ruby on Rails 8
Does Ruby 3.4 support threads? Yes, Ruby 3.4 supports threads via its native Thread class. However, due to the Global Interpreter Lock (GIL) in MRI (Matz’s Ruby Interpreter), Ruby threads are concurrent but not parallel for CPU-bound tasks. I/O-bound tasks (e.g., HTTP requests, file operations) can still benefit from threading as the GIL is released during I/O waits.
How to do threading in Ruby:
threads = []
3.times do |i|
  threads << Thread.new { puts "Thread #{i} running" }
end
threads.each(&:join) # Wait for all threads to finish
In Ruby on Rails 8:
Use threading for background tasks, API calls, or parallel processing.
Ensure thread safety: Avoid shared mutable state; use mutexes or thread-safe data structures.
Rails automatically manages database connection pools for threads.
Mix in Comparable to add comparison methods (<, >, <=, >=, ==, between?) to a class. Define <=> (spaceship operator) to compare instances:
class Person
  include Comparable
  attr_reader :age

  def initialize(age)
    @age = age
  end

  def <=>(other)
    age <=> other.age
  end
end

alice = Person.new(30)
bob = Person.new(25)
alice > bob # => true
12. Why Ruby is interpreted?
Compiler vs. Interpreter
Compiler
Interpreter
Translates entire code upfront.
Translates and executes line-by-line.
Faster execution.
Slower execution.
Harder to debug.
Easier to debug.
Examples: C++, Rust.
Examples: Python, Ruby.
Why Ruby is interpreted? Ruby prioritizes developer productivity and dynamic features (e.g., metaprogramming). MRI uses an interpreter, but JRuby (JVM) and TruffleRuby use JIT compilation.
Which is better?
Compiler: Better for performance-critical applications.
Interpreter: Better for rapid development and scripting.
13. respond_to? in Ruby
Checks if an object can respond to a method:
str = "hello"
str.respond_to?(:upcase) # => true
Other Languages:
Python: hasattr(obj, 'method')
JavaScript: 'method' in obj
Java/C#: No direct equivalent (static typing avoids runtime checks).
14. Ruby Hash
A key-value collection:
user = { name: "Alice", age: 30 }
Advantages:
Fast O(1) average lookup.
Flexible keys (symbols, strings, objects).
Ordered in Ruby 1.9+.
Use Cases:
Configuration settings.
Caching (e.g., Rails.cache).
Grouping data (e.g., group_by).
15. Lambdas and Procs
Lambda (strict argument check, returns from itself):
lambda = ->(x, y) { x + y }
lambda.call(2, 3) # => 5
Proc (flexible arguments, returns from enclosing method):
def test
  proc = Proc.new { return "Exiting" }
  proc.call
  "Never reached"
end
test # => "Exiting"
Use Cases:
Passing behavior to methods (e.g., map(&:method)).
Callbacks and event handling.
16. Ruby 3.4 Garbage Collector (GC)
Improvements:
Generational GC: Separates objects into young (short-lived) and old (long-lived) generations for faster collection.
Incremental GC: Reduces pause times by interleaving GC with program execution.
Compaction: Reduces memory fragmentation (introduced in Ruby 2.7).
How It Works:
Mark Phase: Traces reachable objects.
Sweep Phase: Frees memory of unmarked objects.
Compaction: Rearranges objects to optimize memory usage.
17. Exception Handling in Ruby
begin
  # Risky code
  File.open("file.txt") { |f| puts f.read }
rescue Errno::ENOENT => e
  # Handle file not found
  puts "File missing: #{e.message}"
rescue StandardError => e
  # General error handling
  puts "Error: #{e}"
ensure
  # Always execute (e.g., cleanup)
  puts "Execution completed."
end
rescue: Catches exceptions.
else: Runs if no exception.
ensure: Runs regardless of success/failure.
Summary
Mixins: Use include (instance methods), extend (class methods), or prepend.
Singletons: Methods on individual objects (e.g., def obj.method).
Meta-Programming: Dynamically define methods/variables with instance_variable_get, define_method, etc.
Lookup: Follows the ancestors chain, including modules and eigenclasses.
Eigenclasses: The hidden class behind every object for singleton methods.