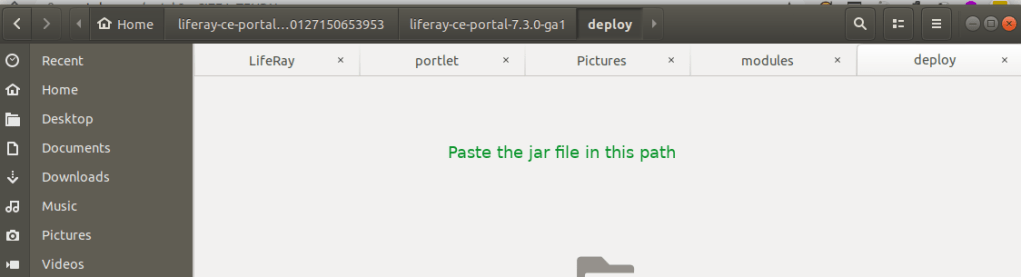
and then copy the *-service.jar into the same folder
You can see these are processing and started in the server logs.
INFO  [com.liferay.portal.kernel.deploy.auto.AutoDeployScanner][AutoDeployDir:263] Processing sitesService.api.jar

~/liferay-ce-portal-tomcat-7.3.0-ga1-20200127150653953/liferay-ce-portal-7.3.0-ga1/osgi/modules][BundleStartStopLogger:39] STARTED sitesService.api_1.0.0 [1115]

[com.liferay.portal.kernel.deploy.auto.AutoDeployScanner][AutoDeployDir:263] Processing sitesService.service.jar

~/liferay-ce-portal-tomcat-7.3.0-ga1-20200127150653953/liferay-ce-portal-7.3.0-ga1/osgi/modules][BundleStartStopLogger:39] STARTED sitesService.service_1.0.0 [1116]
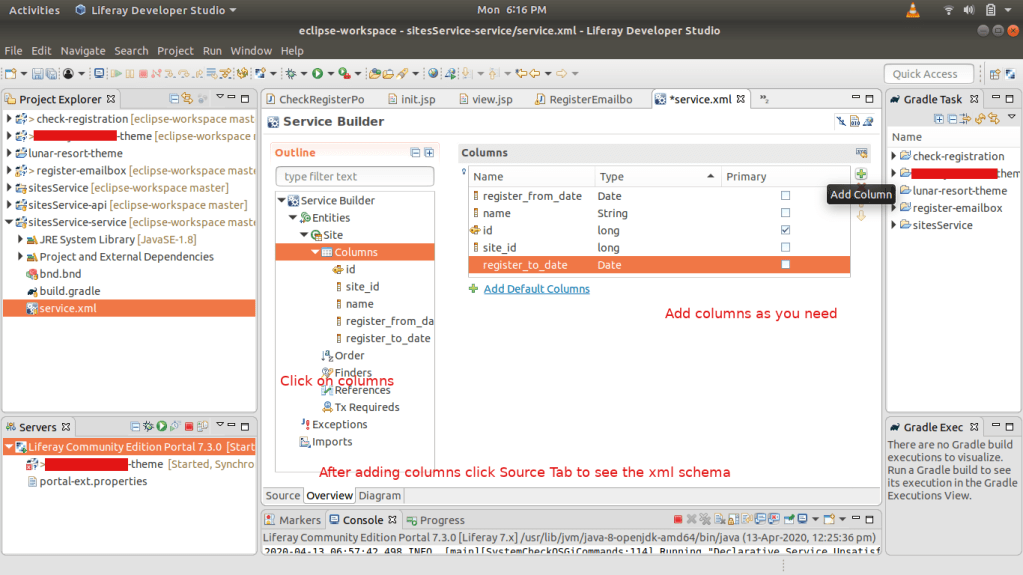
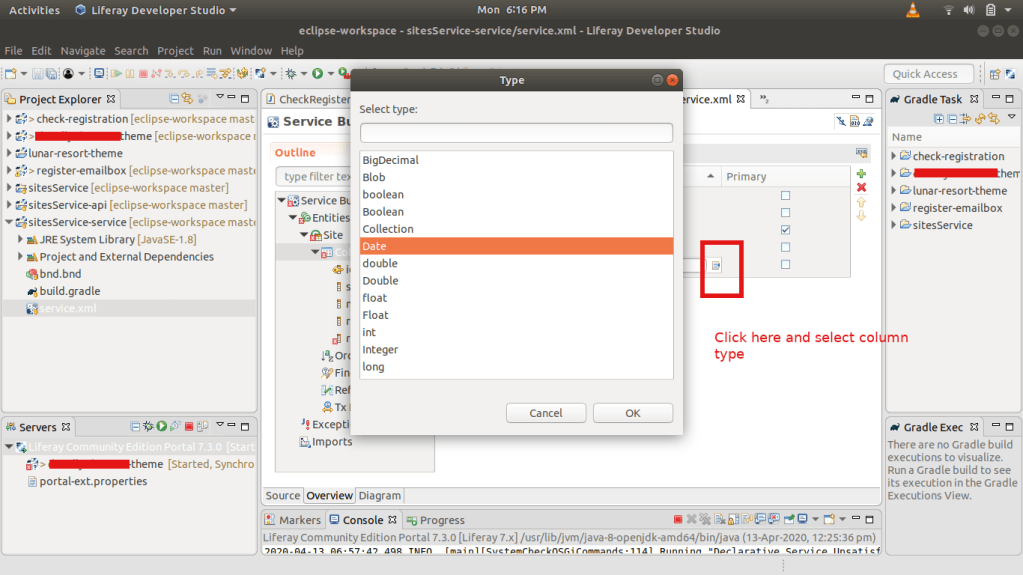
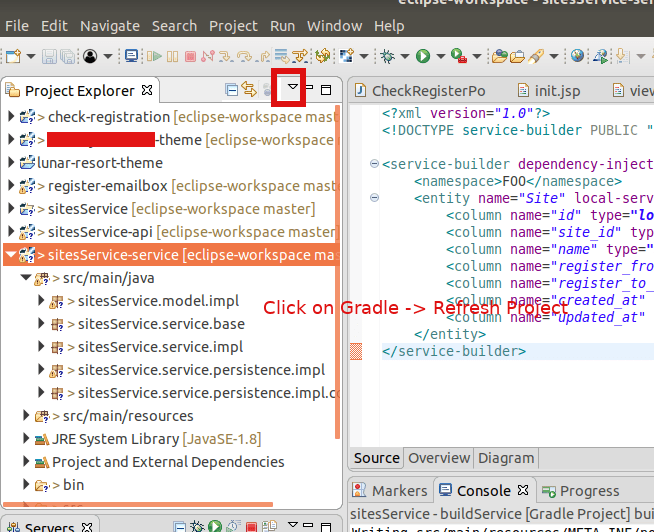
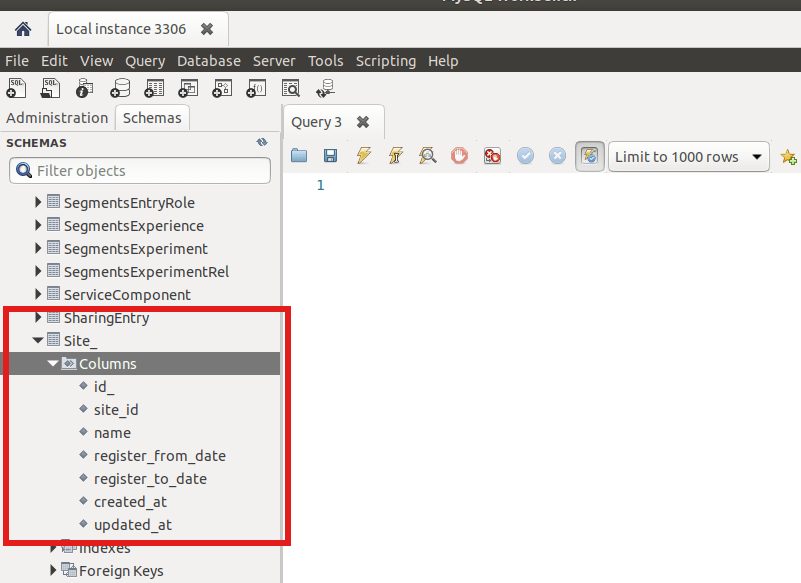
Now check the database, if the Site_ table with all columns are created or not
You can see the table and columns are created. In the next topic we discuss about adding services to this service builder.
A portlet is fragment on a webpage as web application and is used with portlets on the same webpage.
When you access a web site, you interact with an application. That application may be simple: it may only show you information, such as an article. The application may be complex, including forms, sending data etc. These applications run on a platform that provides application developers the building blocks they need to make applications.
If there are so many implementations of MVC frameworks in Java, why did Liferay create yet another one?
Liferay MVC provides these benefits:
It’s lightweight, as opposed to many other Java MVC frameworks. There are no special configuration files that need to be kept in sync with your code. It’s a simple extension of GenericPortlet. You avoid writing a bunch of boilerplate code, since Liferay’s MVC framework simply looks for some pre-defined parameters when the init() method is called. The controller can be broken down into MVC command classes, each of which handles the controller code for a particular portlet phase (render, action, and resource serving phases). Liferay’s portlets use it. That means there are plenty of robust implementations to reference when you need to design or troubleshoot your Liferay applications.
Each portlet phase executes different operations:
Init:
The init() method is called by the portlet container during deployment and reads init parameters defined in portlet.xml file. The Portlet interface exposes the init method as: void init (PortletConfig config) throws PortletException The PortletConfig interface is to retrieve configuration from the portlet definition in the deployment descriptor. The portlet can only read the configuration data. The configuration information contains the portlet name, the portlet initialization parameters, the portlet resource bundle and the portlet application context.
Render:
Generates the portlet’s contents based on the portlet’s current state. When this phase runs on one portlet, it also runs on all other portlets on the page. The Render phase runs when any portlets on the page complete the Action or Event phases.
In this phase portlet generates content and renders on webpage.
The render phase is called in below cases: 1. The page that contains portlet is rendered on web page 2. After completing Action Phase 3. After completing Event Processing phase
In response to a user action, performs some operation that changes the portlet’s state. The Action phase can also trigger events that are processed by the Event phase. Following the Action phase and optional Event phase, the Render phase then regenerates the portlet’s contents.
its result of user actions such as add,edit, delete
only one portlet can be entered into action phase for a request in a portlet container
Any events triggered during the Action phase are handled during the Event phaseof the portlet lifecycle. Events can be used when portlets want to communicatewith each other. The Render phase will be called when all events have been handled.
Event:
Processes events triggered in the Action phase. Events are used for IPC. Once the portlet processes all events, the portal calls the Render phase on all portlets on the page. Resource-serving: Serves a resource independent from the rest of the lifecycle. This lets a portlet serve dynamic content without running the Render phase on all portlets on a page. The Resource-serving phase handles AJAX requests.
Reference:
You can see more details and clarify your doubts by checking the following docs:
Step 4: Deploy again so that you can see the jar file is created as below:
The jar file created
Copy the jar file into this tomcat server folder, so that it can pick the package
Step 5: You can see the package status in the Gogo shell Liferay provides, goto the http://localhost:8080 and check inside the Configuration section Gogo Shell. Type command: lb
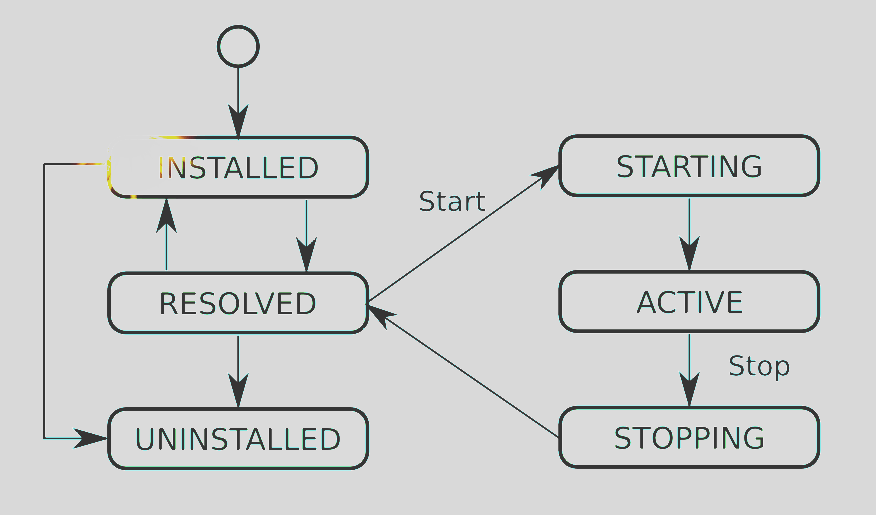
See the status – Installed. It should be ACTIVE after we deploy it.
Here are the list of osgi lifecycle status:
Step 6: Handle the Errors if any
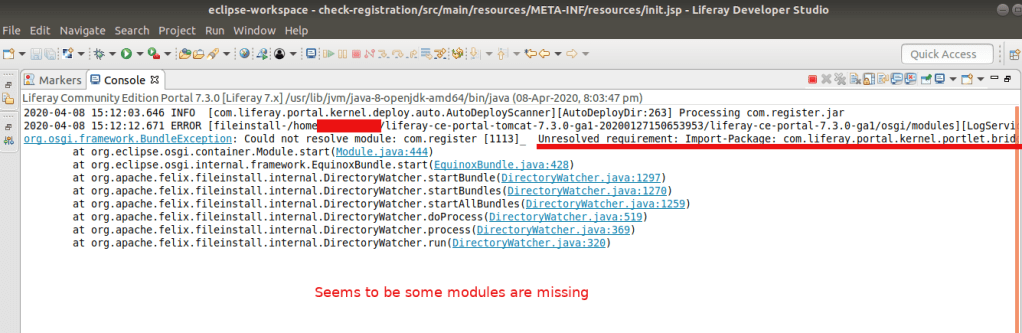
I am getting some issues with this creation, lets see what is the problem.
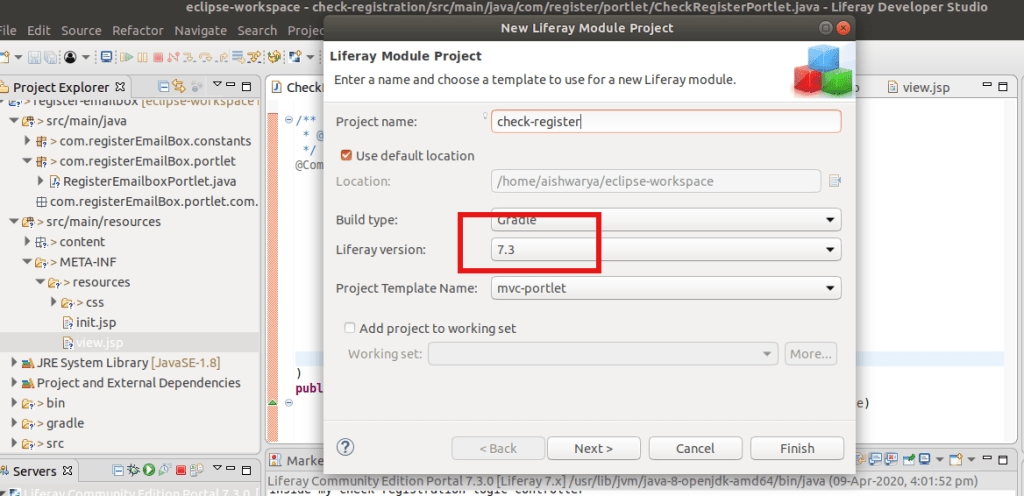
I don’t have any idea why I am getting this. After some research I tried to add the module that is missing here, but no luck. Then I realised we are on Liferay 7.3 and See the pic of the IDE there we selected 7.2 version because thats the latest version available there. Hmm…So…yeahh that may be the issue here. You got that!
So Update your IDE and create the package again.
Now it Works!
And check our newly created portlet in the right side section (inside Widget) of Liferay Site.
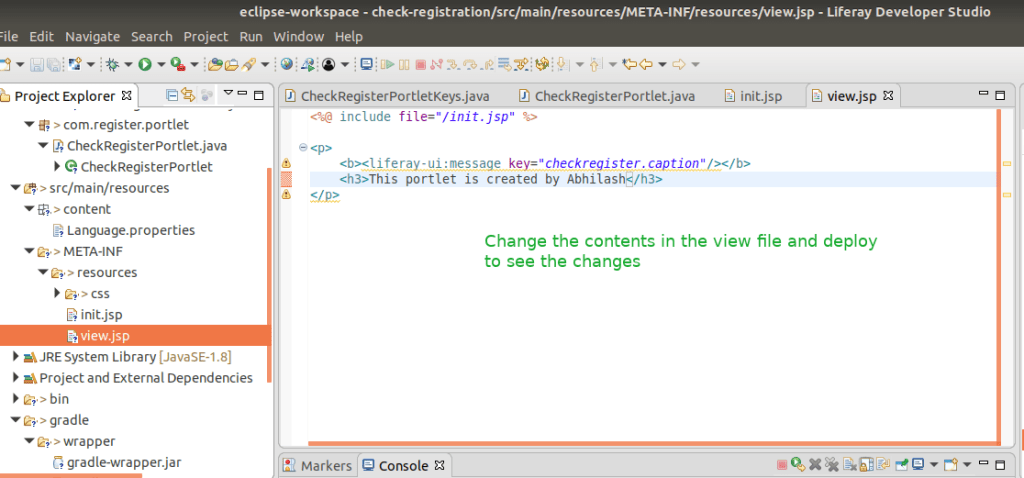
You can see this messge that we wrote inside the Class inside my check registration logic controller in your server console in IDE. And this message This portlet is created by Abhilash inside the Portlet.
Congrats .. You have created your first custom portlet in Liferay.
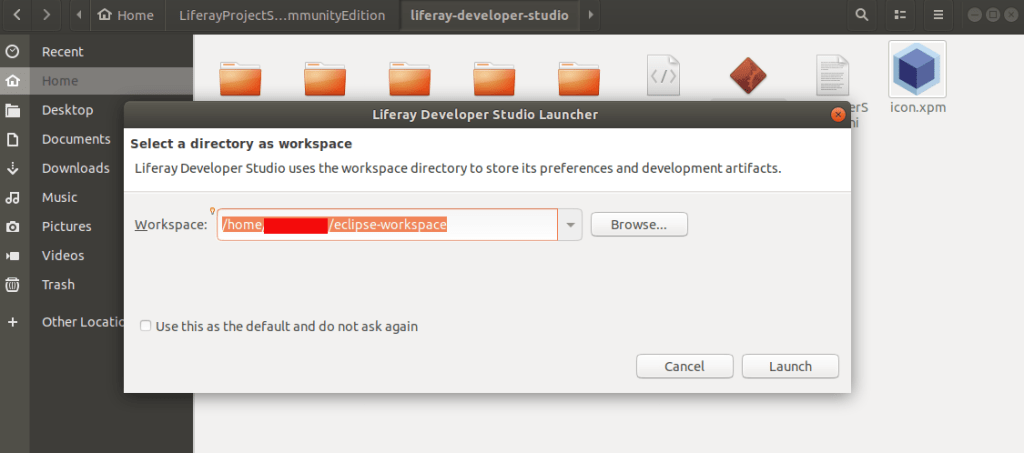
Goto your workspace folder (our developer studio workspace ~/eclipse-workspace):
$ cd ~/eclipse-workspace
$ nvm use 10.5
$ npm install -g generator-liferay-theme
$ npm install -g yo gulp
$ yo liferay-theme
Provide theme name, id, liferay version and font information
? What would you like to call your theme? Theme Moon
? What id would you like to give to your theme? theme-moon
? Which version of Liferay is this theme for? 7.3
? Would you like to add Font Awesome to your theme? No
.........
The project has been created successfully.

 Now we will invoke gulp init for you, to configure your deployment
strategy.

Remember, that you can change your answers whenever you want by
running gulp init again.

? Select your deployment strategy (Use arrow keys)
❯ Local App Server   // select this
  Docker Container
  Other

? Select your deployment strategy Local App Server
? Enter the path to your app server directory: /home/abhilash/liferay-ce-portal-tomcat-7.3.0-ga1-20200127150653953/liferay-ce-portal-7.3.0-ga1/tomcat-9.0.17
? Enter the url to your production or development site: http://localhost:8080
Run the command below from the theme’s root folder to build the files:
$ cd theme-moon
$ gulp build   # this creates the build folder
Now do the following changes to edit the created theme.
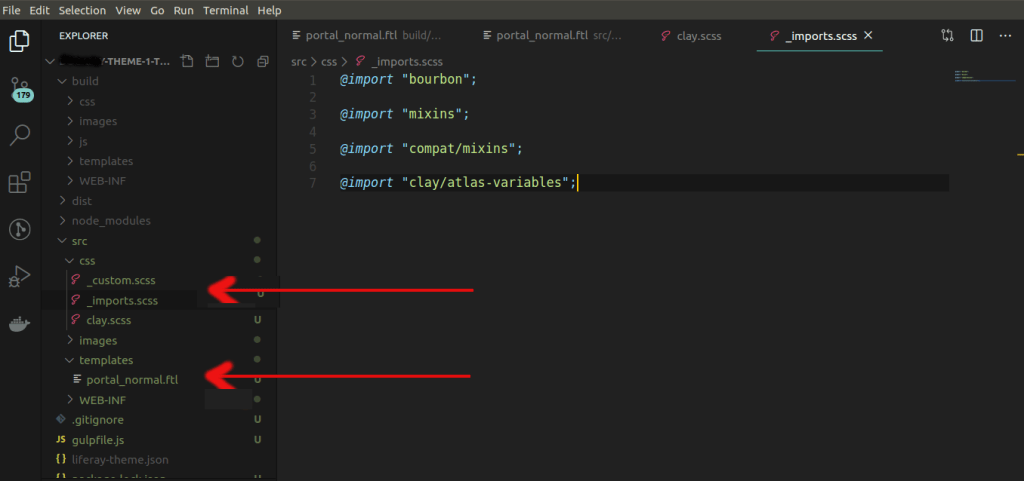
** Create a new /src/templates/ folder and copy portal_normal.ftl from the build/templates/ folder into it.
Configure the theme to extend the Atlas theme. Add aclay.scss file to the theme’s /src/css/ folder and add the import shown below:
@import "clay/atlas";
Create an _imports.scss file in the /src/css/ folder and add the imports shown below to it. This includes the default imports and replaces the clay/base-variables with the Atlas base variables:
You’ve generated the theme, prepared it for development, and configured it to extend the Atlas theme
Customizing the Header and Logo of your theme
Open portal_normal.ftl and replace the <header>...</header> element and contents with the updated code snippet below. This updates the structure slightly, making the banner expand the full width of the Header, and adds a new header_css_class variable to the class attribute. This variable is defined in a later step.
The logo’s height is retrieved with the ${site_logo_height} variable. The height of the logo is a bit too large for the this theme, so you must adjust it. Remove the width attribute from the logo’s image so it defaults to auto:
This applies Bootstrap and Clay utility classes to provide the overall look and feel of the Header. Assigning the classes to a variable keeps portal_normal clean and makes the code easy to maintain. If you want to update the classes, you just have to modify the variable (e.g. header_css_class = header_css_class + " my-new-class").
Add the code snippet below to update the logo_css_class variable to use Bootstrap’s navbar-brand class:
NEW THUMBNAIL FOR THE THEME
Before you upload the theme to see what it looks like so far, you must create a theme thumbnail so you can identify it. Create a thumbnail.png and replace the default from the /src/images/ folder. Note that its dimensions are 480px by 270px. These dimensions are required to display the theme thumbnail properly.
DEVELOPER MODE (If not enabled you may face CSS / JS loading issues )
The theme isn’t complete yet, but you’ll deploy what you have so you can replace the default logo with the your logo. Enable Developer Mode before deploying your theme, so the theme’s files are not cached for future deployments.
Once I faced CSS loading issue in my AWS Liferay site for one theme. After a lot of research I found that, the server doesn’t haveportal-ext.propertiesfile and not enabled the so calledDeveloper Mode
Custom CSS Loading in Liferay
My custom _import.scss almost look like this:
/* These inject tags are used for dynamically creating imports for themelet styles, you can place them where ever you like in this file. */
/* inject:imports */
/* endinject */
/* This file allows you to override default styles in one central location for easier upgrade and maintenance. */
@import "bourbon";

@import "mixins";

@import "compat/mixins";

@import "clay/atlas-variables";
@import "./style.scss";
@import "./innerstyle.scss";
@import "./mixedslider.scss";
------
Liferay loads this css file in HTML like as follows:
This is because of I was not enabled the ‘Developer Mode’ in portal.ext file.
After enabling it as below, my _import.scss styles shows up in Liferay’s main.css file.
Create a portal-ext.properties file in your server’s root folder if it doesn’t exist.
Add the line below to it:
include-and-override=portal-developer.properties
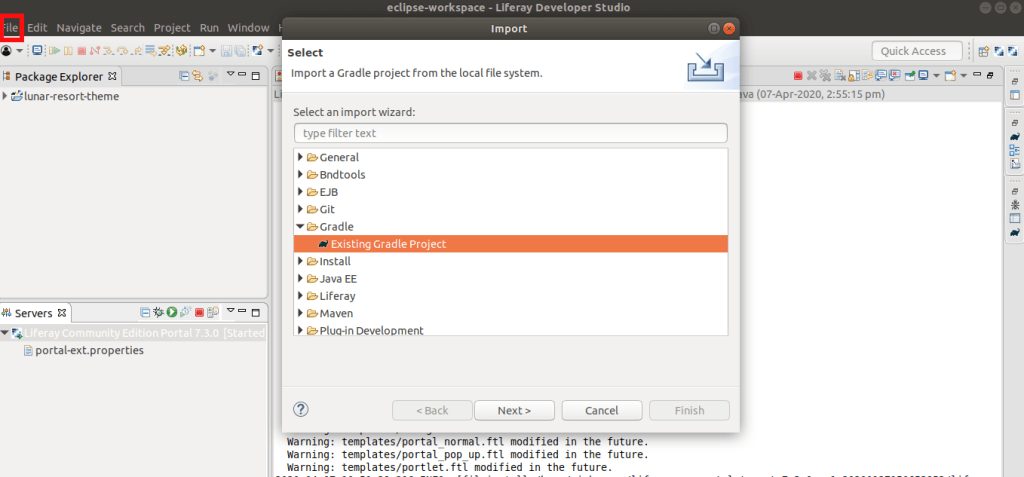
Start the server, if it’s not already started, and deploy the theme with the command below:
$ gulp deploy
.....
[20:34:49] Finished 'plugin:deploy' after 32 ms
[20:34:49] Finished 'deploy:war' after 32 ms
[20:34:49] Finished 'deploy' after 4.78 s
CHANGE LOGO
Open the Control Menu and navigate to Site Builder → Pages. Click the Gear icon next to Public Pages to open the configuration menu. Under the Look and Feel tab, scroll down and click the Change Current Theme button and select the Lunar Resort Theme. Scroll to the Logo heading, click the Change button, upload the new-logo.png logo, and click the Save button to apply the theme and logo.
Go inside the downloaded liferay portal folder. And start the tomcat server
cd ~/liferay-ce-portal-tomcat-7.3.0-ga1-20200127150653953/liferay-ce-portal-7.3.0-ga1/tomcat-9.0.17/bin
sh startup.sh
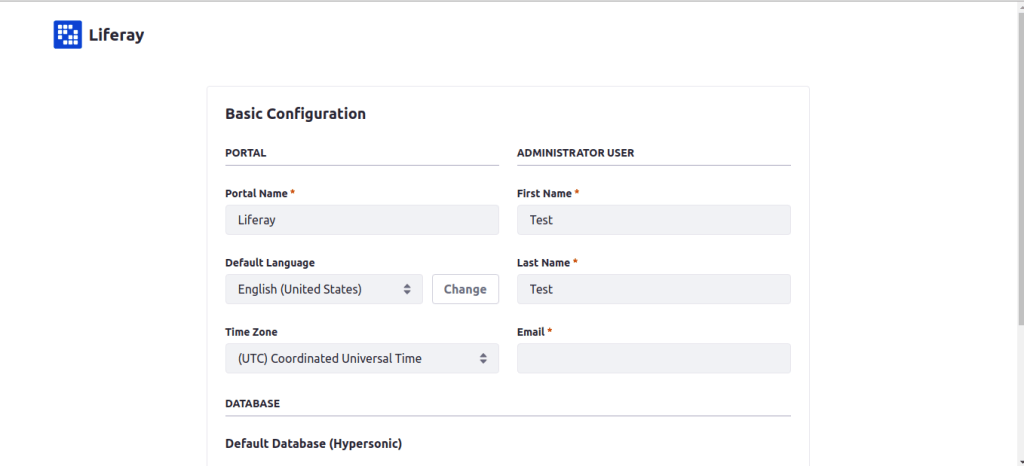
Goto http://localhost:8080/ and start setting up liferay configurations as follows:
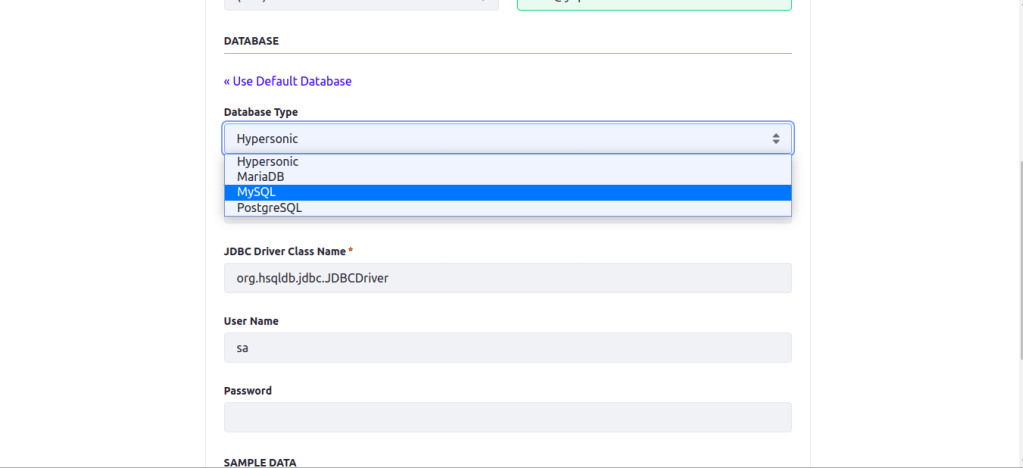
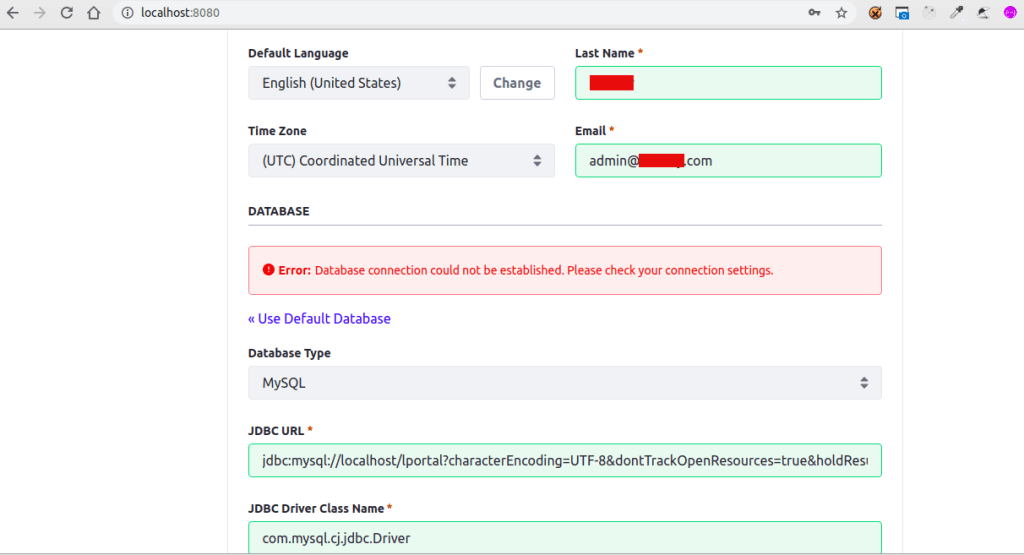
Do the basic configuration and change database to mysql
Mysql database is recommended fot staging and production environment.
JDBC URL: jdbc:mysql://localhost/lportal?characterEncoding=UTF-8&dontTrackOpenResources=true&holdResultsOpenOverStatementClose=true&serverTimezone =GMT&useFastDateParsing=false&useUnicode=true JDBC Driver Class Name: com.mysql.cj.jdbc.Driver
If you get the error like this, some of your provided mysql configuration went wrong. Check your mysql username and password.
If the given mysql configuration is correct, then you have to check the Liferay DB exists in your Mysql database. Else create the DB `lportal` as follows:
Create database ‘lportal’
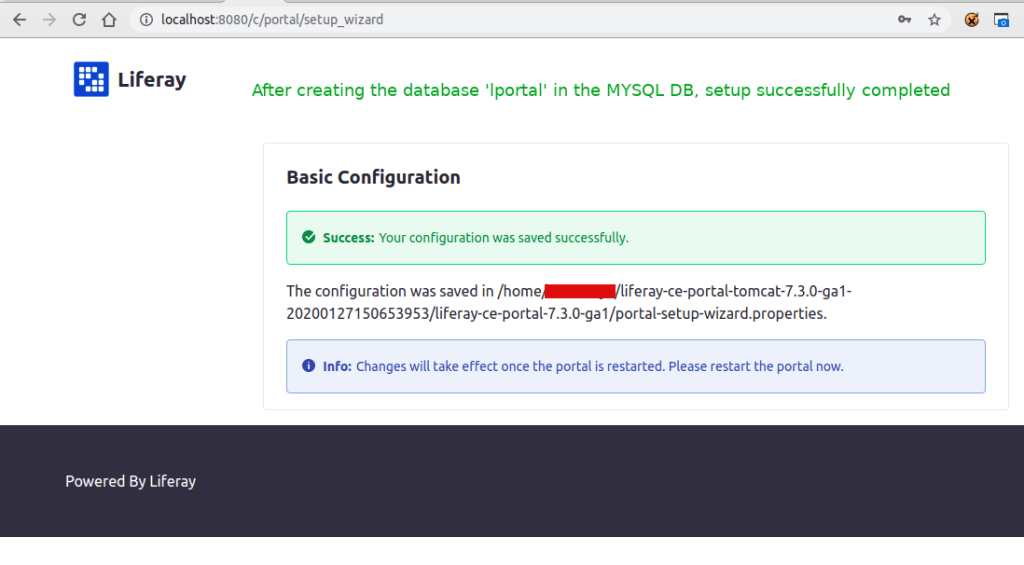
Now click on the Configure button, you will be ready to go
Open ‘~/liferay-ce-portal-tomcat-7.3.0-ga1-20200127150653953/liferay-ce-portal-7.3.0-ga1/portal-setup-wizard.properties’ file and you can see the above configurations added by liferay.
You can see the above server log in Dev studio. Here mentioned about which property files loads during the start and picking MYSQL DB, creating tables for first time in `lportal` database, inserting data to the table
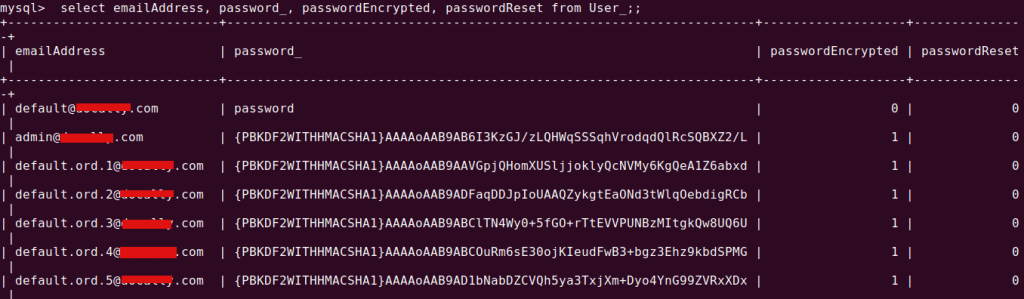
You can see the following tables populated in the database lportal
Here is the list of Users created. We are selected `Add Sample data` option at the time configuration. That is why we can see lot of users with my domain is listed
Login with
Email: provide the email given at the time of register
Password: test (default password for version 7.3)
If you are using Liferay7.2 version, then this default password may not work. In this versionliferay generates a random password, that you can check in the log file as below:
cd ~/Downloads/liferay-ce-portal-tomcat-7.2.1-ga2-20191111141448326/liferay-ce-portal-7.2.1-ga2/tomcat-9.0.17/logs/ && tail -f catalina.out
Search word password. You can get it.
After login you can see this terms of use page
Then a Password remainder page
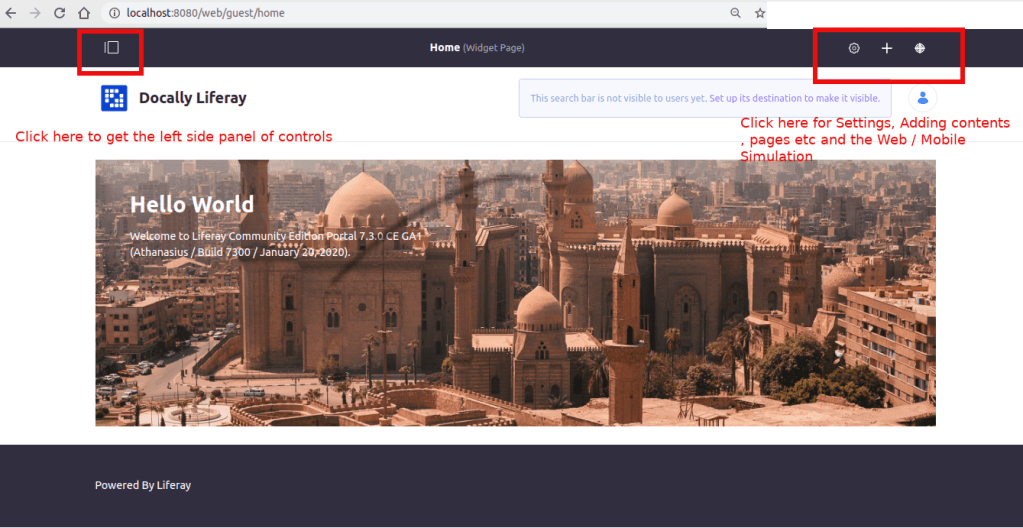
DONE! Congrats, you can see the admin home page with all controls
changing to new db from old db
Add the new db name ‘liferay721’ to portal-setup-wizard.properties
Starting Liferay Community Edition Portal 7.2.1 CE GA2 (Mueller / Build 7201 / November 12, 2019)

2020-05-08 14:45:53.921 INFO  [main][StartupHelper:75] There are no patches installed
2020-05-08 14:45:54.000 WARN  [main][ReleaseLocalServiceImpl:238] Table 'liferay721.Release_' doesn't exist
2020-05-08 14:45:54.003 INFO  [main][ReleaseLocalServiceImpl:129] Create tables and populate with default data
...................
...................
Issues you may face during the setup
Once I created a DB names liferay_7_3_1 and the setup wizard finishes successfully and message shown to restart the server for get into the portal.
When I restart it I received the following issue:
An unexpected system error occurred.

java.lang.NullPointerException
Database is not setup properly. Check the DB name. Use characters as DB name if possible and start the server. If proper DB setup is done, then you can see 250 – 280 tables in database
and the following tables were created in the database named liferay_7_3_1
Then I renamed the DB to liferay731. Then it works! So beware of underscore characters in your DB name.
Another error is shown when the server is not able to connect to your database, or database is not created that is specified as in your portal.ext.properties or portal-setup-wizard.properties
Create a database specified in properties file to get rid of the issue. Else check given DB permissions are correct
This is how Liferay Studio Workspace home page look like
You can create liferay plugins / projects etc from here.
Step 3. Click on right corner first button and open perspective.
select Liferay plugins
Open Perspective
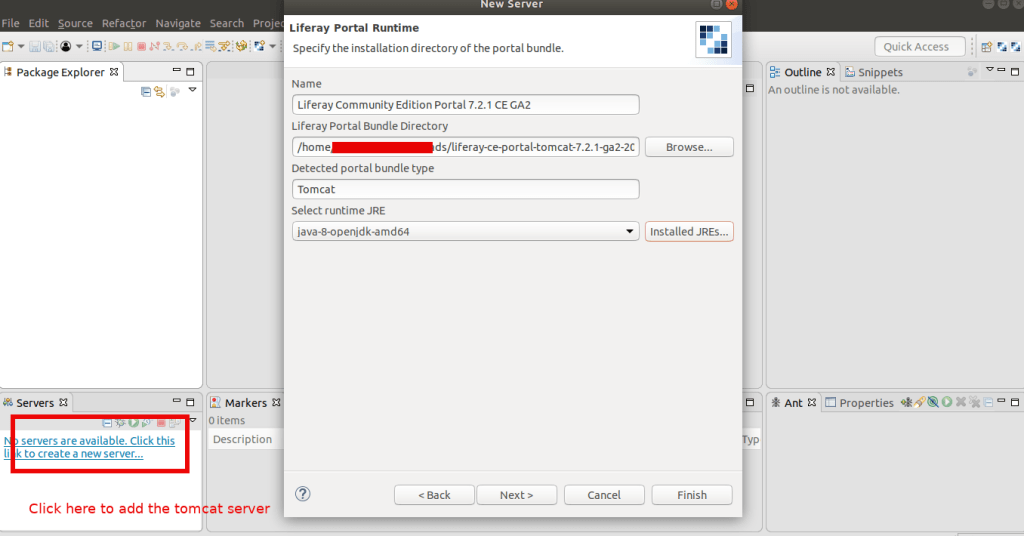
Step 4. Left bottom corner there is ‘Servers’ Tab
right click on it and select ‘New’ -> ‘Server’
Select ‘Liferay inc’ -> Liferay 7.x and click next
Add the tomcat server to your SDK to control the server from SDK. This helps you to see the server logs and other live status in IDE
Select the tomcat server path from your downloaded liferay portal
Make sure you are using the timestamp folder in the path of the server, else it not gonna work. It will show you an error like this:
If you start the tomcat server and try to access it without the timestamp PATH
You can add an existing resources created if available like theme etc to the server. If you don’t have any resources don’t worry. We are going to cover this in next chapter.
Click on the server name on the bottom left corner and you can see the configurations of the server.
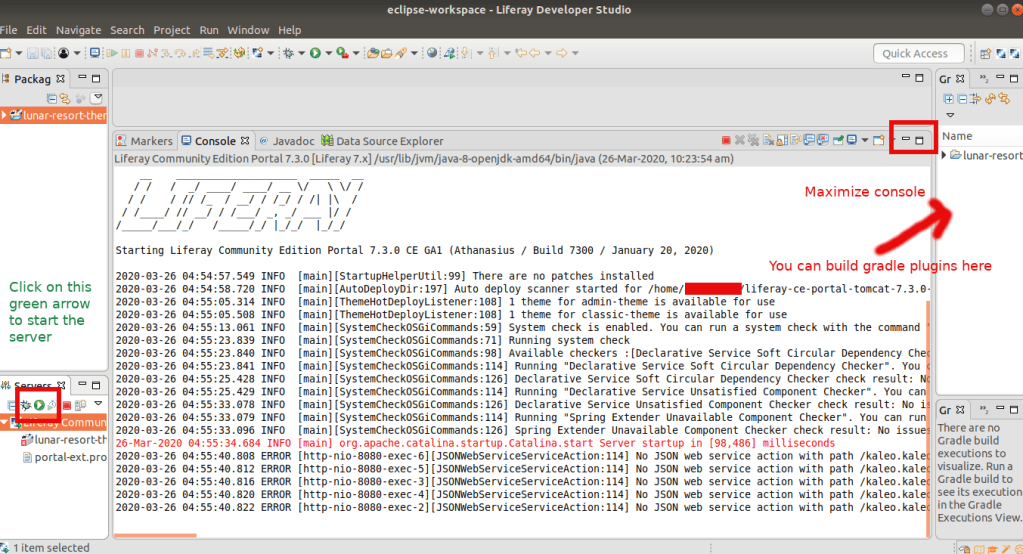
Server Started. You can see the server logs in the console
With liferay we can create any number of custom sites. We can easily create sections like web content, blog content etc and share between those sites. We can drag and drop sections to create website parts. So it is easy to use for admin users to add sections and drag to create pages.
“Liferay Portal is an open source enterprise web platform for building business solutions that deliver immediate results and long-term value. Liferay Portal started out as a personal development project in 2000 and was open sourced in 2001.”
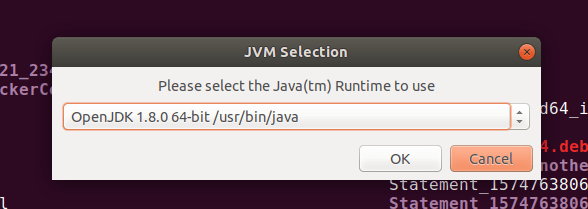
After that Download and install Java (JDK) 8 (if necessary) in your local environment.
OpenJDK 8
Java 8 is the current Long Term Support version and is still widely supported, though public maintenance ends in January 2019. To install OpenJDK 8, execute the following command:
sudo apt install openjdk-8-jdk
➜ java -version
openjdk version "1.8.0_232"
OpenJDK Runtime Environment (build 1.8.0_232-8u232-b09-0ubuntu1~18.04.1-b09)
OpenJDK 64-Bit Server VM (build 25.232-b09, mixed mode)
Extract the liferay portal .zip file. Copy the folder liferay-ce-portal-7.3.0-ga1 to your home path. And go inside the folder path as shown below:
cd ~/liferay-ce-portal-7.3.0-ga1/tomcat-9.0.17/bin
and do:
Start Tomcat server:
sh startup.sh

Using CATALINA_BASE:   /home/abhi/liferay-ce-portal-7.3.0-ga1/tomcat-9.0.17
Using CATALINA_HOME:   /home/abhi/liferay-ce-portal-7.3.0-ga1/tomcat-9.0.17
Using CATALINA_TMPDIR: /home/abhi/liferay-ce-portal-7.3.0-ga1/tomcat-9.0.17/temp
Using JRE_HOME:        /usr/lib/jvm/java-8-openjdk-amd64
Using CLASSPATH:       /home/abhi/liferay-ce-portal-7.3.0-ga1/tomcat-9.0.17/bin/bootstrap.jar:/home/abhi/liferay-ce-portal-7.3.0-ga1/tomcat-9.0.17/bin/tomcat-juli.jar
Tomcat started.
Restart command for Tomcat server:
sh shutdown.sh && sh startup.sh
Goto http://localhost:8080/
Go with default hypersonic DB if you are in testing environment.
Restart the Tomcat server
sh shutdown.sh && sh startup.sh
and goto http://localhost:8080
If the server is not started properly, you can check the logs here:
cd ~/liferay-ce-portal-7.3.0-ga1/tomcat-9.0.17/logs/ && tail -f catalina.out
I faced the following issue in new 7.3 version with mysql db which I didn’t face with 7.2 version with Hypersonic DB. My mysql db schema is not proper to version 7.3.
  __    ____________________  _____  __
   / /   /  _/ ____/ ____/ __ \/   \ \/ /
  / /    / // /_  / __/ / /_/ / /| |\  /
 / /____/ // __/ / /___/ _, _/ ___ |/ /
/_____/___/_/   /_____/_/ |_/_/  |_/_/

Starting Liferay Community Edition Portal 7.3.0 CE GA1 (Athanasius / Build 7300 / January 20, 2020)

2020-03-23 12:22:13.798 INFO  [main][StartupHelperUtil:99] There are no patches installed
You must first upgrade the portal to the required schema version 8.1.0
2020-03-23 12:22:13.860 ERROR [main][MainServlet:300] java.lang.RuntimeException: You must first upgrade the portal to the required schema version 8.1.0
java.lang.RuntimeException: You must first upgrade the portal to the required schema version 8.1.0
	at com.liferay.portal.events.StartupHelperUtil.verifyRequiredSchemaVersion(StartupHelperUtil.java:220)
	at com.liferay.portal.events.StartupAction.doRun(StartupAction.java:136)
	at com.liferay.portal.events.StartupAction.run(StartupAction.java:77)
	at com.liferay.portal.internal.servlet.MainServlet.init(MainServlet.java:297)
You’re presented a Basic Configuration page. Complete the configuration options. Liferay Portal uses an embedded database (HSQL) to make installation fast and easy. This database is not ready for production, so consider configuring a production-ready database (e.g., MySQL) if you plan on doing more than just exploring/testing. Agree to the terms and conditions, create a password, and configure a security question/answer.
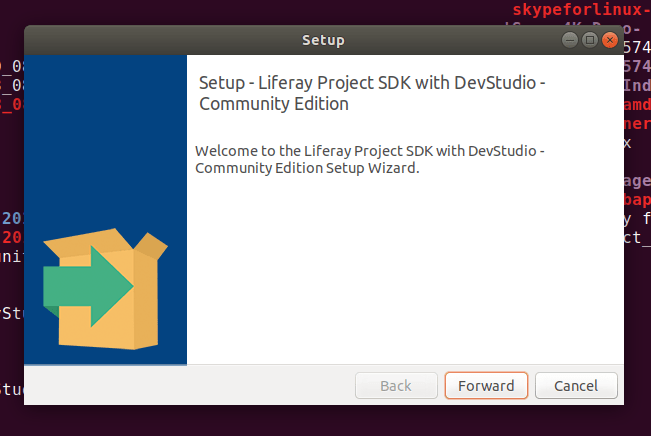
“Liferay Plugin SDK is a development environment allows you to develop plugins for Liferay of all types such as Portlet, Themes, Layout Templates. The Liferay Plugin SDK is based on the Apache Ant tool and it can be integrated with all the common IDEs or used directly from the command line by executing a set of predefined commands (targets, in Ant’s nomenclature). In this tutorial I show how to configure the Plugin SDK in the Eclipse IDE”
This is the paid version from Liferay. With Liferay DXP you can implement not just static site, but something like today’s frontend fromeworks do (updating the DOM according to framework and spontaneous data change). Also you get the liferay support according to your plan.
If you are facing issue to load rubocop plugin to your VS code try the following steps to fix it.
The error message will be something like:
rubocop on VScode not working.Error “rubocop is not executable”
First you have to ensure that you have installed ruby in your machine. if you are using docker containers for your project, ruby is installed inside the containers and VS Code cannot find it.
Next install rubocop gem in your machine
$ gem install rubocop
3. Next take
VS Code -> Settings -> search for 'rubocop' in Ruby > Rubocop: Execute Path
keep a specified number of backups in storage. After each backup is performed, it will remove older backup package files based on the keep setting.
keep as a Number
If a number has been specified and once the keep limit has been reached, the oldest backup will be removed.
Note that if keep is set to 5, then the 6th backup will be transferred and stored, before the oldest is removed. So be sure you have space available for keep + 1 backups
keep as Time
When a Time object is set to keep it will keep backups until that time. Everything older than the set time will be removed.
 $ sudo apt update && sudo apt install openjdk-9-jre-headless
 $ java -version
 openjdk version "9-internal"
 OpenJDK Runtime Environment (build 9-internal+0-2016-04-14-195246.buildd.src)
 OpenJDK 64-Bit Server VM (build 9-internal+0-2016-04-14-195246.buildd.src, mixed mode)
Install Oracle Java:
 $ sudo add-apt-repository ppa:webupd8team/java
 $ sudo apt-get update
 $ sudo apt-get install oracle-java8-installer
 $ java -version
 java version "1.8.0_171"
 Java(TM) SE Runtime Environment (build 1.8.0_171-b11)
 Java HotSpot(TM) 64-Bit Server VM (build 25.171-b11, mixed mode)
After installing Java on Linux system, You must have to set JAVA_HOME and JRE_HOME environment variables. Which is used by many Java applications to find Java libraries during runtime. You can set these variables in /etc/environment file using the following command.
The default data directory for MongoDB is /data/db
This can be overridden by a dbpath option specified on the command line or in a configuration file.
If you install MongoDB via a package manager such as Homebrew or MacPorts these installs typically create a default data directory other than /data/db and set the dbpath in a configuration file.
 $ mongo
 > use admin
 > db.auth("abhilash", “password!“ )
 > mongo
 MongoDB shell version v3.4.7
 connecting to: mongodb://127.0.0.1:27017
 MongoDB server version: 3.4.7
 Server has startup warnings:
 2018-01-22T10:32:18.027+0530 I CONTROL  [initandlisten]
 2018-01-22T10:32:18.027+0530 I CONTROL  [initandlisten] ** WARNING: Access control is not enabled for the database.
 2018-01-22T10:32:18.027+0530 I CONTROL  [initandlisten] **          Read and write access to data and configuration is unrestricted.
 2018-01-22T10:32:18.027+0530 I CONTROL  [initandlisten]
 > use admin
 switched to db admin
 > db
 admin
 > db.auth("abhilash", "password!”);
 1
 > use my_dbname;
 > db.createUser(
   {
     user: "vadmin",
     pwd: “pass111!”,
     roles: [ { role: "readWrite", db: "my_dbname" },
              { role: "read", db: "test" } ]
   }
 )