Now we’ll go full-on query performance pro mode using EXPLAIN ANALYZE and real plans. We’ll learn how PostgreSQL makes decisions, how to catch slow queries, and how your indexes make them 10x faster.
💎 Part 1: What is EXPLAIN ANALYZE?
EXPLAIN shows how PostgreSQL plans to execute your query.
ANALYZE runs the query and adds actual time, rows, loops, etc.
Syntax:
EXPLAIN ANALYZE
SELECT * FROM users WHERE username = 'bob';
✏️ Example 1: Without Index
SELECT * FROM users WHERE username = 'bob';
If username has no index, plan shows:
Seq Scan on users
  Filter: (username = 'bob')
  Rows Removed by Filter: 9999
❌ PostgreSQL scans all rows = Sequential Scan = slow!
➕ Add Index:
CREATE INDEX idx_users_username ON users (username);
Now rerun:
EXPLAIN ANALYZE SELECT * FROM users WHERE username = 'bob';
You’ll see:
Index Scan using idx_users_username on users
  Index Cond: (username = 'bob')
✅ PostgreSQL uses B-tree index 🚀 Massive speed-up!
🔥 Want even faster?
SELECT username FROM users WHERE username = 'bob';
If PostgreSQL shows:
Index Only Scan using idx_users_username on users
  Index Cond: (username = 'bob')
🎉 Index Only Scan! = covering index success! No heap fetch = lightning-fast.
⚠️ Note: Index-only scan only works if:
Index covers all selected columns
Table is vacuumed (PostgreSQL uses visibility map)
If you still get Seq scan output like:
test_db=# EXPLAIN ANALYSE SELECT * FROM users where username = 'aman_chetri';
                                           QUERY PLAN
-------------------------------------------------------------------------------------------------
 Seq Scan on users  (cost=0.00..1.11 rows=1 width=838) (actual time=0.031..0.034 rows=1 loops=1)
   Filter: ((username)::text = 'aman_chetri'::text)
   Rows Removed by Filter: 2
 Planning Time: 0.242 ms
 Execution Time: 0.077 ms
(5 rows)
even after adding an index, because PostgreSQL is saying:
🤔 “The table is so small (cost = 1.11), scanning the whole thing is cheaper than using the index.”
Also: Your query uses only SELECT username, which could be eligible for Index Only Scan, but heap fetch might still be needed due to visibility map.
🔧 Step-by-step Fix:
✅ 1. Add Data for Bigger Table
If the table is small (few rows), PostgreSQL will prefer Seq Scan no matter what.
Try adding ~10,000 rows:
INSERT INTO users (username, email, phone_number)
SELECT 'user_' || i, 'user_' || i || '@mail.com', '1234567890'
FROM generate_series(1, 10000) i;
Then VACUUM ANALYZE users; again and retry EXPLAIN.
✅ 2. Confirm Index Exists
First, check your index exists and is recognized:
\d users
You should see something like:
Indexes:
    "idx_users_username" btree (username)
If not, add:
CREATE INDEX idx_users_username ON users(username);
✅ 3. Run ANALYZE (Update Stats)
ANALYZE users;
This updates statistics — PostgreSQL might not be using the index if it thinks only one row matches or the table is tiny.
✅ 4. Vacuum for Index-Only Scan
Index-only scans require the visibility map to be set.
Run:
VACUUM ANALYZE users;
This marks pages in the table as “all-visible,” enabling PostgreSQL to avoid reading the heap.
✅ 5. Force PostgreSQL to Consider Index
You can turn off sequential scan temporarily (for testing):
SET enable_seqscan = OFF;

EXPLAIN SELECT username FROM users WHERE username = 'bob';
You should now see:
Index Scan using idx_users_username on users ...
⚠️ Use this only for testing/debugging — not in production.
💡 Extra Tip (optional): Use EXPLAIN (ANALYZE, BUFFERS)
EXPLAIN (ANALYZE, BUFFERS)
SELECT username FROM users WHERE username = 'bob';
This will show:
Whether heap was accessed
Buffer hits
Actual rows
📋 Summary
Step
Command
Check Index
\d users
Analyze table
ANALYZE users;
Vacuum for visibility
VACUUM ANALYZE users;
Disable seq scan for test
SET enable_seqscan = OFF;
Add more rows (optional)
INSERT INTO ...
🚨 How to catch bad index usage?
Always look for:
“Seq Scan” instead of “Index Scan” ➔ missing index
“Heap Fetch” ➔ not a covering index
“Rows Removed by Filter” ➔ inefficient filtering
“Loops: 1000+” ➔ possible N+1 issue
Common Pattern Optimizations
Pattern
Fix
WHERE column = ?
B-tree index on column
WHERE column LIKE 'prefix%'
B-tree works (with text_ops)
SELECT col1 WHERE col2 = ?
Covering index: (col2, col1) or (col2) INCLUDE (col1)
WHERE col BETWEEN ?
Composite index with range second: (status, created_at)
WHERE col IN (?, ?, ?)
Index still helps
ORDER BY col LIMIT 10
Index on col helps sort fast
⚡ Tip: Use pg_stat_statements to Find Slow Queries
Enable it in postgresql.conf:
shared_preload_libraries = 'pg_stat_statements'
Then run:
SELECT query, total_exec_time, calls
FROM pg_stat_statements
ORDER BY total_exec_time DESC
LIMIT 5;
🎯 Find your worst queries & optimize them with new indexes!
🧪 Try It Yourself
Want a little lab setup to practice?
CREATE TABLE users (
  user_id serial PRIMARY KEY,
  username VARCHAR(220),
  email VARCHAR(150),
  phone_number VARCHAR(20)
);

-- Insert 100K fake rows
INSERT INTO users (username, email, phone_number)
SELECT
  'user_' || i,
  'user_' || i || '@example.com',
  '999-000-' || i
FROM generate_series(1, 100000) i;
Then test:
EXPLAIN ANALYZE SELECT * FROM users WHERE username = 'user_5000';
Add INDEX ON username
Re-run, compare speed!
🎯 Extra Pro Tools for Query Performance
EXPLAIN ANALYZE → Always first tool
pg_stat_statements → Find slow queries in real apps
auto_explain → Log slow plans automatically
pgBadger or pgHero → Visual query monitoring
💥 Now We Know:
✅ How to read query plans ✅ When you’re doing full scans vs index scans ✅ How to achieve index-only scans ✅ How to catch bad performance early ✅ How to test and fix in real world
MySQL InnoDB: Directly find the row inside the PK B-tree (no extra lookup).
✅ MySQL is a little faster here because it needs only 1 step!
2. SELECT username FROM users WHERE user_id = 102; (Only 1 Column)
PostgreSQL: Might do an Index Only Scan if all needed data is in the index (very fast).
MySQL: Clustered index contains all columns already, no special optimization needed.
✅ Both can be very fast, but PostgreSQL shines if the index is “covering” (i.e., contains all needed columns). Because index table has less size than clustered index of mysql.
3. SELECT * FROM users WHERE username = 'Bob'; (Secondary Index Search)
PostgreSQL: Secondary index on username ➔ row pointer ➔ fetch table row.
MySQL: Secondary index on username ➔ get primary key ➔ clustered index lookup ➔ fetch data.
✅ Both are 2 steps, but MySQL needs 2 different B-trees: secondary ➔ primary clustered.
Consider the below situation:
SELECT username FROM users WHERE user_id = 102;
user_id is the Primary Key.
You only want username, not full row.
Now:
🔵 PostgreSQL Behavior
👉 In PostgreSQL, by default:
It uses the primary key btree to find the row pointer.
Then fetches the full row from the table (heap fetch).
👉 But PostgreSQL has an optimization called Index-Only Scan.
If all requested columns are already present in the index,
And if the table visibility map says the row is still valid (no deleted/updated row needing visibility check),
Then Postgres does not fetch the heap.
👉 So in this case:
If the primary key index also stores username internally (or if an extra index is created covering username), Postgres can satisfy the query just from the index.
✅ Result: No table lookup needed ➔ Very fast (almost as fast as InnoDB clustered lookup).
📢 Postgres primary key indexes usually don’t store extra columns, unless you specifically create an index that includes them (INCLUDE (username) syntax in modern Postgres 11+).
🟠 MySQL InnoDB Behavior
In InnoDB: Since the primary key B-tree already holds all columns (user_id, username, email), It directly finds the row from the clustered index.
So when you query by PK, even if you only need one column, it has everything inside the same page/block.
✅ One fast lookup.
🔥 Why sometimes Postgres can still be faster?
If PostgreSQL uses Index-Only Scan, and the page is already cached, and no extra visibility check is needed, Then Postgres may avoid touching the table at all and only scan the tiny index pages.
In this case, for very narrow queries (e.g., only 1 small field), Postgres can outperform even MySQL clustered fetch.
💡 Because fetching from a small index page (~8KB) is faster than reading bigger table pages.
🎯 Conclusion:
✅ MySQL clustered index is always fast for PK lookups. ✅ PostgreSQL can be even faster for small/narrow queries if Index-Only Scan is triggered.
👉 Quick Tip:
In PostgreSQL, you can force an index to include extra columns by using: CREATE INDEX idx_user_id_username ON users(user_id) INCLUDE (username); Then index-only scans become more common and predictable! 🚀
Isn’t PostgreSQL also doing 2 B-tree scans? One for secondary index and one for table (row_id)?
When you query with a secondary index, like:
SELECT * FROM users WHERE username = 'Bob';
In MySQL InnoDB, I said:
Find in secondary index (username ➔ user_id)
Then go to primary clustered index (user_id ➔ full row)
Let’s look at PostgreSQL first:
♦️ Step 1: Search Secondary Index B-tree on username.
It finds the matching TID (tuple ID) or row pointer.
TID is a pair (block_number, row_offset).
Not a B-tree! Just a physical pointer.
♦️ Step 2: Use the TID to directly jump into the heap (the table).
The heap (table) is not a B-tree — it’s just a collection of unordered pages (blocks of rows).
PostgreSQL goes directly to the block and offset — like jumping straight into a file.
🔔 Important:
Secondary index ➔ TID ➔ heap fetch.
No second B-tree traversal for the table!
🟠 Meanwhile in MySQL InnoDB:
♦️ Step 1: Search Secondary Index B-tree on username.
It finds the Primary Key value (user_id).
♦️ Step 2: Now, search the Primary Key Clustered B-tree to find the full row.
Need another B-tree traversal based on user_id.
🔔 Important:
Secondary index ➔ Primary Key B-tree ➔ data fetch.
Two full B-tree traversals!
Real-world Summary:
♦️ PostgreSQL
Secondary index gives a direct shortcut to the heap.
One B-tree scan (secondary) ➔ Direct heap fetch.
♦️ MySQL
Secondary index gives PK.
Then another B-tree scan (primary clustered) to find full row.
✅ PostgreSQL does not scan a second B-tree when fetching from the table — just a direct page lookup using TID.
✅ MySQL does scan a second B-tree (primary clustered index) when fetching full row after secondary lookup.
Is heap fetch a searching technique? Why is it faster than B-tree?
📚 Let’s start from the basics:
When PostgreSQL finds a match in a secondary index, what it gets is a TID.
♦️ A TID (Tuple ID) is a physical address made of:
Block Number (page number)
Offset Number (row slot inside the page)
Example:
TID = (block_number = 1583, offset = 7)
🔵 How PostgreSQL uses TID?
It directly calculates the location of the block (disk page) using block_number.
It reads that block (if not already in memory).
Inside that block, it finds the row at offset 7.
♦️ No search, no btree, no extra traversal — just:
Find the page (via simple number addressing)
Find the row slot
📈 Visual Example
Secondary index (username ➔ TID):
username
TID
Alice
(1583, 7)
Bob
(1592, 3)
Carol
(1601, 12)
♦️ When you search for “Bob”:
Find (1592, 3) from secondary index B-tree.
Jump directly to Block 1592, Offset 3.
Done ✅!
Answer:
Heap fetch is NOT a search.
It’s a direct address lookup (fixed number).
Heap = unordered collection of pages.
Pages = fixed-size blocks (usually 8 KB each).
TID gives an exact GPS location inside heap — no searching required.
That’s why heap fetch is faster than another B-tree search:
No binary search, no B-tree traversal needed.
Only a simple disk/memory read + row offset jump.
🌿 B-tree vs 📁 Heap Fetch
Action
B-tree
Heap Fetch
What it does
Binary search inside sorted tree nodes
Direct jump to block and slot
Steps needed
Traverse nodes (root ➔ internal ➔ leaf)
Directly read page and slot
Time complexity
O(log n)
O(1)
Speed
Slower (needs comparisons)
Very fast (direct)
🎯 Final and short answer:
♦️ In PostgreSQL, after finding the TID in the secondary index, the heap fetch is a direct, constant-time (O(1)) access — no B-tree needed! ♦️ This is faster than scanning another B-tree like in MySQL InnoDB.
🧩 Our exact question:
When we say:
Jump directly to Block 1592, Offset 3.
We are thinking:
There are thousands of blocks.
How can we directly jump to block 1592?
Shouldn’t that be O(n) (linear time)?
Shouldn’t there be some traversal?
🔵 Here’s the real truth:
No traversal needed.
No O(n) work.
Accessing Block 1592 is O(1) — constant time.
📚 Why?
Because of how files, pages, and memory work inside a database.
When PostgreSQL stores a table (the “heap”), it saves it in a file on disk. The file is just a long array of fixed-size pages.
Each page = 8KB (default in Postgres).
Each block = 1 page = fixed 8KB chunk.
Block 0 is the first 8KB.
Block 1 is next 8KB.
Block 2 is next 8KB.
…
Block 1592 = (1592 × 8 KB) offset from the beginning.
✅ So block 1592 is simply located at 1592 × 8192 bytes offset from the start of the file.
✅ Operating systems (and PostgreSQL’s Buffer Manager) know exactly how to seek to that byte position without reading everything before it.
As I mentioned in the previous post, I have decided to move away from micro-services. To achieve this, I am taking an AWS EC2 instance and configuring each micro-service on this instance. For this setup, I am using an Ubuntu 16.04 machine because my application setup is a bit old. However, if you have newer versions of Rails, Ruby, etc., you may want to choose Ubuntu 20.04.
Our setup includes Ruby on Rails (5.2.1) micro-services (5-10 in number), a NodeJS application, a Sinatra Application, and an Angular 9.1 Front-End Application.
To begin, go to the AWS EC2 home page and select an Ubuntu 16.04 machine with default configurations and SSH enabled.
Install Mysql 5.7 (Remember this is for Ubuntu 16.04, 18.04 versions)
sudo apt-get install mysql-server-5.7 mysql-client-core-5.7 libmysqlclient-dev
sudo service mysql status # or
systemctl status mysql
username: <your-username>, password: <your-password>
You can also try mysql_secure_installation, if you use other mysql version.
Note that if you are setting up Ubuntu 20.04, there is a significant change in MySQL, as the version of MySQL is now 8.0 instead of 5.7. If you have applications running in MySQL 5.7, it is recommended that you set up and use Ubuntu 16.04 or 18.04.
We will continue the installation process in our next post.
Go inside the downloaded liferay portal folder. And start the tomcat server
cd ~/liferay-ce-portal-tomcat-7.3.0-ga1-20200127150653953/liferay-ce-portal-7.3.0-ga1/tomcat-9.0.17/bin
sh startup.sh
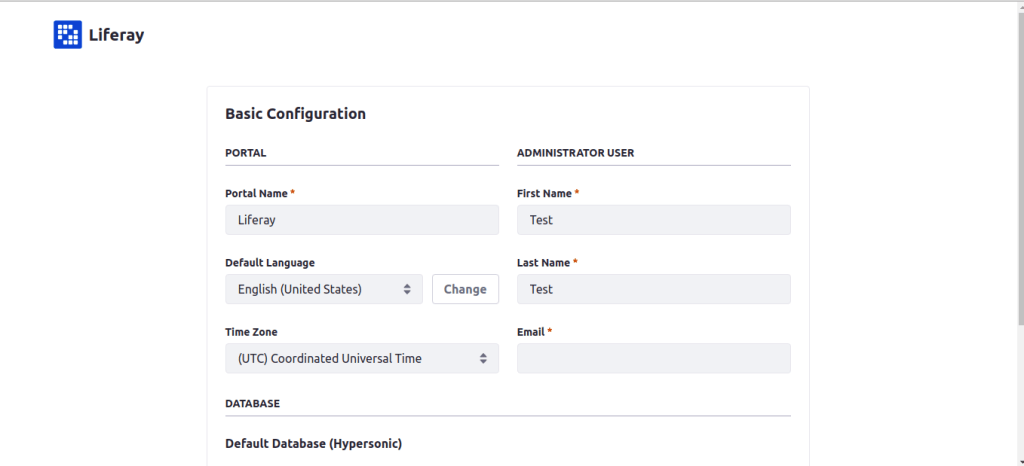
Goto http://localhost:8080/ and start setting up liferay configurations as follows:
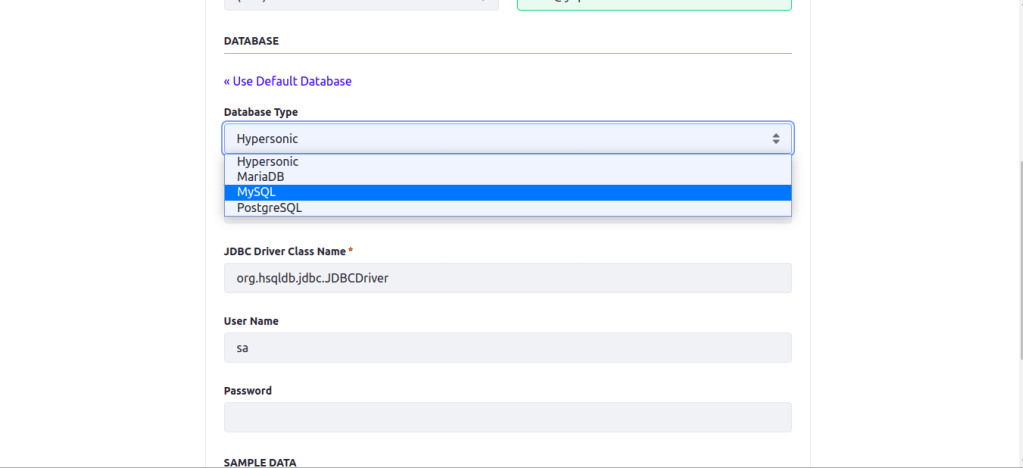
Do the basic configuration and change database to mysql
Mysql database is recommended fot staging and production environment.
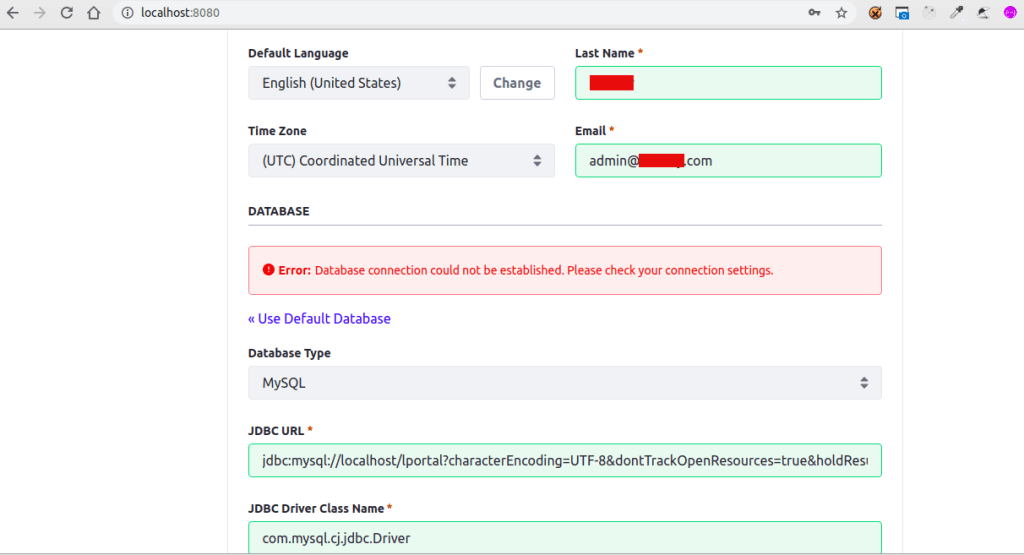
JDBC URL: jdbc:mysql://localhost/lportal?characterEncoding=UTF-8&dontTrackOpenResources=true&holdResultsOpenOverStatementClose=true&serverTimezone =GMT&useFastDateParsing=false&useUnicode=true JDBC Driver Class Name: com.mysql.cj.jdbc.Driver
If you get the error like this, some of your provided mysql configuration went wrong. Check your mysql username and password.
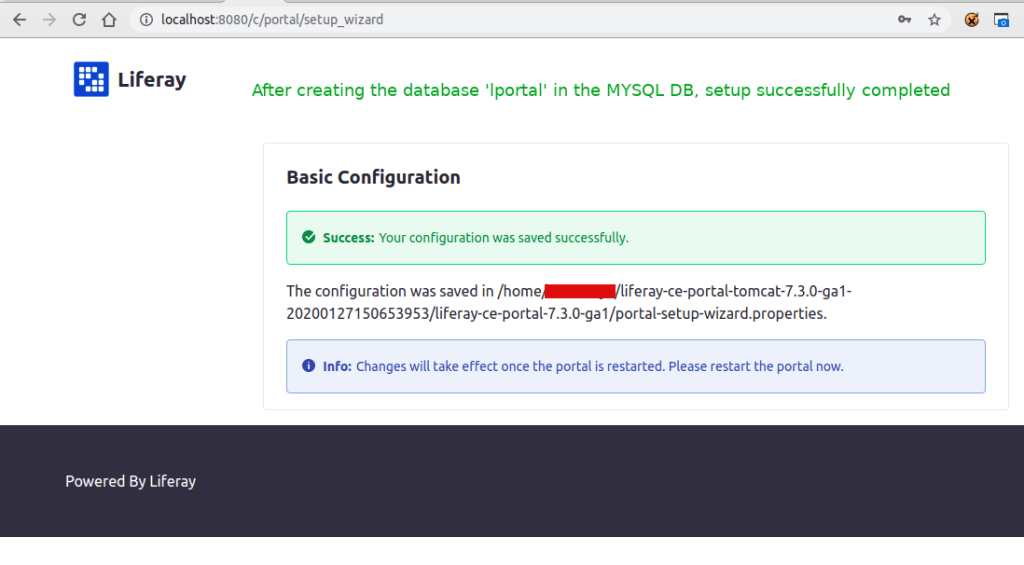
If the given mysql configuration is correct, then you have to check the Liferay DB exists in your Mysql database. Else create the DB `lportal` as follows:
Create database ‘lportal’
Now click on the Configure button, you will be ready to go
Open ‘~/liferay-ce-portal-tomcat-7.3.0-ga1-20200127150653953/liferay-ce-portal-7.3.0-ga1/portal-setup-wizard.properties’ file and you can see the above configurations added by liferay.
You can see the above server log in Dev studio. Here mentioned about which property files loads during the start and picking MYSQL DB, creating tables for first time in `lportal` database, inserting data to the table
You can see the following tables populated in the database lportal
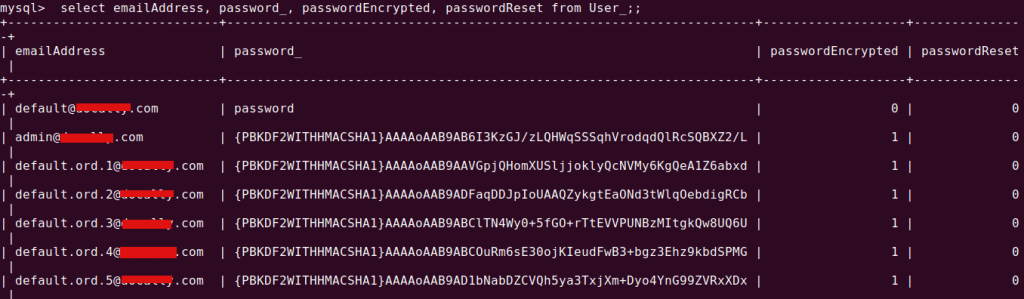
Here is the list of Users created. We are selected `Add Sample data` option at the time configuration. That is why we can see lot of users with my domain is listed
Login with
Email: provide the email given at the time of register
Password: test (default password for version 7.3)
If you are using Liferay7.2 version, then this default password may not work. In this versionliferay generates a random password, that you can check in the log file as below:
cd ~/Downloads/liferay-ce-portal-tomcat-7.2.1-ga2-20191111141448326/liferay-ce-portal-7.2.1-ga2/tomcat-9.0.17/logs/ && tail -f catalina.out
Search word password. You can get it.
After login you can see this terms of use page
Then a Password remainder page
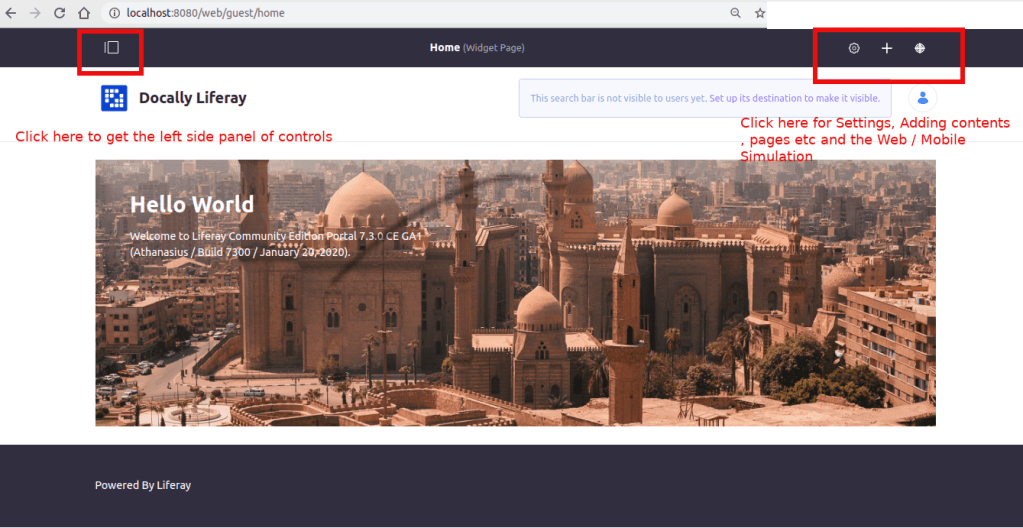
DONE! Congrats, you can see the admin home page with all controls
changing to new db from old db
Add the new db name ‘liferay721’ to portal-setup-wizard.properties
Starting Liferay Community Edition Portal 7.2.1 CE GA2 (Mueller / Build 7201 / November 12, 2019)

2020-05-08 14:45:53.921 INFO  [main][StartupHelper:75] There are no patches installed
2020-05-08 14:45:54.000 WARN  [main][ReleaseLocalServiceImpl:238] Table 'liferay721.Release_' doesn't exist
2020-05-08 14:45:54.003 INFO  [main][ReleaseLocalServiceImpl:129] Create tables and populate with default data
...................
...................
Issues you may face during the setup
Once I created a DB names liferay_7_3_1 and the setup wizard finishes successfully and message shown to restart the server for get into the portal.
When I restart it I received the following issue:
An unexpected system error occurred.

java.lang.NullPointerException
Database is not setup properly. Check the DB name. Use characters as DB name if possible and start the server. If proper DB setup is done, then you can see 250 – 280 tables in database
and the following tables were created in the database named liferay_7_3_1
Then I renamed the DB to liferay731. Then it works! So beware of underscore characters in your DB name.
Another error is shown when the server is not able to connect to your database, or database is not created that is specified as in your portal.ext.properties or portal-setup-wizard.properties
Create a database specified in properties file to get rid of the issue. Else check given DB permissions are correct