
Modern web and mobile applications demand secure APIs. Traditional session-based authentication falls short in stateless architectures like RESTful APIs. This is where Token-Based Authentication and JWT (JSON Web Token) shine. In this blog post, we’ll explore both approaches, understand how they work, and integrate them into a Rails 8 application.
🔐 1. What is Token-Based Authentication?
Token-based authentication is a stateless security mechanism where the server issues a unique, time-bound token after validating a user’s credentials. The client stores this token (usually in local storage or memory) and sends it along with each API request via HTTP headers.
✅ Key Concepts:
- Stateless: No session is stored on the server.
- Scalable: Ideal for distributed systems.
- Tokens can be opaque (random strings).
Algorithms used:
- Token generation commonly uses
SecureRandom.
🔎 What is SecureRandom?
SecureRandom is a Ruby module that generates cryptographically secure random numbers and strings. It uses operating system facilities (like /dev/urandom on Unix or CryptGenRandom on Windows) to generate high-entropy values that are safe for use in security-sensitive contexts like tokens, session identifiers, and passwords.
For example:
SecureRandom.hex(32) # generates a 64-character hex string (256 bits)
In Ruby, if you encounter the error:
(irb):5:in '<main>': uninitialized constant SecureRandom (NameError)
Did you mean?  SecurityError
It means the SecureRandom module hasn’t been loaded. Although SecureRandom is part of the Ruby Standard Library, it’s not automatically loaded in every environment. You need to explicitly require it.
✅ Solution
Add the following line before using SecureRandom:
require 'securerandom'
Then you can use:
SecureRandom.hex(16) # => "a1b2c3d4e5f6..."
📚 Why This Happens
Ruby does not auto-load all standard libraries to save memory and load time. Modules like SecureRandom, CSV, OpenURI, etc., must be explicitly required if you’re working outside of Rails (like in plain Ruby scripts or IRB).
In a Rails environment, require 'securerandom' is typically handled automatically by the framework.
🛠️ Tip for IRB
If you’re experimenting in IRB (interactive Ruby shell), just run:
require 'securerandom'
SecureRandom.uuid  # or any other method
This will eliminate the NameError.
🔒 Why 256 bits?
A 256-bit token offers a massive keyspace of 2^256 combinations, making brute-force attacks virtually impossible. The higher the bit-length, the better the resistance to collision and guessing attacks. Most secure tokens range between 128 and 256 bits. While larger tokens are more secure, they consume more memory and storage.
⚠️ Drawbacks:
- SecureRandom tokens are opaque and must be stored on the server (e.g., in a database) for validation.
- Token revocation requires server-side tracking.
👷️ Implementing Token-Based Authentication in Rails 8
Step 1: Generate User Model
rails g model User email:string password_digest:string token:string
rails db:migrate
Step 2: Add Secure Token
# app/models/user.rb
has_secure_password
has_secure_token :token
Step 3: Authentication Controller
# app/controllers/api/v1/sessions_controller.rb
class Api::V1::SessionsController < ApplicationController
  def create
    user = User.find_by(email: params[:email])
    if user&.authenticate(params[:password])
      user.regenerate_token
      render json: { token: user.token }, status: :ok
    else
      render json: { error: 'Invalid credentials' }, status: :unauthorized
    end
  end
end
Step 4: Protect API Endpoints
# app/controllers/application_controller.rb
class ApplicationController < ActionController::API
  before_action :authenticate_user!

  private

  def authenticate_user!
    token = request.headers['Authorization']&.split(' ')&.last
    @current_user = User.find_by(token: token)
    render json: { error: 'Unauthorized' }, status: :unauthorized unless @current_user
  end
end
🔐 2. What is JWT (JSON Web Token)?
JWT is an open standard for secure information exchange, defined in RFC 7519.

🔗 What is RFC 7519?
RFC 7519 is a specification by the IETF (Internet Engineering Task Force) that defines the structure and rules of JSON Web Tokens. It lays out how to encode claims in a compact, URL-safe format and secure them using cryptographic algorithms. It standardizes the way information is passed between parties as a JSON object.
Check: https://datatracker.ietf.org/doc/html/rfc7519
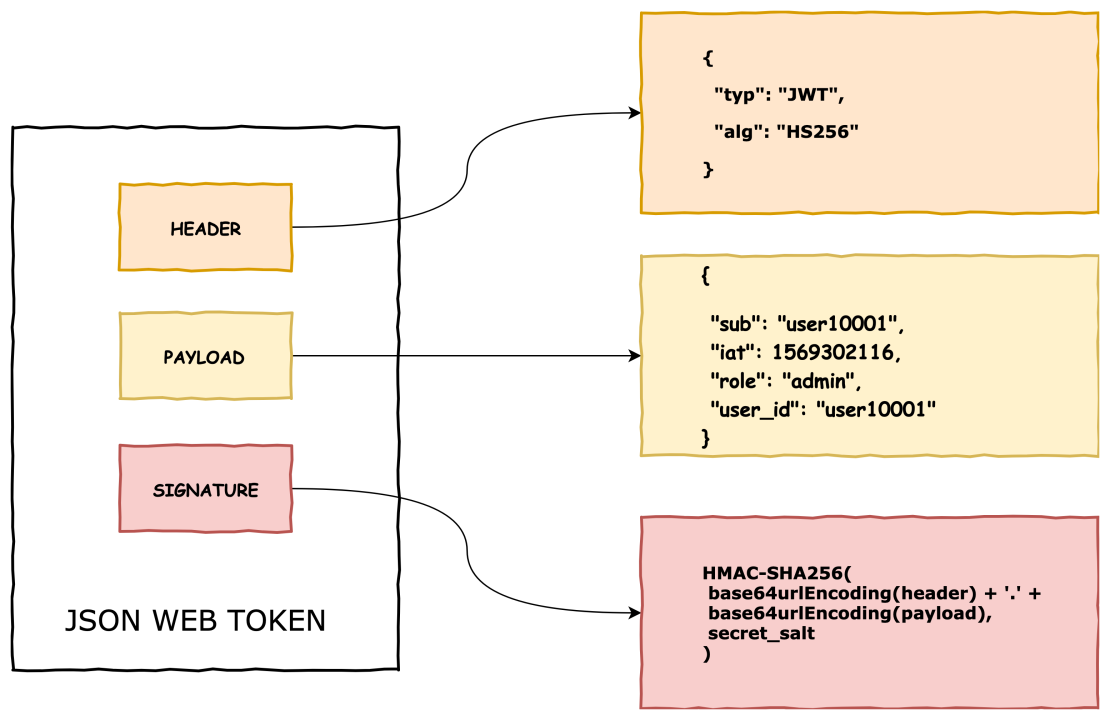
📈 Structure of JWT:
A JWT has three parts:
- Header: Specifies the algorithm used (e.g., HS256) and token type (JWT).
- Payload: Contains claims (e.g., user_id, exp).
- Signature: Validates the token integrity using a secret or key.
Example:
eyeJhbGciOiJIUzI1NiIsInR5cCI6IkpXVCJ9.eyJ1c2VyX2lkIjoxLCJleHAiOjE2ODk5OTk5OTl9.Dr2k1ehxw7qBKi_Oe-JogBxy...
🚀 Why 3 Parts?
- The Header informs the verifier of the cryptographic operations applied.
- The Payload is the actual data transferred.
- The Signature protects the data and ensures that the token hasn’t been modified.

This makes JWT self-contained, tamper-resistant, and easily verifiable without a server-side lookup.
⚖️ JWT Algorithms in Detail
📁 HS256 (HMAC SHA-256)
HS256 stands for HMAC with SHA-256. It is a symmetric algorithm, meaning the same secret is used for signing and verifying the JWT.
- HMAC: Hash-based Message Authentication Code combines a secret key with the hash function.
- SHA-256: A 256-bit secure hash function that produces a fixed-length output.
⚡ Why JWT uses HS256?
- It’s fast and computationally lightweight.
- Ensures that only someone with the secret can produce a valid signature.
- Ideal for internal applications where the secret remains safe.
If your use case involves public key encryption, you should use RS256 (RSA) which uses asymmetric key pairs.
🌟 Advantages of JWT over Basic Tokens
| Feature | Token-Based | JWT |
|---|---|---|
| Self-contained | No | Yes |
| Verifiable without DB | No | Yes |
| Expiry built-in | No | Yes |
| Tamper-proof | Low | High |
| Scalable | Medium | High |
🧬 Deep Dive: The Third Part of a JWT — The Signature
📌 What is the Third Part?
The third part of a JWT is the signature. It ensures data integrity and authenticity.
Structure of a JWT:
<base64url-encoded header>.<base64url-encoded payload>.<base64url-encoded signature>
Each section is Base64URL-encoded and joined with .
🔍 How is the Signature Generated?
The signature is created using a cryptographic algorithm like HS256, and it’s built like this:
HMACSHA256(
  base64UrlEncode(header) + "." + base64UrlEncode(payload),
  secret_key
)
✅ Example:
Assume the following:
Header: {
  "alg": "HS256",
  "typ": "JWT"
}
Payload: {
  "user_id": 1,
  "exp": 1717777777
}
Secret key: "my$ecretKey"
- Base64URL encode header and payload:
header = Base64.urlsafe_encode64('{"alg":"HS256","typ":"JWT"}') # eyJhbGciOiJIUzI1NiIsInR5cCI6IkpXVCJ9payload = Base64.urlsafe_encode64('{"user_id":1,"exp":1717777777}') # eyJ1c2VyX2lkIjoxLCJleHAiOjE3MTc3Nzc3Nzd9 - Concatenate them with a period:
data = "#{header}.#{payload}" - Sign it with
HMAC SHA-256using your secret:signature = OpenSSL::HMAC.digest('sha256', 'my$ecretKey', data) - Base64URL encode the result:
Base64.urlsafe_encode64(signature)
Now your JWT becomes:
<encoded-header>.<encoded-payload>.<encoded-signature>
🎯 Why Is the Signature Crucial?
- Tamper Detection: If someone changes the payload (e.g.,
user_id: 1touser_id: 9999), the signature will no longer match, and verification will fail. - Authentication: Only the party with the secret key can generate a valid signature. This confirms the sender is trusted.
- Integrity: Ensures the content of the token hasn’t been altered between issuance and consumption.
🔐 What If Signature Is Invalid?
When the server receives the token:
JWT.decode(token, secret, true, { algorithm: 'HS256' })
If the signature doesn’t match the header + payload:
- It raises an error (
JWT::VerificationError) - The request is rejected with
401 Unauthorized
⚙️ Why Use HS256?
- HS256 (HMAC with SHA-256) is fast and secure for symmetric use cases.
- Requires only a single shared secret for encoding and decoding.
- Ideal for internal systems or when you fully control both the issuer and verifier.
Great questions! Let’s break them down in simple, technical terms:
1️⃣ What is a Digital Signature in JWT?
A digital signature is a way to prove that a piece of data has not been tampered with and that it came from a trusted source.
🔐 In JWT:
- The signature is created using:
- The Header (e.g.
{"alg": "HS256", "typ": "JWT"}) - The Payload (e.g.
{"user_id": 1, "exp": 1717777777}) - A secret key (known only to the issuer)
- The Header (e.g.
✅ Is it encryption?
❌ No, the signature does not encrypt the data.
✅ It performs a one-way hash-based verification using algorithms like HMAC SHA-256.
HMACSHA256(base64url(header) + "." + base64url(payload), secret)
The result is a hash (signature), not encrypted data.
📌 What does “digitally signed” mean?
When a JWT is digitally signed, it means:
- The payload was not altered after being issued
- The token was created by someone who knows the secret key
2️⃣ Can JWT Transfer Big JSON Payloads?
Technically, yes, but with trade-offs.
🧾 Payload in JWT
The payload can be any JSON object:
{
  "user_id": 1,
  "role": "admin",
  "permissions": ["read", "write", "delete"],
  "data": { "long_array": [...], "details": {...} }
}
🚧 But Watch Out:
| Concern | Description |
|---|---|
| 🔄 Token Size | JWTs are often stored in headers or cookies. Big payloads increase HTTP request size. |
| 🔐 Not Encrypted | Anyone who gets the token can read the payload unless it’s encrypted. |
| 💾 Storage | Browsers and mobile clients have limits (e.g., cookie size = ~4KB). |
| 🐢 Performance | Bigger payloads = slower parsing, transfer, and validation. |
3️⃣ Can We Encrypt a JWT?
Yes, but that requires JWE — JSON Web Encryption (not just JWT).
✨ JWT ≠ Encrypted
A normal JWT is:
- Signed (to prove authenticity & integrity)
- Not encrypted (anyone can decode and read payload)
🔐 If You Want Encryption:
Use JWE (RFC 7516), which:
- Encrypts the payload
- Uses algorithms like AES, RSA-OAEP, etc.
However, JWE is less commonly used, as it adds complexity and processing cost.
✅ Summary
| Feature | JWT (Signed) | JWE (Encrypted) |
|---|---|---|
| Data readable? | Yes | No |
| Tamper-proof? | Yes | Yes |
| Confidential? | No | Yes |
| Commonly used? | ✅ Yes | ⚠️ Less common |
| Algorithm | HMAC/RS256 (e.g. HS256) | AES/RSA |
🔁 What does “one-way hash-based verification using HMAC SHA-256” mean?
Let’s decode this phrase:
💡 HMAC SHA-256 is:
- HMAC = Hash-based Message Authentication Code
- SHA-256 = Secure Hash Algorithm, 256-bit output
When combined:
HMAC SHA-256 = A cryptographic function that creates a hash (fingerprint) of some data using a secret key.
It does NOT encrypt the data. It does NOT encode the data. It just creates a fixed-length signature to prove authenticity and integrity.
🔒 One-Way Hashing (vs Encryption)
| Concept | Is it reversible? | Purpose | Example Algo |
|---|---|---|---|
| 🔑 Encryption | ✅ Yes (with key) | Hide data | AES, RSA |
| 🧪 Hashing | ❌ No | Prove data hasn’t changed | SHA-256 |
| ✍️ HMAC | ❌ No | Sign data w/ secret | HMAC SHA256 |
🔍 How HMAC SHA-256 is used in JWT (Detailed Example)
Let’s take:
header  = {"alg":"HS256","typ":"JWT"}
payload = {"user_id":123,"exp":1717700000}
secret  = "my$ecretKey"
🔹 Step 1: Base64Url encode header and payload
base64_header  = Base64.urlsafe_encode64(header.to_json)
# => "eyJhbGciOiJIUzI1NiIsInR5cCI6IkpXVCJ9"

base64_payload = Base64.urlsafe_encode64(payload.to_json)
# => "eyJ1c2VyX2lkIjoxMjMsImV4cCI6MTcxNzcwMDAwMH0"
🔹 Step 2: Concatenate them with a dot
data = "#{base64_header}.#{base64_payload}"
# => "eyJhbGciOiJIUzI1NiIsInR5cCI6IkpXVCJ9.eyJ1c2VyX2lkIjoxMjMsImV4cCI6MTcxNzcwMDAwMH0"
🔹 Step 3: Generate Signature using HMAC SHA-256
require 'openssl'
require 'base64'

signature = OpenSSL::HMAC.digest('sha256', secret, data)
# => binary format

encoded_signature = Base64.urlsafe_encode64(signature).gsub('=', '')
# => This is the third part of JWT
# => e.g., "NLoeHhY5jzUgKJGKJq-rK6DTHCKnB7JkPbY3WptZmO8"
✅ Final JWT:
<header>.<payload>.<signature>
Anyone receiving this token can:
- Recompute the signature using the same secret key
- If it matches the one in the token, it’s valid
- If it doesn’t match, the token has been tampered
❓ Is SHA-256 used for encoding or encrypting?
❌ SHA-256 is not encryption.
❌ SHA-256 is not encoding either.
✅ It is a hash function: one-way and irreversible.
It’s used in HMAC to sign data (prove data integrity), not to encrypt or hide data.
✅ Summary:
| Purpose | SHA-256 / HMAC SHA-256 |
|---|---|
| Encrypts data? | ❌ No |
| Hides data? | ❌ No (use JWE for that) |
| Reversible? | ❌ No |
| Used in JWT? | ✅ Yes (for signature) |
| Safe? | ✅ Very secure if secret is strong |
🎯 First: The Big Misunderstanding — Why JWT Isn’t “Encrypted”
JWT is not encrypted by default.
It is just encoded + signed.
You can decode the payload, but you cannot forge the signature.
🧠 Difference Between Encoding, Encryption, and Hashing
| Concept | Purpose | Reversible? | Example |
|---|---|---|---|
| Encoding | Make data safe for transmission | ✅ Yes | Base64 |
| Encryption | Hide data from unauthorized eyes | ✅ Yes (with key) | AES, RSA |
| Hashing | Verify data hasn’t changed | ❌ No | SHA-256, bcrypt |
🔓 Why can JWT payload be decoded?
Because the payload is only Base64Url encoded, not encrypted.
Example:
{
  "user_id": 123,
  "role": "admin"
}
When sent in JWT, it becomes:
eyJ1c2VyX2lkIjoxMjMsInJvbGUiOiJhZG1pbiJ9
✅ You can decode it with any online decoder. It’s not private, only structured and verifiable.
🔐 Then What Protects the JWT?
The signature is what protects it.
- It proves the payload hasn’t been modified.
- The backend signs it with a secret key (HMAC SHA-256 or RS256).
- If anyone tampers with the payload and doesn’t have the key, they can’t generate a valid signature.
🧾 Why include the payload inside the JWT?
This is the brilliant part of JWT:
- The token is self-contained.
- You don’t need a database lookup on every request.
- You can extract data like
user_id,role,permissionsright from the token!
✅ So yes — it’s just a token, but a smart token with claims (data) you can trust.
This is ideal for stateless APIs.
💡 Then why not send payload in POST body?
You absolutely can — and often do, for data-changing operations (like submitting forms). But that’s request data, not authentication info.
JWT serves as the proof of identity and permission, like an ID card.
You put it in the Authorization header, not the body.
📦 Is it okay to send large payloads in JWT?
Technically, yes, but not recommended. Why?
- JWTs are sent in every request header — that adds bloat.
- Bigger tokens = slower transmission + possible header size limits.
- Keep payload minimal: only what’s necessary (user id, roles, permissions, exp).
If your payload is very large, use a token to reference it in DB or cache, not store everything in the token.
⚠️ If the secret doesn’t match?
Yes — that means someone altered the token (probably the payload).
- If user_id was changed to 999, but they can’t recreate a valid signature (they don’t have the secret), the backend rejects the token.
🔐 Then When Should We Encrypt?
JWT only signs, but not encrypts.
If you want to hide the payload:
- Use JWE (JSON Web Encryption) — a different standard.
- Or: don’t put sensitive data in JWT at all.
🔁 Summary: Why JWT is a Big Deal
- ✅ Self-contained authentication
- ✅ Stateless (no DB lookups)
- ✅ Signed — so payload can’t be tampered
- ❌ Not encrypted — anyone can see payload
- ⚠️ Keep payload small and non-sensitive
🧠 One Last Time: Summary Table
| Topic | JWT | POST Body |
|---|---|---|
| Used for | Authentication/identity | Submitting request data |
| Data type | Claims (user_id, role) | Form/input data |
| Seen by user? | Yes (Base64-encoded) | Yes |
| Security | Signature w/ secret | HTTPS |
| Stored where? | Usually in browser (e.g. localStorage, cookie) | N/A |
Think of JWT like a sealed letter:
- Anyone can read the letter (payload).
- But they can’t forge the signature/stamp.
- The receiver checks the signature to verify the letter is real and unmodified.
🧨 Yes, JWT Payload is Visible — and That Has Implications
The payload of a JWT is only Base64Url encoded, not encrypted.
This means anyone who has the token (e.g., a user, a man-in-the-middle without HTTPS, or a frontend dev inspecting in the browser) can decode it and see:
{
  "user_id": 123,
  "role": "admin",
  "permissions": ["read", "write", "delete"],
  "email": "user@example.com"
}
🔐 Is This a Security Risk?
It depends on what you put inside the payload.
✅ Safe things to include:
user_idexp(expiration timestamp)- Minimal role or scope info like
"role": "user"
❌ Do not include sensitive data:
- Email addresses (if private)
- Password hashes (never!)
- Credit card info
- Internal tokens or database keys
- Personally Identifiable Info (PII)
🔎 So Why Do People Still Use JWT?
JWT is great when used correctly:
- It doesn’t prevent others from reading the payload, but it prevents them from modifying it (thanks to the signature).
- It allows stateless auth without needing a DB lookup on every request.
- It’s useful for microservices where services can verify tokens without a central auth store.
🧰 Best Practices for JWT Payloads
- Treat the payload as public data.
- Ask yourself: “Is it okay if the user sees this?”
- Never trust the token blindly on the client.
- Always verify the signature and claims server-side.
- Use only identifiers, not sensitive context.
- For example, instead of embedding full permissions:
{ "user_id": 123, "role": "admin" }fetch detailed permissions on the backend based on role.
- For example, instead of embedding full permissions:
- Encrypt the token if sensitive data is needed.
- Use JWE (JSON Web Encryption), or
- Store sensitive data on the server and pass only a reference (like a session id or user_id).
📌 Bottom Line
JWT is not private. It is only protected from tampering, not from reading.
So if you use it in your app, make sure the payload contains only safe, public information, and that any sensitive logic (like permission checks) happens on the server.
🚀 Integrating JWT in Rails 8
Step 1: Add Gem
gem 'jwt'
Step 2: Generate Secret Key
# config/initializers/jwt.rb
JWT_SECRET = Rails.application.credentials.jwt_secret || 'your_dev_secret_key'
Step 3: Authentication Logic
# app/services/json_web_token.rb
class JsonWebToken
  def self.encode(payload, exp = 24.hours.from_now)
    payload[:exp] = exp.to_i
    JWT.encode(payload, JWT_SECRET, 'HS256')
  end

  def self.decode(token)
    body = JWT.decode(token, JWT_SECRET, true, { algorithm: 'HS256' })[0]
    HashWithIndifferentAccess.new body
  rescue
    nil
  end
end
Step 4: Sessions Controller for JWT
# app/controllers/api/v1/sessions_controller.rb
class Api::V1::SessionsController < ApplicationController
  def create
    user = User.find_by(email: params[:email])
    if user&.authenticate(params[:password])
      token = JsonWebToken.encode(user_id: user.id)
      render json: { jwt: token }, status: :ok
    else
      render json: { error: 'Invalid credentials' }, status: :unauthorized
    end
  end
end
Step 5: Authentication in Application Controller
# app/controllers/application_controller.rb
class ApplicationController < ActionController::API
  before_action :authenticate_request

  def authenticate_request
    header = request.headers['Authorization']
    token = header.split(' ').last if header
    decoded = JsonWebToken.decode(token)
    @current_user = User.find_by(id: decoded[:user_id]) if decoded
    render json: { error: 'Unauthorized' }, status: :unauthorized unless @current_user
  end
end
🌍 How Token-Based Authentication Secures APIs
🔒 Benefits:
- Stateless: Scales well
- Works across domains
- Easy to integrate with mobile/web clients
- JWT is tamper-proof and verifiable
⚡ Drawbacks:
- Token revocation is hard without server tracking (esp. JWT)
- Long-lived tokens can be risky if leaked
- Requires HTTPS always
📆 Final Thoughts
For most Rails API-only apps, JWT is the go-to solution due to its stateless, self-contained nature. However, for simpler setups or internal tools, basic token-based methods can still suffice. Choose based on your app’s scale, complexity, and security needs.
Happy coding! 🚀
