Rails 7+ API error handling that scales โš–๏ธ

A solid API error strategy gives you:

  • Consistent JSON error shapes
  • Correct HTTP status codes
  • Separation of concerns (domain vs transport)
  • Observability without leaking internals

Below is a practical, production-ready approach that covers controller hooks, controllers, models/libs, background jobs, and moreโ€”illustrated with a real scenario from Session::CouponCode.

Core principles

  • Keep transport (HTTP, JSON) in controllers; keep domain logic in models/libs.
  • Map known, expected failures to specific HTTP statuses.
  • Log unexpected failures; return a generic message to clients.
  • Centralize API error rendering in a base controller.

1) A single error boundary for all API controllers

Create a base Error::ApiError and rescue it (plus a safe catchโ€‘all) in your ApiController.

# lib/error/api_error.rb
module Error
  class ApiError < StandardError
    attr_reader :status, :details
    def initialize(message, status = :unprocessable_entity, details: nil)
      super(message)
      @status  = status
      @details = details
    end
  end
end
# app/controllers/api_controller.rb
class ApiController < ActionController::Base
  include LocaleConcern
  skip_forgery_protection

  impersonates :user,
               ......

  # Specific handlers first
  rescue_from Error::ApiError,                          with: :handle_api_error
  rescue_from ActionController::ParameterMissing,       with: :handle_bad_request
  rescue_from ActiveRecord::RecordNotFound,             with: :handle_not_found
  rescue_from ActiveRecord::RecordInvalid,              with: :handle_unprocessable
  rescue_from ActiveRecord::RecordNotUnique,            with: :handle_conflict

  # Catchโ€‘all last
  rescue_from StandardError,                            with: :handle_standard_error

  private

  def handle_api_error(e)
    render json: { success: false, error: e.message, details: e.details }, status: e.status
  end

  def handle_bad_request(e)
    render json: { success: false, error: e.message }, status: :bad_request
  end

  def handle_not_found(_e)
    render json: { success: false, error: 'Not found' }, status: :not_found
  end

  def handle_unprocessable(e)
    render json: { success: false, error: e.record.errors.full_messages }, status: :unprocessable_entity
  end

  def handle_conflict(_e)
    render json: { success: false, error: 'Conflict' }, status: :conflict
  end

  def handle_standard_error(e)
    Rollbar.error(e, path: request.fullpath, client_id: try(:current_client)&.id)
    render json: { success: false, error: 'Something went wrong' }, status: :internal_server_error
  end
end
  • Order matters. Specific rescue_from before StandardError.
  • This pattern avoids duplicating rescue_from across controllers and keeps HTML controllers unaffected.

2) Errors in before actions

Because before_action runs inside controllers, the same rescue_from handlers apply.

Two patterns:

  • Render in the hook for simple guard clauses:
before_action :require_current_client

def require_current_client
  return if current_client
  render json: { success: false, error: 'require_login' }, status: :unauthorized
end
  • Raise a domain/auth error and let rescue_from handle JSON:
# lib/error/unauthorized_error.rb
module Error
  class UnauthorizedError < Error::ApiError
    def initialize(message = 'require_login') = super(message, :unauthorized)
  end
end

before_action :require_current_client

def require_current_client
  raise Error::UnauthorizedError unless current_client
end

Prefer raising if you want consistent global handling and logging.

3) Errors inside controllers

Use explicit renders for happy-path control flow; raise for domain failures:

def create
  form = CreateThingForm.new(params.require(:thing).permit(:name))
  result = CreateThing.new(form: form).call

  if result.success?
    render json: { success: true, thing: result.thing }, status: :created
  else
    # Known domain failure โ†’ raise an ApiError to map to 422
    raise Error::ApiError.new(result.message, :unprocessable_entity, details: result.details)
  end
end

Common controller exceptions (auto-mapped above):

  • ActionController::ParameterMissing โ†’ 400
  • ActiveRecord::RecordNotFound โ†’ 404
  • ActiveRecord::RecordInvalid โ†’ 422
  • ActiveRecord::RecordNotUnique โ†’ 409

4) Errors in models, services, and libs

Do not call render here. Either:

  • Return a result object (Success/Failure), or
  • Raise a domainโ€‘specific exception that the controller maps to an HTTP response.

Example from our scenario, Session::CouponCode:

# lib/error/session/coupon_code_error.rb
module Error
  module Session
    class CouponCodeError < Error::ApiError; end
  end
end
# lib/session/coupon_code.rb
class Session::CouponCode
  def discount_dollars
    # ...
    case
    when coupon_code.gift_card?
      # ...
    when coupon_code.discount_code?
      # ...
    when coupon_code.multiorder_discount_code?
      # ...
    else
      raise Error::Session::CouponCodeError, 'Unrecognized discount code'
    end
  end
end

Then, in ApiController, the specific handler (or the Error::ApiError handler) renders JSON with a 422.

This preserves separation: models/libs raise; controllers decide HTTP.

5) Other important surfaces

  • ActiveJob / Sidekiq
  • Prefer retry_on, discard_on, and jobโ€‘level rescue with logging.
  • Return no HTTP here; jobs are async.
class MyJob < ApplicationJob
  retry_on Net::OpenTimeout, wait: 10.seconds, attempts: 3
  discard_on Error::ApiError
  rescue_from(StandardError) { |e| Rollbar.error(e) }
end
  • Mailers
  • Use rescue_from to avoid bubbleโ€‘ups crashing deliveries:
class ApplicationMailer < ActionMailer::Base
  rescue_from Postmark::InactiveRecipientError, Postmark::InvalidEmailRequestError do
    # no-op / log
  end
end
  • Routing / 404
  • For APIs, keep 404 mapping at the controller boundary with rescue_from ActiveRecord::RecordNotFound.
  • For HTML, config.exceptions_app = routes + ErrorsController.
  • Middleware / Rack
  • For truly global concerns, use middleware. This is rarely necessary for controller-scoped API errors in Rails.
  • Validation vs. Exceptions
  • Use validations (ActiveModel/ActiveRecord) for expected user errors.
  • Raise exceptions for exceptional conditions (invariants violated, external systems fail unexpectedly).

6) Observability

  • Always log unexpected errors in the catchโ€‘all (StandardError).
  • Add minimal context: client_id, request.fullpath, feature flags.
  • Avoid leaking stack traces or internal messages to clients. Send generic messages on 500s.

7) Testing

  • Unit test domain services to ensure they raise Error::ApiError (or return Failure).
  • Controller/request specs: assert status codes and JSON shapes for both happy path and error path.
  • Ensure before_action guards either render or raise as intended.

Applying this to our scenario

  • /lib/session/coupon_code.rb raises Error::Session::CouponCodeError on unknown/invalid discount values.
  • /app/controllers/api_controller.rb rescues that error and returns JSON:
  • { success: false, error: e.message } with a 422 (or via Error::ApiError base).

This converts prior 500s into clean API responses and keeps error handling centralized.

When to generalize vs. specialize

  • Keep a catchโ€‘all rescue_from StandardError in ApiController to prevent 500s from leaking internals.
  • Still add specific handlers (or subclass Error::ApiError) for known cases to control the correct status code and message.
  • Do not replace everything with only StandardErrorโ€”you’ll lose semantics and proper HTTP codes.

โ€”

  • Key takeaways
  • Centralize APIโ€wide error handling in ApiController using specific handlers + a safe catchโ€‘all.
  • Raise domain errors in models/libs; render JSON only in controllers.
  • Map common Rails exceptions to correct HTTP statuses; log unexpected errors.
  • Prefer Error::ApiError as a base for consistent message/status handling across the API.

Software Architectย Guide: Designing a RESTful API for a ๐ŸŒ Multi-Tenant Blogging Platform

Building a multi-tenant blogging platform requires thoughtful design of the API to ensure clarity, scalability, and security. In this post, we’ll explore a RESTful API design including versioning, nested resources, and authentication, using clear examples and best practices.


๐Ÿงฉ Understanding the Requirements

Before diving into endpoints, let’s break down what the platform supports:

  • Multiple tenants (e.g., organizations, teams)
  • Each tenant has users
  • Users can create blogs, and each blog has posts
  • Posts can have comments
  • Authentication is required

๐Ÿ“ Versioning

Weโ€™ll use URI-based versioning:

/api/v1/

This helps manage breaking changes cleanly.


๐Ÿ” Authentication

We’ll use token-based authentication (e.g., JWT or API keys). Each request must include:

Authorization: Bearer <token>

๐Ÿ“Œ Base URL

https://api.blogcloud.com/api/v1

๐Ÿ“š API Endpoint Design

๐Ÿ”ธ Tenants

Tenants are top-level entities.

  • GET /tenants โ€“ List all tenants (admin only)
  • POST /tenants โ€“ Create a new tenant
  • GET /tenants/:id โ€“ Show tenant details
  • PATCH /tenants/:id โ€“ Update tenant
  • DELETE /tenants/:id โ€“ Delete tenant

๐Ÿ”ธ Users (Scoped by tenant)

  • GET /tenants/:tenant_id/users โ€“ List users for tenant
  • POST /tenants/:tenant_id/users โ€“ Create user
  • GET /tenants/:tenant_id/users/:id โ€“ Show user
  • PATCH /tenants/:tenant_id/users/:id โ€“ Update user
  • DELETE /tenants/:tenant_id/users/:id โ€“ Delete user

๐Ÿ”ธ Blogs (Belong to users)

  • GET /tenants/:tenant_id/users/:user_id/blogs โ€“ List blogs
  • POST /tenants/:tenant_id/users/:user_id/blogs โ€“ Create blog
  • GET /tenants/:tenant_id/users/:user_id/blogs/:id โ€“ Show blog
  • PATCH /tenants/:tenant_id/users/:user_id/blogs/:id โ€“ Update blog
  • DELETE /tenants/:tenant_id/users/:user_id/blogs/:id โ€“ Delete blog

๐Ÿ”ธ Posts (Belong to blogs)

  • GET /blogs/:blog_id/posts โ€“ List posts
  • POST /blogs/:blog_id/posts โ€“ Create post
  • GET /blogs/:blog_id/posts/:id โ€“ Show post
  • PATCH /blogs/:blog_id/posts/:id โ€“ Update post
  • DELETE /blogs/:blog_id/posts/:id โ€“ Delete post

๐Ÿ”ธ Comments (Belong to posts)

  • GET /posts/:post_id/comments โ€“ List comments
  • POST /posts/:post_id/comments โ€“ Add comment
  • DELETE /posts/:post_id/comments/:id โ€“ Delete comment

โ“Question: what is the full url of comments?

No, the full URL for comments should not be:

https://api.blogcloud.com/api/v1/tenants/:tenant_id/users/:user_id/blogs/posts/:post_id/comments

That nesting is too deep and redundant, because:

  • By the time you’re at a post, you already implicitly know which blog/user/tenant it’s under (assuming proper authorization).
  • Posts have unique IDs across the system (or at least within blogs), so we donโ€™t need the entire hierarchy in every request.

โœ… Correct RESTful URL for Comments

If your post_id is unique (or unique within a blog), the cleanest design is:

https://api.blogcloud.com/api/v1/posts/:post_id/comments

or, if you prefer to keep blog_id context:

https://api.blogcloud.com/api/v1/blogs/:blog_id/posts/:post_id/comments

Use that second version only if post_id is not globally unique, and you need the blog context.

๐Ÿ” Recap of Comments Endpoints

ActionHTTP VerbEndpoint
List commentsGET/api/v1/posts/:post_id/comments
Create commentPOST/api/v1/posts/:post_id/comments
Delete commentDELETE/api/v1/posts/:post_id/comments/:id

๐Ÿง  Design Rule of Thumb

  • โœ… Keep URLs meaningful and shallow.
  • โŒ Don’t over-nest resources unless it’s needed to enforce scoping or clarify context.

๐Ÿ“ฅ Example: Create a Blog Post

Request:

POST /blogs/123/posts
Authorization: Bearer <token>
Content-Type: application/json

{
  "title": "Why REST APIs Still Matter",
  "body": "In this post, we explore the benefits of RESTful design..."
}

Response:

201 Created
{
  "id": 456,
  "title": "Why REST APIs Still Matter",
  "body": "In this post, we explore the benefits of RESTful design...",
  "created_at": "2025-07-03T10:00:00Z"
}


โœ… Best Practices Followed

  • Nesting: Resources are nested to show ownership (e.g., blogs under users).
  • Versioning: Prevents breaking old clients.
  • Consistency: Same verbs and JSON structure everywhere.
  • Authentication: Every sensitive request requires a token.

๐Ÿง  Final Thoughts

Designing a RESTful API for a multi-tenant app like a blogging platform requires balancing structure and simplicity. By properly scoping resources, using versioning, and enforcing auth, you build an API that’s powerful, secure, and easy to maintain.

Bonus Tip: Document your API using tools like Swagger/OpenAPI to make onboarding faster for new developers.

You are an awesome Architect ๐Ÿš€

โœจ Securing Your Rails 8 API ๐ŸŒ with Token ๐Ÿท -Based Vs JWT Authentication ๐Ÿ”‘

Modern web and mobile applications demand secure APIs. Traditional session-based authentication falls short in stateless architectures like RESTful APIs. This is where Token-Based Authentication and JWT (JSON Web Token) shine. In this blog post, we’ll explore both approaches, understand how they work, and integrate them into a Rails 8 application.

๐Ÿ” 1. What is Token-Based Authentication?

Token-based authentication is a stateless security mechanism where the server issues a unique, time-bound token after validating a user’s credentials. The client stores this token (usually in local storage or memory) and sends it along with each API request via HTTP headers.

โœ… Key Concepts:

  • Stateless: No session is stored on the server.
  • Scalable: Ideal for distributed systems.
  • Tokens can be opaque (random strings).

๐Ÿƒบ Algorithms used:

  • Token generation commonly uses SecureRandom.

๐Ÿ”Ž What is SecureRandom?

SecureRandom is a Ruby module that generates cryptographically secure random numbers and strings. It uses operating system facilities (like /dev/urandom on Unix or CryptGenRandom on Windows) to generate high-entropy values that are safe for use in security-sensitive contexts like tokens, session identifiers, and passwords.

For example:

SecureRandom.hex(32) # generates a 64-character hex string (256 bits)

In Ruby, if you encounter the error:

(irb):5:in '<main>': uninitialized constant SecureRandom (NameError)
Did you mean?  SecurityError

It means the SecureRandom module hasnโ€™t been loaded. Although SecureRandom is part of the Ruby Standard Library, it’s not automatically loaded in every environment. You need to explicitly require it.

โœ… Solution

Add the following line before using SecureRandom:

require 'securerandom'

Then you can use:

SecureRandom.hex(16)  # => "a1b2c3d4e5f6..."

๐Ÿ“š Why This Happens

Ruby does not auto-load all standard libraries to save memory and load time. Modules like SecureRandom, CSV, OpenURI, etc., must be explicitly required if you’re working outside of Rails (like in plain Ruby scripts or IRB).

In a Rails environment, require 'securerandom' is typically handled automatically by the framework.

๐Ÿ› ๏ธ Tip for IRB

If you’re experimenting in IRB (interactive Ruby shell), just run:

require 'securerandom'
SecureRandom.uuid  # or any other method

This will eliminate the NameError.

๐Ÿ”’ Why 256 bits?

A 256-bit token offers a massive keyspace of 2^256 combinations, making brute-force attacks virtually impossible. The higher the bit-length, the better the resistance to collision and guessing attacks. Most secure tokens range between 128 and 256 bits. While larger tokens are more secure, they consume more memory and storage.

โš ๏ธ Drawbacks:

  • SecureRandom tokens are opaque and must be stored on the server (e.g., in a database) for validation.
  • Token revocation requires server-side tracking.

๐Ÿ‘ท๏ธ Implementing Token-Based Authentication in Rails 8

Step 1: Generate User Model

rails g model User email:string password_digest:string token:string
rails db:migrate

Step 2: Add Secure Token

# app/models/user.rb
has_secure_password
has_secure_token :token

Step 3: Authentication Controller

# app/controllers/api/v1/sessions_controller.rb
class Api::V1::SessionsController < ApplicationController
  def create
    user = User.find_by(email: params[:email])
    if user&.authenticate(params[:password])
      user.regenerate_token
      render json: { token: user.token }, status: :ok
    else
      render json: { error: 'Invalid credentials' }, status: :unauthorized
    end
  end
end

Step 4: Protect API Endpoints

# app/controllers/application_controller.rb
class ApplicationController < ActionController::API
  before_action :authenticate_user!

  private

  def authenticate_user!
    token = request.headers['Authorization']&.split(' ')&.last
    @current_user = User.find_by(token: token)
    render json: { error: 'Unauthorized' }, status: :unauthorized unless @current_user
  end
end


๐Ÿ” 2. What is JWT (JSON Web Token)?

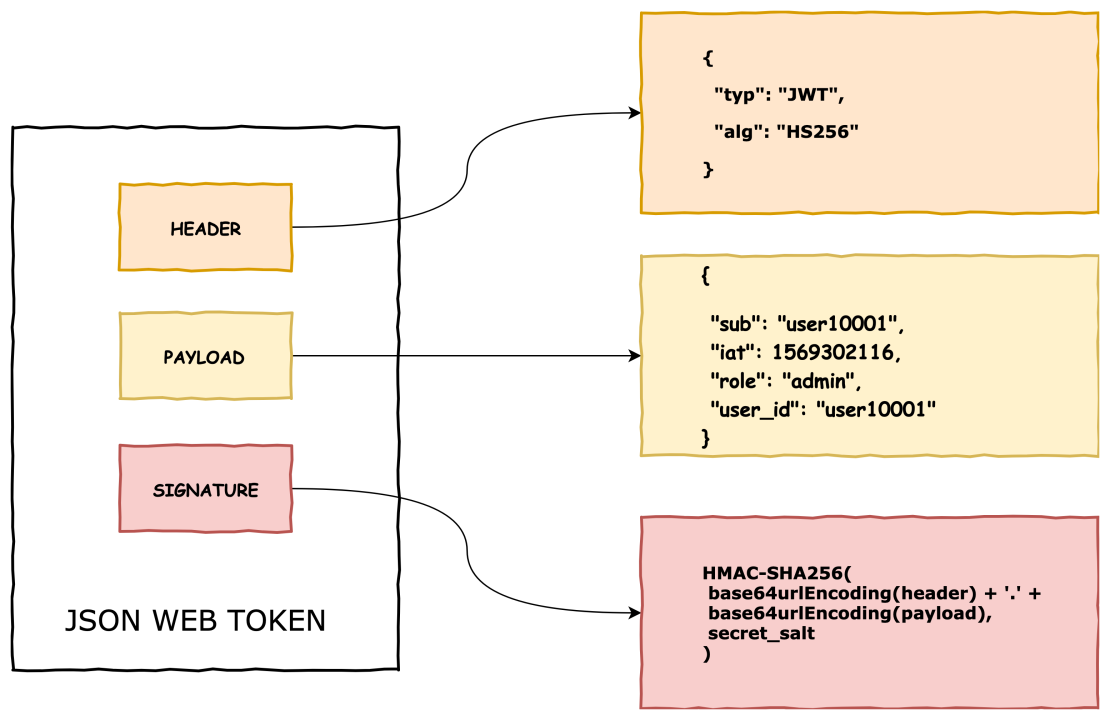
JWT is an open standard for secure information exchange, defined in RFC 7519.

๐Ÿ”— What is RFC 7519?

RFC 7519 is a specification by the IETF (Internet Engineering Task Force) that defines the structure and rules of JSON Web Tokens. It lays out how to encode claims in a compact, URL-safe format and secure them using cryptographic algorithms. It standardizes the way information is passed between parties as a JSON object.

Check: https://datatracker.ietf.org/doc/html/rfc7519

๐Ÿ“ˆ Structure of JWT:

A JWT has three parts:

  1. Header: Specifies the algorithm used (e.g., HS256) and token type (JWT).
  2. Payload: Contains claims (e.g., user_id, exp).
  3. Signature: Validates the token integrity using a secret or key.

Example:

eyeJhbGciOiJIUzI1NiIsInR5cCI6IkpXVCJ9.eyJ1c2VyX2lkIjoxLCJleHAiOjE2ODk5OTk5OTl9.Dr2k1ehxw7qBKi_Oe-JogBxy...

๐Ÿš€ Why 3 Parts?

  • The Header informs the verifier of the cryptographic operations applied.
  • The Payload is the actual data transferred.
  • The Signature protects the data and ensures that the token hasn’t been modified.

This makes JWT self-contained, tamper-resistant, and easily verifiable without a server-side lookup.

โš–๏ธ JWT Algorithms in Detail

๐Ÿ“ HS256 (HMAC SHA-256)

HS256 stands for HMAC with SHA-256. It is a symmetric algorithm, meaning the same secret is used for signing and verifying the JWT.

  • HMAC: Hash-based Message Authentication Code combines a secret key with the hash function.
  • SHA-256: A 256-bit secure hash function that produces a fixed-length output.
โšก Why JWT uses HS256?
  • It’s fast and computationally lightweight.
  • Ensures that only someone with the secret can produce a valid signature.
  • Ideal for internal applications where the secret remains safe.

If your use case involves public key encryption, you should use RS256 (RSA) which uses asymmetric key pairs.

๐ŸŒŸ Advantages of JWT over Basic Tokens

FeatureToken-BasedJWT
Self-containedNoYes
Verifiable without DBNoYes
Expiry built-inNoYes
Tamper-proofLowHigh
ScalableMediumHigh

๐Ÿงฌ Deep Dive: The Third Part of a JWT โ€” The Signature

๐Ÿ“Œ What is the Third Part?

The third part of a JWT is the signature. It ensures data integrity and authenticity.

Structure of a JWT:

<base64url-encoded header>.<base64url-encoded payload>.<base64url-encoded signature>

Each section is Base64URL-encoded and joined with .

๐Ÿ” How is the Signature Generated?

The signature is created using a cryptographic algorithm like HS256, and it’s built like this:

HMACSHA256(
  base64UrlEncode(header) + "." + base64UrlEncode(payload),
  secret_key
)

โœ… Example:

Assume the following:

Header: {
  "alg": "HS256",
  "typ": "JWT"
}
Payload: {
  "user_id": 1,
  "exp": 1717777777
}
Secret key: "my$ecretKey"

  1. Base64URL encode header and payload:
    header = Base64.urlsafe_encode64('{"alg":"HS256","typ":"JWT"}') # eyJhbGciOiJIUzI1NiIsInR5cCI6IkpXVCJ9

    payload = Base64.urlsafe_encode64('{"user_id":1,"exp":1717777777}') # eyJ1c2VyX2lkIjoxLCJleHAiOjE3MTc3Nzc3Nzd9
  2. Concatenate them with a period: data = "#{header}.#{payload}"
  3. Sign it with HMAC SHA-256 using your secret:
    signature = OpenSSL::HMAC.digest('sha256', 'my$ecretKey', data)
  4. Base64URL encode the result: Base64.urlsafe_encode64(signature)

Now your JWT becomes:

<encoded-header>.<encoded-payload>.<encoded-signature>

๐ŸŽฏ Why Is the Signature Crucial?
  • Tamper Detection: If someone changes the payload (e.g., user_id: 1 to user_id: 9999), the signature will no longer match, and verification will fail.
  • Authentication: Only the party with the secret key can generate a valid signature. This confirms the sender is trusted.
  • Integrity: Ensures the content of the token hasn’t been altered between issuance and consumption.
๐Ÿ” What If Signature Is Invalid?

When the server receives the token:

JWT.decode(token, secret, true, { algorithm: 'HS256' })

If the signature doesn’t match the header + payload:

  • It raises an error (JWT::VerificationError)
  • The request is rejected with 401 Unauthorized

โš™๏ธ Why Use HS256?

  • HS256 (HMAC with SHA-256) is fast and secure for symmetric use cases.
  • Requires only a single shared secret for encoding and decoding.
  • Ideal for internal systems or when you fully control both the issuer and verifier.

Great questions! Let’s break them down in simple, technical terms:


1๏ธโƒฃ What is a Digital Signature in JWT?

A digital signature is a way to prove that a piece of data has not been tampered with and that it came from a trusted source.

๐Ÿ” In JWT:

  • The signature is created using:
    • The Header (e.g. {"alg": "HS256", "typ": "JWT"})
    • The Payload (e.g. {"user_id": 1, "exp": 1717777777})
    • A secret key (known only to the issuer)

โœ… Is it encryption?

โŒ No, the signature does not encrypt the data.
โœ… It performs a one-way hash-based verification using algorithms like HMAC SHA-256.

HMACSHA256(base64url(header) + "." + base64url(payload), secret)

The result is a hash (signature), not encrypted data.

๐Ÿ“Œ What does “digitally signed” mean?

When a JWT is digitally signed, it means:

  • The payload was not altered after being issued
  • The token was created by someone who knows the secret key

2๏ธโƒฃ Can JWT Transfer Big JSON Payloads?

Technically, yes, but with trade-offs.

๐Ÿงพ Payload in JWT

The payload can be any JSON object:

{
  "user_id": 1,
  "role": "admin",
  "permissions": ["read", "write", "delete"],
  "data": { "long_array": [...], "details": {...} }
}

๐Ÿšง But Watch Out:

ConcernDescription
๐Ÿ”„ Token SizeJWTs are often stored in headers or cookies. Big payloads increase HTTP request size.
๐Ÿ” Not EncryptedAnyone who gets the token can read the payload unless it’s encrypted.
๐Ÿ’พ StorageBrowsers and mobile clients have limits (e.g., cookie size = ~4KB).
๐Ÿข PerformanceBigger payloads = slower parsing, transfer, and validation.

3๏ธโƒฃ Can We Encrypt a JWT?

Yes, but that requires JWE โ€” JSON Web Encryption (not just JWT).

โœจ JWT โ‰  Encrypted

A normal JWT is:

  • Signed (to prove authenticity & integrity)
  • Not encrypted (anyone can decode and read payload)
๐Ÿ” If You Want Encryption:

Use JWE (RFC 7516), which:

  • Encrypts the payload
  • Uses algorithms like AES, RSA-OAEP, etc.

However, JWE is less commonly used, as it adds complexity and processing cost.

โœ… Summary
FeatureJWT (Signed)JWE (Encrypted)
Data readable?YesNo
Tamper-proof?YesYes
Confidential?NoYes
Commonly used?โœ… Yesโš ๏ธ Less common
AlgorithmHMAC/RS256 (e.g. HS256)AES/RSA

๐Ÿ” What does “one-way hash-based verification using HMAC SHA-256” mean?

Let’s decode this phrase:

๐Ÿ’ก HMAC SHA-256 is:

  • HMAC = Hash-based Message Authentication Code
  • SHA-256 = Secure Hash Algorithm, 256-bit output

When combined:

HMAC SHA-256 = A cryptographic function that creates a hash (fingerprint) of some data using a secret key.

It does NOT encrypt the data. It does NOT encode the data. It just creates a fixed-length signature to prove authenticity and integrity.

๐Ÿ”’ One-Way Hashing (vs Encryption)

ConceptIs it reversible?PurposeExample Algo
๐Ÿ”‘ Encryptionโœ… Yes (with key)Hide dataAES, RSA
๐Ÿงช HashingโŒ NoProve data hasnโ€™t changedSHA-256
โœ๏ธ HMACโŒ NoSign data w/ secretHMAC SHA256

๐Ÿ” How HMAC SHA-256 is used in JWT (Detailed Example)

Let’s take:

header  = {"alg":"HS256","typ":"JWT"}
payload = {"user_id":123,"exp":1717700000}
secret  = "my$ecretKey"

๐Ÿ”น Step 1: Base64Url encode header and payload

base64_header  = Base64.urlsafe_encode64(header.to_json)
# => "eyJhbGciOiJIUzI1NiIsInR5cCI6IkpXVCJ9"

base64_payload = Base64.urlsafe_encode64(payload.to_json)
# => "eyJ1c2VyX2lkIjoxMjMsImV4cCI6MTcxNzcwMDAwMH0"

๐Ÿ”น Step 2: Concatenate them with a dot

data = "#{base64_header}.#{base64_payload}"
# => "eyJhbGciOiJIUzI1NiIsInR5cCI6IkpXVCJ9.eyJ1c2VyX2lkIjoxMjMsImV4cCI6MTcxNzcwMDAwMH0"

๐Ÿ”น Step 3: Generate Signature using HMAC SHA-256

require 'openssl'
require 'base64'

signature = OpenSSL::HMAC.digest('sha256', secret, data)
# => binary format

encoded_signature = Base64.urlsafe_encode64(signature).gsub('=', '')
# => This is the third part of JWT
# => e.g., "NLoeHhY5jzUgKJGKJq-rK6DTHCKnB7JkPbY3WptZmO8"

โœ… Final JWT:

<header>.<payload>.<signature>

Anyone receiving this token can:

  • Recompute the signature using the same secret key
  • If it matches the one in the token, it’s valid
  • If it doesn’t match, the token has been tampered

โ“ Is SHA-256 used for encoding or encrypting?

โŒ SHA-256 is not encryption.
โŒ SHA-256 is not encoding either.
โœ… It is a hash function: one-way and irreversible.

It’s used in HMAC to sign data (prove data integrity), not to encrypt or hide data.

โœ… Summary:

PurposeSHA-256 / HMAC SHA-256
Encrypts data?โŒ No
Hides data?โŒ No (use JWE for that)
Reversible?โŒ No
Used in JWT?โœ… Yes (for signature)
Safe?โœ… Very secure if secret is strong

๐ŸŽฏ First: The Big Misunderstanding โ€” Why JWT Isn’t “Encrypted”

JWT is not encrypted by default.

It is just encoded + signed.
You can decode the payload, but you cannot forge the signature.

๐Ÿง  Difference Between Encoding, Encryption, and Hashing

ConceptPurposeReversible?Example
EncodingMake data safe for transmissionโœ… YesBase64
EncryptionHide data from unauthorized eyesโœ… Yes (with key)AES, RSA
HashingVerify data hasn’t changedโŒ NoSHA-256, bcrypt

๐Ÿ”“ Why can JWT payload be decoded?

Because the payload is only Base64Url encoded, not encrypted.

Example:

{
  "user_id": 123,
  "role": "admin"
}

When sent in JWT, it becomes:

eyJ1c2VyX2lkIjoxMjMsInJvbGUiOiJhZG1pbiJ9

โœ… You can decode it with any online decoder. Itโ€™s not private, only structured and verifiable.

๐Ÿ” Then What Protects the JWT?

The signature is what protects it.

  • It proves the payload hasnโ€™t been modified.
  • The backend signs it with a secret key (HMAC SHA-256 or RS256).
  • If anyone tampers with the payload and doesn’t have the key, they canโ€™t generate a valid signature.

๐Ÿงพ Why include the payload inside the JWT?

This is the brilliant part of JWT:

  • The token is self-contained.
  • You donโ€™t need a database lookup on every request.
  • You can extract data like user_id, role, permissions right from the token!

โœ… So yes โ€” it’s just a token, but a smart token with claims (data) you can trust.

This is ideal for stateless APIs.

๐Ÿ’ก Then why not send payload in POST body?

You absolutely can โ€” and often do, for data-changing operations (like submitting forms). But thatโ€™s request data, not authentication info.

JWT serves as the proof of identity and permission, like an ID card.

You put it in the Authorization header, not the body.

๐Ÿ“ฆ Is it okay to send large payloads in JWT?

Technically, yes, but not recommended. Why?

  • JWTs are sent in every request header โ€” that adds bloat.
  • Bigger tokens = slower transmission + possible header size limits.
  • Keep payload minimal: only whatโ€™s necessary (user id, roles, permissions, exp).

If your payload is very large, use a token to reference it in DB or cache, not store everything in the token.

โš ๏ธ If the secret doesnโ€™t match?

Yes โ€” that means someone altered the token (probably the payload).

  • If user_id was changed to 999, but they canโ€™t recreate a valid signature (they donโ€™t have the secret), the backend rejects the token.

๐Ÿ” Then When Should We Encrypt?

JWT only signs, but not encrypts.

If you want to hide the payload:

  • Use JWE (JSON Web Encryption) โ€” a different standard.
  • Or: don’t put sensitive data in JWT at all.

๐Ÿ” Summary: Why JWT is a Big Deal

  • โœ… Self-contained authentication
  • โœ… Stateless (no DB lookups)
  • โœ… Signed โ€” so payload can’t be tampered
  • โŒ Not encrypted โ€” anyone can see payload
  • โš ๏ธ Keep payload small and non-sensitive

๐Ÿง  One Last Time: Summary Table

TopicJWTPOST Body
Used forAuthentication/identitySubmitting request data
Data typeClaims (user_id, role)Form/input data
Seen by user?Yes (Base64-encoded)Yes
SecuritySignature w/ secretHTTPS
Stored where?Usually in browser (e.g. localStorage, cookie)N/A

Think of JWT like a sealed letter:

  • Anyone can read the letter (payload).
  • But they can’t forge the signature/stamp.
  • The receiver checks the signature to verify the letter is real and unmodified.

๐Ÿงจ Yes, JWT Payload is Visible โ€” and That Has Implications

The payload of a JWT is only Base64Url encoded, not encrypted.

This means anyone who has the token (e.g., a user, a man-in-the-middle without HTTPS, or a frontend dev inspecting in the browser) can decode it and see:

{
  "user_id": 123,
  "role": "admin",
  "permissions": ["read", "write", "delete"],
  "email": "user@example.com"
}

๐Ÿ” Is This a Security Risk?

It depends on what you put inside the payload.

โœ… Safe things to include:

  • user_id
  • exp (expiration timestamp)
  • Minimal role or scope info like "role": "user"

โŒ Do not include sensitive data:

  • Email addresses (if private)
  • Password hashes (never!)
  • Credit card info
  • Internal tokens or database keys
  • Personally Identifiable Info (PII)

๐Ÿ”Ž So Why Do People Still Use JWT?

JWT is great when used correctly:

  • It doesn’t prevent others from reading the payload, but it prevents them from modifying it (thanks to the signature).
  • It allows stateless auth without needing a DB lookup on every request.
  • It’s useful for microservices where services can verify tokens without a central auth store.

๐Ÿงฐ Best Practices for JWT Payloads

  1. Treat the payload as public data.
    • Ask yourself: โ€œIs it okay if the user sees this?โ€
  2. Never trust the token blindly on the client.
    • Always verify the signature and claims server-side.
  3. Use only identifiers, not sensitive context.
    • For example, instead of embedding full permissions: { "user_id": 123, "role": "admin" } fetch detailed permissions on the backend based on role.
  4. Encrypt the token if sensitive data is needed.
    • Use JWE (JSON Web Encryption), or
    • Store sensitive data on the server and pass only a reference (like a session id or user_id).

๐Ÿ“Œ Bottom Line

JWT is not private. It is only protected from tampering, not from reading.

So if you use it in your app, make sure the payload contains only safe, public information, and that any sensitive logic (like permission checks) happens on the server.


๐Ÿš€ Integrating JWT in Rails 8

Step 1: Add Gem

gem 'jwt'

Step 2: Generate Secret Key

# config/initializers/jwt.rb
JWT_SECRET = Rails.application.credentials.jwt_secret || 'your_dev_secret_key'

Step 3: Authentication Logic

# app/services/json_web_token.rb
class JsonWebToken
  def self.encode(payload, exp = 24.hours.from_now)
    payload[:exp] = exp.to_i
    JWT.encode(payload, JWT_SECRET, 'HS256')
  end

  def self.decode(token)
    body = JWT.decode(token, JWT_SECRET, true, { algorithm: 'HS256' })[0]
    HashWithIndifferentAccess.new body
  rescue
    nil
  end
end

Step 4: Sessions Controller for JWT

# app/controllers/api/v1/sessions_controller.rb
class Api::V1::SessionsController < ApplicationController
  def create
    user = User.find_by(email: params[:email])
    if user&.authenticate(params[:password])
      token = JsonWebToken.encode(user_id: user.id)
      render json: { jwt: token }, status: :ok
    else
      render json: { error: 'Invalid credentials' }, status: :unauthorized
    end
  end
end

Step 5: Authentication in Application Controller

# app/controllers/application_controller.rb
class ApplicationController < ActionController::API
  before_action :authenticate_request

  def authenticate_request
    header = request.headers['Authorization']
    token = header.split(' ').last if header
    decoded = JsonWebToken.decode(token)
    @current_user = User.find_by(id: decoded[:user_id]) if decoded
    render json: { error: 'Unauthorized' }, status: :unauthorized unless @current_user
  end
end

๐ŸŒ How Token-Based Authentication Secures APIs

๐Ÿ”’ Benefits:

  • Stateless: Scales well
  • Works across domains
  • Easy to integrate with mobile/web clients
  • JWT is tamper-proof and verifiable

โšก Drawbacks:

  • Token revocation is hard without server tracking (esp. JWT)
  • Long-lived tokens can be risky if leaked
  • Requires HTTPS always

๐Ÿ“† Final Thoughts

For most Rails API-only apps, JWT is the go-to solution due to its stateless, self-contained nature. However, for simpler setups or internal tools, basic token-based methods can still suffice. Choose based on your app’s scale, complexity, and security needs.


Happy coding! ๐Ÿš€

Guide: Railsย 8 API Application โ€“ Authentication ๐Ÿ” mechanisms | Sample Rails API app with Rspec Test cases

When building a Rails API app, you typically need token-based authentication instead of cookie-based sessions (which are more common in full-stack Rails apps). Here are the most common authentication mechanisms you can use in a Rails API-only application:

๐Ÿ” 1. Token-Based Authentication

Most Common & Recommended for APIs

a. JWT (JSON Web Tokens)

  • Gems: jwt, knock, devise-jwt
  • How it works: After login, the server issues a JWT token which the client must include in the Authorization header (Bearer <token>) in subsequent requests.
  • Pros:
    • Stateless, scalable.
    • Widely supported across mobile and frontend frameworks.
  • Cons:
    • Tokens can’t be invalidated easily without extra measures (e.g., a blacklist).

b. Token-based Auth with Devise + TokenAuthenticatable

  • Gems: devise_token_auth
  • Uses Devise under the hood.
  • Stores tokens on the server (in DB), enabling logout and token revocation.
  • Compatible with React Native and SPAs.

๐Ÿ” 2. OAuth 2.0 / OmniAuth (for Third-party Logins)

  • Gems: omniauth, doorkeeper
  • Use when you want users to log in via:
    • Google
    • Facebook
    • GitHub
  • Doorkeeper is often used to implement OAuth 2 provider (if youโ€™re exposing your API to other apps).
  • Best when integrating external identity providers.

๐Ÿ” 3. API Key Authentication

  • Useful for machine-to-machine communication or when exposing APIs to third-party developers.
  • Each user/client is assigned a unique API key.
  • Example: Authorization: Token token=abc123
  • You store the API key in the DB and verify it on each request.
  • Lightweight and easy to implement.

๐Ÿ” 4. HTTP Basic Authentication

  • Simple and built-in with Rails (authenticate_or_request_with_http_basic).
  • Not suitable for production unless combined with HTTPS and only used for internal/testing tools.

๐Ÿ‘‰๐Ÿป Choosing the Right Auth Mechanism

Use CaseRecommended Method
Mobile app or frontend SPAJWT (devise-jwt / knock)
Internal API between servicesAPI key
Want email/password with token authdevise_token_auth
External login via Google/GitHubomniauth + doorkeeper
OAuth2 provider for third-party devsdoorkeeper
Quick-and-dirty internal authHTTP Basic Auth

๐Ÿ”„ How JWT Authentication Works โ€” Step by Step

1. User Logs In

  • The client (e.g., React app, mobile app) sends a POST /login request with email/password.
  • Your Rails API validates the credentials.
  • If valid, it generates a JWT token and sends it back to the client.
{
  "token": "eyJhbGciOiJIUzI1NiIsInR5cCI6IkpXVCJ9..."
}

2. Client Stores the Token

  • The client stores the token in localStorage, sessionStorage, or memory (for SPAs), or a secure storage for mobile apps.

3. Client Sends Token on Requests

  • For any subsequent request to protected resources, the client includes the JWT in the Authorization header:
Authorization: Bearer eyJhbGciOiJIUzI1NiIsInR5cCI6IkpXVCJ9...

4. Server Verifies the Token

  • Rails extracts the token, decodes it using a secret key, and verifies:
    • The signature is valid.
    • The token is not expired.
    • The user ID (or sub claim) is valid.

If everything checks out, the request is allowed to proceed.

5. Token Expiration

  • Tokens usually include an exp (expiration) claim, e.g., 15 minutes, 1 hour, etc.
  • After expiration, the client must log in again or use a refresh token flow if supported.

๐Ÿ”’ Security: Is JWT Secure?

JWT can be secure, if used correctly. Here’s a breakdown:

โœ… Security Benefits

FeatureWhy It Helps
StatelessNo session storage needed; scales easily
SignedThe token is signed (HMAC or RSA), so it canโ€™t be tampered with
CompactSent in headers; easy to pass around
Exp claimTokens expire automatically after a period

โš ๏ธ Security Considerations

IssueDescriptionMitigation
Token theftIf an attacker steals the token, they can impersonate the user.Always use HTTPS. Avoid storing tokens in localStorage if possible.
No server-side revocationTokens canโ€™t be invalidated until they expire.Use short-lived access tokens + refresh tokens or token blacklist (DB).
Long token lifespanLonger expiry means higher risk if leaked.Keep exp short (e.g., 15โ€“30 min). Use refresh tokens if needed.
Poor secret handlingIf your secret key leaks, anyone can forge tokens.Store your JWT_SECRET in environment variables, never in code.
JWT stored in localStorageSusceptible to XSS attacks in web apps.Use HttpOnly cookies when possible, or protect against XSS.
Algorithm confusionAttacker could force a weak algorithm.Always validate the algorithm (alg) on decoding. Use only HMAC or RSA.

๐Ÿงช Example Token (Decoded)

A typical JWT has three parts:

eyJhbGciOiJIUzI1NiIsInR5cCI6IkpXVCJ9.
eyJ1c2VyX2lkIjoxLCJleHAiOjE3MDAwMDAwMDB9.
SflKxwRJSMeKKF2QT4fwpMeJf36POk6yJV_adQssw5c

Breakdown:

  1. Header (Base64-encoded JSON)
{
  "alg": "HS256",
  "typ": "JWT"
}

  1. Payload
{
  "user_id": 1,
  "exp": 1700000000
}

  1. Signature
  • HMAC-SHA256 hash of header + payload + secret key.

๐Ÿ›ก Best Practices for JWT in Rails API

  • Use devise-jwt or knock to handle encoding/decoding securely.
  • Set short token lifetimes (exp claim).
  • Use HTTPS only.
  • Consider implementing refresh tokens for session continuation.
  • Avoid token storage in localStorage unless you trust your frontend.
  • Rotate secrets periodically (invalidate tokens when secrets change).

Now Let’s create a sample Rails API application and test what we learned.

๐Ÿงฑ Sample Rails API web app: Prerequisites

  • A Rails 8 app with --api mode enabled: rails new my_api_app --api
  • A User model with email and password_digest.
  • We’ll use bcrypt for password hashing.

โœ… Step 1: Add Required Gems

In your Gemfile:

gem 'jwt'
gem 'bcrypt'

Then run:

bundle install

โœ… Step 2: Generate the User Model

rails g model User email:string password_digest:string
rails db:migrate

In app/models/user.rb:

class User < ApplicationRecord
  has_secure_password
end

Now you can create users with secure passwords.

โœ… Step 3: Create JWT Helper Module

Create a service object or helper to encode/decode tokens.

app/lib/json_web_token.rb (create the lib folder if needed):

# app/lib/json_web_token.rb
class JsonWebToken
  SECRET_KEY = Rails.application.credentials.secret_key_base

  def self.encode(payload, exp = 24.hours.from_now)
    payload[:exp] = exp.to_i
    JWT.encode(payload, SECRET_KEY)
  end

  def self.decode(token)
    decoded = JWT.decode(token, SECRET_KEY)[0]
    HashWithIndifferentAccess.new(decoded)
  rescue JWT::DecodeError => e
    nil
  end
end

โœ… Step 4: Create the Authentication Controller

rails g controller auth

app/controllers/auth_controller.rb:

class AuthController < ApplicationController
  def login
    user = User.find_by(email: params[:email])

    if user&.authenticate(params[:password])
      token = JsonWebToken.encode(user_id: user.id)
      render json: { token: token }, status: :ok
    else
      render json: { error: 'Invalid credentials' }, status: :unauthorized
    end
  end
end

โœ… Step 5: Protect Other Endpoints with Authentication

Make a reusable authenticate_request method.

app/controllers/application_controller.rb:

class ApplicationController < ActionController::API
  before_action :authenticate_request

  attr_reader :current_user

  private

  def authenticate_request
    header = request.headers['Authorization']
    token = header.split(' ').last if header.present?

    if token
      decoded = JsonWebToken.decode(token)
      @current_user = User.find_by(id: decoded[:user_id]) if decoded
    end

    render json: { error: 'Unauthorized' }, status: :unauthorized unless @current_user
  end
end

Now all your controllers inherit this behaviour unless you skip_before_action.

โœ… Step 6: Add Routes

config/routes.rb:

Rails.application.routes.draw do
  post '/login', to: 'auth#login'

  get '/profile', to: 'users#profile' # Example protected route
end

โœ… Step 7: Example Protected Controller

rails g controller users

app/controllers/users_controller.rb:

class UsersController < ApplicationController
  def profile
    render json: { id: current_user.id, email: current_user.email }
  end
end

๐Ÿงช Test It Out (Example)

Step 1: Create a User (via Rails Console)

User.create!(email: "test@example.com", password: "password123")

Step 2: Login via POST /login

POST /login
Content-Type: application/json

{
  "email": "test@example.com",
  "password": "password123"
}

Response:

{ "token": "eyJhbGciOi..." }

Step 3: Use Token in Authenticated Request

GET /profile
Authorization: Bearer eyJhbGciOi...

๐Ÿ”’ Extras You Might Add Later

  • Token expiration errors
  • Refresh tokens
  • Token revocation (e.g., a blacklist table)
  • Roles/permissions inside the token (e.g., admin claims)

Let’s now write RSpec tests for the JWT-based authentication flow we just set up in your Rails API app.

Assumptions

  • You already have:
    • A User model with email and password_digest
    • An AuthController with login
    • A UsersController with a protected profile action
    • JWT auth logic in JsonWebToken

๐Ÿ”ง Step 1: Add RSpec & Factory Bot

In your Gemfile (if not already added):

group :development, :test do
  gem 'rspec-rails'
  gem 'factory_bot_rails'
end

group :test do
  gem 'faker'
end

Then install:

bundle install
rails generate rspec:install


๐Ÿญ Step 2: Setup Factory for User

spec/factories/users.rb:

FactoryBot.define do
  factory :user do
    email { Faker::Internet.email }
    password { 'password123' }
    password_confirmation { 'password123' }
  end
end


๐Ÿงช Step 3: Auth Request Specs

spec/requests/auth_spec.rb:

require 'rails_helper'

RSpec.describe 'Authentication', type: :request do
  let!(:user) { create(:user, password: 'password123') }

  describe 'POST /login' do
    context 'with valid credentials' do
      it 'returns a JWT token' do
        post '/login', params: { email: user.email, password: 'password123' }

        expect(response).to have_http_status(:ok)
        expect(JSON.parse(response.body)).to include('token')
      end
    end

    context 'with invalid credentials' do
      it 'returns unauthorized' do
        post '/login', params: { email: user.email, password: 'wrong' }

        expect(response).to have_http_status(:unauthorized)
        expect(JSON.parse(response.body)).to include('error')
      end
    end
  end
end


๐Ÿ”’ Step 4: Profile (Protected) Request Specs

spec/requests/users_spec.rb:

require 'rails_helper'

RSpec.describe 'Users', type: :request do
  let!(:user) { create(:user) }
  let(:token) { JsonWebToken.encode(user_id: user.id) }

  describe 'GET /profile' do
    context 'with valid token' do
      it 'returns user profile' do
        get '/profile', headers: { 'Authorization' => "Bearer #{token}" }

        expect(response).to have_http_status(:ok)
        json = JSON.parse(response.body)
        expect(json['email']).to eq(user.email)
      end
    end

    context 'without token' do
      it 'returns unauthorized' do
        get '/profile'
        expect(response).to have_http_status(:unauthorized)
      end
    end

    context 'with invalid token' do
      it 'returns unauthorized' do
        get '/profile', headers: { 'Authorization' => 'Bearer invalid.token' }
        expect(response).to have_http_status(:unauthorized)
      end
    end
  end
end

๐Ÿ“ฆ Final Tips

  • Run tests with: bundle exec rspec
  • You can stub JsonWebToken.decode in unit tests if needed to isolate auth logic.