
Prerequisites
- Workflow Change: Feature Branch + Pull Request, Enable branch protection
https://railsdrop.com/2025/04/12/setup-rails-8-app-part-9-setup-ci-cd-with-github-actions/ - Database Setup: Postgresql (Or Mysql) in our case. https://railsdrop.com/2025/04/18/setup-rails-8-app-part-11-migrate-database-from-sqlite/
- Setup Test Cases: Setup some test cases for github actions to run and verify our app is working as expected. https://railsdrop.com/2025/05/03/rails-8-controller-integration-tests/
- SimpleCov and Brakeman setup: For measuring and enforcing test coverage and for automated static analysis of security vulnerabilities. https://railsdrop.com/2025/05/05/rails-8-setup-simplecov-brakeman-for-test-coverage-security/
Our System Setup
- Ruby version: 3.4.1
- Rails version: 8.0.2
- JavaScript tooling: using rails default tubo-stream, NO nodeJS or extra js
We would love to see:
- RuboCop linting Checks
- SimpleCov test coverage report
- Brakeman security scan
Here’s how to set up CI that runs on every push, including pull requests:
1. Create GitHub Actions Workflow
Create this file: .github/workflows/ci.yml
name: Rails CI

# Trigger on pushes to main or any feature branch, and on PRs targeting main
on:
  push:
    branches:
      - main
      - 'feature/**'
  pull_request:
    branches:
      - main

jobs:
  # 1) Lint job with RuboCop
  lint:
    name: RuboCop Lint
    runs-on: ubuntu-latest

    steps:
      - name: Checkout code
        uses: actions/checkout@v3

      - name: Set up Ruby
        uses: ruby/setup-ruby@v1
        with:
          ruby-version: 3.4.1
          bundler-cache: true

      - name: Install dependencies
        run: |
          sudo apt-get update -y
          sudo apt-get install -y libpq-dev
          bundle install --jobs 4 --retry 3

      - name: Run RuboCop
        run: bundle exec rubocop --fail-level E

  # 2) Test job with Minitest
  test:
    name: Minitest Suite
    runs-on: ubuntu-latest
    needs: lint

    services:
      postgres:
        image: postgres:15
        ports:
          - 5432:5432
        env:
          POSTGRES_PASSWORD: password
        options: >-
          --health-cmd pg_isready
          --health-interval 10s
          --health-timeout 5s
          --health-retries 5

    env:
      RAILS_ENV: test
      DATABASE_URL: postgres://postgres:password@localhost:5432/test_db

    steps:
      - name: Checkout code
        uses: actions/checkout@v3

      - name: Set up Ruby
        uses: ruby/setup-ruby@v1
        with:
          ruby-version: 3.4.1
          bundler-cache: true

      - name: Install dependencies
        run: |
          sudo apt-get update -y
          sudo apt-get install -y libpq-dev
          bundle install --jobs 4 --retry 3

      - name: Set up database
        run: |
          bin/rails db:create
          bin/rails db:schema:load

      - name: Run Minitest
        run: bin/rails test
  # 3) Security job with Brakeman
  security:
    name: Brakeman Scan
    runs-on: ubuntu-latest
    needs: [lint, test]

    steps:
      - uses: actions/checkout@v3
      - name: Set up Ruby
        uses: ruby/setup-ruby@v1
        with:
          ruby-version: 3.4.1
          bundler-cache: true

      - name: Install Brakeman
        run: bundle install --jobs 4 --retry 3

      - name: Run Brakeman
        run: bundle exec brakeman --exit-on-warnings
How this works:
on.push&on.pull_request:- Runs on any push to
mainorfeature/**, and on PRs targetingmain.
- Runs on any push to
lintjob:- Checks out code, sets up Ruby 3.4.1, installs gems (with
bundler-cache), then runsbundle exec rubocop --fail-level Eto fail on any error-level offenses.
- Checks out code, sets up Ruby 3.4.1, installs gems (with
testjob:- Depends on the lint job (
needs: lint), so lint must pass first. - Spins up a PostgreSQL 15 service, sets
DATABASE_URLfor Rails, creates & loads the test database, then runs your Minitest suite withbin/rails test.
- Depends on the lint job (
🛠 What Does .github/dependabot.yml Do?
This YAML file tells Dependabot:
♦️ Which dependencies to monitor
♦️ Where (which directories) to look for manifest files
♦️ How often to check for updates
♦️ What package ecosystems (e.g., RubyGems, npm, Docker) are used
♦️ Optional rules like versioning, reviewer assignment, and update limits
Dependabot then opens automated pull requests (PRs) in your repository when:
- There are new versions of dependencies
- A security advisory affects one of your dependencies
This helps you keep your app up to date and secure without manual tracking.
🏗 Example: Typical .github/dependabot.yml
Here’s a sample for a Ruby on Rails app:
version: 2
updates:
  - package-ecosystem: bundler
    directory: "/"
    schedule:
      interval: weekly
    open-pull-requests-limit: 5
    rebase-strategy: auto
    ignore:
      - dependency-name: rails
        versions: ["7.x"]
  - package-ecosystem: github-actions
    directory: "/"
    schedule:
      interval: weekly
♦️ Place the .github/dependabot.yml file in the .github directory of your repo root.
♦️ Tailor the schedule and limits to your team’s capacity.
♦️ Use the ignore block carefully if you deliberately skip certain updates (e.g., major version jumps).
♦️ Combine it with branch protection rules so Dependabot PRs must pass tests before merging.
🚀 Steps to Push and Test Your CI
✅ You can push both files (ci.yml and dependabot.yml) together in one commit
Here’s a step-by-step guide for testing that your CI works right after the push.
1️⃣ Stage and commit your files
git add .github/workflows/ci.yml .github/dependabot.yml
git commit -m 'feat: Add github actions CI workflow Close #23'
2️⃣ Push to a feature branch
(for example, if you’re working on feature/github-ci):
git push origin feature/github-ci
3️⃣ Open a Pull Request
- Go to GitHub → your repository → create a pull request from
feature/github-citomain.
4️⃣ Watch GitHub Actions run
- Go to the Pull Request page.
- You should see a yellow dot / pending check under “Checks”.
- Click the “Details” link next to the check (or go to the Actions tab) to see live logs.
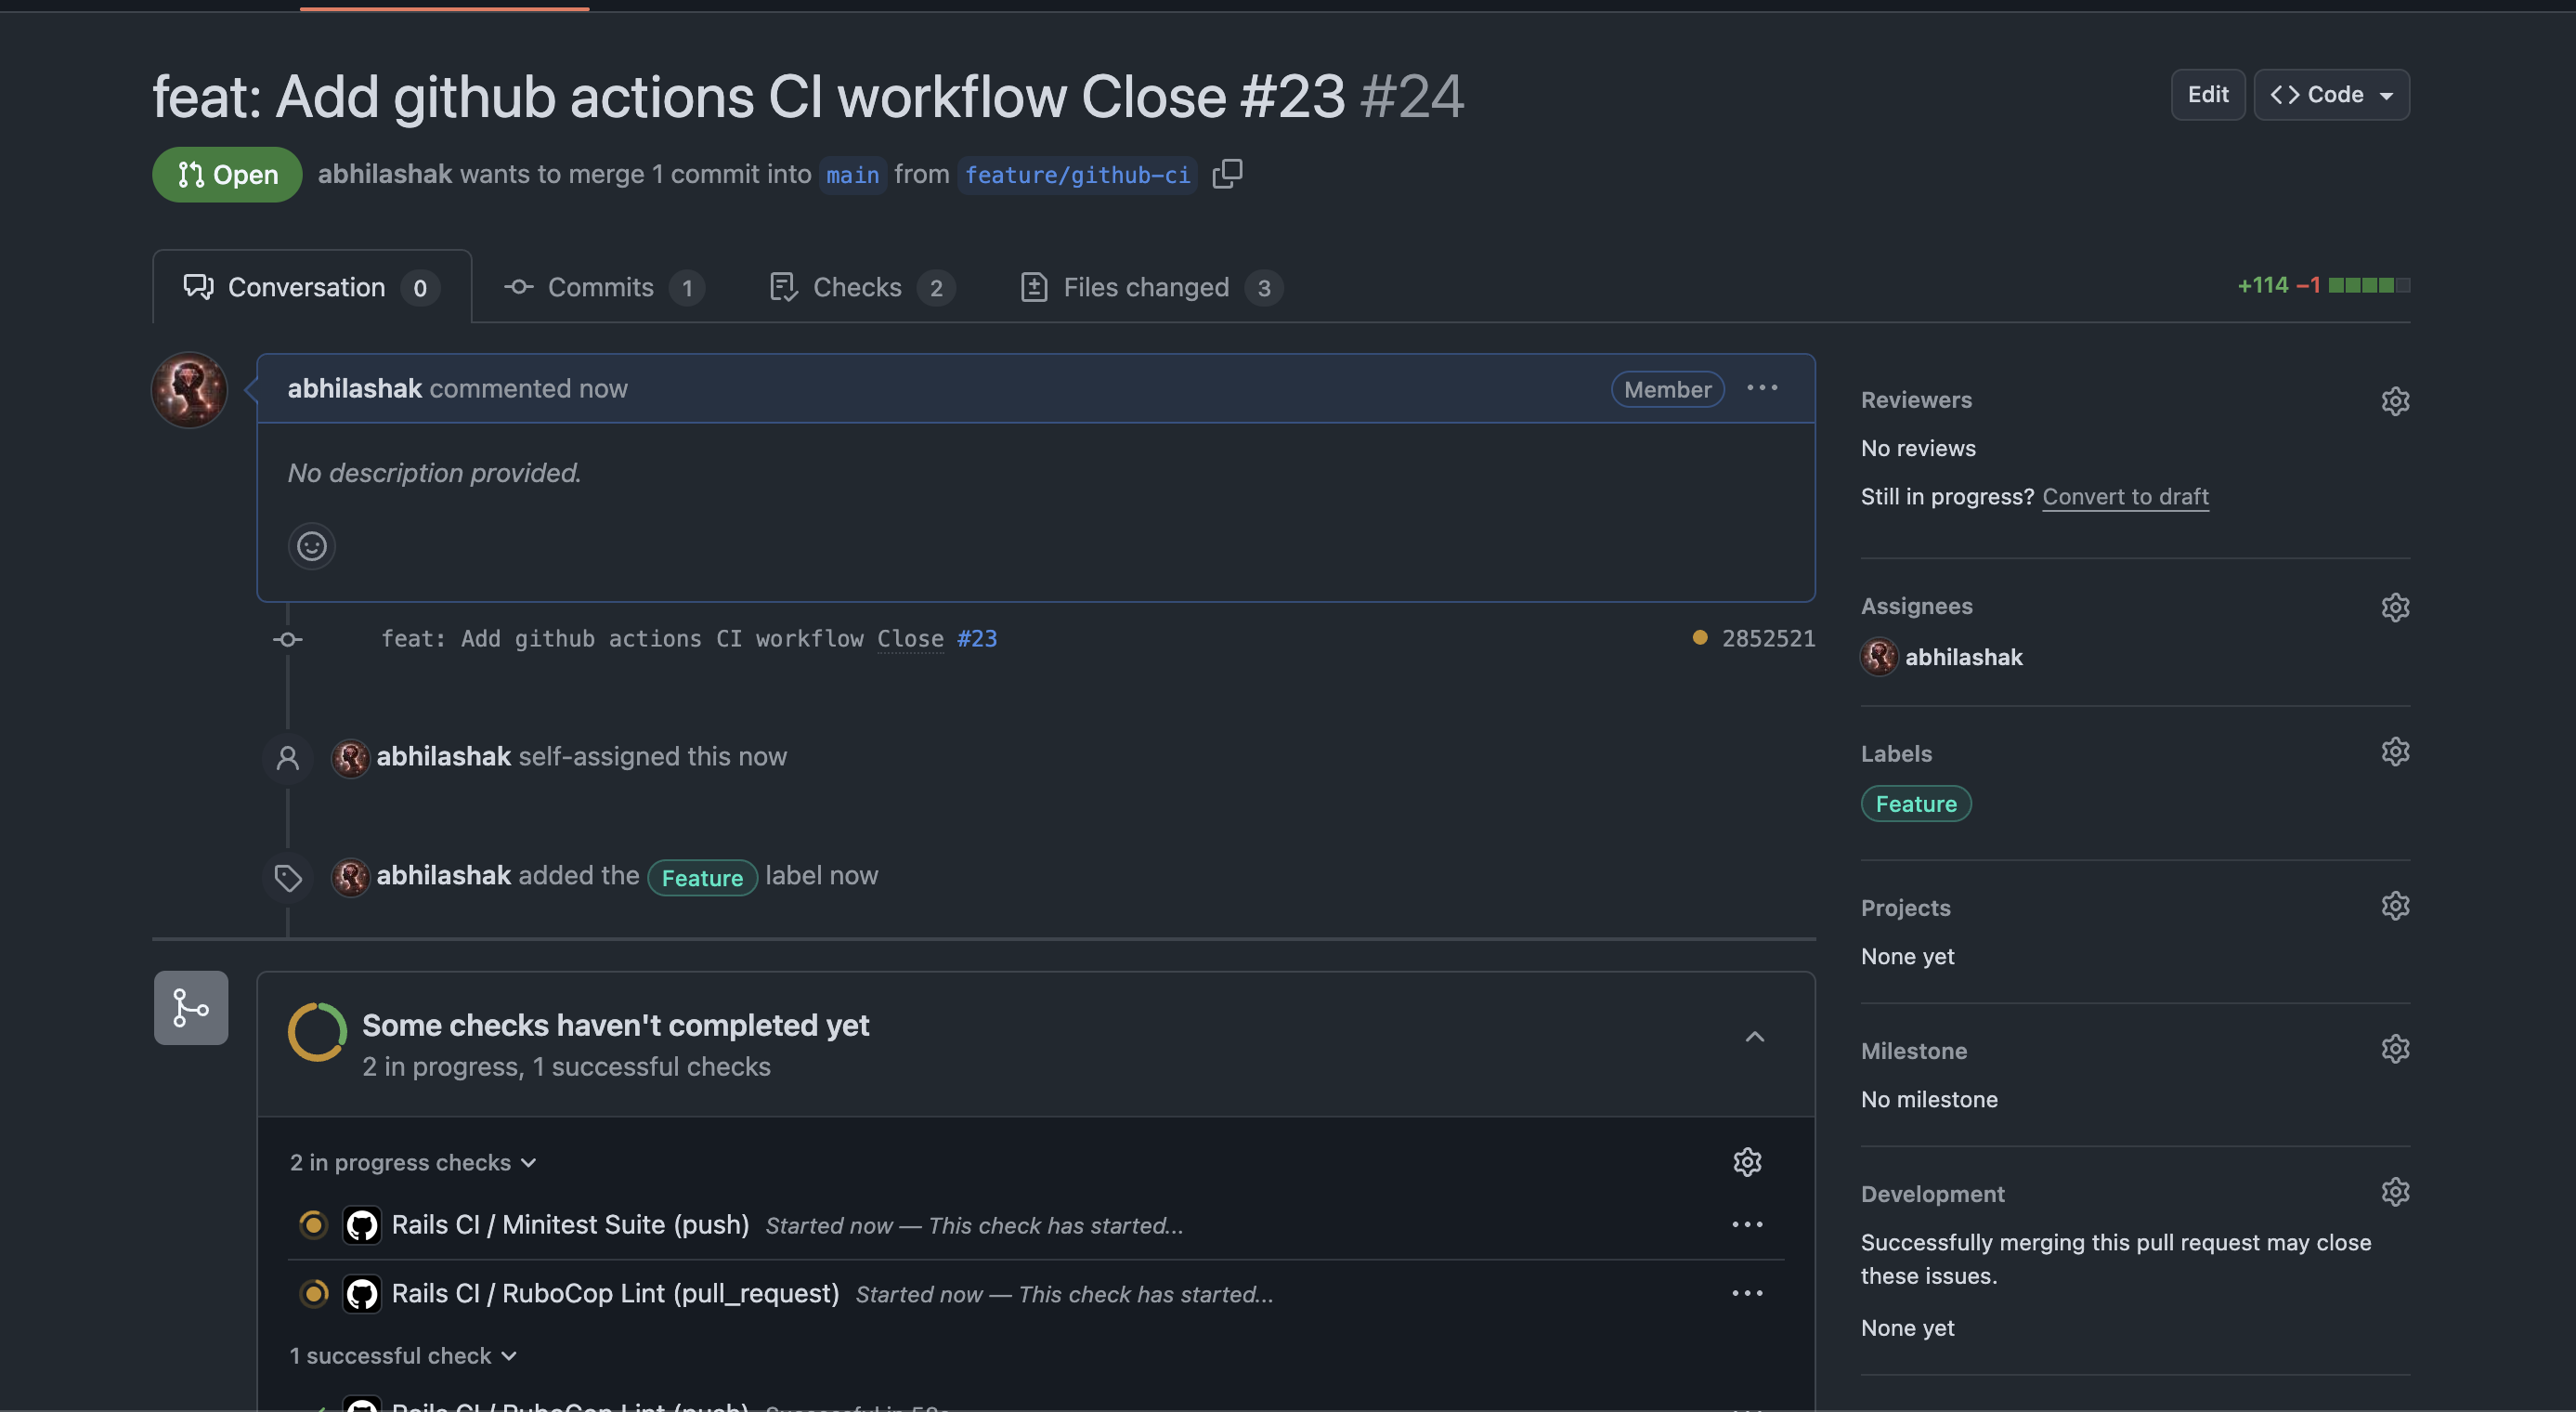
✅ How to Know It’s Working
✔️ If all your jobs (e.g., RuboCop Lint, Minitest Suite) finish with green checkmarks, your CI setup is working!
❌ If something fails, you’ll get a red X and the logs will show exactly what failed.

So what’s the problem. Check details.
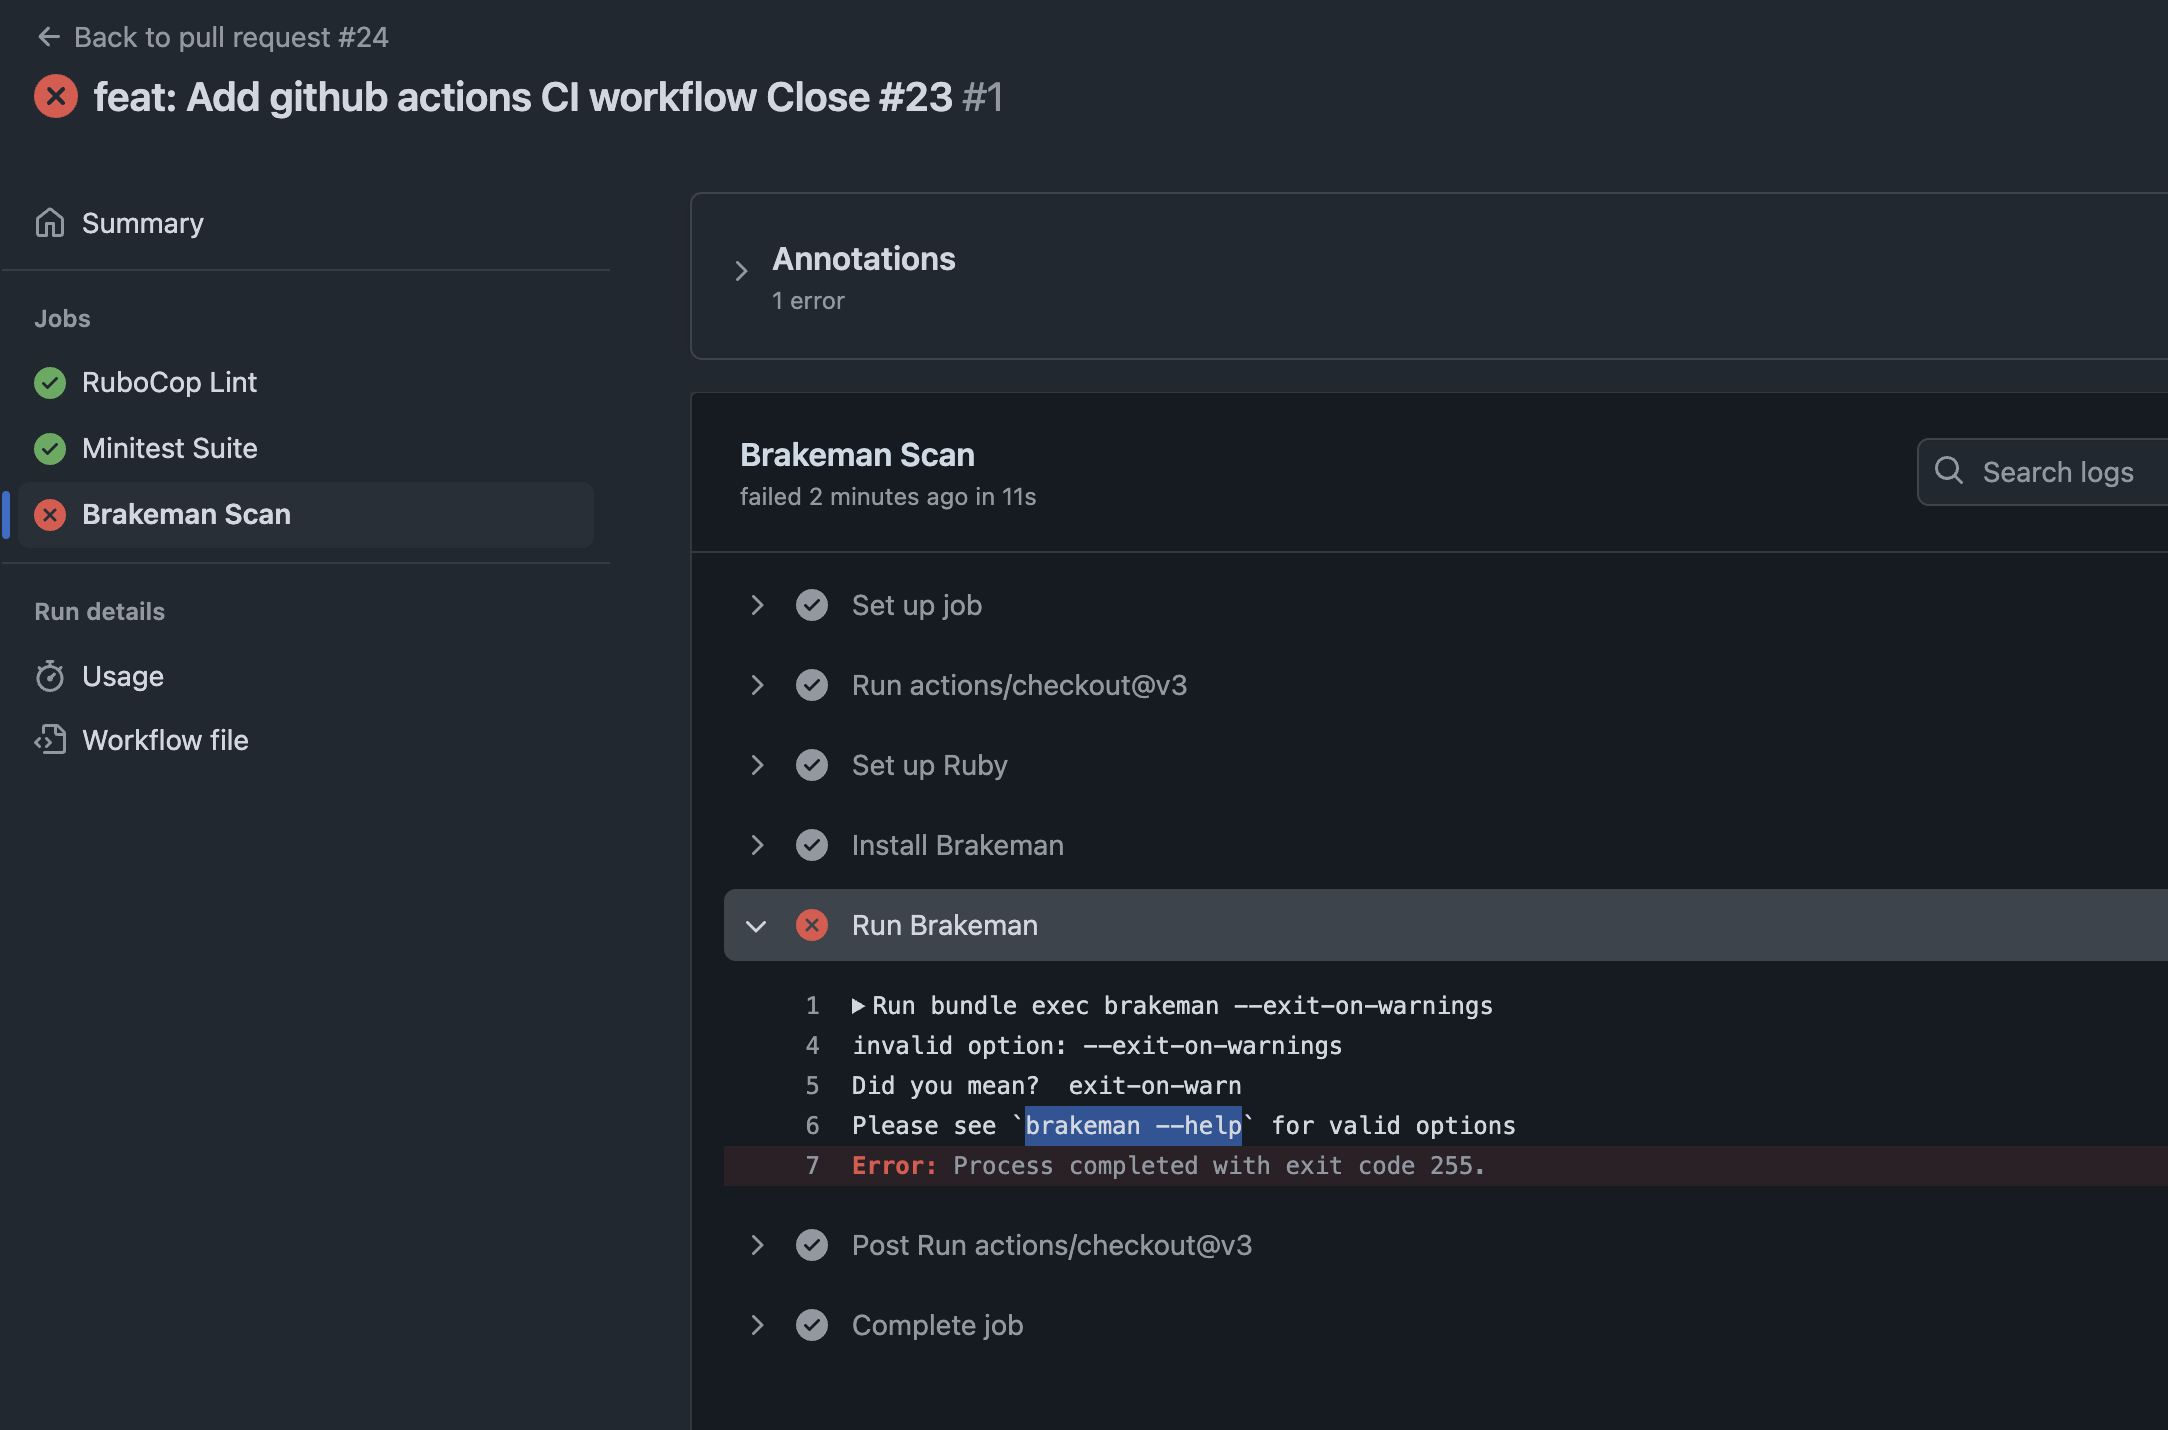
Check brakeman help for further information about the option.
➜  design_studio git:(feature/github-ci) brakeman --help | grep warn
    -z, --[no-]exit-on-warn          Exit code is non-zero if warnings found (Default)
        --ensure-ignore-notes        Fail when an ignored warnings does not include a note
Modify the option and run again:
run: bundle exec brakeman --exit-on-warn
Push the code and check all checks are passing. ✅

🛠 How to Test Further
If you want to trigger CI without a PR, you can push directly to main:
git checkout main
git merge feature/setup-ci
git push origin main
Note: Make sure your
.github/workflows/ci.ymlincludes:on: push: branches: [main, 'feature/**'] pull_request: branches: [main]This ensures CI runs on both pushes and pull requests.
🧪 Pro Tip: Break It Intentionally
If you want to see CI fail, you can:
- Add a fake RuboCop error (like an unaligned indent).
- Add a failing test (
assert false). - Push and watch the red X appear.
This is a good way to verify your CI is catching problems!
Happy Rails CI setup! 🚀
