
What is a portlet?
A portlet is fragment on a webpage as web application and is used with portlets on the same webpage.
When you access a web site, you interact with an application. That application may be simple: it may only show you information, such as an article. The application may be complex, including forms, sending data etc. These applications run on a platform that provides application developers the building blocks they need to make applications.
If there are so many implementations of MVC frameworks in Java, why did Liferay create yet another one?
Liferay MVC provides these benefits:
It’s lightweight, as opposed to many other Java MVC frameworks.
There are no special configuration files that need to be kept in sync with your code.
It’s a simple extension of GenericPortlet.
You avoid writing a bunch of boilerplate code, since Liferay’s MVC framework simply looks for some pre-defined parameters when the init() method is called.
The controller can be broken down into MVC command classes, each of which handles the controller code for a particular portlet phase (render, action, and resource serving phases).
Liferay’s portlets use it. That means there are plenty of robust implementations to reference when you need to design or troubleshoot your Liferay applications.
Each portlet phase executes different operations:
Init:
The init() method is called by the portlet container during deployment and reads init parameters defined in portlet.xml file. The Portlet interface exposes the init method as: void init (PortletConfig config) throws PortletException
The PortletConfig interface is to retrieve configuration from the portlet definition in the deployment descriptor. The portlet can only read the configuration data. The configuration information contains the portlet name, the portlet initialization parameters, the portlet resource bundle and the portlet application context.
Render:
Generates the portlet’s contents based on the portlet’s current state. When this phase runs on one portlet, it also runs on all other portlets on the page. The Render phase runs when any portlets on the page complete the Action or Event phases.
In this phase portlet generates content and renders on webpage.
The render phase is called in below cases:
1. The page that contains portlet is rendered on web page
2. After completing Action Phase
3. After completing Event Processing phase
below is example:
<portlet:renderURL var=“loadEmployees”> <portlet:param name=”mvcPath”
value=”/WEB-INF/view/empList.jsp” /> </portlet:renderURL>
<a href=”<%=loadEmployees%>”>Click here</a>
Action:
In response to a user action, performs some operation that changes the portlet’s state. The Action phase can also trigger events that are processed by the Event phase. Following the Action phase and optional Event phase, the Render phase then regenerates the portlet’s contents.
its result of user actions such as add,edit, delete
- only one portlet can be entered into action phase for a request in a portlet container
- Any events triggered during the Action phase are handled during the Event phaseof the portlet lifecycle. Events can be used when portlets want to communicatewith each other. The Render phase will be called when all events have been handled.
Event:
Processes events triggered in the Action phase. Events are used for IPC. Once the portlet processes all events, the portal calls the Render phase on all portlets on the page.
Resource-serving: Serves a resource independent from the rest of the lifecycle. This lets a portlet serve dynamic content without running the Render phase on all portlets on a page. The Resource-serving phase handles AJAX requests.
Reference:
You can see more details and clarify your doubts by checking the following docs:
https://help.liferay.com/hc/en-us/articles/360018159451-Liferay-MVC-Portlet-
https://help.liferay.com/hc/en-us/articles/360018159431-Introduction-to-Portlets-
https://help.liferay.com/hc/en-us/articles/360017880432-Creating-an-MVC-Portlet-
http://www.javasavvy.com/liferay-portlet-basics-and-lifecycle/
Now we get into the action.
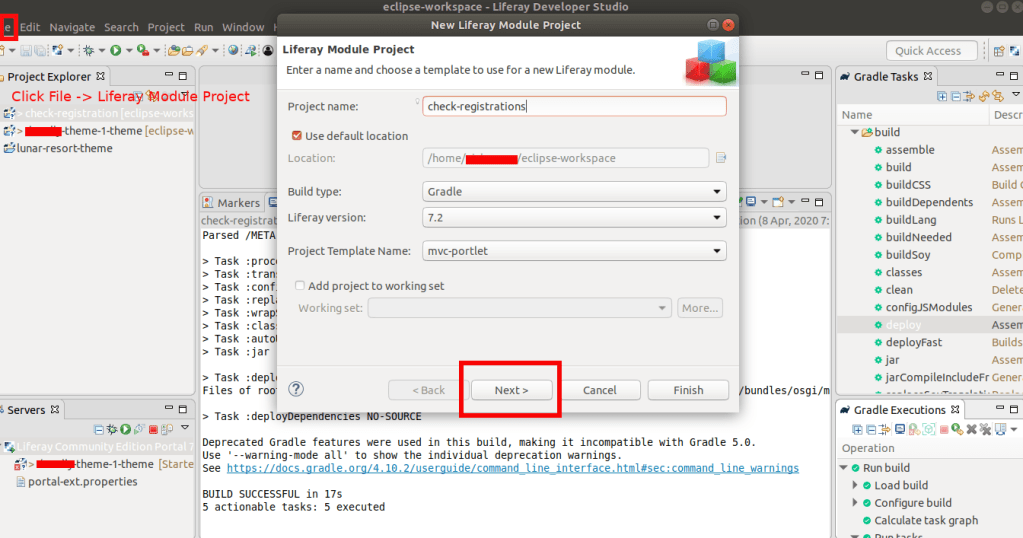
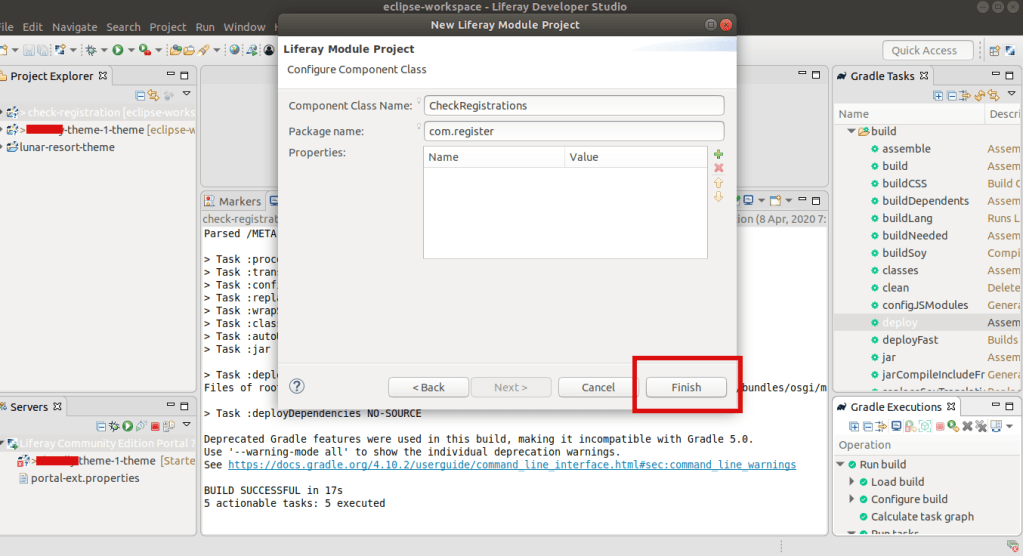
Step 1: Open Developer Studio and goto File -> New -> Liferay Module Project
Step 2: Take Gradle task from right side section and double click on the deploy of created portlet


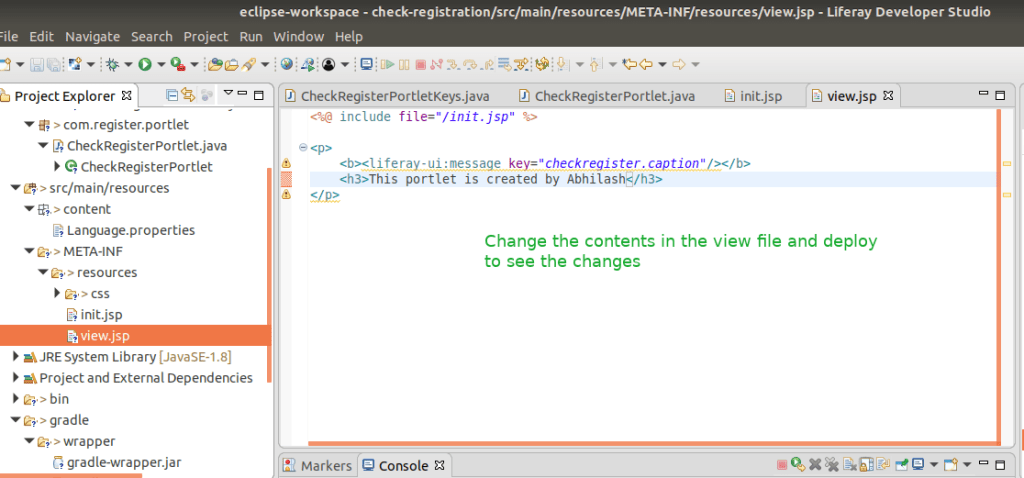
Step 3: We will be changing the Class file and view file and deploy the changes and check
Add some code snnippet inside the above java Class, so that class look like this:
package com.register.portlet;

import com.register.constants.CheckRegisterPortletKeys;

import java.io.IOException;

import com.liferay.portal.kernel.portlet.bridges.mvc.MVCPortlet;

import javax.portlet.Portlet;
import javax.portlet.PortletException;
import javax.portlet.RenderRequest;
import javax.portlet.RenderResponse;

import org.osgi.service.component.annotations.Component;

/**
 * @author abhilash
 */
@Component(
	immediate = true,
	property = {
		"com.liferay.portlet.display-category=Register",
		"com.liferay.portlet.header-portlet-css=/css/main.css",
		"com.liferay.portlet.instanceable=true",
		"javax.portlet.display-name=CheckRegister",
		"javax.portlet.init-param.template-path=/",
		"javax.portlet.init-param.view-template=/view.jsp",
		"javax.portlet.name=" + CheckRegisterPortletKeys.CHECKREGISTER,
		"javax.portlet.resource-bundle=content.Language",
		"javax.portlet.security-role-ref=power-user,user"
	},
	service = Portlet.class
)
public class CheckRegisterPortlet extends MVCPortlet {
	public void doView(RenderRequest renderRequest, RenderResponse renderResponse)
		   throws IOException, PortletException {
		System.out.println("inside my check registration logic controller");
		super.doView(renderRequest, renderResponse);
	}
}
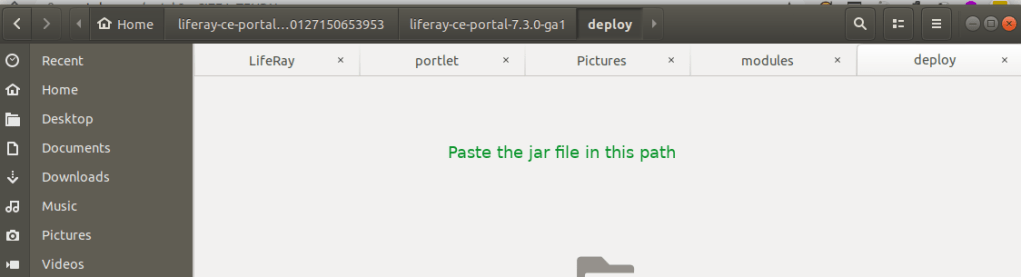
Step 4: Deploy again so that you can see the jar file is created as below:

Step 5: You can see the package status in the Gogo shell Liferay provides, goto the http://localhost:8080 and check inside the Configuration section Gogo Shell. Type command: lb

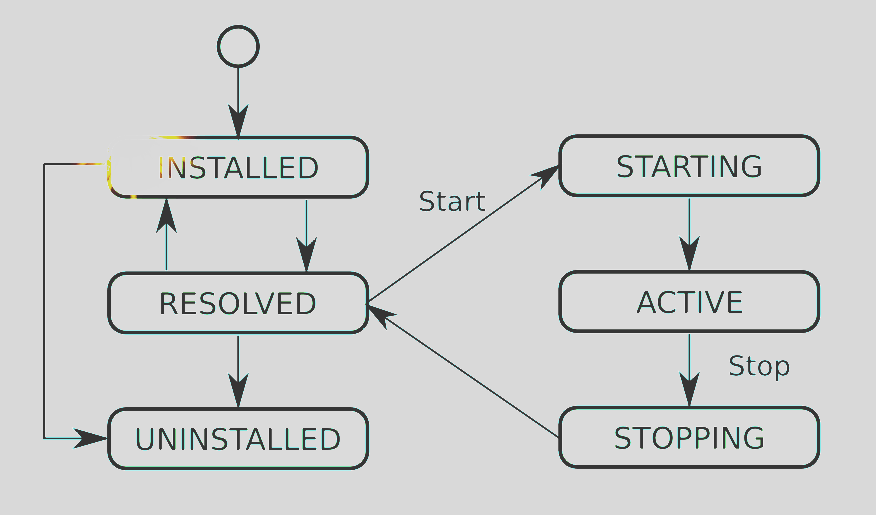
Here are the list of osgi lifecycle status:
Step 6: Handle the Errors if any
I am getting some issues with this creation, lets see what is the problem.
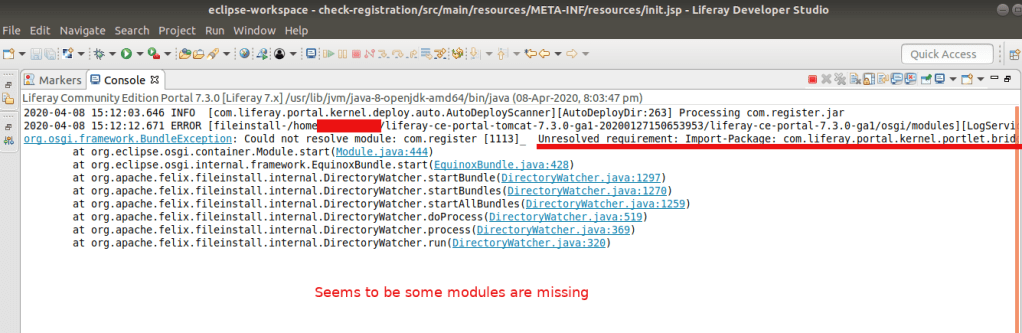
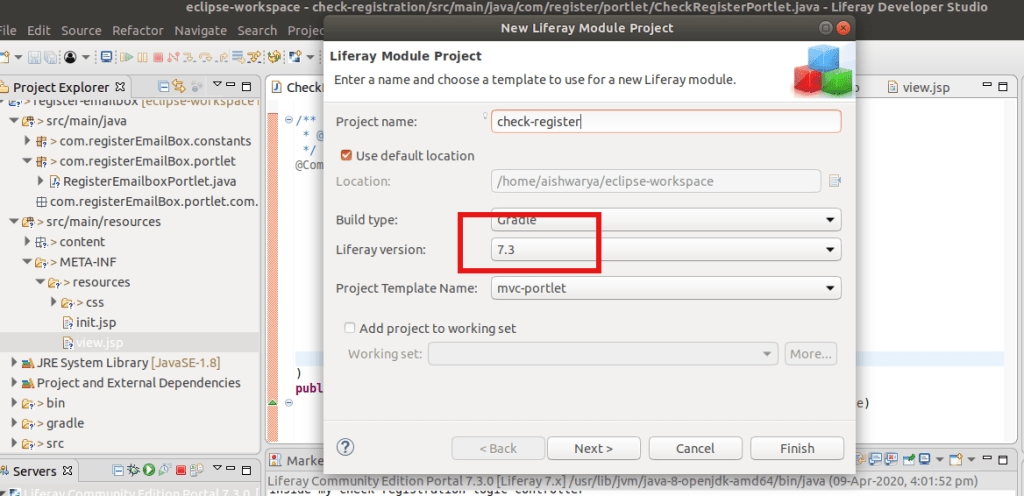
I don’t have any idea why I am getting this. After some research I tried to add the module that is missing here, but no luck. Then I realised we are on Liferay 7.3 and See the pic of the IDE there we selected 7.2 version because thats the latest version available there. Hmm…So…yeahh that may be the issue here. You got that!
So Update your IDE and create the package again.
And check our newly created portlet in the right side section (inside Widget) of Liferay Site.

You can see this messge that we wrote inside the Class inside my check registration logic controller in your server console in IDE. And this message This portlet is created by Abhilash inside the Portlet.
Congrats .. You have created your first custom portlet in Liferay.
