
You can see the details for setting up themes from here:
https://help.liferay.com/hc/en-us/articles/360034979312-Setting-up-the-Theme
Goto your workspace folder (our developer studio workspace ~/eclipse-workspace):
$ cd ~/eclipse-workspace
$ nvm use 10.5
$ npm install -g generator-liferay-theme
$ npm install -g yo gulp
$ yo liferay-theme

? What would you like to call your theme? Theme Moon
? What id would you like to give to your theme? theme-moon
? Which version of Liferay is this theme for? 7.3
? Would you like to add Font Awesome to your theme? No
.........
The project has been created successfully.

 Now we will invoke gulp init for you, to configure your deployment
strategy.

Remember, that you can change your answers whenever you want by
running gulp init again.

? Select your deployment strategy (Use arrow keys)
❯ Local App Server   // select this
  Docker Container
  Other

? Select your deployment strategy Local App Server
? Enter the path to your app server directory: /home/abhilash/liferay-ce-portal-tomcat-7.3.0-ga1-20200127150653953/liferay-ce-portal-7.3.0-ga1/tomcat-9.0.17
? Enter the url to your production or development site: http://localhost:8080

Run the command below from the theme’s root folder to build the files:
$ cd theme-moon
$ gulp build   # this creates the build folder
Now do the following changes to edit the created theme.
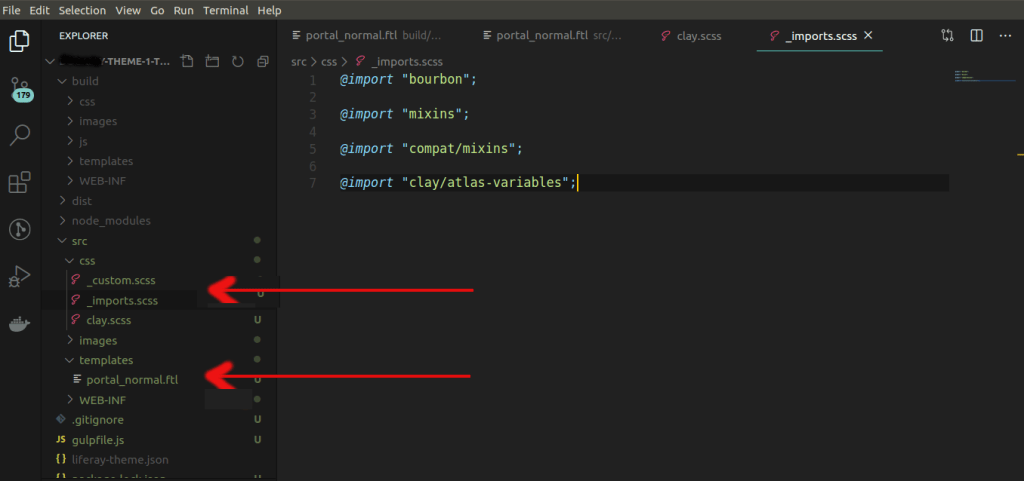
** Create a new /src/templates/ folder and copy portal_normal.ftl from the build/templates/ folder into it.
Configure the theme to extend the Atlas theme. Add a clay.scss file to the theme’s /src/css/ folder and add the import shown below:
@import "clay/atlas";
Create an _imports.scss file in the /src/css/ folder and add the imports shown below to it. This includes the default imports and replaces the clay/base-variables with the Atlas base variables:
@import "bourbon";

@import "mixins";

@import "compat/mixins";

@import "clay/atlas-variables";
You’ve generated the theme, prepared it for development, and configured it to extend the Atlas theme
Customizing the Header and Logo of your theme
Open portal_normal.ftl and replace the <header>...</header> element and contents with the updated code snippet below. This updates the structure slightly, making the banner expand the full width of the Header, and adds a new header_css_class variable to the class attribute. This variable is defined in a later step.
<header class="${header_css_class}">
	<div class="container-fluid" id="banner" role="banner">
		<a class="${logo_css_class}" href="${site_default_url}" title="<@liferay.language_format arguments="${site_name}" key="go-to-x" />">
			<img alt="${logo_description}" height="${site_logo_height}" src="${site_logo}" width="${site_logo_width}" />
			<#if show_site_name>
				${site_name}
			</#if>
		</a>

		<#if has_navigation>
			<#include "${full_templates_path}/navigation.ftl" />
		</#if>
	</div>
</header>
Replace the <div class="container-fluid" id="wrapper"> element with the updated code below to remove some margins and padding:
<div class="container-fluid mt-0 pt-0 px-0" id="wrapper">
And move the wrapper down, and place it directly above the <section id="content"> element:
<div class="container-fluid mt-0 pt-0 px-0" id="wrapper">
  <section id="content">
  ...
  </section>
  <footer...>
  ...
  </footer>
</div>
The logo’s height is retrieved with the ${site_logo_height} variable. The height of the logo is a bit too large for the this theme, so you must adjust it. Remove the width attribute from the logo’s image so it defaults to auto:
<img alt="${logo_description}" height="${site_logo_height}" src="${site_logo}" />
Create init_custom.ftl in your theme’s /src/templates/ folder and assign the logo’s site_logo_height variable to the value below:
<#assign site_logo_height = 56 />
Assign the new header_css_class variable you added in step one to the value below:
<
#assign header_css_class =
"navbar navbar-expand-md navbar-dark flex-column flex-md-row bd-navbar"
/>
This applies Bootstrap and Clay utility classes to provide the overall look and feel of the Header. Assigning the classes to a variable keeps portal_normal clean and makes the code easy to maintain. If you want to update the classes, you just have to modify the variable (e.g. header_css_class = header_css_class + " my-new-class").
Add the code snippet below to update the logo_css_class variable to use Bootstrap’s navbar-brand class:
NEW THUMBNAIL FOR THE THEME
Before you upload the theme to see what it looks like so far, you must create a theme thumbnail so you can identify it. Create a thumbnail.png and replace the default from the /src/images/ folder. Note that its dimensions are 480px by 270px. These dimensions are required to display the theme thumbnail properly.
DEVELOPER MODE (If not enabled you may face CSS / JS loading issues )
The theme isn’t complete yet, but you’ll deploy what you have so you can replace the default logo with the your logo. Enable Developer Mode before deploying your theme, so the theme’s files are not cached for future deployments.
Once I faced CSS loading issue in my AWS Liferay site for one theme. After a lot of research I found that, the server doesn’t have
Custom CSS Loading in Liferayportal-ext.propertiesfile and not enabled the so calledDeveloper Mode
My custom _import.scss almost look like this:
/* These inject tags are used for dynamically creating imports for themelet styles, you can place them where ever you like in this file. */

/* inject:imports */

/* endinject */

/* This file allows you to override default styles in one central location for easier upgrade and maintenance. */

@import "bourbon";

@import "mixins";

@import "compat/mixins";

@import "clay/atlas-variables";

@import "./style.scss";

@import "./innerstyle.scss";

@import "./mixedslider.scss";

------
Liferay loads this css file in HTML like as follows:
<link class="lfr-css-file" data-senna-track="temporary" href="http://localhost:8080/o/myTheme-theme/css/main.css?browserId=other&themeId=myTheme_WAR_myThemetheme&languageId=en_US&b=7301&t=1588754322000" id="liferayThemeCSS" rel="stylesheet" type="text/css" />
When clicking on this file, I get different css as follows instead of the _import.scss file listed above.
/*1559583096000*/
.loadingmask-message{background:transparent;border-width:0;display:block;height:1em;margin-left:auto;margin-right:auto;position:relative;text-align:left;width:1em}.loadingmask-message .loadingmask-message-content{-webkit-animation:loading-animation 1.2s infinite ease-out;animation:loading-animation 1.2s
........
This is because of I was not enabled the ‘Developer Mode’ in portal.ext file.
After enabling it as below, my _import.scss styles shows up in Liferay’s main.css file.
Create a portal-ext.properties file in your server’s root folder if it doesn’t exist.
Add the line below to it:
include-and-override=portal-developer.properties
Start the server, if it’s not already started, and deploy the theme with the command below:
$ gulp deploy
.....
[20:34:49] Finished 'plugin:deploy' after 32 ms
[20:34:49] Finished 'deploy:war' after 32 ms
[20:34:49] Finished 'deploy' after 4.78 s
CHANGE LOGO
Open the Control Menu and navigate to Site Builder → Pages. Click the Gear icon next to Public Pages to open the configuration menu. Under the Look and Feel tab, scroll down and click the Change Current Theme button and select the Lunar Resort Theme. Scroll to the Logo heading, click the Change button, upload the new-logo.png logo, and click the Save button to apply the theme and logo.
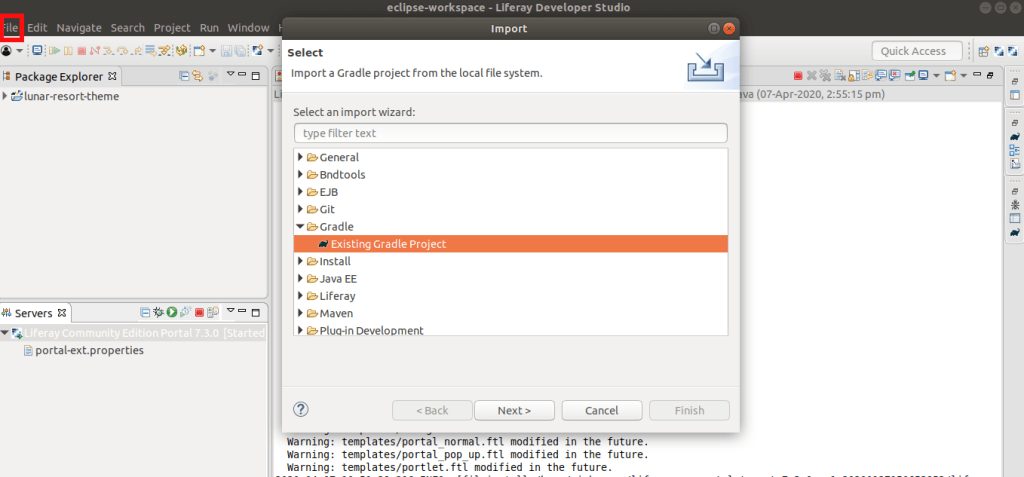
IMPORT THIS THEME IN IDE
And at last how to import this theme so that your tomcat server runs it?
Goto your Developer studio
Goto File -> Import -> Import gradle project -> select the path of this theme root directory -> Done!

Right click on the server and restart it. OR right click on the theme after draging it to the server and click on restart
Then goto http://localhost:8080/
click on Settings icon on top -> Under theme select
Define a specific look and feel for this page.

Click on the new theme and click SAVE button. You can see your new theme activated. Congrats!
